Buyer Fit Snapshot
| Best fit | Heat Sealed Poly Mailers Benefits That Pay Off projects where brand print, material claims, artwork control, MOQ, and repeat-order consistency need to be specified before quoting. |
|---|---|
| Quote inputs | Share finished size, material target, print colors, finish, packing count, annual reorder estimate, ship-to region, and any compliance wording. |
| Proofing check | Approve dieline scale, logo placement, barcode or warning zones, color tolerance, closure strength, and carton packing before bulk production. |
| Main risk | Vague material claims, crowded artwork, missing packing details, or unclear freight terms can make a low unit price expensive after revisions. |
Fast answer: Heat Sealed Poly Mailers Benefits That Pay Off: Film, Print, MOQ, and Carton Packing should be specified like a repeatable production item. The safest quote records material, print method, finish, artwork proof, packing count, and reorder notes in one written spec.
Production checks before approval
Compare the actual filled-product size with the drawing, then confirm tolerance on folds, seals, hang holes, label areas, and retail display edges. Reserve space for logos, QR codes, warning copy, and material claims before decorative graphics fill the panel.
Quote comparison points
Review material grade, print process, finish, sampling route, tooling charges, carton quantity, and freight assumptions side by side. A quote is only useful when the supplier can repeat the same color, closure quality, and packing count on the next order.
One weak seam can turn a profitable order into a refund, a replacement shipment, and a bad review before the customer even reaches the tracking page.
That is why a practical grasp of tips heat sealed poly mailers benefits matters before the first box leaves the dock. I am using that phrase intentionally, because the topic is broader than a bag spec and narrower than general packaging advice. Many teams treat the seal like a checkbox. It is not. The seam decides whether the parcel arrives intact, whether the brand looks careful, and whether shipping losses stay tolerable.
The useful version of this topic is never glamorous. It is controlled, repetitive, and measurable. Fewer damages. Cleaner presentation. Less money leaking out of the fulfillment line. That is the real appeal for small shops and high-volume operations alike. And yes, it can feel kinda boring compared with print finishes or seasonal packaging campaigns, but boring is good when the metric is damage rate.
Why weak seals create bigger packaging problems than they look
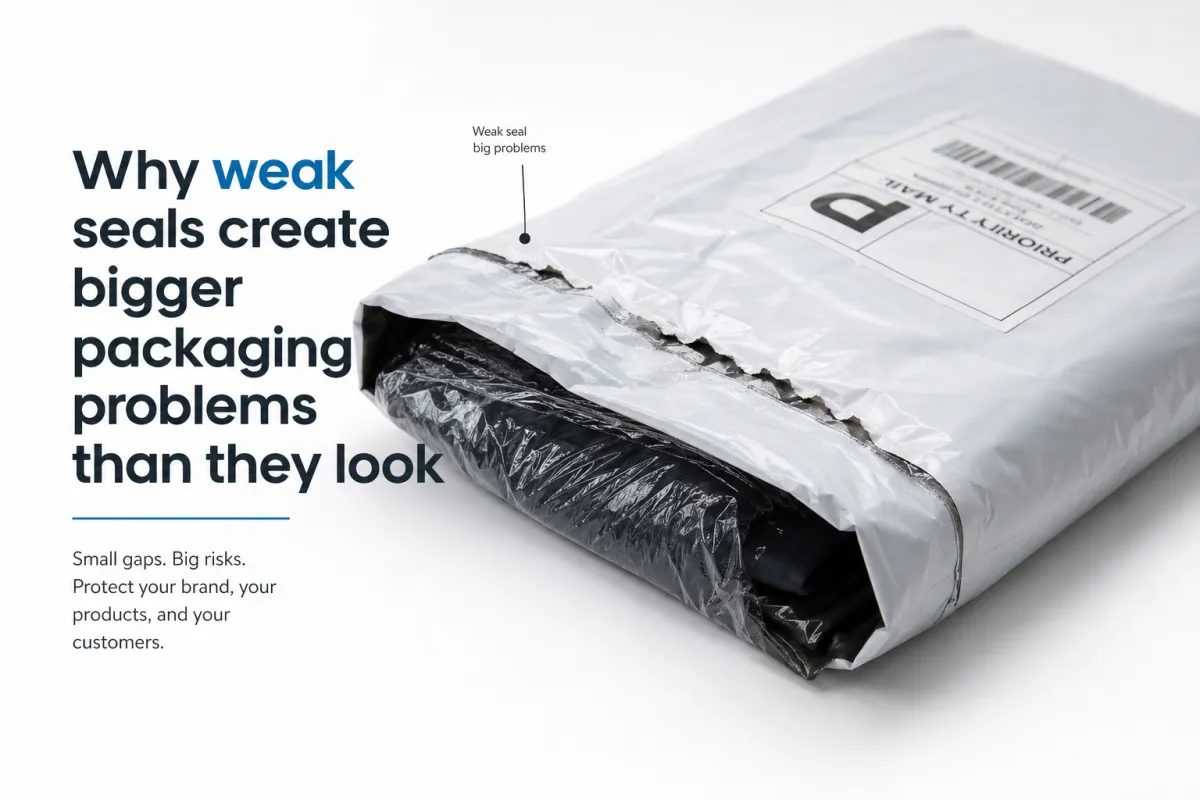
A mailer can look pristine on the outside and still fail in transit. Distribution centers do not handle parcels gently. They stack them, press them, drop them, and shove them through routes that punish anything fragile. A seam that survives the packing table may split once it starts moving with hundreds of other packages. Then the order becomes a complaint, a repack, and a hit to account health. One failure often costs more than the sale itself.
I have seen that exact pattern in warehouse audits: a bag passes a quick hand check, then opens after one conveyor turn and a bit of compression from the next carton. That is why teams keep circling back to seal integrity before they choose graphics or finishes. A strong seal is more than a closure style. It is a damage-control decision. It also affects the math in a way most sourcing teams underestimate.
Three wins you actually get when the seal is right
- Fewer damages: Less seam splitting means fewer spills, fewer returns, and fewer chargebacks tied to transit.
- Cleaner presentation: A sealed edge looks deliberate, and that matters when the package is the first physical touchpoint with the customer.
- Better shipping control: Losses become easier to forecast, claims are easier to track, and fulfillment planning stops relying on guesswork.
Put numbers on it. Suppose a store ships 2,000 small accessory orders a month, with $4 in fulfillment cost per order and about $6 in shipping per unit. If 1.5% of packages fail at the seam, that is 30 failures. At $10 in replacement labor and materials per incident, the monthly hit lands around $300. Over a quarter, a weak specification can burn through more than many teams spend on campaigns in a week.
The failure pattern that shows up again and again
The story is familiar. A mailer passes a visual check at the packing station, clears the scan line, then opens during transfer at 2 a.m. The seam looked straight, so the team assumed it was sealed. Straight is not the same as fused. If the heat profile drifted, if the film was too thin, or if the item was packed too tight, the seam can separate under pressure.
That is why performance should be judged by outcomes, not by pretty samples. Batch consistency matters more than a lucky run. If returns rise after a small spec change, treat that as a warning signal. A simple log helps: stock code, seal settings, complaint type, temperature conditions, and failure rate. Patterns show up fast when the data is plain.
What are the tips heat sealed poly mailers benefits for small and large fulfillment operations?
For both a one-person shop and a fulfillment center, the benefit is not just cleaner packaging. It is predictability. With heat sealing, teams stop treating each shipment as a roll of the dice and start treating it as controlled output. That shift usually shows up first in fewer support escalations and slower churn in repeat complaints.
There is also a less obvious gain: packaging consistency can reduce labor friction. Teams that measure seal quality early spend less time stopping lines for emergency repacks, less time fighting stock swaps, and less time arguing with sales teams that assume shipping is a fixed cost. If the workflow is tight, the whole operation feels less frantic.
For a small brand, that can mean the difference between answering emails all night and actually sleeping. For a larger shipper, it can mean a steadier claims profile and fewer exceptions buried in monthly reports. The upside is practical, not flashy.
Tips Heat Sealed Poly Mailers Benefits: How the Seal Works
Before you trust a machine, understand the mechanism. Heat sealing is a controlled fusion of film layers. Three variables work together: heat, pressure, and dwell time, which is the length of time heat touches the seam. If one variable drifts, failure can hide until shipping exposes it. If all three are tuned, the seam becomes an actual bond instead of a decorative edge.
Confusion usually starts here. A heat-sealed closure is not a glue strip and it is not a folded flap with sticky backing. It does not depend on adhesive behavior that changes with humidity or abrasion. Heat alters the polymer over a controlled strip, creating a continuous barrier. That is the practical heart of the heat-sealed approach, and it is why experienced converters talk about process windows instead of a single magic number.
The advantages show up in three ways. Tamper resistance improves because the seam takes more force to open than a fold-over edge. Moisture intrusion drops when the line is uniform, especially for goods that react badly to humidity. The outer edge looks cleaner too, which matters when the parcel reaches the customer first and the product second. A torn seam does not read as premium.
What changes when heat, pressure, or dwell shifts
If the temperature is too low, the layers sit against each other but do not fuse. Too much heat causes channeling, thinning, or wrinkles. Uneven pressure creates patchy adhesion. A short dwell leaves weak spots even when the rest of the seam appears fine. A long dwell can distort film and warp printed areas.
The useful rule is simple: lock settings to the spec and stop adjusting by feel after approval. A printer or converter should provide a real process window for each mailer, with a target temperature band and pressure range validated through small pilot lots. That is where benefits become visible instead of theoretical.
Quality standards are not decorative either. Packaging teams often reference ASTM methods for tensile and puncture-style comparisons, while transport testing usually follows ISTA handling and performance expectations to mirror carrier stress. If a supplier cannot explain the test conditions they used, that is a problem worth raising immediately.
Another wrinkle matters here. A lot can test clean in a static inspection and still fail in movement because seam behavior changes over shipping cycles. The takeaway is blunt. If a bag survives a controlled press test but fails real parcel handling, the issue is not only the seal. It is a system problem across materials, machine settings, and actual route conditions.
Key Factors That Change Results
People overcomplicate this section all the time. They pick one thickness, one artwork file, and one shipping lane, then expect every product shape to behave the same way. Heat-seal reliability appears only when the whole stack is tuned around the product, the machine, and the route it will travel.
Material thickness and film blend
Typical poly mailer films for shipping often sit somewhere around 1.8 to 4.0 mil, though actual gauge varies by supplier and market. Lightweight garments may be fine on the lower end. Dense or fragile goods usually need a heavier stock to support the seam. Hard corners are the enemy here; they create point pressure that punctures thin film faster than most people expect.
If you are choosing between PE, PP, or co-extruded blends, compare heat sensitivity, puncture behavior, and print performance. A lower-cost monomaterial can fit sustainability goals, yet it may be less forgiving on rough routes. A stronger barrier film costs more upfront, but if it cuts seam failures in half, the total cost can come out lower. That is the part many buyers miss when they treat envelope selection like a style choice.
Product shape, weight, and edge behavior
Weight matters. Shape matters more than most teams admit. A 250 g soft item is easy to seal. A 250 g rigid item with four sharp corners is another story. Corners concentrate stress, especially when parcels are stacked tightly. Sharp edges dig into the seam zone during compression. That is where seal strength and post-seal durability disappear if the spec is too optimistic.
If the SKU includes metal clasps, pen tubes, glass vials, or rigid frames, the bag width and seal settings should be chosen with puncture risk in mind. Teams often reduce failure by adding a foam sleeve or recycled paper wrap around the sharpest points and by moving the load line so the seam is not taking the full brunt of compression.
Print coverage, seal zones, and closure style
Heavy ink coverage can interfere with sealing if the print runs too close to the closure line. Leave a clear buffer between full-bleed graphics and the heat zone. In many operations, a 6-10 mm seal line margin keeps ink from migrating into the bond area, though print-specific testing should always confirm the final margin.
Closure style changes behavior too. A plain front seal moves fast and suits straightforward retail shipments. A tamper-evident style makes sense for higher-value items even if it slows the line slightly. Branding near the seam can sharpen the look, yet the wrong material pairing can reduce heat efficiency. That trade-off is real, and it should be priced in before the order goes live.
Seal zone width is not decoration. Too narrow, and the edge can zipper open under load. Too wide, and the bag wastes material and becomes harder to open cleanly. Many production teams aim for enough width to survive handling without making the customer fight the package at opening.
Storage and handling before shipment
Excellent mailers fail early when storage is careless. Heat, sunlight, humidity, and stacking pressure all alter film behavior. Keep rolls or bundled mailers off the floor, away from hot ducts, and out from under heavy pallets. A finished bag left under weight for too long can take on distortions that show up later as inconsistent sealing.
Use a hard rule: if storage regularly climbs above about 85F for extended periods or humidity stays high, recheck incoming stock and seal performance. If the climate swings, shift to shorter runs and tighter inspection before dispatch. Nobody enjoys telling a customer the failure started long before the package left the building, and nobody hears that explanation as convincing.
This is the practical payoff of good mailer design: better margins, fewer repacks, and a brand that looks organized because the basics are actually controlled.
Step-by-Step Process and Timeline for a Clean Seal
Most shipping problems are process failures wearing a product-failure costume. If the workflow is vague, the mailer becomes a lottery ticket. A disciplined sequence keeps outcomes repeatable from lot to lot.
1) Start with a hard product spec sheet
Before asking for proof, record the exact product size, average and maximum weight, item rigidity, corner risk, preferred opening style, and target finish. Add whether the package needs high-tack sealing or a tamper-evident style. Without those details, the rest is speculation. Include the top three complaint types you want to avoid, because those are the real acceptance criteria.
If the product size varies, measure at the 95th percentile instead of leaning on the average. One oversized item is enough to expose a weak seam that a perfect sample never reveals.
2) Use samples as a decision tool, not decoration
Sample review is where money is saved or wasted. A quick turnaround, usually 2-5 business days depending on stock and artwork, is worth waiting for because testing on arrival beats promises on paper. Ask for at least one stress sample loaded with the heaviest and most awkward items.
- Test the seam by hand pull at the corners.
- Drop check from modest heights and stack-test with 5-8 units in a box.
- Run a quick moisture check on thin contents.
- Review print alignment and opening behavior.
If something fails, do not hide behind prettier artwork. The sample review should force a settings correction before the design is locked. That is the point where performance stops being a phrase and starts becoming measurable.
3) Use a simple approval flow before full production
Keep the flow short and strict:
- test seal ->
- inspect seam continuity under 3x magnification where possible ->
- run drop and handling checks ->
- confirm final artwork and quantities.
The process looks unglamorous. It works. Packaging mistakes usually begin when this checklist turns optional. If a team member wants to skip a step because the sample "looks fine," that is usually the moment to slow down, not speed up.
4) Set realistic timing and avoid panic buys
For planning, many brands use these working windows: sample request to approval 2-7 business days, production lockup 4-10 business days, and shipping after production 2-5 business days. If artwork is stable and the stock is available, those ranges hold fairly well. Change the dieline, proof, and color in the same cycle, and the calendar stretches.
Rush orders are real. They can be useful. They also tend to raise cost by 20-40% and reduce room for reruns. If the order supports a critical launch, build in a contingency run. Cheap panic usually becomes expensive later.
A process should lower surprises, not create them. If your timeline includes a hard quality checkpoint after production and no one is available to sign off, the timeline is fiction.
The strongest orders usually come from disciplined routines around operational control, and that discipline begins long before the first printed bag reaches the warehouse.
Cost and Pricing: What drives heat-sealed mailer quotes
Pricing always becomes the topic sooner or later. Unit price matters, but it is only one piece of the decision. The first sourcing mistake is treating the mailer as a fixed cost and ignoring claims, setup, and delays.
What moves unit cost the most
| Option | Typical Spec | Seal Method / Finish | Indicative Unit Price | Typical Use Case |
|---|---|---|---|---|
| Starter | 1.9-2.2 mil, basic size ranges | Standard front heat seal, 1-side print | USD $0.10-$0.18 (5,000 units), $0.16-$0.26 (1,000 units) | Light, flexible items; low budget |
| Balanced | 2.5-3.0 mil, stronger film blend | Wider seal band, richer print control | USD $0.15-$0.25 (5,000), $0.20-$0.34 (1,000) | Skincare, fashion basics, regular monthly shipping |
| Premium | 3.5-4.0 mil, reinforced option | Tamper-resistant or high-tack profile, full-color | USD $0.24-$0.42 (5,000), $0.32-$0.58 (1,000) | Higher fragility, long-distance shipping, premium positioning |
MOQs drive the first big shift. If you can commit to 5,000-10,000 units, unit price usually drops enough to justify better stock for many products. Smaller, irregular demand makes low-volume buying expensive in a different way. You pay more per bag and still risk leftover inventory that sits too long.
The math is easy to miss because the swing looks tiny. A $0.14 versus $0.16 difference seems harmless until 10,000 pieces are on the order. That is a $200 spread. Small, until stronger packaging lowers damage from 1.2% to 0.5% on 10,000 units. If each incident costs about $20, savings climb quickly into four figures. That is where quality-focused selection becomes margin control instead of packaging trivia.
Hidden costs that wreck the quote comparison
Every quote has hidden pieces. Setup fees, die or cutting changes, proofing cycles, and color correction can add USD $50-$250 depending on complexity. Special inks and metallic effects can push it higher. Rush handling often adds another 15-35%, depending on speed and supplier capacity. Comparing only unit cost leads people straight into the wrong baseline.
Labor is the part many buyers forget to count. One seam failure can trigger:
- repack time, including relabeling and reboxing,
- customer service follow-up,
- refund coordination,
- and return postage.
At scale, that is a freight problem hiding inside a packaging decision. If your team’s average replacement handling lands in the USD $7-$12 per incident range, the math shifts fast. That is why total cost comparison must include seal integrity testing and not only the quote sheet.
If sustainability claims matter, ask for supply-chain transparency and split the order by SKU risk. Heavier stock for fragile items. Lighter stock for impact-safe items. Compare on real volumes instead of broad assumptions. Keep one more line in the spreadsheet for disposal and recycling handling.
For more technical context on materials and end-of-life options, see EPA packaging and recycling guidance.
Common Mistakes That Cancel the Benefits
Strong specs still fail when execution gets sloppy. A good film can still produce weak results if one variable drifts for just one cycle.
Underheating, overheating, and everything between
Underheated seams open at the corners. Overheated seams shrink, wrinkle, and sometimes silver under stress. Both defects can look acceptable during a quick glance. Both can fail once the parcel starts moving. The answer is repeatable settings and batch testing.
Most teams skip acceptance thresholds. A basic rule helps: if seam edges blister, reduce the thermal setting by 5-10C equivalent and test again. If the seam peels with a light pull, increase dwell slightly or adjust pressure. It sounds mechanical because it is mechanical.
Overstuffing and compression damage
Filling the bag to the limit feels efficient until the package folds at the seam during transfer. Rigid products make this worse. Overstuffing increases point loads and edge pressure, and that pressure can drag the seal apart in transit. Keep fill height realistic. Avoid the tempting "one more item" habit.
"A consistently packed bag with a properly managed fill line outperforms a heavier stock bag that is overfilled and structurally abused."
That line is not poetic. It is the difference between an orderly shipment and a failure that shows up later in support tickets.
Cheapest material trap
The lowest-cost film can look identical to a better one and still fail in use. Lower-grade stock often has weaker tear resistance and less tolerance for heat. If your route is short and low-stress, that might be fine. If shipments cross multiple hubs and weather zones, it usually is not.
The false economy is straightforward. Save $0.03 per unit and lose more than that to failures. Across 20,000 units, that is a clean $600 gain that disappears by week two. If a team says, "we will never know," run the numbers anyway. Costs do not stay hidden forever.
Sample-only validation and bad storage habits
One glossy sample in a showroom proves very little about actual shipping. Real checks matter more: transit simulation, stacking stress, and temperature swing tests. Stock stored near heat sources or compressed on unreleased pallets can lose reliability before the first shipment leaves.
Ask suppliers to confirm packaging age and storage method for incoming rolls or bags. For larger runs, use date codes and rotate older stock first unless the spec requires a different sequence. Strictness costs less than cleanup.
Remember this in the context of real operations: the right spec still fails when execution turns messy.
Expert Tips and Next Steps Before You Order
Time to move from theory to action. If an order is close, use the next 30 minutes to avoid one expensive mistake.
Order a test batch that has meaning
Start with a production-like batch, not a novelty sample. Fifty to 300 units is enough to reveal seal consistency, especially on repeat-heavy SKUs. Compare three outcomes: seal strength, opening experience, and visual finish after handling. If the results vary too much, stop and correct before full commitment.
For small runs and pilot campaigns, this is the cheapest confidence you can buy. A test that mirrors real use is worth more than a polished sample in a lighting booth, every time.
Use a practical order checklist
- Item weight range and max dimensions
- Target finish and opening style
- Seal method and expected line strength
- Volume plan: first lot + refill timing
- Lead time constraints and budget ceiling
This is the internal control card. If one of those five points is missing, the spec is not locked. If the spec is not locked, pricing turns into guesswork.
Ask the right questions before approval
Before clicking approve, ask for:
- sample photos from the inside and seam area, with scale references,
- pricing tiers by 1k, 5k, and 10k units, and
- production timing by stage, including approval and shipping buffers.
Ask for a real-world test report, not only a visual sample. If a supplier cannot provide those basics, pausing is safer. You can compare options under Custom Packaging Products and review the selection in Custom Poly Mailers.
QC at arrival is non-negotiable
When boxes arrive, inspect at least 5-10% of the quantity on first receiving: check seam continuity, pull-test a few random units, review print registration, and confirm color is not migrating near the sealing zone. Keep photos with batch IDs. If one batch drifts, quarantine it before packing begins.
That is how to apply operational discipline in a real facility: not as a slogan, but as a habit. If the first lot passes, scale with confidence. If it fails, you just avoided a much larger problem.
Conclusion: Use the tips heat sealed poly mailers benefits perspective as a decision tool, not marketing copy
If one lesson stands out, it is this: the cheapest-looking mailer is rarely the cheapest outcome. A heat-sealed process only earns its place when materials, machine settings, and logistics behavior are tied together in one repeatable system. Lock the specification. Test early. Verify every batch. Adjust with actual results.
The advantages do not appear in a mockup. They show up in lower return rates, fewer complaints, and fewer late-night repack jobs. They also show up in steadier inventory planning because the shipping cost is less likely to surprise you.
If presentation matters, the path to a better-looking order usually starts with ordinary controls: consistent heat, the right dwell, stable storage, and a controlled fill line. Nothing about that is flashy. It is simply smart operations. Apply it to one SKU, prove the failure rate drops and rework time shrinks, then expand from there. That is the practical version of growth.
Before your next full order, spend 15 minutes with your team and answer one question: are we buying a bag, or are we buying a controlled failure rate? If the answer is not the second one, revisit the quote, ask better questions, and run a short test. The results are real. The next decision should show it.
And here is the blunt part: if your current setup has seen a seam failure in the last two campaigns, you are already paying tuition. Better to pay a little more now and own the outcome than let customers pay for the lesson later.
FAQ
What are the main benefits of heat-sealed poly mailers for small brands?
The main advantages are stronger consistency, cleaner handling, and fewer returns. Better seams and better material matching usually reduce transit damage, especially for frequent shippers and longer routes. The biggest gain is predictable performance across every order, not just a sample that looks good on a desk.
How do I know if heat sealed poly mailers are strong enough for my products?
Start by matching bag gauge to the maximum product weight and shape, then verify with a small batch test. Include a drop test and a normal-handling check, not only a visual review. If the seam stretches, cracks, or wrinkles near a corner, the spec is too weak or the settings need adjustment.
Do heat sealed poly mailers cost more than regular mailers?
They can cost more per unit, especially when the film is thicker or the print coverage is heavier. Total economics often improve once damage claims drop. Compare the full cycle cost: production, labor, replacements, and support, not only the bag price.
How long does the heat sealing process usually take in production?
Sample generation is usually the fastest stage, often within 2-5 business days for straightforward programs. Production moves faster once the spec is locked because the settings can be repeated. Rush jobs exist, but they usually add cost and shrink the room for retesting.
What mistakes hurt heat sealed poly mailers performance the most?
Wrong thickness, overstuffing, and poor storage are the top three. Temperature drift is the silent fourth: too low and the seam is weak, too high and the material deforms. Most avoidable failures still come from skipping hands-on testing and shipping based on appearance alone.


