A digital proof for embroidered beanies is really a production check. Screen art can look sharper and bigger than the finished stitch-out, and knit fabric stretches, folds, and compresses in ways a flat mockup never shows. The point is the build, not the polish. For a typical 6-8 cm front logo on a cuffed knit cap, the digitized file usually lands somewhere in the 5,000-10,000 stitch range, depending on size and detail.
A clean mockup can still lie.
The biggest risk is approving a design before the practical details are settled. Buyers need finished size, placement, thread colors, backing, and a clear note on whether the artwork was simplified for embroidery. If the order uses recycled yarn or sustainable blanks, ask for the paperwork early, such as GRS for recycled content, GOTS for organic cotton yarn, or OEKO-TEX Standard 100 for yarns and thread.
Beer embroidered beanies digital proof checklist: what the proof should show
A useful proof does more than drop a logo onto a beanie template. It shows how the stitch file will be built and where the limits are. On knit headwear, a logo can still miss the mark if it sits too high on the cuff, lands too close to a seam, or finishes at the wrong size. In practice, the proof should spell out the exact embroidery field, such as 3.5 x 2.0 inches on the front cuff or 90 x 45 mm on the front panel.
At a minimum, the proof should confirm placement, finished dimensions, thread colors, stabilizer choice, and any artwork changes needed for embroidery. If the original design uses fine lines or tiny type, the proof should make clear whether those details were thickened, removed, or merged into larger shapes. That is the difference between a readable cap and a cluttered one. For knit beanies, a common build uses 40-weight polyester embroidery thread, a cut-away backing, and a water-soluble topping when the knit is especially soft or fuzzy.
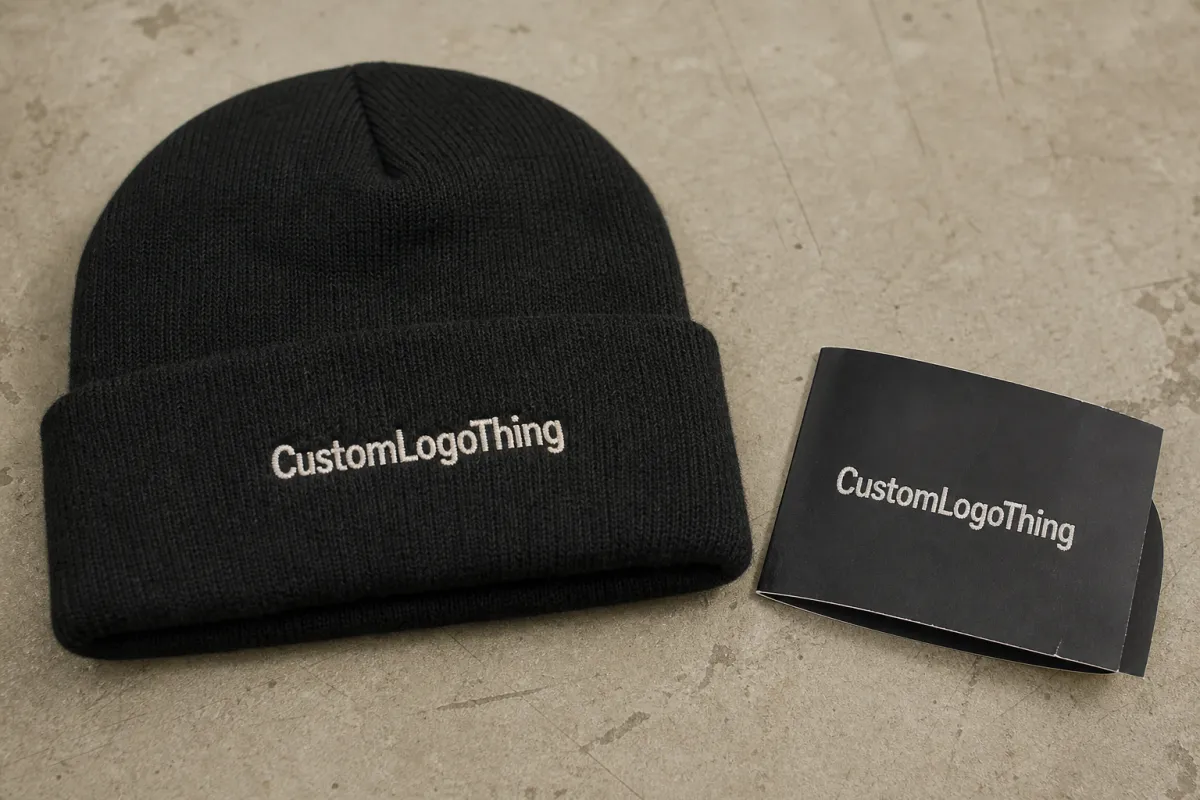
- Placement - front cuff, front panel, side panel, or a cuffless position.
- Finished size - list it in inches or millimeters, not vague labels.
- Thread colors - use embroidery thread references, not screen colors.
- Stitch method - satin, fill, run, or a mix of the three.
- Artwork adjustments - text widened, shapes merged, detail reduced.
The proof should also make the decision easy for the buyer. If a brewery crest includes a small tagline, ask whether that line will still be legible at the approved size after the knit stretches and the beanie is worn. If the answer is uncertain, the design needs another review before approval. A practical rule is that lettering below about 4-5 mm in height often needs simplification, especially on looser acrylic knits or cuffless styles.
A proof should work like a production map. If the layout, scale, and thread plan are fuzzy on paper, they will be fuzzy on the machine.
Good proofs also keep the broader order in view. If the beanies are part of a retail or event package, decoration approval should line up with packaging, folding, and shipping expectations. A clean embroidery decision can still create problems if the rest of the order changes later. That is why many production teams freeze the mockup, labeling, and carton packout details before bulk stitching starts.
How the proof translates to embroidery on a knit cap
Embroidery is a translation, not a copy. Digitizing turns artwork into stitch direction, density, underlay, and pull compensation. Those settings decide whether a logo holds its shape or swells at the edges. A good proof spells that out instead of hiding it behind a polished image. On commercial equipment, the file is usually run on a multi-needle cap or flat embroidery machine, then checked as a sew-out before bulk approval.
Three stitch behaviors matter most. Satin stitches handle narrow columns and sharp borders. Fill stitches cover larger areas. Underlay stabilizes the knit so the design does not sink into the beanie or lose edge definition.
Without it, the result can look soft or uneven. For most beanies, the digitizer will also set pull compensation so rounded letters do not shrink and dense borders do not buckle.
Stitch direction matters too because it changes how thread reflects light and how the logo reads at a distance. A design can look balanced in one direction and busier or flatter in another. Buyers rarely ask about that detail, but it affects quality. In production, the operator may test a short sample run on a 12-needle head to verify density, tension, and stitch order before committing to the full batch.
The beanie itself changes the result. A tighter acrylic knit usually supports cleaner edges than a loose weave. A cuff gives more stability than a soft crown panel. Cuffless styles can look cleaner, but they offer less structure for embroidery. If the logo sits on the cuff, the proof should show the fold line and the narrower working area.
A 100% acrylic beanie and an acrylic-wool blend do not behave the same; the blend often feels softer, but the looser surface can require a slightly larger minimum stroke width.
Thread color should also be treated carefully. Embroidery thread reflects light, so the same color can look brighter or darker than a screen version. Color notes should identify actual thread references or at least say whether the match is exact or visually close. Thread behaves differently from print ink, and the proof should make that clear. If the order calls for certified materials, ask for OEKO-TEX Standard 100 thread or GRS-certified recycled thread where the product line requires it.
Key factors that affect stitch quality, readability, and fit
The usual problems are too much detail, weak placement, or a beanie style that leaves too little usable surface. The proof should test all three before approval, because fixing them after production starts is costly.
Logo complexity is the first constraint. Thin lines, small counters, stacked wording, and nested icons can look polished on screen and turn noisy in thread. Anything that depends on hairline detail should be reviewed at the actual finished size, not just enlarged on a monitor. For most knit headwear, line work below about 1.0 mm and tiny type below about 4 mm high often needs redraws or simplification.
Placement comes next. Front cuff embroidery is common because the surface is stable, but side placement can feel more current and cuffless styles can create a cleaner front field. Fit matters too. A higher-profile beanie exposes more of the front panel, while a low-profile style compresses the visible area and changes how the logo reads. If the cap has a folded cuff, the proof should show the actual fold height so the artwork is not placed too low or hidden when worn.
Material and knit structure matter just as much as the art. Acrylic and acrylic-blend beanies are popular because they hold shape reasonably well and keep pricing accessible. Even so, yarn thickness, knit density, and cuff height affect how much detail the machine can hold. A tighter cuff generally supports smaller lettering better than a loose weave. If the blank is organic cotton or a cotton blend, a GOTS-certified yarn can support the sustainability claim, while OEKO-TEX Standard 100 helps confirm the fabric and thread are tested for harmful substances.
Contrast is often overlooked. Dark thread on dark fabric may look premium in a mockup and nearly disappear at a distance. High-contrast combinations improve readability immediately. Thread sheen also matters: a matte thread can calm a busy design, while a brighter finish can make a simple logo feel more energetic. In practical production, that means choosing a shade that survives the knit texture instead of fighting it.
Readability is the test that matters most. If the logo cannot be read from a few feet away, the art needs another pass before anyone signs off.


