Supplement Unstructured Dad Hats Digital Proof Checklist
A digital proof can save a hat order, or quietly set up a bad one. The supplement unstructured dad hats Digital Proof Checklist matters because a soft crown does not behave like a flat mockup on a screen. If you are buying merch for a supplement brand, the proof is the last controlled moment before stitches, thread tension, and setup costs turn a concept into inventory.
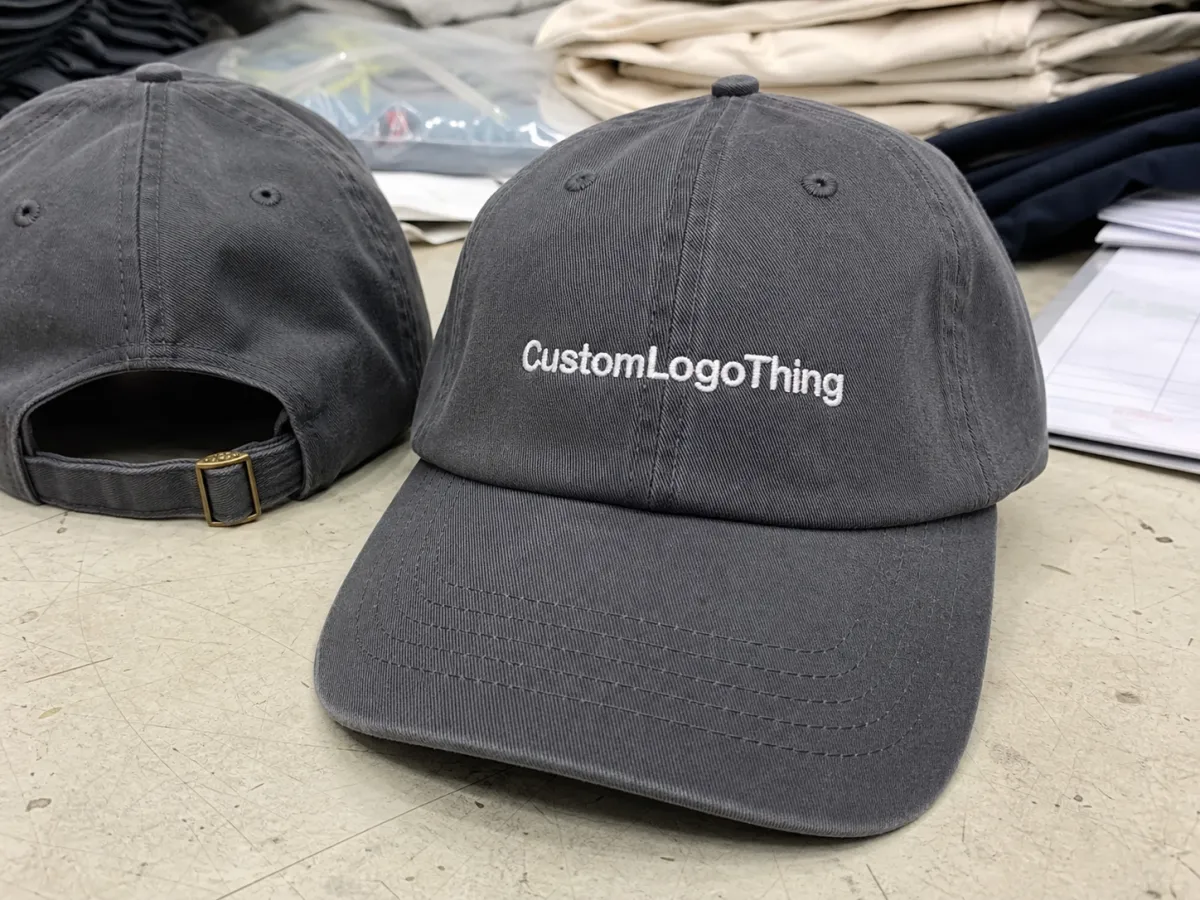
Unstructured dad hats have a low profile, relaxed crown, and less front-panel support than structured caps. That detail becomes important when the logo lands lower than expected, crosses a seam, or reads wider than it did in the proof. A proof is supposed to catch those failures before anyone approves a run of 50, 100, or 500 units and discovers the issue in finished product.
The problem is usually translation, not intent. Buyers approve a version that looks right on screen but never gets mapped to actual hat behavior. Soft crowns fold, drape, and settle differently depending on fabric, backing, decoration method, and closure. A useful proof should show all of that clearly enough that nobody has to guess.
If the proof does not show exact size, placement, thread colors, and construction notes, it is not a real approval. It is just a preview with production risk attached.
What the proof should catch before production
The first job of the supplement unstructured dad hats Digital Proof Checklist is to stop a soft-crown hat from becoming an expensive surprise. A digital proof is a production map. It should confirm the logo size, placement, stitch style, thread colors, hat color, backing, closure, and any seam-avoidance notes before a single unit gets made.
That level of detail matters because unstructured crowns collapse differently from structured ones. The front panel does not hold itself up as rigidly, so the embroidery field shifts with the fabric, the crown depth, and the way the hat sits on a head. A centered logo can look perfect on a screen and still sit too low, crowd the seam, or feel oversized on the actual cap.
Supplement brands get tripped up here often. Promo buyers usually want a clean, logo-forward hat that looks premium without feeling heavy. In practice, a moderate front hit often works better than a massive one. Oversized art can flatten the hat visually, especially on a relaxed crown where the front panel already has a soft silhouette.
Good proofing also catches the details buyers forget to request. Backing type affects comfort and stability. A heavier backing can stabilize embroidery, but it can also make the front panel feel stiffer than expected. Closure style matters too. Self-fabric straps, brass buckles, and fabric slides each change the rear profile and how the cap wears.
For brands that want the hat to feel approachable rather than rigid, the proof should make those tradeoffs visible before approval. Compare the proof with the spec sheet and the decoration capabilities listed on our Manufacturing Capabilities page so the approved version matches what the factory can actually build.
For packaging or retail presentation, guidance from the Institute of Packaging Professionals is useful once the hat moves beyond embroidery. The cap itself may be simple. The order around it rarely is.
Process and timeline: how proofs move to production
The proof timeline is usually fast if the artwork is clean and the buyer is decisive. A vector logo, clear notes, and one person empowered to approve the proof can produce a first pass in about 24 to 72 hours. If the file is fuzzy, the color direction is vague, or multiple stakeholders keep rewriting the art direction, the same process can stretch across several business days.
The normal sequence is straightforward. First, the buyer sends the artwork and hat details. Second, the vendor returns a digital proof showing placement, dimensions, thread colors, and any construction notes. Third, the buyer reviews the proof and sends one consolidated revision list. Fourth, the vendor updates the proof and confirms the final specs. Fifth, the approved proof is released to production and becomes the reference for the run.
Once the proof is approved, it becomes the source of truth. If someone changes the logo size, thread palette, or placement after signoff, that can trigger a new proof, a new timeline, and sometimes a new charge. That is not stubbornness; it is how the shop avoids making 500 hats that match the wrong version of the artwork.
There are a few delays that are easy to prevent. Missing vector files are one. Vague notes like “make it a little bigger” are another. So is sending fragmented feedback from marketing, leadership, and retail without deciding who has final say. Bundle the comments, then approve once.
| Decoration option | Typical setup cost | Typical unit cost at 24-48 pcs | Best use | Main watch-out |
|---|---|---|---|---|
| Flat embroidery | $35-$75 digitizing | $7-$12 per hat | Most logo-forward front hits | Too much small detail can blur |
| 3D puff embroidery | $45-$95 digitizing | $8-$14 per hat | Bolder marks with a raised look | Not every logo reads well in puff |
| Woven patch | $60-$120 setup | $6-$11 per hat | Fine detail and cleaner edges | Patch size has to fit the crown |
| Sewn label | $25-$60 setup | $4-$8 per hat | Minimal branding and lower budgets | Small logos can disappear fast |
Those ranges are decoration-only and can shift with quantity, thread count, and extra finishing. If the order includes retail packaging or ship-ready cartons, ask whether the supplier tests outer cartons to ISTA methods. A hat can leave the factory fine and still arrive crushed if carton strength was ignored.
Pricing, MOQ, and unit-cost tradeoffs for small runs
MOQ is where a lot of buyers run into reality. Lower minimums are useful, but they are rarely cheap on a per-unit basis. Setup work does not shrink because the order is small. The art file still needs review. Embroidery still needs digitizing if the design is stitched. The proof still needs a human to verify that the logo does not look wrong on a soft crown.
For small runs, the jump from 24 pieces to 100 pieces is usually where the quote starts to feel more reasonable. A 24-piece run can work for a launch, a sales team, or a limited promo drop. A 100-piece run often gives a better per-hat price without creating warehouse clutter. Beyond that, 250 and up can lower unit cost again, but only if the decoration stays simple and the revisions stay under control.
Ask for a quote that spells out the messy parts: proof revisions, digitizing, mockup changes, sample charges, shipping, and rush handling. If those are buried, you are one “small adjustment” away from a surprise invoice. The cleanest suppliers list them up front because the order is easier to approve when the math is visible.
There is also a hidden cost in overdesigning the hat. Small text, too many thread colors, or a complicated patch can make the product look more premium on a screen while increasing labor and failure risk in production. Simple is not always cheaper, but simple is usually more predictable.
Here is the practical way to control cost without turning the hat into a bargain-bin piece:
- Keep embroidery in a readable range, usually around 2.5 to 3.25 inches wide for most front logos.
- Limit thread colors unless the design truly needs them.
- Skip extra labels, hangtags, or custom packaging unless they support the sale.
- Use one approval round instead of four half-decisions.
The supplement unstructured dad hats Digital Proof Checklist helps with pricing because the proof shows what is actually being bought. A cap that looks simple can still carry a lot of setup cost if the art is complex. A cap that looks expensive can be relatively easy to make if the decoration is clean and the placement is standard.
For buyers comparing embroidery with patch work before approving a quote, the capabilities overview on our embroidery and patch capabilities page is a useful reference. The goal is not to chase the lowest number. It is to buy the hat that will still look right after production, packing, and shipping.
Logo size, placement, and decoration limits on unstructured crowns
Unstructured crowns are soft by design, which is the whole appeal. They wear relaxed. They break in quickly. They also misbehave if the artwork is oversized or placed without restraint. A structured cap can hide a lot. A dad hat cannot.
Placement starts with the obvious choice: center front. That remains the most common option because it gives the cleanest read and the least room for confusion. Side hits can feel more subtle. A back logo can work if the front already carries a woven patch or another visual anchor. Low front placement can look modern, but it can also collide with the seam or crown curve if the design is too tall.
Decoration method changes the result too. Flat embroidery gives crisp edges and works well for wordmarks and clean symbols. 3D puff adds height, but it needs bold shapes and simple letters or it turns messy fast. Woven patches are good for detail, though they still need enough surface area to read. Sewn labels are tidy and understated, but they will not carry a complicated brand mark.
Fabric color and finish matter more than many proofs admit. Washed cotton absorbs light differently than bright twill. Pigment-dyed fabric can mute thread colors. Dark hats make small logos harder to read. A digital proof should show the cap color, the thread callout, and enough contrast to spot obvious problems before production starts.
Avoid fuzzy instructions like “make it pop.” Give measurable directions: 3 inches wide, centered 0.5 inches above the seam, flat embroidery with white and navy thread, no seam overlap. Those instructions turn a proof into a usable document instead of a conversation starter.
Step-by-step approval workflow from file upload to signoff
Start with file prep. Send vector art, not a screenshot if you can avoid it. Include the exact hat color, target quantity, preferred decoration method, and any brand color references. If the logo has a thin line or tiny text, say that up front.
Step two is the first review. Check spelling first. Then check the logo dimensions, placement, stitch style, and whether the art sits safely away from seams, vents, and the closure. If the hat has a shallow crown, make sure the proof reflects that.
Step three is revision control. One response. One list. No scattered notes. If the buyer wants to move the logo up, tighten the thread palette, and switch from buckle closure to self-fabric strap, all of that should arrive in one message or one marked-up proof.
Step four is quote matching. Compare the final proof against the estimate before approving anything. Does the price still match the decoration method? Does the quantity match? Did the delivery timing change because the art was revised? A proof that looks good but no longer matches the quote is not ready.
Step five is signoff discipline. Save the approved proof with the purchase order or invoice. If the order is reordered later, that file becomes the reference for size, color, and placement. Good buyers keep that paper trail because it saves time on replacements, restocks, and future runs.
From a production point of view, the approval is the handoff. Once it is signed, the shop assumes the file is final. If the artwork changes after that point, treat it like a new order, not a casual tweak. That is how you protect timing, pricing, and the finished result.
Common mistakes that wreck unstructured dad hat proofs
The biggest mistake is approving the look without checking the actual dimensions. A logo can appear centered in a mockup and still land too low once it is stitched on a relaxed crown. The second biggest mistake is ignoring seams and crown depth. Unstructured hats do not give much room to hide bad planning.
Color is another trap. Buyers see a screen and assume thread will match perfectly. It will not always happen that way. Thread, fabric dye, screen settings, and lighting all affect how the final color reads. A digital proof is directional. It is not magic.
People also miss the details inside the cap. Backing, stabilizer, inside patch borders, and seam tape can affect comfort and appearance. If the logo is close to the crown seam, the backing choice matters more than most buyers expect. That can be the difference between a hat that feels soft and one that feels stiff in the front panel.
Slow approvals cause their own damage. Every extra round increases the chance that someone contradicts a previous note or forgets what was already agreed. Then the vendor has to reconcile multiple versions of the same idea, which wastes time and invites mistakes.
Most production mistakes are approval mistakes that started in the inbox. That is why the supplement unstructured dad hats Digital Proof Checklist is worth using even for small orders. Small orders are not immune. They are just cheaper to ruin.
For brands that care about sustainability claims, paper inserts and packaging can be aligned with FSC-certified stock or responsibly sourced materials. That does not fix a weak hat proof, but it keeps the broader merch package from feeling half thought out.
How long does the digital proof process for unstructured dad hats usually take?
Clean artwork and straightforward embroidery usually get a first proof in about 24 to 72 hours. Missing vector files, color matching, or special finishes can add several business days.
What should I check on an unstructured dad hats digital proof before approving it?
Check the logo size, placement, and spelling first. Then confirm thread colors, hat color, backing, and any notes about seams or crown depth. Make sure the proof still matches the quote.
How does MOQ affect pricing on supplement-style dad hat orders?
Lower MOQ orders usually cost more per hat because setup, digitizing, and proof work are spread across fewer units. Ask for breakpoints at 24, 48, 100, and 250 pieces to see where unit cost drops.
Can I change the logo after the proof is approved?
Small tweaks can trigger a new proof and possibly a new setup charge. Major artwork changes usually restart digitizing and can push the timeline back.
Are digital proofs accurate enough for color matching on unstructured dad hats?
They are good for direction, but not perfect for exact Pantone matching on screen. Ask for thread codes or Pantone references if color matters to the brand.


