Beer Logo Patch Beanies Material Sample Guide: What Buyers Are Really Comparing
A beanie gets handled more than most taproom coasters. Someone picks it up from a merch shelf, stretches the cuff, rubs the patch with a thumb, checks the price tag, and decides in a few seconds whether the brewery looks worth wearing. That is why a beer Logo Patch Beanies material sample guide is not just a decoration checklist. It is a tactile brand test.
Buyers often start with the logo, which makes sense, but the better comparison is broader: knit body, patch substrate, attachment method, thread or print finish, backing, border, color behavior, and sample approval process. A clean digital mockup can hide a weak hand feel. A beautiful patch can fail on the wrong cuff height. A $2 unit-cost difference can separate a giveaway item from a $28 taproom retail piece.
Sampling works like a tasting flight. Nobody orders a flight for one abstract beer; they want side-by-side proof. Texture, weight, finish, balance, and aftertaste all matter. A buyer comparing woven, embroidered, leatherette, PVC, sublimated, and chenille patches is doing the same work with merchandise.
Breweries, beer festivals, bottle shops, distributors, and event teams ask for samples for practical reasons: logo detail, hand feel, wash behavior, color match, and perceived retail value. A festival beanie may need to survive rain, sweat, crushed storage bins, and several rounds of handling by volunteers. A brewery retail drop may need a softer knit, cleaner label presentation, and packaging that does not make the product feel like leftover promo stock. If the order is packed in corrugated cardboard cartons with kraft dividers or belly bands, even the pack-out can affect how staff perceive the merchandise before it reaches the shelf.
Buyer reality: a patch sample is not approved because it looks good alone. It is approved because it looks right on the beanie, at retail distance, under imperfect lighting, and after real handling.
The goal is not to pick the fanciest patch. The goal is to choose the material and construction that keep the brewery logo legible, durable, comfortable, and worth the price printed on the tag.
How Patch Materials Change the Look, Feel, and Durability of Brewery Beanies
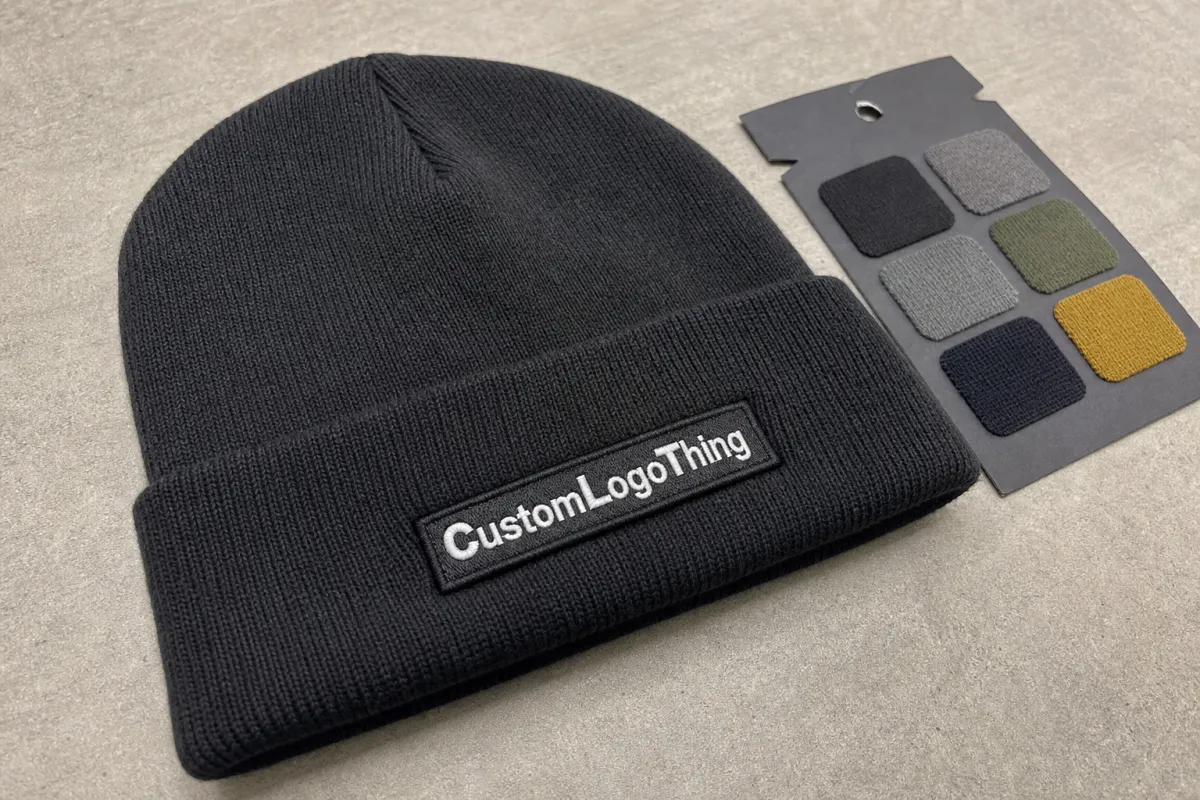
Patch material does more than carry artwork. It changes the read of the whole beanie. A woven badge says precise and retail-ready. A leatherette square feels warm and premium, especially for winter releases or barrel-aged branding. PVC suggests outdoor events, ski trips, fishing docks, rain jackets, and cooler weather. The same brewery logo can feel like three different brands depending on the patch.
Woven patches
Woven patches are often the safest first sample for small type, hop illustrations, badge-style marks, and crisp linework. The threads are woven into a flatter surface, so detail holds better than standard embroidery at compact sizes. If a brewery logo includes an established date, tiny town name, fine rays, thin barley stems, or a detailed crest, woven usually gives the artwork more room to survive translation.
The tradeoff is texture. Woven patches look clean and controlled, but they do not have the raised, old-school feel of embroidery. For many brewery logos, that is not a problem. A tight woven patch can make the beanie look more like a finished retail product than a basic giveaway.
Embroidered patches
Embroidered patches are the classic textured option. They work well for bold marks, block letters, heritage branding, simple icons, and taproom merchandise that benefits from visible thread. The surface has depth, and that depth is part of the appeal.
The same stitch buildup that creates dimension can also swallow fine detail. Very small lettering, thin can-art typography, and tight badge borders may fill in, especially below roughly 0.125 inch letter height. If the logo needs raised texture more than micro-detail, embroidery earns its place. If every word needs to be readable, sample carefully before approving bulk.
Leatherette and faux leather patches
Leatherette patches can make a beanie feel more expensive without using real leather. Most samples rely on debossing, laser engraving, or printed accents. The color range is narrower than woven or sublimated patches, often sitting in tan, brown, black, gray, and a few specialty tones.
Restraint helps here. A simple mark, usually about 2 to 2.75 inches wide, tends to work better than a crowded brewery badge on leatherette. Fine lines may engrave beautifully on a flat sample and still feel weak once the patch bends with the cuff. Ask whether the material is washable, how the edge behaves after flexing, and whether the attachment method is stitch-only, adhesive-assisted, or heat-applied.
PVC and rubber patches
PVC or rubber patches suit modern beer brands, outdoor festivals, ski-town breweries, fishing clubs, and winter events. They resist moisture better than many fabric options and carry bold color blocks well. Raised layers can make simple artwork feel dimensional without relying on thread.
Setup can cost more, especially if a custom mold is required. That cost is easier to justify on 300- to 500-piece runs or reorders where the same patch design will repeat. PVC can also feel heavier and less breathable than fabric patches, so it needs the right beanie body and patch size. Oversized rubber badges on soft rib knits often feel clunky.
Sublimated and chenille patches
Sublimated patches carry full-color artwork, gradients, and can-label graphics. They are flatter and less tactile, but they solve a real problem: color complexity. If a limited-release IPA uses six colors, a sunset gradient, or illustration-heavy can art, sublimation may preserve the artwork better than thread.
Chenille moves in the opposite direction. It is fuzzy, varsity-inspired, and dramatic. It works best for large letters or simple shapes, not small brewery seals. A chenille “B” or hop icon can look strong on a chunky cuff; a detailed circular logo will usually fight the material.
Knit compatibility matters as much as the patch. Acrylic beanies are common because they are cost-efficient, widely available, and hold shape. Recycled polyester blends can support sustainability goals if documentation is available. Wool blends feel warmer and more premium, but they raise cost and care questions. Rib knit stretches more. Waffle knit adds surface texture. Shallow-fit styles leave less real estate for a patch than cuffed beanies with 3 inches or more of fold height.
| Patch Material | Best For | Typical Strength | Watchout |
|---|---|---|---|
| Woven patch | Small type, crests, hop details | Crisp detail at compact sizes | Less raised texture than embroidery |
| Embroidered patch | Bold logos, heritage branding | Classic texture and dimension | Tiny letters can fill in |
| Leatherette patch | Premium winter retail drops | Warm, upscale look | Limited color and fine-detail range |
| PVC or rubber patch | Outdoor events, modern marks | Weather-resistant surface | Setup or mold charges may apply |
| Sublimated patch | Can art, gradients, full color | Strong color reproduction | Flat feel, less dimensional |
Key Specs to Check Before Approving a Beanie Patch Sample
A good sample review is boring in the best way. Measure it. Photograph it. Stretch it gently. Compare it under different light. Then decide. The sample guide that protects a buyer forces attention onto the specs most likely to cause disappointment later.
Start with patch size and placement. A 2.5-inch-wide patch can look balanced on a standard cuffed beanie, while the same patch may dominate a shallow-fit style. A 3-inch patch may suit a bold mountain brewery mark, but feel too heavy for a delicate script logo. Most beanie patches sit around 2 to 3 inches wide, though shape, logo density, and cuff height can shift that range.
Placement needs the same discipline. Check distance from the cuff edge, distance from side seams, and how the patch behaves after the cuff is folded. A patch set too low can look like it is sliding off the beanie. Too high, and it may disappear into the curve of the head. Too close to a seam, and production can look slightly crooked even if the patch was technically applied straight.
Edge finish changes perceived quality. Merrowed borders create a raised stitched rim, common on embroidered and woven patches. Laser-cut or heat-cut edges give cleaner lines for detailed shapes. A standard stitched border can frame a logo neatly without the bulk of a merrowed edge. Leatherette patches sometimes use a raw-look edge, which can look premium if the cut is clean and cheap if the material curls.
Color matching is more complicated than a Pantone number. Pantone references help, but color shifts on thread, rubber, leatherette, and knit surfaces. A warm cream thread can look yellow under amber bulbs. Black rubber may absorb detail. A red patch on a burgundy beanie can flatten into one dark block in social photos. Test contrast across real situations: across a bar, on a retail peg, in a festival crowd, and in a phone photo taken from 6 feet away.
- Patch dimensions: width, height, shape, and visible logo area.
- Cuff placement: center alignment, seam clearance, and fold height.
- Stitch density: clean fills without puckering or stiff buildup.
- Backing thickness: stable enough to hold shape, not so stiff that it fights the knit.
- Logo legibility: readable at 3 feet, 6 feet, and in a quick mobile photo.
Backing deserves more attention than it usually gets. A thin woven patch may need enough backing to stay flat on a stretchy cuff, but too much stiffness makes the beanie feel like it has a card sewn to the front. Leatherette and PVC patches can also resist the natural curve of the knit. If the patch edge lifts, pulls, or tents when the beanie is worn, the finished piece will look cheaper than the quote suggests.
Use a simple inspection method before approval. Photograph the sample flat. Photograph it on a head form. Photograph it under daylight. Photograph it under warm taproom lighting. That last one matters because amber bulbs can turn subtle thread colors muddy. If the beanie will ship through wholesale or e-commerce, also ask how it will be packed: polybag, recycled material, kraft paper band, or retail tag. If sustainability claims appear on packaging, check whether terms such as FSC certified, post-consumer waste, or biodegradable packaging are documented rather than decorative.
Process and Timeline: From Artwork File to Approved Beanie Sample
The production path is not mysterious, but it has more checkpoints than many first-time merch buyers expect. A typical custom beanie order moves from artwork review to logo cleanup, patch material recommendation, digital proof, physical pre-production sample, buyer approval, bulk production, quality control, and shipping. Skip too many of those steps, and the order becomes a gamble.
Digital proofs are useful. They confirm layout, approximate scale, patch shape, placement, and logo positioning. Physical samples answer different questions: does the patch feel right, does the knit distort, does the thread catch light, does the color look acceptable, and does the beanie feel like something a customer would pay for?
Timing depends on artwork readiness, material choice, approval speed, and whether custom components are involved. As a practical range, digital proofs can often be prepared in 1 to 3 business days after usable artwork is received. Physical samples commonly take 7 to 15 business days, sometimes longer for PVC molds, custom-dyed beanies, specialty yarns, or unusual patch shapes. Bulk production might run another 10 to 25 business days after approval, with shipping added after that. Those ranges are not guarantees, but they are safer than assuming every problem can be fixed in a week.
What slows the process? Low-resolution logos. Missing vector art. Unclear Pantone targets. Switching from cuffed acrylic to shallow recycled polyester after proofing. Oversized patches that need redesign. Late revisions from an owner who only sees the sample after everyone else has signed off. Most delays begin before production, not during stitching.
Build in review time if multiple people need to weigh in. Brewery owners may care about brand consistency. Merch managers may care about retail price. Taproom staff may care about what customers actually touch. Distributors may care about repeatability across locations. A 24-hour internal approval window sounds efficient until four stakeholders see four different risks.
Practical rule: rush orders can work, but fewer sample rounds mean fewer chances to catch the wrong patch size, stiff backing, weak color contrast, or poor logo translation.
For shipping durability, some buyers also ask about carton testing and pack-out. If beanies are going to retail partners, festival booths, or distributors, outer cartons should be strong enough for stacking and handling. The International Safe Transit Association publishes widely used package testing protocols, and while a beanie order does not need the same scrutiny as glass bottles, crushed cartons and moisture exposure still create real problems.
Cost, MOQ, and Quote Factors for Custom Beer Logo Beanies
Pricing has a formula, even when the quote looks simple: blank beanie cost plus patch production, attachment labor, setup fees, sample fees, packaging, shipping, and any rush charges. The visible patch is only one cost line. The less visible work around it often decides whether the order lands on budget.
As a broad buying range, basic custom beanies with a simple patch can sometimes land around $6 to $10 per unit at higher quantities. More premium knits, leatherette patches, PVC patches, retail tagging, or smaller runs can push into the $10 to $18-plus range. A short test run usually protects cash flow but carries a higher unit cost because setup is spread across fewer pieces. Larger runs reduce setup impact, but they also tie up more money and storage.
Patch material affects cost in different ways. Woven patches can be efficient for detail because the design is built into the weave. Embroidery can rise with stitch count, coverage, and thread changes. Leatherette depends on size, engraving method, and attachment labor. PVC may require mold or setup charges, especially for custom shapes or multiple raised layers. Sublimation can be attractive for complex color, but the patch base, border, and edge finish still matter.
MOQ, or minimum order quantity, is not always one number. Minimums may apply separately to the blank beanie style, beanie color, patch type, custom patch material, packaging, and reorder stock. A buyer might be able to order 144 beanies in one knit color, while a custom PVC patch may price better at 300 or 500 pieces. Ask where the minimum really sits before comparing suppliers.
| Quote Factor | Typical Buyer Detail to Provide | Why It Changes Price |
|---|---|---|
| Quantity | 144, 300, 500, or 1,000 pieces | Setup cost spreads across more units as volume rises |
| Beanie body | Acrylic cuffed, wool blend, recycled polyester, waffle knit | Yarn, construction, and availability vary widely |
| Patch material | Woven, embroidered, leatherette, PVC, sublimated | Each method has different setup, labor, and material cost |
| Logo complexity | Vector file, number of colors, small text, gradients | Detail affects stitch count, weaving, printing, or mold work |
| Packaging | Hang tag, belly band, recycled polybag, carton pack | Retail presentation and sustainability specs add cost |
| Delivery need | ZIP code and in-hands date | Freight method and rush scheduling can shift the quote |
The cheapest sample is not always the cheapest retail outcome. If a low-cost embroidered patch makes the brewery name hard to read, sell-through can suffer. If a better woven patch adds $0.60 per unit but helps the beanie retail for $4 more, the math changes quickly. From a packaging buyer’s point of view, this is similar to choosing between thin mailers and protective corrugated cardboard: the lower upfront cost can create hidden damage, returns, or brand drag.
A strong quote request for a beer Logo Patch Beanies material sample guide includes quantity, beanie style, preferred patch materials, logo file, target patch size, placement, packaging needs, delivery ZIP code, and required in-hands date. Send the same file and spec notes to every supplier if you are comparing quotes. Otherwise, the pricing may look competitive while the products being quoted are not the same.
Common Sampling Mistakes That Make Brewery Beanies Look Off
The most common mistake is approving artwork on a screen without checking how the logo behaves on a curved, stretchy cuff. A flat proof is polite. A worn beanie is honest.
Tiny text fails often. Established dates, hop veins, thin badge borders, and delicate can-label details can disappear when translated into embroidery or low-contrast thread. If the letter height is too small, the sample may technically reproduce the logo but still fail as merchandise. There is a difference.
Material mismatch is another quiet problem. A premium barrel-aged stout brand may look better with leatherette or a dark woven patch. A bright hazy IPA release may need sublimation or PVC to preserve energy and color. A lager brand with a clean wordmark might only need a tight woven label on a navy cuff. The sample should match the beer’s positioning, not just the logo file.
Do not overload the patch with can-label detail. A beanie is a moving billboard, not a full label panel. People see it from across a room, in a checkout line, on a trail, or in a photo where the patch takes up only a small part of the frame. One strong icon and a readable brewery name usually beat six tiny ingredients, a founding date, a city name, and a hop illustration fighting for space.
Placement errors create instant visual doubt. Patching too low on the cuff makes the beanie look unfinished. Patching too close to the seam creates alignment anxiety. Applying patches to knits that distort heavily during wear can make a rectangular badge look bowed or tilted. Ask for photos on an actual head form, not just a flat table.
Quality-control misses are less glamorous, but they matter: uneven stitching, puckering, weak adhesive backing, thread tails, color drift between sample and bulk order, inconsistent cuff fold height, and patches that shift a few millimeters across a run. For a 500-piece order, even a 4 percent defect rate means 20 beanies that need sorting, discounting, or replacing. That is real money.
Packaging can create its own misses. Over-compressed beanies packed too tightly may arrive with crushed cuffs or bent leatherette edges. Generic plastic bags can cheapen a premium retail drop. If the brand cares about recycled materials or post-consumer waste, align the packaging spec before production rather than after the beanies are finished.
Build a Sample Kit Before Ordering Bulk Beanies
The cleanest workflow is simple: choose two beanie bodies, shortlist three patch materials, set one target patch size, and request samples using the same logo file. That keeps the comparison controlled. If everything changes at once, nobody can tell whether the winning sample worked because of the patch, the knit, the color, or the logo adjustment.
For most brewery buyers, it helps to compare one conservative option and one bolder option. Example: a woven badge patch on a black cuffed acrylic beanie versus a debossed leatherette patch on a heather charcoal wool blend. Or a sublimated can-art patch against a PVC badge for an outdoor festival release. The point is contrast with purpose, not random variety.
Create a comparison grid before opinions take over. Score each sample from 1 to 5 for logo clarity, hand feel, perceived retail price, durability, color accuracy, delivery timing, and unit cost. Then hand the samples to the people who will sell or wear them: bartenders, merch managers, festival staff, mug club members, and wholesale partners. A buyer at a desk may love a subtle tone-on-tone patch. A bartender under warm lighting may tell you nobody can read it.
- Pick two beanie bodies with different fits or yarns.
- Select three patch materials that match the brand and budget.
- Use one approved vector logo file for every sample.
- Set one target patch size, such as 2.5 inches wide, before testing variations.
- Photograph each sample flat, worn, under daylight, and under taproom lighting.
- Save the approved proof, sample, spec sheet, and packaging notes for reorders.
Reorder discipline is underrated. Save the approved sample in a labeled bag or box. Keep the proof, Pantone notes, patch size, backing type, edge finish, beanie SKU, thread references, and carton spec. If a reorder happens six months later, those details prevent the next batch from being rebuilt from memory.
A beer Logo Patch Beanies material sample guide should turn a subjective merch decision into a controlled comparison of fabric, finish, cost, and timeline. Better samples reduce guesswork, protect brand presentation, and help a brewery order beanies that people actually want to buy, wear, and keep.
FAQ
What should be included in a beer logo patch beanies material sample guide?
A beer Logo Patch Beanies material sample guide should include beanie fabric options, patch material swatches, decoration methods, patch size recommendations, edge finishes, backing types, color references, pricing notes, MOQ details, and estimated production timing. The strongest versions show actual samples on cuffed beanies, not just loose patches.
Which patch material is best for detailed brewery logos on beanies?
Woven patches are usually strongest for small text, fine linework, and detailed badge-style brewery logos. Sublimated patches work well for full-color can-art graphics, gradients, and limited-release artwork. Embroidered patches are better for bold, simple logos where raised texture matters more than tiny detail.
How long does it take to sample custom beer logo patch beanies?
Digital proofs often take 1 to 3 business days after usable artwork is supplied. Physical samples commonly take 7 to 15 business days, with longer timelines for PVC molds, leatherette testing, specialty yarns, custom colors, or unusual patch shapes. Bulk production is usually scheduled only after sample approval.
How much do custom beer logo patch beanies cost?
Cost depends on blank beanie quality, patch material, logo complexity, patch size, order quantity, setup fees, sample fees, packaging, shipping, and rush production. Basic larger-quantity orders may land around $6 to $10 per unit, while premium knits, specialty patches, retail packaging, and smaller runs can move into the $10 to $18-plus range.
Can I use the same beer logo patch sample for multiple beanie styles?
Sometimes, but test placement on each beanie style before approving bulk production. Cuff height, knit stretch, seam position, yarn thickness, and beanie depth can change how the same patch looks when worn. A patch that works on a tall cuffed acrylic beanie may feel oversized on a shallow-fit rib knit.


