Branded Water Bottle Labels: Buyer’s Guide to Quotes
Branded Water Bottle Labels are easy to approve and easy to get wrong. A mockup can look clean while the finished label fails in the real world because of condensation, curved bottle panels, or the wrong adhesive. The buyer’s job is to match the label to the container and the conditions it will actually face.
That means deciding early whether the bottles will be chilled, handled repeatedly, displayed briefly, or used in a retail setting. Those use cases change the material, finish, and quote. A label for a short event handout is not the same spec as a label that needs to survive coolers and constant handling.
Most problems come from guessing. The label panel is measured from a photo instead of the bottle itself. The adhesive is chosen for price instead of temperature. The size is approved before anyone checks the curve of the container. Fix those inputs first and the quote becomes easier to compare.
Why Labels Fail When The Design Is Fine
Design is usually the last thing to fail. The label may look right on screen and still lift, wrinkle, or scuff once it touches a cold bottle. Condensation is the main issue, followed by handling, cooler contact, and rough application.
A dry bottle on a table can hide a lot of weaknesses. Put the same bottle in ice, refrigeration, or a busy service area and the spec changes fast. The adhesive has to bond to a slick surface. The stock has to resist moisture. The finish has to protect the print if people keep touching it.
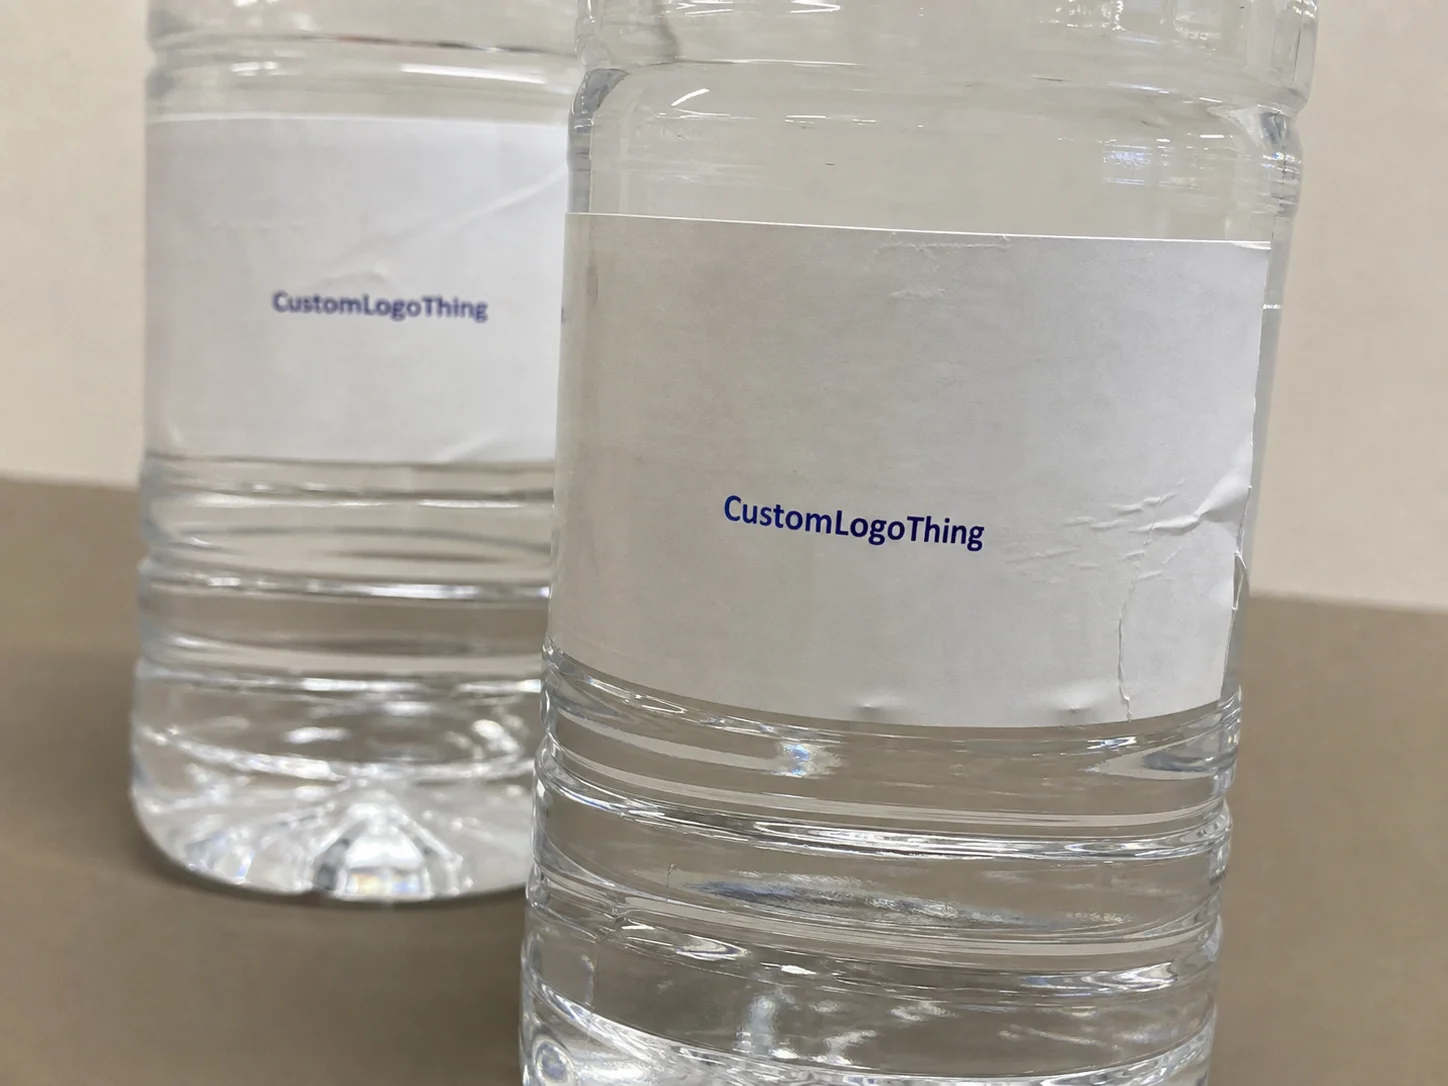
Clear bottles and light-colored beverages expose flaws faster than opaque containers. A label that is slightly crooked, too narrow, or poorly cut reads as a production error, not a design choice. Measuring the actual label panel matters more than estimating the full bottle height.
Use case drives the spec. A promo bottle handed out and consumed quickly has different requirements from a hospitality bottle in a cooler bucket or a retail bottle on display. If the quote ignores those differences, it is being built on assumptions.
For buyers who need a process check, look for suppliers who can speak in terms of adhesion, rub resistance, moisture behavior, and bottle compatibility. Standards and certifications only help when they connect to the real production method. ISTA is useful when label performance is part of a shipped kit or packaged set. FSC is relevant if sourcing requirements call for responsible paper stocks. Neither one replaces a proper label test.
How Water Bottle Labels Are Printed, Cut, and Applied
The workflow is straightforward: artwork review, print, finish, cut or die-cut, then pack for application. Each step affects the final result, especially when the label needs to fit a specific bottle shape or application method.
Most orders fall into three formats. Pressure-sensitive labels are the standard because they are fast to apply and easy to customize. Wrap labels cover more of the bottle and create a stronger branded presence. Sleeve-style formats can work for certain shapes, but they are not automatically the best choice just because they look different. The format should fit the container, the budget, and the application method.
Application method matters. Hand application is simple but depends on consistency. Automated application is faster for larger runs, but it usually requires tighter size tolerance and more consistent bottle geometry. If labels will be applied on a bottling line, in a fulfillment center, or in event prep, that needs to be clear before pricing starts.
Proofing is where avoidable errors get caught. A PDF proof is not enough on its own. Confirm the bottle dimensions, the label panel, and the actual curve of the container. Taper, shoulder shape, and ribbing can change how the adhesive lays down.
The most useful test is a label on the actual bottle under the actual conditions. Chilled if chilled, wet if wet, handled if handled. A design that looks correct on a monitor can still fail on the bottle.
“The artwork was fine. The bottle spec was not.” That sentence appears a lot after the order ships. It is also a very expensive sentence.
Water Bottle Label Cost, MOQ, and Quote Drivers
Pricing usually comes down to six variables: material, adhesive, finish, size, quantity, and shape complexity. Larger labels use more substrate and ink. Special finishes add handling. Odd shapes create more waste. Cold-resistant materials cost more than plain paper stock.
Minimum order quantity matters because setup is not free. A 500-piece order and a 5,000-piece order may use the same artwork, but the fixed cost gets spread very differently. That is why small runs often look expensive per label even when the print itself is simple. Ask for the breakdown if the quote is vague.
Here is a practical comparison buyers can use when evaluating common options:
| Label Type | Typical Use | Relative Cost | What It Does Well | Main Tradeoff |
|---|---|---|---|---|
| Paper pressure-sensitive | Dry or short-duration indoor use | Lowest | Simple branding and lower upfront cost | Weak performance in condensation |
| Film/BOPP pressure-sensitive | Chilled bottles, handling, light moisture | Mid-range | Better moisture resistance and cleaner wear | Costs more than paper stock |
| Premium film with lamination | High-touch events, coolers, longer display time | Higher | Scratch resistance and better presentation | More setup and a higher unit price |
| Specialty shape or sleeve-style option | Distinctive branding or nonstandard containers | Highest | Strong visual impact | Tighter tolerances and more production risk |
Useful pricing ranges, as a starting point: a short promotional run can land around $0.18 to $0.45 per label depending on size, stock, and finish. Larger simple runs can fall below that once setup is spread out. Custom die charges or extra setup fees often add $75 to $250, and specialty shapes can push higher.
To get a useful quote, send the details that change the job: bottle size, label dimensions, quantity, finish preference, storage conditions, and whether the bottles will be chilled, handled repeatedly, or used briefly. A photo of the bottle with a ruler next to the label panel helps more than another round of guesswork.
Compare like with like. A glossy paper label is not the same product as a cold-resistant film with a protective coating. If the headline price is lower but the stock, adhesive, or finish is wrong for the job, the order is not cheaper.
Materials, Adhesives, and Finishes That Survive Cold Bottles
Paper can work in dry conditions. Once cold storage enters the picture, film is usually the safer choice. BOPP and similar polypropylene films resist water better and hold their shape in chilled environments.
Adhesive choice matters just as much as the face stock. A removable adhesive may be fine for a short event, but it can struggle once condensation builds. A permanent adhesive gives stronger grip, though it may leave residue on removal. That tradeoff is normal; the wrong adhesive choice is where most early failures start.
Finish affects both appearance and protection. Gloss gives a brighter, more polished look. Matte feels quieter and can hide small scuffs better. Lamination or a protective coating improves scratch resistance and helps the print survive rough handling. If the bottle is going into a busy service area, the added protection often pays for itself by keeping the brand readable.
Surface texture and bottle geometry complicate the job. A smooth cylindrical bottle is easier to label than one with a strong taper, shoulder, or ribbed grip section. Curves that look minor on a drawing can create edge lift, bridging, or slight twist during application. That is why mockups are not enough.
For sourcing, FSC-certified paper can be useful if sustainability requirements are part of the brief. Just do not confuse certification with performance. A responsible paper stock still needs the correct adhesive system if it is expected to survive condensation.
Production Steps and Turnaround: What the Timeline Looks Like
A normal order moves through quote, artwork review, proofing, production, finishing, packing, and shipping. If the brief is clean and approvals come back quickly, the timeline stays tight. If the spec is unclear, the schedule stretches.
The most common delays are missing dielines, low-resolution artwork, unclear measurements, and last-minute text changes. Each one is fixable. Together, they turn a normal job into a rushed one.
For a straightforward label run, standard turnaround is often about 12 to 15 business days after proof approval. Custom shapes, premium finishes, and larger quantities can push that longer. Rush service can shorten the timeline, but only if the files are clean and approvals are fast.
If the labels will be shipped on rolls, core size, winding direction, and outer diameter matter. If they will be shipped in sheets, sheet size and stack count matter. Those details seem minor until they interfere with application on the line.
Plan for at least one proof review and a realistic shipping window. If the event date depends on the labels arriving on time, build the schedule around approval time, transit time, and one revision if needed.
If you want to see how different constructions map to different use cases, the Case Studies page is useful. For more format options, the Custom Labels & Tags page shows how label construction changes across applications.
Common Mistakes That Make Labels Look Cheap or Fail Early
Guessing the size is the first mistake. Someone measures loosely, adds a margin because it “should be fine,” and the final label either looks undersized or overlaps the seam badly. Measure the actual label panel, then check where the bottle curves near the shoulder and base.
The second mistake is choosing adhesive based on price alone. Cheap adhesive on a chilled bottle is a false economy. Curl, slip, and residue are all predictable outcomes when the adhesive system does not match the use case.
The third mistake is approving the proof on a screen and assuming the bottle will behave the same way. It will not. Screen proofs do not show curvature issues, edge lift, or how the label looks under cold lighting. If the branding needs to line up precisely, ask for a scaled proof or a sample on the actual container.
Underordering creates a different problem. If the campaign goes better than expected, a second run may not arrive in time. Overordering ties up budget in stock that may not fit the next promotion. A sensible quantity includes test units, a small production buffer, and an allowance for spoilage or mismatch.
Vague specs create reprints. Reprints create delays. Delays create awkward emails. The clearer the brief, the cleaner the quote, and the fewer corrections anyone has to make later.
Ask direct questions about cold performance. If the supplier cannot explain how the label behaves on a wet bottle, that is a warning sign. If they can, ask how they verified it. Peel adhesion, rub resistance, and moisture handling should be discussed in practical terms.
Next Steps for Ordering Labels Without Guesswork
Start with the bottle itself. Measure the panel, confirm the curve, and decide whether the bottles will be chilled, iced, stored at room temperature, or moved through a service line. That one decision changes the stock, adhesive, and finish recommendation more than the artwork does.
Then ask for a proof and, if possible, a test on the actual bottle. A small sample run costs far less than a full reprint and tells you whether the label lifts, curls, scuffs, or shifts in the conditions that matter.
Do not compare quotes only by the bottom line. Check the material, adhesive, finish, quantity break, shipping format, and turnaround terms. A lower quote that uses the wrong stock or excludes setup is not a bargain.
If the order is still uncertain, buy a test run first. That keeps risk under control and gives you something real to evaluate before committing to a larger quantity. Once the bottle spec is confirmed and the label survives the actual conditions, scaling the order becomes a procurement decision instead of a gamble.
Keep the brief tight, the measurements exact, and the expectations realistic. That is how the labels stay attached, stay legible, and stay within budget.
What material works best for water bottle labels?
Film-based labels usually perform better than paper when bottles are cold or exposed to condensation. Paper can work for dry, short-duration use, but film is the safer choice for chilled storage, cooler buckets, and repeated handling.
Do water bottle labels stay on when the bottle gets wet?
They can, if the adhesive and stock are selected for moisture and cold storage. A standard label may start to curl or slip once condensation forms. The safest approach is to test the exact bottle and finish before placing the full order.
How many labels should I order?
Order slightly above the exact bottle count so you have room for test units, spoilage, and last-minute replacements. A small buffer is usually smarter than running short during an event.
What do I need for a quote?
Provide bottle dimensions, label size, quantity, material preference, finish, and the environment the bottles will be used in. Mention whether the bottles will be chilled, handled heavily, or used for retail display.
How long does production take?
Simple orders often take about 12 to 15 business days after proof approval. Custom shapes, premium finishes, and larger runs can take longer. Rush jobs are possible, but they still depend on clean files and quick approvals.