Custom Beanies With Logo Patches usually look cleaner than direct embroidery on rib knit because the patch gives the logo a flatter, more controlled surface. That matters on a stretchy cuff, where the fabric shifts and small details can lose clarity fast.
They are common for staff uniforms, retail merch, winter promotions, event kits, and premium giveaways because the build is simple to spec and easy to judge at a glance. The beanie body, patch material, and attachment method all affect wear, cost, and how the finished hat photographs. In many programs, the most practical starting spec is a 100% acrylic cuffed beanie with a 2.0 to 2.5 inch patch, a single front placement, and a 100 to 250 piece MOQ.
What custom beanies with logo patches are
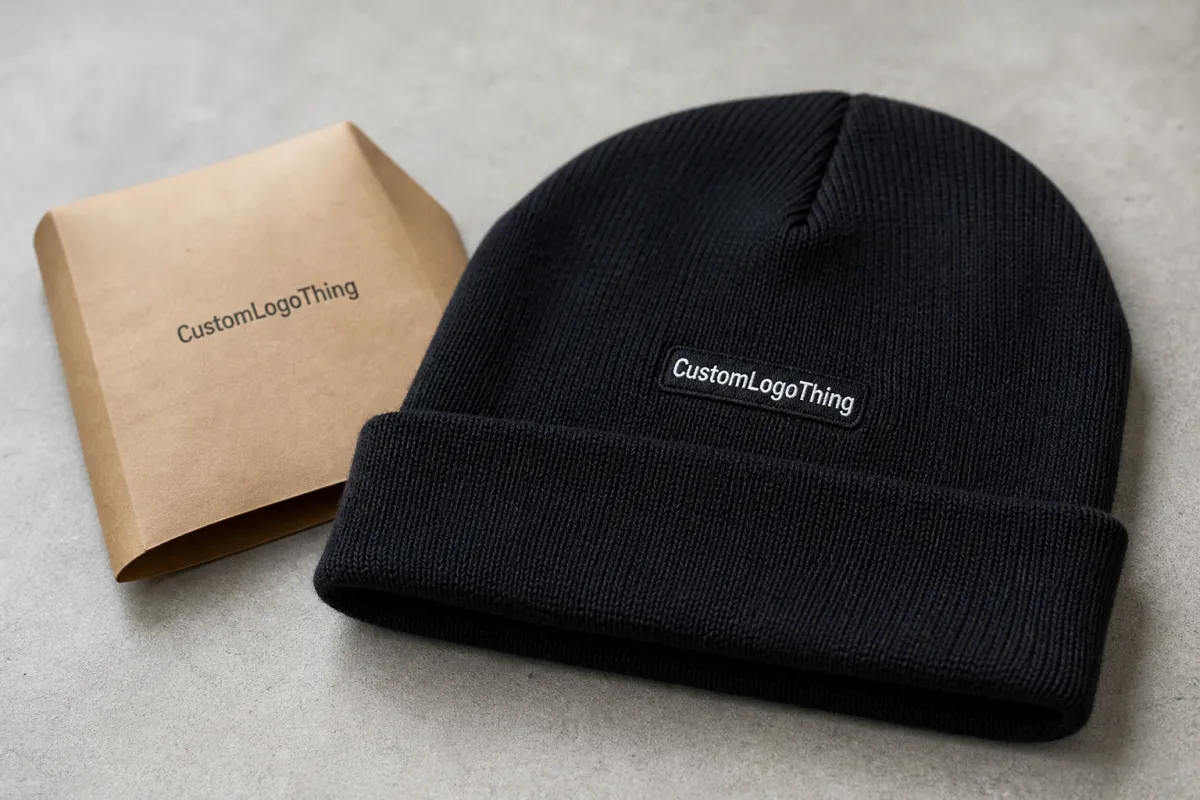
At the simplest level, this product is a knit beanie with a separate logo patch attached to the front, side, or cuff. The patch can be sewn on, heat-applied, or fixed with a combination of methods. Because the patch has its own face, it keeps the logo readable without relying on the stretch and texture of the knit.
Patch material changes the look and the use case. Woven patches handle fine detail well and stay flat. Faux leather looks polished and understated. PVC or rubber reads bold and modern. Embroidered patches add texture and feel more traditional. None is universally best; each one shifts the tone and the price. A woven patch usually supports smaller type down to about 5 to 6 pt equivalent if the weave is tight enough, while PVC works better when the logo has thick shapes and limited fine text.
A patch gives the logo a stable face. On a stretchy beanie, that is often the difference between sharp and sloppy.
That difference matters beyond appearance. A flat woven patch on a cuffed acrylic beanie feels different from a thick molded PVC badge on a chunky rib knit. The same category of hat can read as retail-grade merch, practical staff apparel, or a basic giveaway depending on the materials and finish. If the product needs to feel more premium, a finer gauge knit, tighter stitch density, and a matte faux leather or woven patch often make the biggest difference.
If the logo depends on small internal details, judge the product by the actual construction, not just the mockup. Ask for the patch width and height in millimeters, the minimum line thickness, and the attachment method before approving the proof.
How the patch application process works
The build starts with the beanie body, but the logo should be sized for the patch, not the other way around. A cuffed beanie gives the cleanest front placement. Slouch styles can work too, but the logo area is less predictable because the hat drapes and shifts. Most front placements land between 45 and 60 mm tall for a standard cuffed adult beanie, with a patch width of about 50 to 70 mm depending on the artwork.
Artwork setup is where many orders go off the rails. Good suppliers convert the logo into vector art, check the smallest readable detail, and then match the art to the decoration method. Woven patches need line clarity. Embroidered patches need thread-friendly shapes. PVC needs strong outlines and limited micro-detail. If the logo has tiny type, thin strokes, or gradients, the proof stage is where those issues should be caught. For color control, ask for Pantone matching or at least a printed color reference, and confirm whether the patch is dyed, thread-matched, or printed.
- Select the beanie body. Pick a cuffed, slouch, rib knit, waffle knit, or fleece-lined style that supports the patch size and use case.
- Prepare the artwork. Send vector files if possible, plus Pantone or standard color references when color matching matters.
- Choose the patch format. Woven, faux leather, PVC, embroidered, or felt each changes detail, cost, and finish.
- Confirm placement. Center front on the cuff is easiest to read, but side placement can feel more fashion-driven.
- Review the proof. Check scale, edge thickness, spelling, logo spacing, and how the patch sits against the knit.
- Approve QC standards. Ask how the supplier checks alignment, attachment strength, and finished appearance before packing.
Sewing gives the strongest mechanical hold. Heat bonding gives a flatter look. For most real-world use, especially staff programs and outdoor wear, a combination of methods is safer. A patch that peels after a few wears is not a design choice; it is a production failure. In practice, many factories use a hot-melt adhesive backing plus perimeter sewing, with heat-press settings around 160 to 180 C for 10 to 15 seconds depending on patch material.
Placement also affects the finished feel. Too low and the logo disappears into the fold. Too close to a seam and the patch can warp. Too large and the front of the beanie gets stiff. These are small choices, but they decide whether the hat looks intentional or rushed. Before bulk production, a pre-production sample should confirm centering, patch angle, and the way the cuff springs back after wear.
Production timeline and turnaround expectations
A normal order moves through artwork approval, patch or sample prep, production, finishing, inspection, and shipping. For a straightforward run, proofing often takes 1 to 3 business days. Production commonly falls in the 10 to 18 business day range after approval, with many standard orders landing around 18 to 22 business days door-to-door when sample signoff, packing, and export transit are included. Reorders can move faster if the spec is already locked and the materials are in stock.
That timeline changes with patch type, order size, season, and how fast the buyer responds. A 200-piece run with a simple woven patch is not the same as a 2,500-piece order with a custom PVC badge, special yarn dyeing, and retail packaging. Winter is also the busiest time for this category. If the beanies need custom yarns, color lab dips can add 3 to 5 business days, and custom patch mold creation can add 5 to 10 business days before sewing starts.
Late changes are the biggest schedule killer. Artwork edits after proof approval, color changes after materials are ordered, or vague placement instructions can add days quickly. If the hats need to hit a holiday, event, or retail drop, build margin into the schedule instead of assuming production can absorb changes without delay. A practical planning window for a first-time order is 4 to 6 weeks from initial artwork to receipt if samples are involved.
Pricing factors, MOQ, and quote basics
A useful quote should show the beanie body, patch material, attachment method, quantity breakpoints, setup charges, sample cost, and freight. If the quote only gives one number, there is probably something hidden in it. Ask whether the price includes one decoration location, polybag packaging, size labels, and carton packing, because those details can move the final landed cost more than the patch itself.
The biggest cost drivers are the blank beanie quality, patch construction, decoration complexity, and total quantity. MOQ matters because setup cost gets spread across fewer units on smaller runs, which pushes the per-piece price up. A first run often starts around 100 to 250 pieces, though lower quantities can happen with higher pricing. For patch-only sampling, some suppliers will do 1 to 3 prototype samples at $35 to $120 per style, then credit part of that cost back on bulk orders.
| Patch style | Look and feel | Typical add-on at 500 pcs | Best use |
|---|---|---|---|
| Woven | Flat, crisp, detail-friendly | About $0.25 to $0.60 per unit | Small text, fine lines, retail-ready logos |
| Faux leather | Clean, premium, understated | About $0.35 to $0.80 per unit | Lifestyle brands, staff apparel, premium merch |
| PVC or rubber | Bold, dimensional, modern | About $0.40 to $0.90 per unit | High-contrast logos, outdoor programs, sport use |
| Embroidered patch | Textured, familiar, classic | About $0.20 to $0.55 per unit | Traditional branding, softer visual finish |
For the full finished beanie, many programs land roughly in the $2.50 to $6.50 range per unit at moderate volume, before freight and packaging. At 500 MOQ, a basic acrylic beanie with a small woven patch often falls around $2.50 to $4.00 per unit, while a heavier knit with a molded PVC badge can move closer to $4.50 to $7.00 per unit. That range moves quickly with body weight, patch type, and attachment method.
There are practical ways to control cost without making the item look stripped down. Use one patch location. Keep the patch shape simple. Standardize the beanie color if the campaign allows it. Compare quotes spec for spec; a lower number that hides a thinner body or weaker attachment method is not actually a better value. Also confirm whether the beanie yarn or trims carry relevant certifications such as OEKO-TEX Standard 100 for skin-contact safety, GRS for recycled content, or GOTS if you are specifying organic cotton blends.
Choosing the right beanie body and patch material
The beanie body does more work than many buyers expect. A cuffed beanie gives the cleanest logo real estate. Slouch styles look relaxed, but the logo can sit in a less controlled zone. Waffle knits feel more textured. Fleece-lined styles add warmth but also add bulk. Those choices affect how the patch sits and how the hat wears after a full day.
Acrylic is the most common body material because it is cost-effective, easy to knit at scale, and available in many colors. Cotton blends feel softer and more natural. Wool blends bring warmth and a heavier hand, but they usually need more careful handling and clearer care instructions. If the order is for a winter promo with volume and consistency, acrylic is often the practical answer. If the item is meant to feel like a premium accessory, the body choice deserves more attention. For organic cotton programs, ask for GOTS documentation; for recycled polyester blends, ask for GRS chain-of-custody paperwork; and for general finished-goods safety, ask for OEKO-TEX Standard 100 on the yarns or trims used in the hat.
Patch choice should follow the same logic. Woven patches are a strong fit for small logos with text, because the weave can preserve sharper edges than embroidery at a similar size. Faux leather works well when the brand wants a quieter, more elevated look. PVC is useful when the design needs dimension or outdoor durability. Felt can be a good middle ground when the goal is a softer hand and a vintage feel, though it can fuzz sooner than woven or faux leather in heavy use.
Construction details matter as much as the material. A 12-gauge knit will usually look smoother and more retail-friendly than a looser 7-gauge knit. A tighter rib cuff helps the patch sit flatter. If the order needs more structure, ask for a double-layer cuff or a sewn-in woven label on the inside for branding and size information. If the factory is claiming quality systems, WRAP or BSCI certification is a practical sign that labor and process controls are in place, though it should still be paired with product-specific inspection requirements.
Step-by-step ordering guide for a clean first run
The cleanest orders move in a predictable sequence. Do not jump straight from a logo file to bulk production. The best results usually come from a short approval chain that includes material confirmation, a sample, and a final inspection plan.
- Define the spec. Confirm beanie style, yarn content, patch type, patch size, placement, quantity, target ship date, and packaging.
- Request a quote. Ask for unit price at 100, 250, 500, and 1,000 pieces, plus sample cost, setup fees, and freight estimates.
- Submit artwork. Send vector files, PMS colors, and a short note about minimum text size or any must-keep details.
- Review the digital proof. Check dimensions, spelling, placement, stitch direction, patch edge style, and color callouts.
- Approve a sample. For a new style, ask for a pre-production sample or photo sample, then confirm handfeel, size, and attachment strength.
- Lock QC checkpoints. Confirm in-line checks for color, size, patch alignment, seam integrity, and final packing count.
- Approve production. Once the sample is approved, keep changes to zero unless there is a critical issue.
- Inspect before shipment. Verify random samples for loose threads, crooked patches, stains, yarn defects, and size consistency.
For first runs, ask for a development sample, then a photo or pre-production sample if the artwork is complex. A useful sample review should check patch dimensions to within 1 to 2 mm, logo centering to within about 3 mm on the cuff, and color against the approved reference under daylight or a neutral LED light. If possible, request a pull test on the patch attachment and a wash or rub check if the beanies will see frequent wear.
Inspection should happen in layers. First, inspect incoming yarn or blank bodies for shade variation, missing stitches, and fiber defects. Next, check patch production for cut accuracy, print clarity, and backing consistency. During final assembly, confirm patch placement, edge flatness, stitch count, and thread trimming. Before packing, verify size labels, carton counts, and whether any dust, oil marks, or adhesive residue remain visible on the finished goods.
Common mistakes that weaken fit, finish, or value
One common mistake is choosing the patch before choosing the beanie body. The beanie needs to support the patch visually and physically. A thick molded PVC patch can overpower a loose, soft knit, while a very delicate woven patch can disappear on a chunky rib.
Another mistake is under-sizing the logo. Buyers often want to preserve every detail, but too much information on a patch makes the piece harder to read. If the logo has more than one line of small text, consider simplifying it for the hat version. A clearer 1-color mark often outperforms a compressed full-detail version.
Placement errors are also common. A patch that sits too close to the seam can wrinkle. A patch placed too low on the cuff can fold out of sight. A patch that is too wide for the cuff can distort the knit. The fix is simple: approve exact measurements before production, not just a mockup image.
Some buyers also skip the sample stage to save a few days. That usually costs more later. Even a $35 to $120 sample is cheaper than reworking 500 finished beanies because the patch color is off, the cuff size is wrong, or the logo looks too small in real life.
Finally, do not ignore compliance and labeling. If the hats are going to retail, the inside label, fiber content, country-of-origin marking, and care instructions need to be correct. If sustainability claims matter, ask for proof that the factory can support the claim with GOTS, GRS, or OEKO-TEX Standard 100 documentation rather than relying on a verbal promise.
Expert tips before you place the next order
Start with the use case, not the decoration. A staff beanie worn every day needs different construction than a one-time event giveaway. For daily wear, prioritize a comfortable cuff, secure attachment, and a body that holds shape after repeated use.
Keep the decoration spec simple if speed matters. One patch, one location, one colorway for the body often gets the cleanest result. If you need more visual interest, use the patch shape or material instead of adding extra decoration steps.
Ask for the production method in plain language. For example: 12-gauge machine knit, cut-and-sew patch, heat press plus perimeter stitching, and final needle check before packing. That kind of detail makes it easier to compare suppliers on the same basis.
Build in inspection language before you approve anything. A good order should define acceptable patch tilt, acceptable yarn shade variation, loose-thread tolerance, and whether a final random inspection follows AQL 2.5 or another agreed standard. If the supplier cannot explain the inspection checkpoints, the order is not fully under control yet.
If you are choosing between materials, default to the one that best matches the logo complexity. Woven for detail, faux leather for a clean premium look, PVC for bold branding, embroidered for a softer classic finish. Matching the logo to the material is the fastest way to avoid a compromised result.
FAQ
What is the usual MOQ for custom beanies with logo patches?
Many suppliers start at 100 to 250 pieces. At 500 pieces, pricing usually becomes much more efficient because setup costs are spread across a larger run.
How long does production usually take?
A normal timeline is 1 to 3 business days for proofing and 10 to 18 business days for production after approval. With sampling, packaging, and shipping included, 18 to 22 business days is a realistic planning window for a straightforward order.
Which patch material is best for small text?
Woven patches usually handle small text best because they stay flat and can preserve cleaner edges than embroidery or molded PVC at small sizes.
What certifications should I ask for?
Use GOTS for organic cotton, GRS for recycled content, OEKO-TEX Standard 100 for finished-goods or yarn safety claims, and WRAP or BSCI if you want factory-level social compliance documentation.
What should I check in a sample?
Check patch size, centering, color, edge finish, thread trimming, label accuracy, and attachment strength. If the beanie will be worn hard, ask for a pull test and a simple wash or rub check before bulk approval.
Can the patch be both sewn and heat-applied?
Yes. A dual-method attachment is common because heat gives a flat bond while stitching adds mechanical security. That combination is especially useful for staff apparel and outdoor use.

