Buyer Fit Snapshot
| Best fit | Custom Bottle Dividers for Boxes projects where brand print, material claims, artwork control, MOQ, and repeat-order consistency need to be specified before quoting. |
|---|---|
| Quote inputs | Share finished size, material target, print colors, finish, packing count, annual reorder estimate, ship-to region, and any compliance wording. |
| Proofing check | Approve dieline scale, logo placement, barcode or warning zones, color tolerance, closure strength, and carton packing before bulk production. |
| Main risk | Vague material claims, crowded artwork, missing packing details, or unclear freight terms can make a low unit price expensive after revisions. |
Fast answer: Custom Bottle Dividers for Boxes: Design, Cost, and Fit should be specified like a repeatable production item. The safest quote records material, print method, finish, artwork proof, packing count, and reorder notes in one written spec.
Production checks before approval
Compare the actual filled-product size with the drawing, then confirm tolerance on folds, seals, hang holes, label areas, and retail display edges. Reserve space for logos, QR codes, warning copy, and material claims before decorative graphics fill the panel.
Quote comparison points
Review material grade, print process, finish, sampling route, tooling charges, carton quantity, and freight assumptions side by side. A quote is only useful when the supplier can repeat the same color, closure quality, and packing count on the next order.
Custom bottle dividers for boxes can look insignificant on a packing table, then become the part that decides whether a shipment arrives intact or becomes a return. A carton may be the correct size and still fail if the bottles can tip, touch, or transfer shock to one another during transit. In distribution, small gaps are rarely small for long.
The divider is not just a separator. It affects breakage risk, packing speed, label wear, carton strength, and the total cost of getting a bottle from warehouse to customer. Brands shipping wine, spirits, sauces, oils, premium beverages, or sample kits often discover that the insert is carrying more of the protection plan than they expected.
For teams building product packaging that has to survive real handling, the insert should be treated as part of the full system, not as an accessory added after the carton is chosen. Buyers comparing custom printed boxes, inner partitions, and other Custom Packaging Products usually get better results once the divider is planned alongside the outer structure. That is where packaging design starts to reflect distribution reality instead of only shelf appearance.
Custom Bottle Dividers for Boxes: A Small Part That Prevents Big Damage
A bottle seldom breaks because the carton itself gave out first. More often, the failure begins inside the box, where there is enough room for movement, impact, and rubbing. One bottle shifts into another, or a shoulder presses against a divider wall, and the repeated contact starts the damage. Custom bottle dividers for boxes are designed to interrupt that sequence before it becomes a claim.
Movement is the real enemy. A carton flexes on a conveyor, a pallet settles under load, or a parcel takes a drop at the wrong angle. The bottle may only move a few millimeters, but those few millimeters can be enough to scuff a label, loosen a closure, or put stress into the neck and shoulder. A well-fitted insert keeps that movement small enough that the outer carton can do its job.
Glass bottles take the hardest hit, but they are not the only products that benefit from partitioning. Coated finishes can rub. Metal closures can loosen under vibration. Tall bottles can lean and concentrate force at the shoulder. Even a thick base cannot protect a package that is rattling through a route with repeated shocks. The divider is a simple part, but it changes the outcome in a measurable way.
There is also a labor side to it. A divider that drops into place cleanly can make pack-out faster and more repeatable across shifts. That matters in warehouses where one crew may build the pack in the morning and another in the afternoon. Good retail packaging has to be attractive, but it also has to behave consistently on the line and stay economical through distribution.
The central question is not whether a divider exists. It is whether the divider matches the bottle, the carton, and the shipping environment. That is where custom work earns its value.
A divider that fits the bottle but ignores the route is only half a solution. Protection comes from the bottle, the insert, and the carton acting as one package system.
Wine shipper boxes, liquor gift packs, olive oil cartons, sauce sets, cold brew multi-packs, and branded sample kits all depend on the same basic principle: stop bottle-to-bottle contact before it starts. The outer box matters, but the inner partition layout often decides whether the package stays intact.
How Custom Bottle Dividers for Boxes Work Inside the Ship Carton
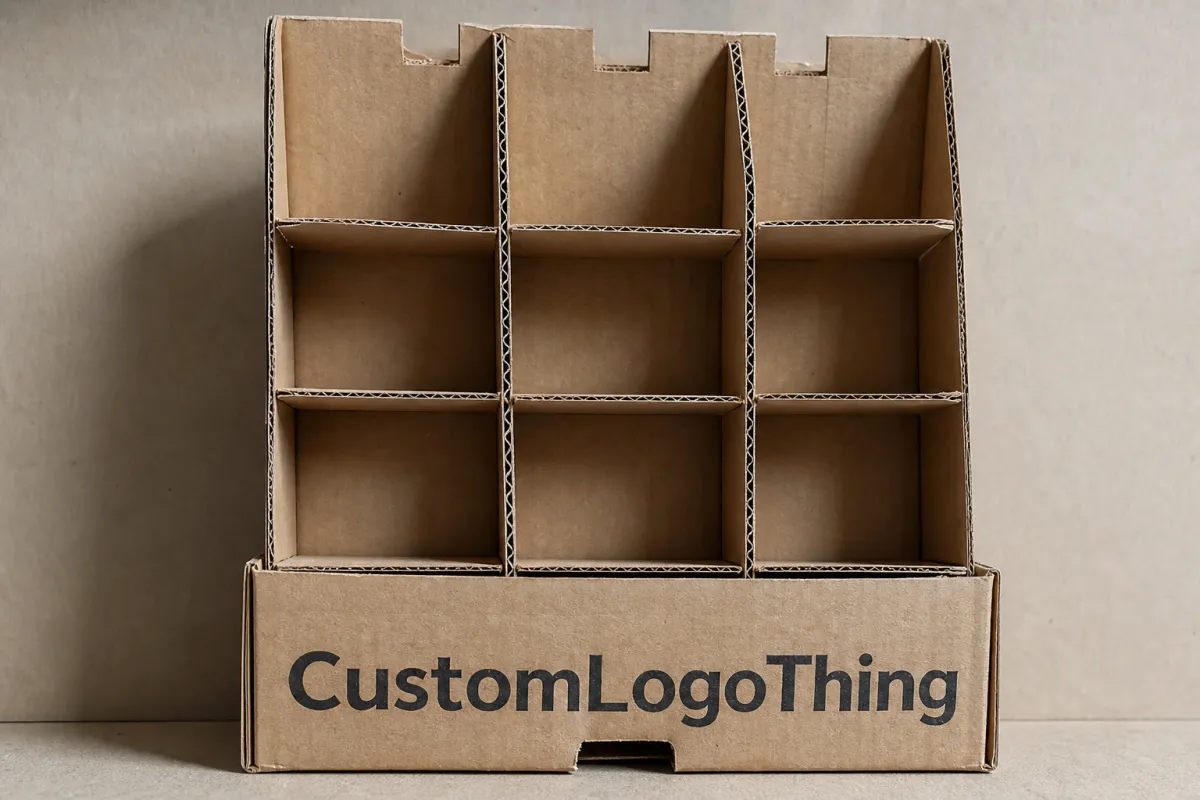
A divider grid creates separate cells. Each cell gives one bottle its own space, reducing sideways movement and spreading impact through the carton walls and the insert structure instead of through the glass. The idea is straightforward: keep each unit upright, separated, and restrained so normal handling does not turn into a collision.
The divider never works alone. It works with the outer shipper, any top or bottom pads, and the bottle shape itself. A short, wide bottle behaves differently from a tall, narrow one. A square bottle sits differently from a round one. A heavy base may improve stability, but a steep shoulder can create a contact point that needs more clearance. Good layout treats those shapes as inputs, not decoration.
Material choice changes the result more than many buyers expect. Corrugated partitions are common because they are economical, easy to source, and familiar to pack teams. Chipboard inserts can suit lighter bottles or presentation-driven packs where a slimmer profile helps. Molded pulp trays form a cradle that can add contour support when the bottle needs more directional hold. Die-cut paperboard components often show up in premium kits where printed presentation and protection have to sit together.
The right choice depends on bottle weight, transit distance, and the type of handling the carton will face. A local hand-delivery pack does not need the same structure as a parcel-shipped bottle moving through a hub network, sortation equipment, and several warehouse stops. That is why material comparison belongs at the start of the project, before the layout is locked.
| Material | Best Fit | Strengths | Tradeoffs | Typical Cost Impact |
|---|---|---|---|---|
| Corrugated partitions | Shipping cartons, wine, spirits, heavier bottles | Good stiffness, familiar production, solid compression performance | Bulkier than chipboard, less refined in presentation | Usually lowest to moderate |
| Chipboard inserts | Lighter bottles, retail-focused packs, tight die-cut layouts | Thin profile, decent printability, neat appearance | Less forgiving for heavy bottles or rough transit | Low to moderate |
| Molded pulp trays | Fragile glass, formed cradles, shock-sensitive packs | Good contour support, natural fiber look, stable bottle nest | Tooling and setup can be higher, appearance is more utilitarian | Moderate to higher |
| Die-cut paperboard components | Premium branded packaging, custom presentation kits | Clean branding, precise fit, strong shelf appeal | Can be less rugged if overcomplicated or underbuilt | Moderate to higher |
Fit is where many inserts succeed or fail. Too loose, and the bottle shifts in transit. Too tight, and the insert can scuff a label, stress a closure, or slow the packing line because operators have to force the part into place. A well-designed divider gives just enough clearance for the bottle to seat cleanly while still limiting movement during vibration and side impact.
The divider also changes carton strength. Once a box is partitioned, load paths shift, and stacking pressure can distribute differently across the pack. That matters in palletized freight, warehouse storage, and humid conditions where board strength softens. A good design considers compression resistance, not only bottle spacing. E-commerce and wholesale shipments that may sit under other cases for hours or days need that margin.
On the line, a smart divider can improve speed. Some designs fold quickly, some arrive pre-glued or pre-kitted, and some nest in ways that reduce training time. A layout that saves a few cents on paper but slows pack-out can cost more in labor, rework, and breakage. That is one reason many buyers ask for a prototype before approving a full run of custom packaging products.
Testing also matters here. Many packaging teams use drop, vibration, and compression checks modeled on common transit conditions, because a static sample on a desk does not reveal how the insert behaves once the carton starts moving. A divider that looks right on paper still has to survive the route it was built for.
Key Factors That Shape the Right Divider Design
The bottle comes first. Diameter, height, shoulder shape, neck profile, and closure type all affect the divider. A bottle with a long neck and steep shoulder may need a different cell opening than a short bottle with a broad top. Decorative embossing, label panels, foil finishes, and sleeve graphics can also change the clearance target because they create surfaces that should not be rubbed.
Weight matters just as much. A 250 ml glass bottle and a 750 ml glass bottle do not behave the same way during transit, even if the footprint looks similar. Heavier bottles carry more momentum during a drop or bounce, which means the insert needs more structural confidence. Fragility is not only about the material; a brittle neck, a thin shoulder transition, or a delicate closure can be the weak point.
Pack count changes the equation. A 2-pack is mainly a spacing and presentation problem. A 4-pack begins to introduce internal load balancing. A 6-pack or 12-pack makes compression and handling more serious because the carton gets heavier and the insert has to manage more total mass. If the pack is meant for retail packaging, the divider may also need to support a clean opening experience so customers can remove the bottles without fighting the box.
Shipping conditions matter just as much as bottle shape. Parcel shipping, LTL freight, warehouse storage, and hand delivery create different stresses. Parcel systems add more sortation impacts. Freight introduces stacking loads. Humidity weakens board performance. If cartons move through several touch points, the divider has to stay stable across all of them. A design that looks perfect in a mockup can still fail if it has not been tested under real movement.
Presentation and branding have a place too. Some companies want the divider to disappear once the box opens. Others want printed surfaces, color cues, or a premium unboxing sequence that supports package branding. That goal is valid, but form should not outrun function. The insert has to protect the bottle first. For branded packaging, the best result usually balances a neat appearance with honest shipping performance.
If the pack will be sold online, the design should reflect product packaging realities rather than shelf-only assumptions. A carton that looks elegant in a catalog may still need heavier board, tighter cell geometry, or stronger corners to survive a carrier network. Real testing belongs in the design discussion, not as a late-stage repair.
- Bottle dimensions: measure the widest diameter, shoulder, neck, and closure height.
- Distribution mode: parcel, freight, or direct hand delivery changes the shock profile.
- Pack count: 2, 4, 6, 8, or 12 bottles each call for different load paths.
- Presentation target: hidden insert, premium reveal, or printed internal structure.
- Testing method: use filled bottles, not empty samples, whenever possible.
One practical detail changes more than people expect: use the actual filled bottle if you can. Liquid weight changes how the container sits in the cell, how it compresses the board, and where it wants to rotate. An empty bottle can seem stable until the product is inside. That looks minor on a drawing and major on a warehouse floor.
Teams developing Custom Printed Boxes and inserts together usually get better results when the specs are aligned from the start. It is easier to match the divider and carton before tooling or cutting begins than to chase fit problems after the first sample arrives.
Production Steps, Process, and Timeline for Custom Bottle Dividers for Boxes
Production begins with information, not cutting. A good supplier will want bottle samples, exact measurements, target carton size, bottle count per box, shipping method, and handling constraints before drawing the divider. The aim is to define the packing problem clearly enough that the first sample actually reveals something useful.
Once those details are in hand, the layout or die line gets developed. At that stage, the designer chooses cell size, board thickness, fold direction, and the way the insert will assemble. Those choices are not cosmetic. Fold orientation can affect speed on the line, and board thickness changes both protection and how much room the bottles have inside the carton.
Sampling is where the design becomes physical. A prototype should be checked with filled bottles, not just dimensions on a screen. The review should include closure clearance, label clearance, carton closure, and a few rough-handling checks. Even a basic bench test can show whether the insert is too snug, too loose, or awkward for packers to use consistently.
Revision rounds are normal. If the bottle shape changes, the closure gets taller, the carton is resized, or a print requirement changes the board structure, the sample may need another pass. That is not a failure. It is how custom packaging reaches a usable specification. Rushing this step usually costs more later in breakage and rework than it saves in calendar time.
Production usually includes cutting, scoring, folding, kitting, and inspection. Quality control should verify that the divider matches the approved drawing, that the partitions sit square, and that the board is not damaged or out of tolerance. At higher volumes, even small deviations can ripple through the line and slow down pack-out.
Lead time depends on several variables: custom tooling, sample approval, order volume, and freight planning. If the project includes new print or a highly specific die-cut geometry, allow more time for proofing and approval. Repeat orders move faster because the die line and approved spec already exist, but the first run still deserves breathing room. That matters even more if the packaging has to align with a product launch or seasonal ship window.
Buyers coordinating several package components often save time by ordering the outer carton, the divider, and any branded paperboard pieces together through printed carton solutions. That kind of planning helps keep the fit consistent from one component to the next.
Typical timeline ranges
Small custom divider projects can move quickly if the bottle geometry is simple and no print revisions are needed, yet many jobs still take time because fit checks matter. A straightforward project may move from brief to approved sample in about one to three weeks, then into production after approval. More complex inserts, new tooling, or multiple rounds of revision can stretch beyond that. If the carton must be coordinated with other packaging elements, plan conservatively instead of assuming the first sample will be the final one.
Cost and Pricing: What Drives the Quote for Bottle Dividers
Material choice is usually the first cost lever. Board grade, flute style, caliper, and fiber content can shift the price more than many teams expect. A heavier corrugated structure may cost more up front but reduce damage, while a lighter chipboard insert may look attractive for presentation and still be less forgiving in transit. The right answer depends on the product, the route, and the tolerance for failure.
Complexity adds cost too. More cells mean more material and more cutting. Tighter tolerances demand more careful setup. Special folds, custom cutouts, or unusual bottle shapes can raise manufacturing time and waste. None of that is a flaw by itself, but it should be visible in the quote so the buyer knows what the money is buying.
MOQ and tooling often appear in the picture as well. If a custom layout needs a die or a dedicated setup, the fixed cost makes small runs less economical than standard inserts. That does not mean small runs are off the table; it means they should be priced with full awareness of setup time and material efficiency. Reorders usually become easier because the tooling and spec are already in place.
Print and finish shift pricing too. A plain kraft insert is different from a branded, color-matched component designed to support package branding. Moisture resistance, specialty coatings, or premium presentation details can add value, but they also add cost and sometimes lead time. The practical question is whether the finished package needs those features to do its job.
Freight and storage can quietly affect landed cost. Dividers are often light but bulky, which means they take up cube in shipping and warehousing. A container full of inserts may move a lot of air. If a supplier quotes only the unit price and ignores cube, the final spend can look cleaner on paper than it does on the receiving dock.
For quote requests, the cleanest approach is to provide bottle size, pack count, annual volume, ship mode, and carton dimensions. That gives a supplier enough information to compare material options and recommend a structure that fits real production needs. It also makes apples-to-apples comparison easier across suppliers of custom packaging products.
| Quote Driver | Why It Matters | How To Reduce Cost Without Hurting Performance |
|---|---|---|
| Board grade | Stronger board usually improves protection but raises cost | Use the lightest grade that still passes testing with filled bottles |
| Cell count | More cells require more material and more cutting time | Standardize pack counts where possible |
| Tooling | Custom dies and setup add fixed cost | Keep the layout consistent across bottle families |
| Print and finish | Branding and coatings can improve presentation but raise spend | Reserve premium finishes for customer-facing packs only |
| Freight cube | Bulky inserts can be expensive to move and store | Check nesting and pallet efficiency before final approval |
Simple corrugated divider structures and molded or die-cut premium options often price differently because the conversion steps and material usage are not the same. Exact numbers depend on volume, bottle size, and the amount of custom work required, so quoting by unit alone can mislead a purchasing team. A better request asks for a landed estimate based on the annual run, not only the first shipment.
Common Mistakes When Specifying Bottle Dividers
The most common mistake is measuring only the box. If the divider is designed from the carton size alone, the bottle may end up with too much room to move or too little room to fit cleanly once the insert is installed. The bottle, not the empty box, should drive the layout.
Another frequent miss is ignoring the shoulder, neck, and closure. Those are often the first places a divider touches, and they are where scuffing or stress shows up first. A bottle may look like it fits from a top-down view but still press against the insert at the shoulder transition or rub the cap during vibration.
Choosing a lighter board grade for a heavy bottle is another expensive shortcut. It may seem fine in a static sample, then fail once the cartons are stacked or moved through a warehouse. Compression issues, bulging panels, and package settling often show up after the first hundred units, which is usually too late to ignore.
Skipping real testing is a mistake as well. A divider that survives one gentle hand test may not survive parcel handling, temperature swings, or pallet movement. Real shipping brings vibration, drop energy, and repeated compression. If the product has to move through different climates or distribution centers, sample testing should follow that path as closely as possible.
Overloading one divider design with too many bottle SKUs can create problems too. On paper, it may look efficient to use one layout for several bottle families. In practice, the fit may be loose for one bottle and tight for another, which slows packers down and increases the chance of misloads. Standardization only helps when the bottle family is genuinely close in dimension.
Overengineering is the opposite problem. A divider with too many folds, too many nested parts, or too much material can raise cost and make assembly awkward. A complex insert is not automatically a better one. The best design is often the simplest structure that passes fit, handling, and shipping tests.
One final issue is forgetting the line operator. If the divider is awkward to assemble, the packaging team will compensate in ways that can undo the intended design. Packaging that requires too much force or too many steps tends to slow production and introduce inconsistency. A pack that feels easy in a mockup should still feel easy after fifty units, not only the first three.
Expert Tips and Next Steps for Better Packaging Decisions
Start with a sample bottle kit and a simple specification sheet. Include bottle dimensions, closure type, target carton, pack count, shipping method, and any branding requirements. That may sound basic, yet it gives the designer enough detail to build a divider that fits the real product instead of a rough concept.
Ask for a mockup or prototype before committing to the full run. A prototype lets you check fit, see how quickly the insert assembles, and judge whether the carton closes without strain. If the product is a premium item, this step is also the best time to review how the insert interacts with the rest of the package so the unboxing feels deliberate rather than improvised.
Standardize divider layouts across bottle families where the dimensions allow it. Shared formats can reduce inventory complexity, simplify reorder planning, and cut down on operator training. The trick is to standardize only where the bottle family truly supports it. A too-broad standard often creates more waste than it saves.
Run a pilot on the actual packing line. A design that looks fine in the sample room can behave differently in real use, especially if the team has a specific fold sequence, sealing method, or throughput target. A small pilot gives you data on pack speed, waste, and handling before the larger order is released.
Track breakage, returns, and pack-out time after launch. Those numbers show whether the divider is performing as intended. If the data shows scuffing, stress points, or slower assembly, revise the insert before the next reorder. Good packaging is rarely a one-time decision; it improves as the product, channel, and shipping conditions become clearer.
If you are building a broader package system, connect the divider to the carton, branding, and presentation goals instead of treating it as an isolated part. That coordination is where savings often appear. A clean insert design can simplify assembly, reduce claims, and make the full pack feel more confident on arrival. The right custom bottle dividers for boxes protect the product, support the workflow, and make future ordering easier instead of harder.
FAQ
What are custom bottle dividers for boxes usually made from?
Most are made from corrugated board, chipboard, or molded pulp, and the best material depends on bottle weight, fragility, and the protection level needed. Corrugated is common for shipping strength, chipboard often works for lighter bottles and tighter presentation-focused packs, and molded pulp can provide a formed cradle with good shock absorption. The final choice should reflect the bottle, the carton, and the shipping route rather than material preference alone.
How do I size custom bottle dividers for boxes correctly?
Measure the bottle at its widest point, then check the shoulder, neck, and closure so the divider does not bind on any part of the container. Use the actual filled bottle whenever possible because product weight changes how the bottle sits and how much clearance it needs. The goal is to leave just enough room to avoid scuffing and stress while keeping the bottle from shifting during shipping.
Are dividers enough for fragile glass bottles, or do I need extra inserts?
For lighter local shipments, a snug divider and a proper outer carton may be enough if the fit is clean and the board is strong enough. For heavier bottles, longer transit, or rough handling, top and bottom pads or a stronger carton can be important to reduce shock and compression damage. The right answer depends on bottle weight, pack count, and how far the package needs to travel.
What affects MOQ and lead time for custom bottle dividers for boxes?
MOQ is often shaped by tooling, material setup, and how efficiently the divider layout can be produced from standard sheet sizes. Lead time can extend if samples, revisions, or print approvals are needed before production starts. Repeat orders usually move faster because the die line and approved specification are already in place.
How can I lower the cost of bottle dividers without causing more breakage?
Simplify the divider layout where possible and standardize pack sizes across bottle families so the design is easier to produce. Choose the lightest board grade that still passes real testing instead of defaulting to the most expensive material, and keep the outer carton close-fitting so the insert does not have to do all the work. Extra material does not always mean better protection, so cost control should come from smart fit and efficient structure rather than thinner margins on safety.

