Buyer Fit Snapshot
| Best fit | Custom Printed Boxes with Insert projects where brand print, material claims, artwork control, MOQ, and repeat-order consistency need to be specified before quoting. |
|---|---|
| Quote inputs | Share finished size, material target, print colors, finish, packing count, annual reorder estimate, ship-to region, and any compliance wording. |
| Proofing check | Approve dieline scale, logo placement, barcode or warning zones, color tolerance, closure strength, and carton packing before bulk production. |
| Main risk | Vague material claims, crowded artwork, missing packing details, or unclear freight terms can make a low unit price expensive after revisions. |
Fast answer: Custom Printed Boxes with Insert: Board, Finish, Dieline, and Unit Cost should be specified like a repeatable production item. The safest quote records material, print method, finish, artwork proof, packing count, and reorder notes in one written spec.
Production checks before approval
Compare the actual filled-product size with the drawing, then confirm tolerance on folds, seals, hang holes, label areas, and retail display edges. Reserve space for logos, QR codes, warning copy, and material claims before decorative graphics fill the panel.
Quote comparison points
Review material grade, print process, finish, sampling route, tooling charges, carton quantity, and freight assumptions side by side. A quote is only useful when the supplier can repeat the same color, closure quality, and packing count on the next order.
Custom Printed Boxes with Insert: How to Spec Them Right
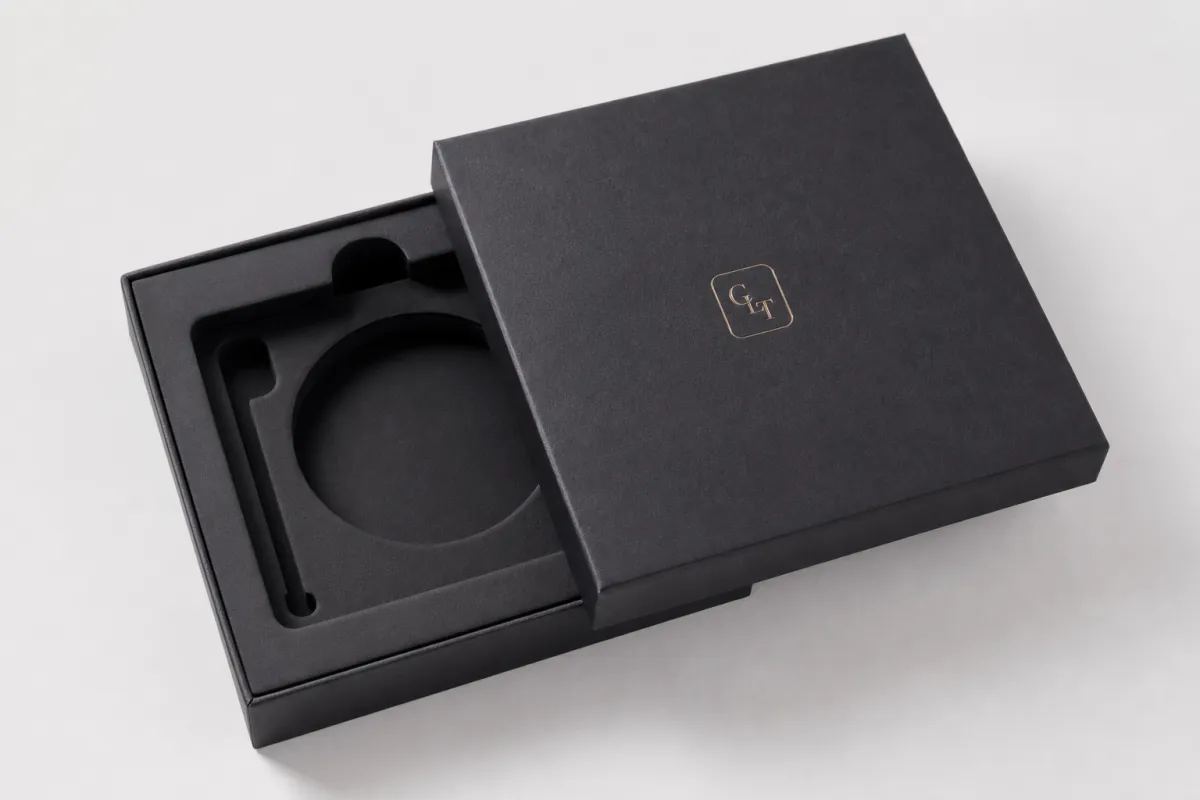
Custom printed boxes with insert are rarely just a decorative extra. More often, they decide whether a product arrives seated properly, with corners intact and accessories still in place, or whether it lands looking like the box had a rough night and nobody won the argument. Most packaging damage begins with movement inside the pack, not with a dramatic hit to the outer carton. The product shifts, lifts, twists, and then one small impact becomes a scratched surface, a crushed edge, or a broken cap. That is why custom printed boxes with insert deserve close attention instead of a quick approval based on a polished rendering.
For a packaging buyer, the assignment is pretty clear: keep the product fixed, protect fragile surfaces, and make the opening feel deliberate. Custom printed boxes with insert can do all three if the fit is correct. They also support branded packaging in a way a plain shipper never will. A printed carton may win attention, but the insert decides whether the reveal feels calm or chaotic. If you are ordering custom printed boxes with insert for retail packaging, ecommerce, or a premium gift kit, the real decision is not whether to use an insert. It is which insert material, cavity style, and tolerance will hold up under real use.
That decision matters because custom printed boxes with insert can look elegant in a mockup and still behave badly in the warehouse. A cavity that is too loose is just cardboard decoration. A cavity that is too tight turns the unboxing into a wrestling match, which is a quick way to scratch a surface or make the package feel overworked. The best version sits in the middle: secure, easy to pack, easy to open, and realistic to manufacture at your quantity.
What Custom Printed Boxes with Insert Actually Solve
People often assume the outer carton carries the full burden. It does not. The outer box mainly handles stacking, print impact, and first impression. The insert manages movement, orientation, and product security. That division matters most for fragile items, cosmetic sets, electronics, subscription kits, candles, glass bottles, and premium gift packaging. Custom printed boxes with insert show up often in those categories because the insert keeps the product from bouncing around like loose change in a jacket pocket.
The easiest way to think about custom printed boxes with insert is this: the box sells the brand, and the insert protects the product. A shaped support can hold a bottle upright, cradle a device, separate components, or keep accessories from drifting into a jumble. That becomes critical in product packaging, because rattling parts make the whole order feel cheaper than it is. A strong exterior can promise quality. A sloppy interior can undo that promise in two seconds flat.
There is also a presentation effect that buyers underestimate. A well-designed insert places the product in a fixed, intentional orientation. A small item can feel far more premium when it opens cleanly and sits where it should. A bad insert does the opposite. It makes even good custom printed boxes with insert feel unfinished, because anything crooked or shifting suggests nobody checked the spec before production.
Here is the practical breakdown:
- Shock control: The insert reduces minor impact and keeps the product from striking the box wall.
- Orientation: It holds the product in the same position every time, which helps packing and unboxing.
- Accessory management: Cords, manuals, droppers, samples, and chargers stay where they belong.
- Brand presentation: The opening moment feels planned instead of improvised.
If a product can move inside the box, the packaging is promising more than it can deliver. Transit usually exposes that gap fast.
Custom printed boxes with insert matter most when a return costs more than the packaging itself. That includes glass, luxury skincare, high-value electronics, and multi-piece bundles where one missing component makes the whole order feel incomplete. Subscription kits belong on that list too. Nobody wants to open a premium set and find loose pieces rolling around like spare screws in a drawer.
In a warehouse audit I sat through last year, a team was blaming breakage on carrier handling. The real problem was a paperboard cavity that let the product drift just enough to chip the finish on the corner. The box looked clean. The damage was not clean at all. That kind of mismatch is common, and it is why packaging review should begin with failure mode, not artwork.
If you are still deciding, start with risk, not decoration. Ask what fails first: a screen scratches, a lid pops open, a bottle tips, or a stack of parts migrates. Once the failure mode is clear, custom printed boxes with insert stop being a guess and become a spec exercise. That is a much better place to spend money.
How Custom Printed Boxes with Insert Are Built
At the structural level, custom printed boxes with insert have four pieces: the outer box, the print surface, the insert cavity, and the product load path. That last piece gets ignored more often than it should. A box is not only a shell. It is a route from packing table to customer hands. If that route includes stacking pressure, drops, vibration, and rough handling, the build needs to account for it from the start.
The outer box is usually a folding carton, mailer, rigid box, or corrugated shipper, depending on the product and the shipping method. Print may cover the exterior only, or both outside and inside if the brand wants a stronger reveal. Custom printed boxes with insert often use full-color exterior print and a cleaner interior print treatment, because the inside becomes visible the moment the lid opens. That is where package branding earns its keep in a very direct way.
The insert itself can take several forms. Die-cut paperboard is common for lighter items and presentation-led packs. Corrugated partitions add structure and help separate multiple parts. Molded pulp works well when the sustainability story matters and the shape is forgiving. Foam still has a place for sensitive, high-impact protection, but it is not the automatic answer just because it feels dense in the hand. Hybrid builds are also common for custom printed boxes with insert when one material cannot solve every requirement alone.
| Insert Type | Best For | Typical Added Cost at Mid Volume | Main Tradeoff |
|---|---|---|---|
| Die-cut paperboard | Cosmetics, gifts, lightweight retail sets | $0.06-$0.18 per unit | Great presentation, less cushioning |
| Corrugated insert | Electronics, heavier kits, ecommerce packs | $0.08-$0.24 per unit | More structure, less refined look |
| Molded pulp | Sustainable brands, reusable transit protection | $0.12-$0.35 per unit | Tooling and lead time can be higher |
| Foam | Fragile devices, glass, precision components | $0.14-$0.40 per unit | Strong protection, weaker eco story |
| Hybrid construction | Mixed product kits and premium packaging design | $0.18-$0.50 per unit | Best performance, higher complexity |
Fit and tolerance are where custom printed boxes with insert either work cleanly or become annoying. A few millimeters can change the feel entirely. Too loose and the product rattles. Too tight and the customer has to force the item out, which can scratch the surface and make the brand feel careless. A good spec balances easy loading in production with enough restraint during shipping. That is not magic. It is measurement discipline, and it is gonna matter more than most first-time buyers expect.
Assembly changes the true cost as well. Some custom printed boxes with insert arrive flat and are folded at pack-out. Some inserts are pre-glued, which speeds assembly but raises unit cost. Some rigid box builds use a separate tray and lid, which looks beautiful but takes more labor and more storage space. If the quote seems unusually low, ask whether the insert ships flat, whether glue is required, and how many manual steps are involved. Cheap packaging often gets expensive the moment a person has to touch it three extra times.
If you need a reference point for box styles and structural options, the Custom Packaging Products page lists common formats before you lock the spec.
For shipping-focused programs, it helps to test against recognized distribution methods. ISTA test methods and basic drop and vibration tests are a sensible benchmark for ecommerce packs, and the ISTA testing standards are a useful reference when you want packaging to survive more than a studio photo session. If your insert passes on a desk and fails in transit, the design is not finished. It is only hopeful.
Production Process and Lead Time for Custom Printed Boxes with Insert
Production for custom printed boxes with insert usually follows the same sequence, even when the exact details change by supplier. It starts with the brief, then artwork, then structural drawings, then a sample or prototype, then final proofing, then printing, cutting, finishing, insert fabrication, packing, and freight. Skip one step and the cost usually shows up later in a fit issue, a late artwork correction, or a production run that arrives with a mistake nobody wants to own.
The biggest delay is rarely the press. It is approval. Missed timelines usually happen because the artwork was not locked, the measurements were uncertain, or the insert spec changed after the proof was already in motion. Custom printed boxes with insert need clean input. If the bottle height shifts by 4 mm after the dieline is built, the fit can change enough to matter. That is why the product dimensions should be finalized before the creative work starts trying to take over.
Timing depends on the structure. A standard paperboard box with a die-cut insert can often move in about 10-18 business days after final proof approval, assuming the artwork is ready and the finish is straightforward. Add specialty coating, foil, embossing, or a more complex insert, and the schedule stretches. Molded pulp can take longer because tooling and sample approval add steps. A new mold is not something to treat casually and hope it sorts itself out.
Here is a practical planning rule for custom printed Boxes with Insert: leave room for revisions, freight, and internal sign-off. A launch does not usually slip because the packaging team moved slowly. It slips because marketing, operations, and procurement all needed one more look, and the calendar had no slack left. That is ordinary. Frustrating, but ordinary.
You can also expect different lead times by volume. Small runs are easier to approve and faster to move through the schedule, but the unit cost is higher because setup is spread across fewer pieces. Larger runs are more efficient on paper, yet they need tighter planning, longer press slots, and more careful coordination with storage and inbound freight. Custom printed boxes with insert reward teams that think 2-4 weeks ahead instead of betting on a generous calendar.
Sample quality matters as much as the final run. A good structural sample shows whether the insert loads cleanly, whether the lid closes without pressure, and whether the printed surfaces align as intended. A clean sample can prevent an expensive production error. A bad sample is not a nuisance. It is a warning.
For sustainability-minded projects, it helps to know which paper sources and certification claims matter. If the insert is paperboard-based or the outer box uses fiber materials, ask about recycled content and responsible sourcing. The FSC certification system is one reference point buyers often use when they want traceable paper sourcing. That does not rescue a weak structure, but it does help with brand claims and procurement paperwork.
Cost, Pricing, MOQ, and Quote Drivers
Custom printed boxes with insert are priced by more than one line item, and that is where surprises begin. Box size, board grade, print coverage, finishing, die complexity, insert material, assembly labor, and freight all move the number. If the quote feels higher than expected, it is usually because one of those pieces drifted from "easy" to "not easy" while nobody was watching closely enough.
A decent rule of thumb: larger boxes, heavier board, broader ink coverage, and more complex inserts all increase cost faster than most first-time buyers expect. A premium-looking package with a poor insert is still a poor package. It simply costs more to disappoint the customer. Custom printed boxes with insert should be judged by the total shipped order, not by the prettiest line on the quote.
MOQ matters too. Small quantities usually have a higher unit cost because setup, cutting dies, and press time are spread across fewer boxes. A 1,000-piece order may carry a noticeably higher per-unit price than a 5,000-piece run with the same structure. That gap is why the first production order often looks awkward on paper. The market is not being unfair. It is just doing the arithmetic.
Shipping style changes the economics as well. Retail-ready packaging, ecommerce mailers, and heavier transit boxes do not share the same structure. A retail box may be tuned for shelf impact and opening experience. An ecommerce pack may need more compression strength and better edge protection. A rigid presentation box may prioritize package branding and tactile appeal, then require a separate shipper for real distribution. Custom printed boxes with insert can work in all three lanes, but the spec should match the job instead of pretending one format solves every problem.
| Buying Scenario | Typical Unit Range | What Drives the Price Up | What Usually Saves Money |
|---|---|---|---|
| Simple retail box with insert | $0.35-$0.85 | Full-color print, specialty finish, tighter fit | Standard board, flat-packed insert |
| Ecommerce mailer with insert | $0.45-$1.10 | Double-wall construction, high crush resistance | Reduced print coverage, simpler insert geometry |
| Premium rigid box with insert | $0.90-$2.50 | Lamination, wrapped board, manual assembly | Simplified interior print, fewer finish effects |
| Mixed-product kit with custom insert | $0.60-$1.75 | Multiple cavities, accessory pockets, hybrid materials | Standardize part sizes and reduce cavity count |
Material choice Affects the Quote in ways that are easy to miss. Paperboard is usually lighter on cost for presentation-led custom printed boxes with insert. Corrugate adds strength without driving the budget into a new tier. Molded pulp may need tooling but can pay back when sustainability and protection matter together. Foam protects well, but it can clash with eco goals or recycling claims, so the apparent savings can disappear later in brand friction.
My buying advice is blunt: compare cost per shipped order, not cost per box. A cheaper box that creates a 3 percent damage rate is not cheaper. It is a refund engine. On 10,000 units, that is 300 damaged orders, before you even count repack labor, customer service time, and replacement freight. If custom printed boxes with insert reduce damage, lower repack labor, and improve the opening experience, the real savings show up where the spreadsheet usually gets ignored.
Step-by-Step Guide to Spec the Right Insert
Start with the product, not the box. That sounds obvious, yet it gets ignored constantly. Measure the item carefully, including protective wraps, sleeves, caps, cords, and any accessory that ships with it. Then decide how the product should sit: upright, flat, suspended, or nested. Custom printed boxes with insert work best when the product layout is defined before artwork starts pretending to be the main event.
Next, map the protection zones. What surfaces are fragile? Corners, lids, screens, glass shoulders, nozzles, and exposed edges all need attention. If a product has one side that should never touch a hard surface, the insert needs a recess or buffer there. If the box contains multiple items, decide what separates them and what can touch without damage. That kind of detail looks dull on paper and saves a great deal of money later.
Then choose the material by job, not by trend. Paperboard works well for lighter products and crisp presentation. Corrugate provides structure and a bit more resilience. Molded pulp is a smart option for brands that want fiber-based protection and a cleaner sustainability story. Foam still has a place for highly sensitive products that need precise support. Hybrid inserts are useful when the pack contains both delicate and heavier items. The goal is not to pick the fanciest material. The goal is to choose the one that solves the actual problem inside custom printed boxes with insert.
- Measure accurately: Include the product, sleeves, and accessories.
- Mark the failure points: Identify the surfaces that cannot be hit or crushed.
- Choose the right cavity style: Single pocket, multi-pocket, tray, or partition.
- Ask for a physical sample: Drawings hide fit issues that cardboard exposes immediately.
- Test the full pack-out: Try packing, closing, shipping, and opening the actual set.
Requesting a sample is not optional if the pack matters. A flat dieline can look perfect on screen, but a real product exposes problems software does not catch. Does the lid bow? Does the insert tear? Does the product load from the side without dragging on the cavity? Those are the questions custom printed boxes with insert need answered before mass production, not after.
Testing should stay practical, not theatrical. A simple drop test, shake test, stack test, and unboxing review can reveal most of the real issues. For ecommerce and transit-heavy programs, a baseline aligned with ISTA methods or a comparable distribution test makes sense. If the pack survives only gentle handling, it has not been tested. It has been admired. Those are not the same thing, and carriers do not care which one you preferred.
Internal feedback matters too. Put the prototype in front of the people who will pack it, ship it, or receive it. Warehouse teams notice loading friction. Sales teams notice presentation. Operations teams notice whether the insert slows pack-out by 20 seconds per unit, which becomes a real labor cost at scale. Custom printed boxes with insert need to work inside the workflow, not only in the design review.
If you need a starting point for formats, the Custom Packaging Products page can help you compare construction styles before you request a quote. A better starting point means fewer revisions, and fewer revisions mean fewer headaches. That is not glamorous, but it is how packaging gets done without drama.
Common Mistakes That Make Inserts Useless
The first mistake is the loose cavity. If the product can slide, tilt, or rattle, the insert is not doing its job. It may still look nice in a mockup, but shipping will expose the weakness. A loose insert in custom printed boxes with insert is basically decorative cardboard with confidence issues. It looks finished until the first transit lane starts moving it around.
The second mistake is overcomplication. Some designs turn into tiny engineering projects that nobody wants to assemble. If the team needs a manual to load the box, the structure is probably too clever. Custom printed boxes with insert should be repeatable at scale. A pack-out that takes too long creates labor waste, slows fulfillment, and increases the chance that someone puts a component in the wrong cavity. That is how a pretty design becomes a daily annoyance.
The third mistake is choosing a material that fights the business case. Soft foam may protect well, but it can complicate recycling claims or sit badly with brands that want a fiber-first story. On the other hand, a paperboard insert might look cleaner on a sustainability deck but fail for heavy or fragile components. There is no universal winner. The right answer depends on product weight, shipping stress, and brand priorities. Custom printed boxes with insert only work when the material matches the risk.
Temperature and carrier handling matter more than many teams admit. A prototype that survives a short indoor test can fail after a hot truck ride, a cold warehouse, or a stacking-pressure situation that lasts longer than expected. Compression strength, fit retention, and glue performance all matter. If your packaging assumes gentle handling, it is already underbuilt.
A nice-looking outer print does not rescue a weak insert. The customer opens the box, sees the damage, and blames the brand. Not the carrier. Not the cardboard. The brand.
Branding mistakes cause another kind of mess. A lot of teams invest heavily in exterior graphics and then treat the insert like invisible filler. That is a missed opportunity. Interior print can support product education, brand story, or a cleaner reveal. On the flip side, if the insert tears during opening or shows rough edges, the entire experience feels cheap. Custom printed boxes with insert should feel deliberate on both the outside and the inside.
Some teams also forget the accessories. A charger, dropper, spatula, sample pouch, or manual that wanders around inside the pack can scratch the main product or make the presentation look sloppy. If the accessory belongs in the kit, give it a place. If it does not need a place, remove it. Fewer moving parts usually mean better packaging and fewer things to fail.
Finally, do not approve a structure without checking the actual production workflow. A design that looks perfect in CAD can still be annoying to assemble, hard to inspect, or slow to pack. The best custom printed boxes with insert balance protection, presentation, and labor. Miss one of those, and the program stops feeling efficient very quickly.
Expert Tips and Next Steps Before You Order
Ask for two quotes: one with the full spec you want, and one with a simplified version. That comparison shows where the real money sits. If the difference between the two is only a few cents, the upgraded insert may be worth it. If the premium version adds labor, tooling, and freight headaches without improving damage rates, you have your answer. Custom printed boxes with insert should be judged on total value, not just on visual appeal.
Lock the product dimensions first, then build the packaging around them. Do not try to force a standard insert to fit an odd product shape unless you are willing to accept compromises. A custom cavity is often worth the extra setup because it lowers pack-out frustration and reduces transit risk. For many brands, that tradeoff is easier to defend than squeezing a strange item into a generic structure and hoping the problem stays hidden.
Get the sample into real hands. Not just a designer's hands. Put it in front of the person who packs orders, the person who handles returns, and the person who has to explain a damaged shipment to a customer. That feedback is practical, and it is usually more honest than a review from someone staring at a rendering. Custom printed boxes with insert live or die by use, not by mood.
Compare landed cost, not ex-works price. Packaging cost, insert assembly, freight, storage, and expected damage rate all belong in the same conversation. A cheaper structure that creates damage and repack labor will cost more over time. A slightly more expensive pack that reduces breakage can pay for itself quickly. That is especially true for premium product packaging, where one damaged order can wipe out the savings from several good ones.
One more thing: do not confuse a good-looking sample with a production-ready one. A prototype can hide print shifts, glue issues, board spring-back, or cavity looseness that appears at volume. If the custom printed boxes with insert are going into a launch, a promo kit, or a subscription program, approve them only after they pass the real-world check. Packaging should make the product look better and travel better. If it only does one of those, the job is not finished.
For teams comparing formats or building out a broader packaging program, the Custom Packaging Products page can help narrow the structure before final pricing is requested. That step saves time, and time is usually the cheapest thing to waste until a launch date gets involved.
My practical rule is simple: define the product, request a prototype, test the shipping route, and place the order only after the custom printed boxes with insert prove they can protect the product without making pack-out miserable. That is the kind of packaging decision that holds up in the warehouse, not just on the rendering board.
FAQ
How tight should custom printed boxes with insert fit the product?
Aim for a snug fit with just enough clearance to load the product without force. If it slides, the fit is too loose. If it scrapes, bends, or jams, the fit is too tight. For fragile items, test the fit with the real product plus any sleeve, wrap, or accessory that ships with it. Custom printed boxes with insert work best when the fit is controlled, not heroic.
Are custom printed boxes with insert better than foam inserts?
Not always. Foam is strong for fragile products, but it can be more than you need for lighter packs or brands that want a fiber-based sustainability story. Paperboard, corrugate, and molded pulp often win on cost, recycling perception, and package branding. Foam is the better choice only when the product truly needs high-impact cushioning or a very precise hold.
What affects the price of custom printed boxes with insert the most?
Box size, material thickness, print coverage, and insert complexity usually move the price fastest. Low quantities raise unit cost because setup and tooling get spread across fewer pieces. Special finishes, custom shapes, and manual assembly can add more than people expect. If you want a better quote on custom printed boxes with insert, simplify the structure before you ask for pricing.
How long does production usually take for custom printed boxes with insert?
Simple designs can move quickly once artwork and measurements are approved. More complex structures, samples, and specialty inserts add time before production starts. A standard paperboard build can often run in about 10-18 business days after approval, while molded or highly customized inserts may take longer. Build in time for revisions, freight, and internal sign-off so the launch does not stall on packaging.
What should I send when requesting a quote for custom printed boxes with insert?
Send exact product dimensions, product weight, quantity, and how the item should sit inside the box. Include artwork needs, finish preferences, shipping method, and whether the boxes need to arrive flat or pre-assembled. The clearer the spec, the fewer surprises in the quote and the fewer headaches later. If the numbers are tight, a better brief usually does more for the price than a vague request ever will.
Custom printed boxes with insert are not hard to spec once you stop treating them like decoration and start treating them like a functional shipping system. Get the dimensions right, choose the insert material based on the actual product risk, test the pack under real conditions, and you will end up with packaging that protects the product, supports branded packaging, and makes the opening experience feel worth paying for. The final move is straightforward: approve custom printed boxes with insert only after the prototype proves it can survive the route the product will actually take.

