A drawer box looks simple until the insert drags, the sleeve bows, or the product shifts just enough in transit to scuff the printed face. That is why custom cabinet drawer boxes need to be specified like engineered product packaging, not just a good-looking sleeve with a tray inside.
The format has an obvious appeal. A customer pulls the tray out, the product appears in a controlled reveal, and the package feels more substantial than a tuck carton, mailer, or basic lid-and-base box. Behind that reveal sit measurements, board choices, insert decisions, glue patterns, wrap tension, print tolerances, and shipping assumptions. If one of them is wrong, the box tells on itself immediately.
What Custom Cabinet Drawer Boxes Are Really Built to Do
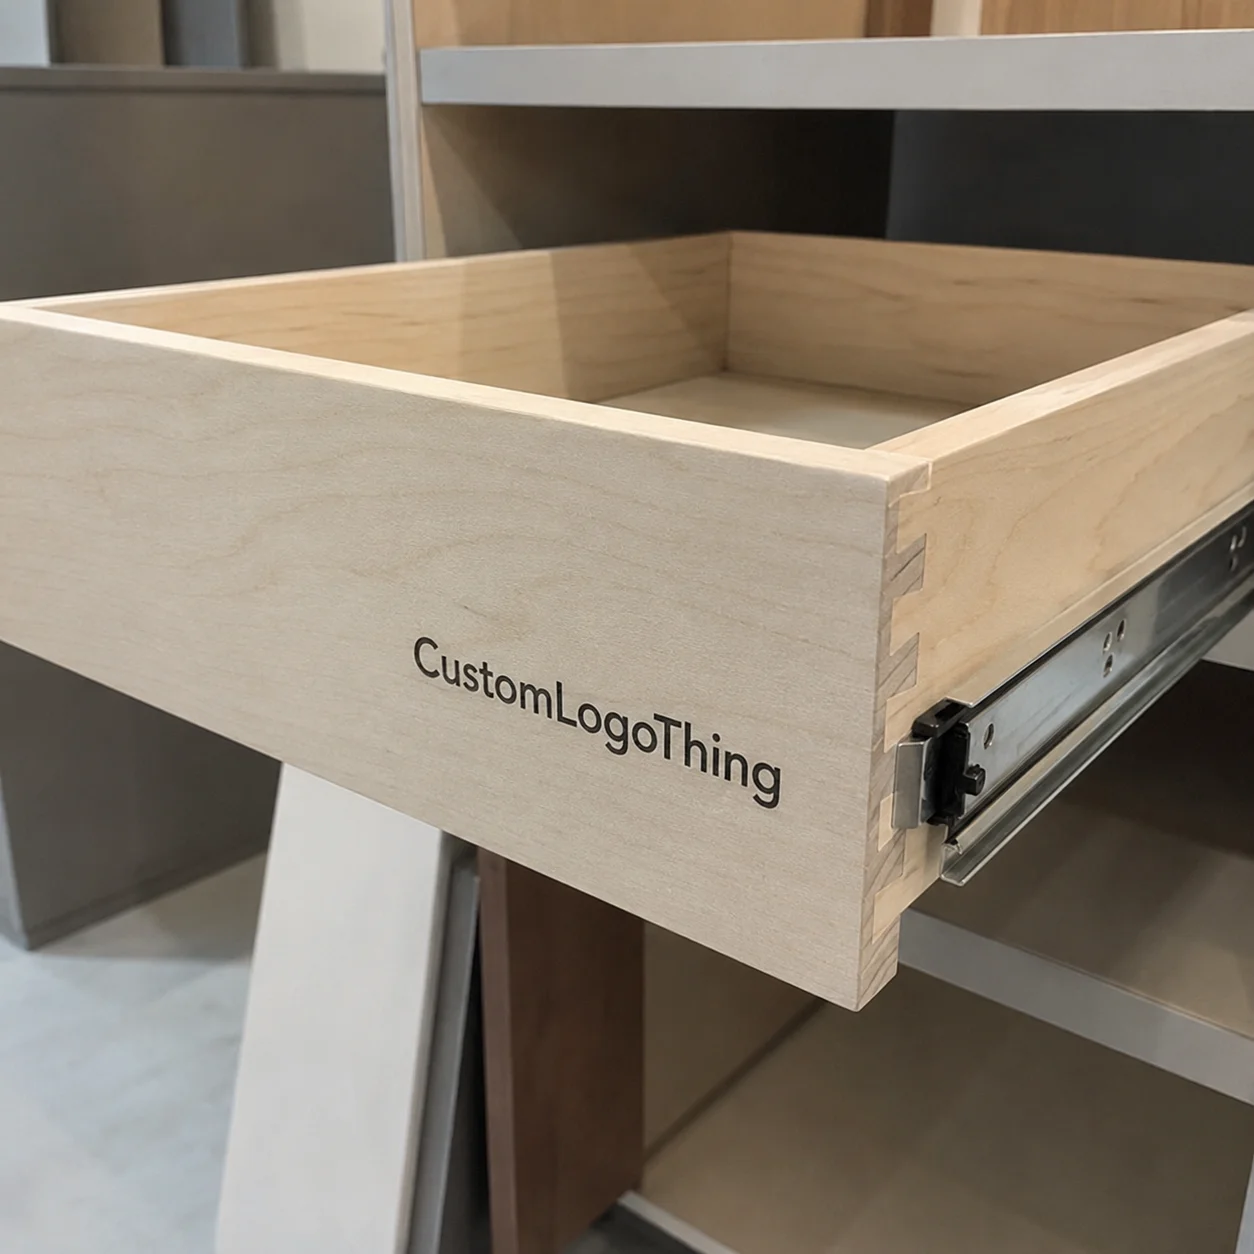
Custom cabinet drawer boxes are sliding-tray packages made with an outer sleeve and an inner tray. In packaging, “cabinet” describes the pull-out motion. It does not refer to kitchen cabinetry or woodworking drawers. These boxes are common for premium retail products, gift sets, cosmetics, jewelry, electronics accessories, stationery kits, candles, sample programs, cannabis accessories where permitted, and branded bundles that need a deliberate opening sequence.
The basic structure has two working parts: the outer sleeve, which provides the shell, and the inner tray, which carries the product. From there, the design can stay restrained or become more layered. A thumb notch improves grip. A ribbon pull adds a premium cue. Foam, molded pulp, paperboard, or corrugated inserts hold the product in place. A belly band, label panel, divider system, or printed reveal panel can add function without changing the core mechanism.
Good drawer packaging has to protect the product, organize components, present the brand, support repeatable packing, and feel right in the hand. Miss one job, and the whole package drops a grade. A sleeve that is 1 mm too tight can feel sticky after lamination. Add 2 mm too much clearance and the tray may rattle like a sample box assembled in a hurry. Drawer packaging rewards precision. It also punishes optimistic assumptions.
Practical callout: Approve the structure before falling in love with the artwork. A beautiful printed wrap cannot fix a drawer that scrapes, binds, or lets the product shift during handling.
How Drawer-Style Boxes Work From Sleeve to Insert
The relationship between sleeve and tray is the center of the format. The tray needs enough clearance to move smoothly, but not so much that it feels loose or crooked. In a well-built rigid drawer box, the movement has light resistance, a straight track, and a clean stop as the tray reaches the end of the sleeve. In a lighter paperboard version, the priority may be faster opening, lower freight weight, and efficient assembly.
Several build paths are common. Rigid setup drawer boxes usually use greyboard in the 1.5 mm to 2.5 mm range, wrapped with printed art paper, specialty paper, kraft paper, or textured stock. Folding carton drawer boxes may use SBS, C1S, C2S, or kraft paperboard, often around 300 gsm to 450 gsm depending on box size and product weight. Kraft drawer sleeves create a natural paper look and are often paired with one-color or two-color printing. Corrugated drawer-style boxes, commonly using E-flute or micro-flute board, add crush resistance for heavier goods or ecommerce packs.
Materials control both strength and feel. Greyboard gives rigid walls and square edges, but it adds cost and assembly time. SBS paperboard prints cleanly and folds efficiently, but it does not have the same heft. E-flute corrugated can protect better during parcel shipping, though the flute profile may show on large printed panels unless the liner and print method are chosen carefully.
Small production details matter more than buyers expect. Grain direction affects folding behavior and sleeve squareness. Board thickness changes outside dimensions and slide clearance. Wrap tension can pull a rigid sleeve slightly out of square if the paper is applied too aggressively or dries unevenly. These are not academic problems. They appear as friction, bowed sides, uneven edges, and trays that behave differently across the same run.
Insert choices shape protection, cost, sustainability claims, and packing speed. EVA foam can look crisp and hold hard goods tightly, but it is not the easiest material to defend from a sustainability standpoint. Molded pulp gives a paper-based appearance and works well for many cosmetics, electronics accessories, and natural product lines. Paperboard dividers suit kits and sample sets. Corrugated partitions add strength for heavier items. Vacuum-formed trays can create precise cavities for irregular shapes, although tooling and plastic selection need careful review.
Decoration is where the package starts carrying the brand story. Offset printing is common for larger runs and tighter color control. Digital printing can suit lower quantities or fast proofing. Foil stamping, embossing, debossing, spot UV, matte lamination, soft-touch lamination, and uncoated textures all change the hand feel. Compared with hinged rigid boxes, drawer boxes often feel compact and ceremonial. Compared with tuck cartons, they cost more but create a stronger reveal and more usable interior display space.
Key Specs That Decide Fit, Strength, and Shelf Appeal
The safest specification order is blunt: product dimensions, product weight, orientation inside the tray, clearance, insert style, and shipping method. Decoration follows structure. A logo can move 3 mm without destroying the project. A cavity that is 3 mm too shallow can create a fit failure.
Start with the product itself. Measure length, width, and height at the largest points, not the prettiest points. If the item is soft, flexible, tapered, or has a cap, button, hinge, pump, cord, raised label, or fragile edge, note it. Weigh the product, then estimate packed weight with insert, literature, accessories, and outer packaging. A 180 g packed item and a 650 g packed item may need different board, insert support, and shipper planning even if they look similar on screen.
Inside and outside dimensions are often mixed up during quoting. The product lives inside the tray, so the manufacturer needs usable internal space after board thickness, wrap material, insert walls, and glue allowances are accounted for. A product measuring 6 x 4 x 1 inches may need an internal tray closer to 6.25 x 4.25 x 1.25 inches once finger access and insert clearance are included. Then the outside dimension grows again based on board thickness and sleeve construction.
Clearance controls the slide. For smaller rigid drawer boxes, a working clearance of roughly 1.5 mm to 3 mm per side is common, though the right number depends on board thickness, wrap paper, box size, humidity, and finish. Soft-touch lamination, heavily textured paper, and uncoated wraps can increase friction. A snug fit feels premium only if production variation, packing pressure, and climate do not turn it into a sticky fit.
Board thickness should follow the job. A small jewelry drawer box may feel right with 1.5 mm rigid board. A larger product kit may need 2.0 mm or 2.5 mm greyboard, reinforced corners, or a corrugated shipper around it. A folding drawer made from 350 gsm C1S artboard can work nicely for a lightweight promotional set, but it is not equivalent to a wrapped rigid box built for a glass bottle or dense electronic device.
Insert depth deserves the same attention as the sleeve. A clean cutout is not enough. Fragile products need support at stress points: bottle shoulders, device corners, caps, glass edges, or protruding controls. If the insert is too shallow, the product can jump during vibration. If it is too tight, fulfillment workers may damage the item while loading it. The best inserts allow quick loading, secure hold, and easy customer removal without prying.
Branding areas include the sleeve top, sleeve sides, tray face, tray floor, insert surface, ribbon, belly band, label panel, and interior reveal panel. For retail, leave clean barcode zones and avoid placing critical copy on curved folds or high-friction slide areas. For direct-to-consumer shipping, think harder about scuff resistance and whether the drawer box needs tissue, a protective wrap, or a dedicated shipper.
Sustainability choices should be specified early. Recycled board content, FSC-certified paper where available, paper-based inserts, soy or water-based inks, reduced lamination, and right-sized structures can all reduce material burden. The Forest Stewardship Council is a useful reference point for paper sourcing language, while the EPA sustainable materials management guidance gives broader context for material reduction and end-of-life decisions.
| Specification Area | Common Options | Practical Impact |
|---|---|---|
| Board Structure | 1.5-2.5 mm rigid greyboard, 300-450 gsm paperboard, E-flute corrugated | Controls stiffness, weight, shelf feel, and shipping durability |
| Insert Type | EVA foam, molded pulp, paperboard divider, corrugated partition, vacuum-formed tray | Affects product hold, sustainability profile, tooling cost, and packing speed |
| Print Method | Digital, offset, flexo for some corrugated builds | Influences color control, setup cost, minimum quantity, and turnaround |
| Finish | Matte lamination, soft-touch, foil, embossing, debossing, spot UV | Adds visual value but may increase scuff risk, lead time, and unit cost |
| Shipping Path | Retail case pack, ecommerce parcel, palletized freight, sample kit mailing | Determines whether the drawer box acts as presentation only or part of protection |
Cost, MOQ, and Quote Factors for Drawer Box Projects
Pricing depends on structure before decoration. A rigid drawer box with a foam insert, ribbon pull, foil logo, and soft-touch wrap is a different job from a folding kraft paperboard drawer sleeve with one-color print. Both may be valid. They simply belong to different cost lanes.
The main quote drivers are dimensions, board grade, board thickness, quantity, print coverage, finish selection, insert complexity, assembly labor, packing method, and freight volume. For small paperboard drawer boxes, digital runs may work for lower quantities, especially if the design avoids specialty tooling. Rigid drawer boxes usually become more efficient at higher quantities because cutting, wrapping, setup, and assembly planning are spread across more units.
As a rough planning range, a simple folding paperboard drawer package might price around $0.70-$1.80 per unit at several thousand pieces, depending on size, print, and finishing. A compact rigid drawer box with a printed wrap may run roughly $2.50-$6.00 per unit at moderate quantities. Add a Custom Foam Insert, foil die, specialty paper, or hand-applied ribbon and the number can climb quickly. Freight, material markets, exchange rates, carton size, and testing requirements can move a quote far outside these ranges.
MOQ is practical, not arbitrary. Lower quantities may be possible with digital print and simpler structures, sometimes around 250-500 units for certain paperboard builds. Rigid boxes with custom inserts and specialty finishes often make more sense at 1,000-3,000 units or more because setup and labor are heavier. If a supplier offers a very low MOQ on a complex rigid drawer box, ask whether samples, dies, inserts, packing, and freight are included in the comparison.
Tooling and setup can include dielines, cutting dies, foil dies, embossing dies, insert tooling, sample fees, and proofing costs. A foil die for a small logo may be modest. A large sculpted emboss or vacuum-formed tray tool can change the economics. Unit cost drops with quantity because press setup, material purchasing, die setup, and assembly planning are shared across more boxes.
The cheapest quote can become expensive if the box fails fit testing, arrives scuffed, or slows fulfillment. The pattern is familiar in packaging procurement: the low unit cost wins the purchase order, then the team pays through rework, extra tissue, slower packing, repacking damage, or customer complaints. For custom cabinet drawer boxes, compare quotes by specification, not by the bottom-line number alone.
- Quote checklist: box style, finished size, product dimensions, product weight, quantity range, print requirements, finish preferences, insert needs, destination, shipping method, and target in-hand date.
- Fit checklist: tray clearance, insert cavity size, product orientation, finger access, accessory space, and shipper compatibility.
- Brand checklist: logo files, color references, typography rules, barcode placement, claims, warnings, and inside-panel copy.
Process and Lead Time From Dieline to Delivery
A typical drawer box project moves through discovery, measurement review, structure recommendation, dieline creation, artwork placement, sampling, approval, production, quality checks, packing, and shipment. If the product is fragile, heavy, expensive, or oddly shaped, the measurement review and sampling steps deserve more time.
Simple paperboard drawer boxes can often move faster than rigid builds because they are printed, die-cut, folded, glued, and packed through a carton-like workflow. Rigid drawer boxes involve board cutting, wrap printing, lamination if used, gluing, wrapping, setting time, tray assembly, sleeve assembly, insert placement, inspection, and case packing. A small rigid structure may look simple on a desk. The production path has more touch points than its shape suggests.
Sampling comes in levels. A digital mockup shows visual layout and panel placement, but it does not prove fit. A white structural sample checks size, tray action, insert position, and product hold. A printed sample shows color, finish, artwork alignment, and surface behavior. A pre-production sample is the final confirmation before the full run starts. For drawer packaging, the white structural sample is often the highest-value early checkpoint because it catches dimensional problems before decoration distracts everyone.
Lead time depends on materials, quantity, finish, tooling, insert type, order queue, and freight method. A straightforward paperboard drawer box may move through proofing and production in a few weeks after approval. A rigid drawer box with custom inserts, foil stamping, specialty paper, and ocean freight can require a longer schedule. Air freight can reduce transit time, but bulky packaging can erase savings because drawer boxes ship a lot of volume compared with their product weight.
Artwork readiness prevents avoidable delays. Provide vector logos, correct color callouts, bleed, safe zones, barcode files, dieline orientation, and clear notes for interior versus exterior panels. If color matters, specify Pantone references or approved printed targets rather than relying on screen previews. Coated paper, uncoated paper, kraft stock, lamination, and digital versus offset output can all shift appearance.
Before approval, test the tray slide, product fit, insert hold, corner strength, print alignment, scuff resistance, and packed behavior inside the shipper. For parcel shipping, consider drop and vibration expectations. The International Safe Transit Association offers widely used packaged-product performance test procedures at ista.org. Even without a formal test, the logic is useful: the package has to survive the distribution path, not just look good in a review meeting.
Build in a few extra days for sampling and revisions. That buffer often saves more time than rushing straight into production, especially if the first sample reveals a tight tray, weak corner, undersized cavity, or artwork panel too close to a wrapped edge.
Common Mistakes That Make Drawer Boxes Feel Cheap
Fit problems show up first. Too much clearance makes the drawer rattle. Too little clearance makes the tray scrape, stick, or pull the sleeve out of shape. The frustrating part is that both errors can come from good intentions: one team wants a premium snug reveal, another wants easy opening, and neither has tested the exact material stack with the real insert and product weight.
Another mistake is designing only for the product photo. Product packaging still has to move through fulfillment. Someone has to load the insert, place the item, add literature, close the tray, apply labels, add overwrap if needed, and case-pack the boxes at a repeatable speed. If a ribbon gets trapped, a label covers the thumb notch, or the product needs to be pressed hard into the cavity, labor cost rises quietly.
Underspecified inserts are a quiet source of failures. A foam or paperboard cavity may look correct on screen, yet fail to support the product during drops, vibration, or repeated handling. Heavy items need support underneath and around stress points. Tall items may need side control. Multi-piece kits need divider logic so components do not collide. The best insert is not always the most expensive one; it is the one that holds the real product through the real handling path.
Over-finishing can also make a box feel less premium. Foil, embossing, spot UV, soft-touch lamination, metallic paper, and a ribbon pull can all be attractive, but too many effects fight for attention. They add cost, slow production, and sometimes create surfaces that scuff easily. A restrained design on good paper with clean edges often feels better than a busy package covered in expensive treatments.
Shipping cartons get ignored too often. A beautiful drawer box can still arrive crushed if the master carton is weak, the void fill is wrong, or the case pack allows boxes to rub against each other. For Custom Printed Boxes with dark matte finishes, scuffing inside the shipper can be a bigger issue than board crush. Tissue, paper sleeves, poly alternatives, paper wraps, or adjusted case orientation may be needed.
Color expectations can cause late frustration. Black printed on uncoated kraft will not look like the same black on laminated white art paper. Digital proof color may not match offset production. Metallic foil reflects light differently from metallic ink. Screen previews help with layout; printed proofs are better for judging real color, texture, and finish.
Factory-floor advice: Approve the structure first, then refine decoration. If the sleeve, tray, and insert are dimensionally wrong, premium printing will not make the package feel right.
Next Steps Before You Order a Drawer Box Run
Before requesting pricing, gather the information a packaging team needs to specify the job accurately. Measure the product at its widest, tallest, and deepest points. Weigh the packed item if accessories, inserts, or literature are included. Photograph how the product should sit in the tray. Decide whether the box is mainly for retail display, gifting, ecommerce shipping, sample presentation, or a mix of those uses.
Choose the target experience. A snug premium reveal may need rigid board, tight slide control, a ribbon pull, and a carefully finished insert. Easy-open ecommerce packaging may need more clearance, stronger shipper protection, and scuff-resistant surfaces. A paper-forward presentation may point toward kraft paper, recycled board, molded pulp, paperboard dividers, and reduced lamination. A high-protection kit may need corrugated support, deeper cavities, or separate compartments for each component.
Prepare brand assets before the dieline stage gets crowded. That means vector logo files, color references, typography rules, product claims, regulatory marks, barcodes, warning copy, country-of-origin language if needed, and any message that must appear inside the reveal. If your brand already uses a broader system of Custom Packaging Products, keep paper tone, logo scale, and finish choices consistent so the drawer box feels like part of the same family.
Ask for structural guidance instead of sending only a finished design. A manufacturer may be able to reduce cost by changing board thickness, simplifying an insert, adjusting the sleeve depth, moving a foil area, or replacing a plastic tray with folded paperboard. Good packaging design is the balance between product fit, production efficiency, brand impression, and shipping reality.
Request a sample when the product is fragile, heavy, unusually shaped, sold as a multi-piece kit, or expected to ship as an ecommerce order. Use the real product, real insert, and planned shipper during review. Open and close the tray several times. Shake it gently. Pack it the way fulfillment will pack it. Look for rub marks, loose components, tight corners, label interference, and any point where the customer may struggle.
Compare quotes by specification, not just price. Confirm whether inserts, finishes, sampling, packing, freight assumptions, and outer cartons are included. If one quote includes a printed rigid sleeve, EVA insert, foil die, white sample, and case packing while another quote lists only the sleeve and tray, those are not equal offers.
Before approving custom cabinet drawer boxes, confirm the sample with the real product, the real insert, and the real shipping plan. That one step protects the fit, the brand experience, and the budget better than any polished rendering can.
FAQ
What are custom drawer boxes used for in product packaging?
They are used for premium product presentation, organized kits, gift sets, cosmetics, electronics, jewelry, samples, and other items that benefit from a controlled slide-out reveal. They can protect the product, separate components, improve unboxing, and create more printable brand surface than many simple folding cartons.
How do I measure a product for custom cabinet drawer packaging?
Measure the product length, width, height, and weight, then note how it should face when the tray opens. Include space for inserts, finger access, protective clearance, labels, wraps, and any accessories packed with the main item.
Are custom cabinet drawer boxes more expensive than regular cartons?
Usually yes, especially when they are made as rigid boxes with wrapped board, inserts, foil, embossing, or specialty paper. The higher cost comes from more material, tighter tolerances, added assembly, and a more complex sleeve-and-tray structure.
What is the typical lead time for drawer-style packaging boxes?
Lead time depends on structure, quantity, materials, sampling, finishing, and freight method. Rigid drawer boxes and projects with custom inserts or specialty finishes generally need more time than simple folding paperboard drawer boxes.
Can custom cabinet drawer boxes be made with sustainable materials?
Yes. Options can include recycled board, kraft paper, FSC-certified paper where available, paperboard dividers, molded pulp inserts, and reduced plastic lamination. The best sustainable choice depends on product weight, protection needs, print expectations, and whether the box must survive parcel shipping.
For buyers comparing custom cabinet drawer boxes, the smartest move is simple: define the product, confirm the structure, test the sample, and lock the artwork only after the sleeve, tray, and insert perform the way they should.

