Custom courier bags packing requirements for fitness studio fulfillment sound narrow until you map what actually goes into a studio order. Folded leggings, a shaker bottle, a protein sample, a class card, maybe a damp towel return: the contents are small, but they do not behave like a single clean retail item. They flex, leak, snag, compress, and shift. That is exactly why courier bags deserve the same attention buyers usually reserve for cartons or insert programs.
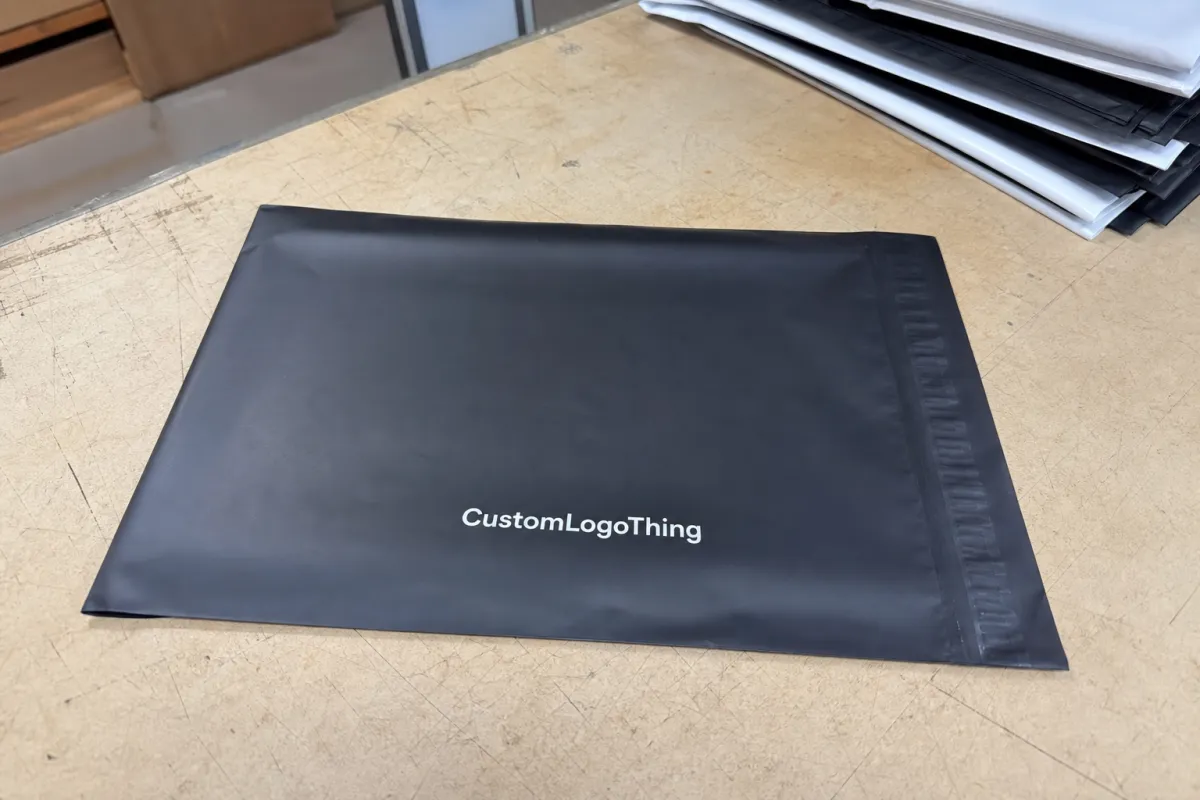
The bag is not decoration. It is the last piece of packaging that touches the packing line, and in many cases it is the first thing the customer sees. If the film is too thin, a zipper or bottle edge can bruise it. If the seal is inconsistent, the team slows down. If the label panel is wrong, the carrier scan becomes a nuisance. A studio order does not need luxury packaging; it needs a bag that can hold shape, close cleanly, and survive the handling chain without looking tired by the time it arrives.
That practical standard matters even more in fitness fulfillment because the risks are different from fashion-only shipping. Sweat, condensation, elastic seams, powders, and accessory kits create failure points that are easy to miss on a sample table. If you already use Custom Packaging Products for cartons or inserts, the courier bag should fit the same operational logic: protect the product, speed the process, and present the brand clearly without creating extra work for the team.
Custom courier bags packing requirements for fitness studio fulfillment
The starting point is simple: a studio order is usually more mixed than it first appears. One shipment may include a folded top, a pair of socks, a metal bottle, and a small information card. That blend of soft and hard items changes the packaging requirement immediately. Apparel collapses easily, but hard corners press against film. Damp goods may not weigh much, yet they can weaken the bag presentation if the seal area is narrow or the closure is overworked.
So I treat courier bags as a shipping container first and a branding surface second. That does not mean the brand is unimportant. It means the visual layer works best after the functional layer is stable. A clean logo, a readable return address, and enough flat area for a carrier label make the package look intentional. But if the bag tears during loading or the print sits where the label needs to go, the design has already failed the operation.
For buyers, the useful way to evaluate a courier bag is to break the decision into four parts: size, gauge, closure, and surface quality. Size determines whether the order lies flat or bulges. Gauge affects puncture resistance and stiffness. Closure affects packing speed and repeatability. Surface quality affects both brand appearance and scan reliability. A studio shipping mostly tees and leggings can often use a lighter spec. A studio shipping bottles, supplements, or damp returns usually needs more margin.
A courier bag does not need to be fancy to perform well. It needs enough structure to seal properly, enough strength to travel through a rough fulfillment line, and enough consistency that the team does not have to think twice about every order.
That last point matters because studio teams are often lean. One person may pick, pack, label, and stage in the same shift. Packaging that saves ten seconds per order is not a small improvement. Over a week, it changes labor strain, error rates, and how often the team has to reopen a bag that should have worked the first time.
For most fitness businesses, the courier bag should behave more like practical product packaging than retail display packaging. The right spec supports the workflow, not the other way around.
Courier bag specs that survive apparel, supplements, and sweat
A usable specification starts with dimensions. For apparel-only shipments, many buyers end up in the 10 x 13 inch to 14 x 19 inch range, depending on how the garment is folded and how much room is needed for the seal. Once the pack includes a shaker, tub, towel, or bundled accessories, a little extra width and length usually helps more than it hurts. Too small, and the bag stretches around corners. Too large, and the pack floats inside the mailer, which can look untidy and waste material.
Flat bags are simpler and often cheaper. Gusseted bags offer more forgiveness when the contents are bulky or irregular. That tradeoff shows up fast in fitness fulfillment. A flat bag is usually fine for folded apparel and paper inserts. A gusseted bag is a safer choice for sweatshirts, towel bundles, or mixed kits with hard items. If the studio ships both categories, it may be smarter to keep two approved sizes rather than force one bag to do everything badly.
Film gauge is the next decision. In practice, many standard mailers sit somewhere around 60-90 micron, while heavier-use packs may need 90-120 micron. That range is not a rule; it is a starting point. Heavier film improves puncture resistance and often feels more premium, but it also adds cost and can make the bag stiffer to pack. The best choice is usually the lightest film that still survives the actual contents, the actual handling, and the actual route.
Closure style changes both speed and failure rate. A strong permanent adhesive is usually the fastest choice for outbound orders that are not meant to be reopened. A resealable strip makes sense for exchange-heavy apparel, membership kits, or any order that may be checked before final handoff. The wrong closure can create a slow line even if the bag itself is strong. A well-specified closure is one of the easiest ways to improve packing consistency.
Surface finish deserves more attention than it gets. Opaque film usually gives a cleaner branded look and better privacy. Clear or tinted film can make contents visible, which may be useful in some workflows, but it rarely gives the same polished finish. The label panel should stay flat, clean, and away from seams or heavy texture. If the barcode lands on a wrinkled or glossy area, the team pays for it later at scan time.
| Bag type | Typical build | Best for | Typical unit price at 5,000 pcs | Main tradeoff |
|---|---|---|---|---|
| Lightweight mailer | 60-70 micron, flat, single seal | Tees, socks, simple inserts | $0.08-$0.14 | Lower puncture resistance |
| Standard branded courier bag | 70-90 micron, opaque, clean label panel | Most apparel and welcome kits | $0.12-$0.22 | May need size testing for bulkier folds |
| Heavy-duty courier bag | 90-120 micron, reinforced seal, higher stiffness | Mixed kits, bottles, damp returns | $0.22-$0.40 | Higher cost and slightly more storage space |
Those prices move with print coverage, resin market conditions, bag dimensions, and freight. Still, they are useful because they keep the quote conversation grounded. A buyer can see, fairly quickly, whether the spec is drifting into a premium build or staying inside a practical range.
How fitness studio pack-outs should flow from shelf to shipment
Pack-out design is where theory meets a real bench. The courier bag should match the way orders move from shelf to shipment, not the way a quote sheet imagines they move. A good flow starts with picking, then assembly, then insert placement, then sealing, then labeling, then scanning. If the team has to reopen a bag twice, the adhesive loses consistency and the line loses rhythm.
That is why I like to sort studio orders into a few practical pack families. Single apparel shipments are usually the cleanest. Membership welcome kits often need extra space for cards or event notices. Class bundles can combine garments with accessories like grips, towels, or a small bottle. Replacement orders are more awkward because they may include paperwork, returns instructions, or a second closure. Each family behaves differently, even if the printed artwork is identical.
The operational benefit of matching the bag to the family is immediate. Staff can train faster, because the pack-out is obvious. Error detection improves, because the bag shape makes it easier to spot an out-of-place item. Rework drops, because seals are under less strain. In a lean operation, those gains matter more than a slightly better unit price.
Brand presentation still matters, just in a restrained way. A clean print field, a readable logo, and a tidy label area make the package feel thought through. If the studio wants the bag to connect visually with inserts or cartons, a consistent color block or logo placement usually does more than cramming extra graphics onto the film. Paired with a simple insert card or a small carton from Custom Packaging Products, the package system feels connected without becoming complicated.
One field habit saves a surprising amount of time: finish the pack-out with the same four steps every time. Seal, label, scan, stage. Short, repetitive, and easy to train. Packing systems usually fail when the team improvises around ambiguity.
Process and timeline: artwork approval, sampling, and production
The approval process should be plain and documented. Confirm bag dimensions, closure type, film gauge, print colors, print placement, and carton count before the order moves forward. Then review a digital proof. If the order is sizable or the contents are complicated, ask for a physical sample. The sample should be packed the way the studio actually packs, not the way it would pack if someone had all day to arrange each item perfectly.
Artwork revisions are one of the easiest ways to lose time. Low-resolution files, unclear logo placement, or a mismatch between the print area and the design layout can stretch the calendar by days. Color matching can add more time if the brand expects a specific tone rather than a close approximation. Sampling adds a step, but it often prevents much more expensive mistakes later. A sample that reveals a weak seal or awkward label panel is cheaper than a full run that has to be reworked.
A simple courier bag spec can often move from final proof approval through production in roughly 12-18 business days. More complicated print, special finishes, or higher minimums can push that out. Freight adds its own clock, especially if the order is palletized or split across receiving points. The best buyers plan the bag replenishment before inventory gets tight. Waiting until the last carton is nearly empty is how otherwise routine packaging orders become urgent.
Write change requests in direct language. If the barcode area must stay blank, say so. If the bag needs a tear notch, a return strip, or a wider seal band, state it clearly. If a carton count matters for storage, include that too. Ambiguity is expensive in production. Clear instructions are one of the few things that genuinely lower risk without increasing cost.
If paper inserts or cartons are part of the same packaging system, FSC certification may matter on that side of the order. For certification and materials context, the FSC site is a useful reference.
Cost, pricing, and MOQ drivers that change your quote
Packaging price is usually the sum of several decisions, not one big one. Bag size changes material usage. Film thickness changes resin consumption and stiffness. More print colors increase setup and production attention. A resealable closure or reinforced seal adds labor and components. Even carton density affects freight, which affects landed cost. A buyer who only compares headline unit price can miss the part of the cost that actually hits the budget.
MOQ works the same way. A higher Minimum Order Quantity can lower the per-bag price, but it also increases storage needs and ties up cash. That can be fine for a high-volume studio with predictable usage. It is less attractive for a smaller operation with seasonal spikes or limited back room space. Cheap inventory is not really cheap if it sits too long or forces the team to store boxes in awkward places.
For context, a basic custom courier bag may sit in the low teens per unit at scale, while a heavier branded version with more print coverage can move into the low twenties. Special features, thicker film, or more complex closures can raise the number further. Freight can change the picture more than people expect, especially on smaller orders. That is why the delivered number matters more than the factory number alone.
| Cost driver | What it changes | Buyer takeaway |
|---|---|---|
| Bag size | Material usage and carton density | Match the bag to the most common order, not the largest rare order |
| Film gauge | Puncture resistance and feel | Use the lightest gauge that survives real handling |
| Print coverage | Ink, setup, and proofing time | Place print where it improves the package, not everywhere space exists |
| MOQ | Per-unit cost and inventory risk | Choose a quantity the studio can store and consume at a steady pace |
| Freight and palletization | Landed cost and delivery timing | Compare the delivered price, not the factory price alone |
If you are comparing mailers with cartons or inserts from our Custom Packaging Products, keep the spec honest. A lower-cost film that tears every few dozen shipments is not a lower-cost solution in practice. It just moves the expense into labor and customer service.
Common mistakes that lead to tears, leaks, and rework
One of the biggest mistakes is sizing the bag from product weight alone. Weight matters, but shape matters too. A light shirt with a zipper can puncture more easily than a heavier towel. A hard bottle cap can rub through thin film during transit. Damp apparel may not weigh much, but it changes how the bag flexes and how the adhesive behaves. The better test is the combination of contents, handling, and shipping route.
Another common error is under-specifying the closure. A seal that feels fine on a bench may fail once the bag is stacked, dropped, or shifted in carrier sorting. The opposite problem happens too: a closure that is too stubborn slows the line and encourages workarounds. The best closure is the one the team can use the same way every time.
Studios also tend to design around a hero item and ignore the full basket. The standard order looks easy. Then the customer adds a shaker, a towel, or a second garment, and the bag suddenly becomes too tight. The adhesive has less margin. The label crowding gets worse. The print area disappears under the barcode. A more reliable approach is to size the bag for the most common mix and then test a slightly bulky version of that mix before final approval.
Sample approval is another weak point. A sample packed carefully by hand can hide problems that show up during daily use. If the team packs fast, the real-world result is usually rougher than a showroom sample. That is why the sample should reflect the actual line, not an idealized version of it.
There is also a recycling and disposal issue to consider when the packaging system includes mixed materials. For broader waste and recovery guidance, the EPA can be a useful reference point, especially if the studio is reviewing secondary packaging or return routing.
Expert testing and quality checks before you place a repeat order
Testing is where the spec earns its keep. Before a repeat order, run a few checks that mirror actual use: a drop test from bench height, a seal inspection, a label adhesion test, and a scan test through the normal carrier workflow. None of those checks requires a lab. They just require consistency. A short, disciplined test with the actual packers usually reveals more than a perfect sample on a desk.
Use the orders the studio ships most often. Test folded apparel. Test a damp item if moisture is part of the process. Include the small accessories that tend to shift in transit. If the bag holds the bulkiest typical order and still scans cleanly, the spec is probably close. If it fails at the label panel or seal line, that failure will repeat at scale.
Consistency across the sample set matters as much as the sample itself. One good bag does not prove a good production lot. Check seal width, print alignment, surface feel, and label-panel uniformity across several pieces. If one bag feels softer or the print block drifts, that can be the first sign of a lot-to-lot issue. Packaging on a busy fulfillment bench lives or dies on repetition.
Outside testing standards can help keep the process objective. A basic drop and distribution check modeled on ISTA methods gives the buyer a repeatable way to judge whether the bag is ready for routine shipping. It does not need to be complicated. It just needs to be consistent enough to catch weak points before they become costly.
If the bag passes, document the approved spec in plain language. If it fails, change one variable at a time so the fix is visible. That habit makes the next reorder easier to manage and lowers the odds of drifting into a different product without noticing.
Next steps: sample, measure, and set a reorder rhythm
The fastest way to move from uncertainty to a usable spec is to measure the most common studio orders and write down what each kit actually contains. That means folded garments, bottle height, insert count, accessory size, and anything else that changes the pack shape. Once the real pack-outs are clear, the bag size question becomes much easier to answer. A spreadsheet can estimate a lot, but a physical stack tells the truth faster.
From there, request samples and pack them with live orders. Do not approve a bag only because it looks good on paper. The closure, bulge, and label placement need to work with the team’s real rhythm. If the sample is awkward to close or hard to scan, it will still be awkward after the full run arrives.
Then set a reorder rhythm based on usage, lead time, and storage. High-volume studios should not wait for the last carton to disappear before placing the next order. Lower-volume studios may prefer smaller, more frequent replenishment to avoid holding too much inventory. Both approaches can work. The key is to make the rhythm intentional rather than reactive.
Keep a short internal standard sheet. Include the approved bag size, film gauge, closure type, artwork file version, carton count, and the order types that drove the decision. That sheet turns the packaging from a one-off purchase into a repeatable operating tool. For a fitness studio, that is usually the real goal: fewer surprises, cleaner pack-outs, and a bag that performs the same way on order one and order one thousand.
What size custom courier bag works best for fitness studio fulfillment?
Start with the most common order profile, usually one to three folded apparel items plus a small insert or accessory. Choose a size that leaves enough flat space for the label and seal, but does not create so much extra air that the package ships inefficiently. Test the bag with the bulkiest typical order, not just the lightest one.
How thick should courier bags be for sweaty gym clothing?
Use a film gauge that balances puncture resistance with packing speed, especially if the contents include zippers, seams, or damp fabric. If moisture is common, prioritize stronger seals and a sturdier feel over the lightest possible film. Match thickness to the real handling environment, including sorting, stacking, and carrier transit.
What affects the unit cost of fitness studio courier bags most?
Bag size, film thickness, and print complexity usually drive the biggest swings in price. MOQ, freight, and storage needs can matter just as much as the quoted unit cost. Special features like resealable closures, opaque film, or custom finishes will usually raise the total.
How long does the production process usually take for custom courier bags?
Timeline depends on artwork approval, sampling, and the production schedule at the packaging plant. Simple specs move faster than jobs that need multiple proofs or color matching. Build in extra time for freight and for any revisions after sample review.
Should a fitness studio use resealable or permanent-seal courier bags?
Use a permanent seal when the order is single-use, highly standardized, and meant to ship quickly. Choose resealable options when returns, swaps, or repeated handling are part of the customer experience. Match the closure to the studio's real workflow, not just the branding look.
