The product made it through manufacturing, storage, pick-and-pack, and freight, then arrived with a scuffed corner because the insert was treated like decorative fluff. Cute. Expensive. Very avoidable. Custom Cut Foam Inserts are foam components cut to match the shape, size, weight, and fragility of a specific product or kit, so the item stays controlled instead of wandering around inside the box like it paid rent.
The goal is not just cushioning. Good foam controls movement, improves presentation, speeds repeatable packing, reduces damage, and makes the unboxing feel intentional. That matters for electronics, tools, cosmetics, medical-adjacent devices, promotional kits, glassware, collectibles, sample boxes, and any product with a finish customers will notice immediately.
Generic foam sheets, bubble wrap, molded pulp, and paper void fill all have a place. Bubble wrap is cheap and flexible, but it looks temporary and depends heavily on the person packing the order. Molded pulp can be strong for certain shapes and sustainability goals, although tooling and minimums may be a hurdle. Paper void fill blocks open space. It does not lock a high-gloss device into a retail presentation.
The buyer question is simple: does the added unit cost prevent enough damage, returns, labor, or brand disappointment to justify the insert?
Custom Cut Foam Inserts Prevent the Expensive Kind of “Almost Fits”
“Almost fits” is packaging code for “will probably fail when the carrier gets creative.” A box can look fine on a desk and still perform badly in transit. If the product shifts 6 mm every time the carton is handled, that movement adds up through vibration, drops, stacking pressure, and warehouse handling.
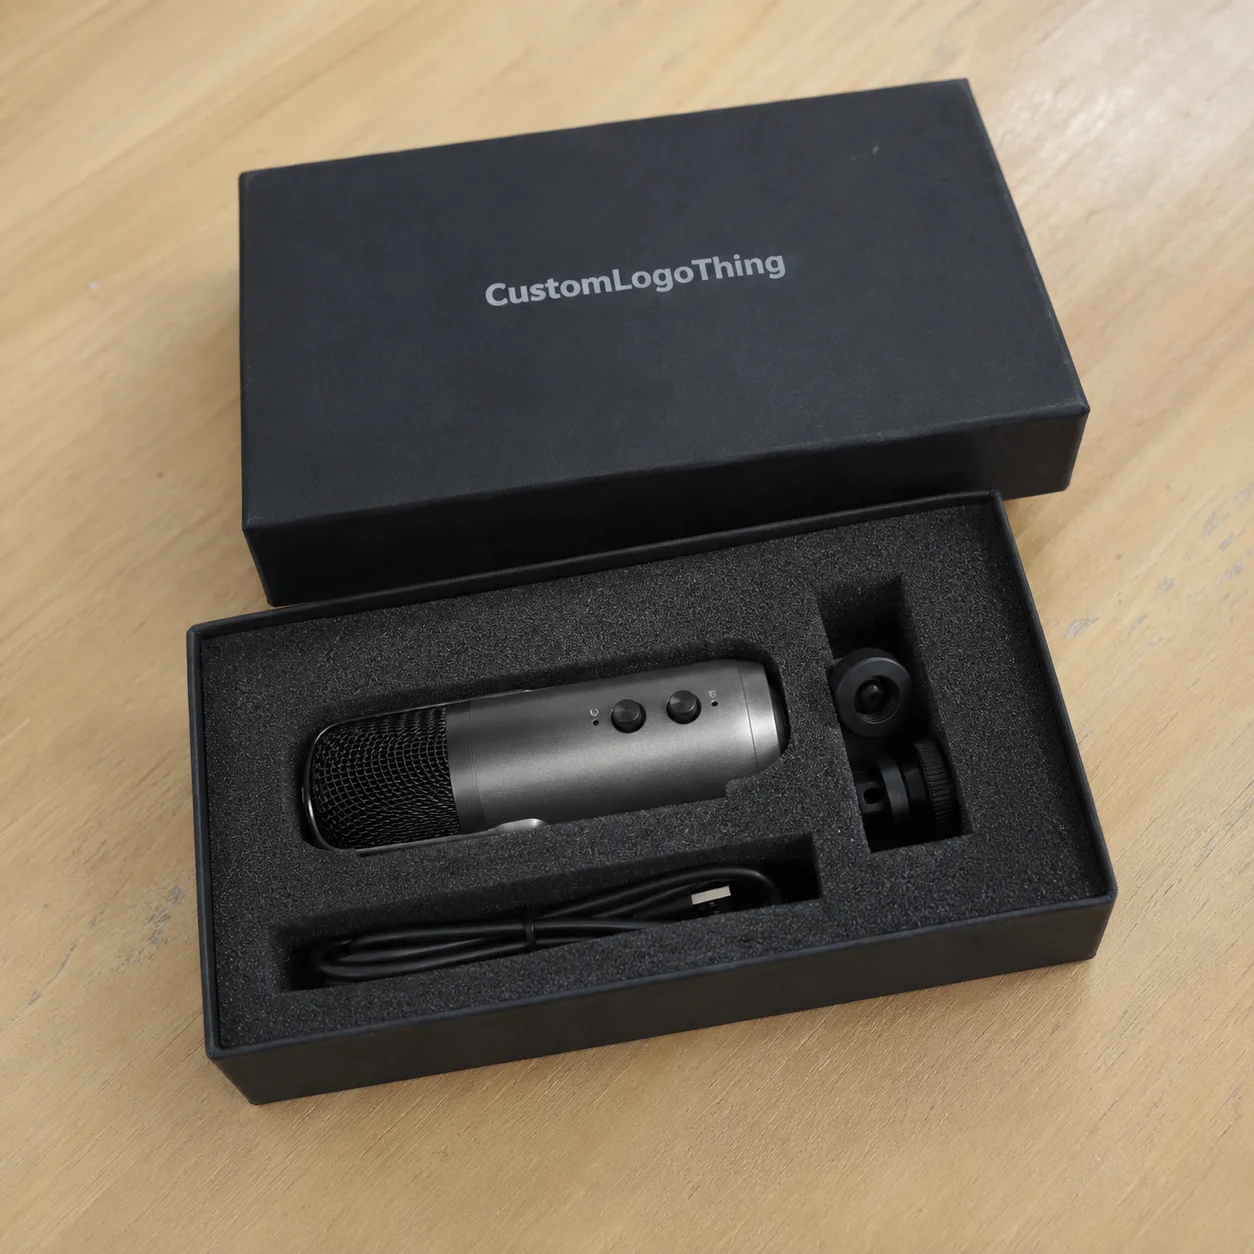
Custom cut foam inserts solve that by creating defined cavities, support zones, and clearance areas. The insert can hold one hero product, multiple accessories, a full kit, or a sample set that needs to arrive in a specific order. For branded packaging, that repeatability matters. The customer should not open the box and see cables floating over a product face, a bottle cap digging into a label, or a premium tool wrapped like leftovers.
There is a cost tradeoff. Simple paper fill might cost pennies per shipment. A basic foam insert at volume may still be economical, while a thick multi-layer EVA insert for a low-volume launch can cost several dollars per unit. That sounds painful until the product is $180, the return freight is $12, the replacement labor is real, and the customer now thinks the brand cuts corners.
Packaging math is rarely just the insert price.
Buyer rule: if damage, scratches, presentation, or packing speed affect margin or customer trust, a fitted insert deserves a serious quote. If the product is cheap, rugged, and hidden from the customer, do not overbuild the box just to feel fancy.
How Foam Inserts Are Designed Around the Product
Foam insert design starts with contact points. The cavity should support the product where it can safely take pressure while avoiding screens, coated surfaces, caps, triggers, hinges, raised logos, labels, sharp corners, and anything fragile enough to complain later. A good cavity profile does not simply trace the largest outline. It considers how the product enters the foam, how it sits under compression, and how it is removed by an actual human with normal hands.
Common layouts include a single product cavity, a multi-part kit layout, a layered insert, a lift-out tray, a finger-notch layout, a display-style presentation insert, and a shipper-focused protective insert. A presentation insert sells the product when the box opens. A transit insert takes the beating during shipping. The best designs do both without pretending physics is optional.
Tolerance is the boring little detail that saves money. If the cavity is too tight, packing slows down and product surfaces can rub. If it is too loose, the product rattles and the foam becomes expensive decoration. For many retail items, designers may allow a small clearance around non-critical edges while using tighter support at stronger surfaces. Heavy or fragile products need fit testing, not optimistic guessing.
Manufacturers can work from CAD files, dielines, product samples, 3D scans, or precise measurements. Real samples are best for irregular products because curves, cables, caps, textures, and soft components love making measurements look smarter than they are.
Orientation also matters. Face-up layouts improve unboxing. Vertical layouts organize kits. Nested layouts reduce box size. Locked-in layouts protect high-value products where movement is the enemy.
Outer packaging has to be part of the same conversation. The insert should work with the rigid box, folding carton, mailer, or shipper so lid clearance, compression, and presentation line up. Custom printed boxes may look great on the outside, but if the insert sits 3 mm too high and the lid bows, congratulations, the box now announces the mistake for you.
Material, Density, and Finish Choices That Actually Matter
Foam choice should follow the product, shipping method, and budget. Picking by vibes is how buyers end up with a beautiful insert that performs badly, or a protective insert that makes a premium product look like it came from a garage shelf.
| Foam Type | Best Use | Typical Feel | Buyer Notes |
|---|---|---|---|
| EVA foam | Premium presentation, durable cavities, gift boxes, sales kits | Firm, smooth, structured | Usually costs more, but looks cleaner and holds shape well |
| PE foam | Protective shipping, reusable inserts, heavier products | Firm, resilient, practical | Strong option for transit protection and industrial kits |
| PU foam | Soft cushioning for lighter or delicate products | Soft, compressible | Good shock absorption, but can look less premium depending on grade |
| Anti-static foam | Electronics, circuit boards, sensitive components | Varies by grade | Raise ESD needs before quoting, not after sampling |
Density affects feel, support, appearance, and price. Denser foam usually feels firmer, holds shape better, and costs more. Softer foam can absorb shock well, but it may compress, tear more easily, or look less polished in a presentation box. For many product packaging projects, the right answer is not the “best” foam. It is the foam that supports the item, survives fulfillment, and fits the target price.
Thickness matters too. A 5 mm pad may organize lightweight items, but it will not properly protect a heavy glass bottle or metal device. Fragile or heavy products often need deeper foam, layered construction, or stronger support below the cavity. Laminated foam layers are common for depth, color contrast, pull tabs, stepped cavities, and multi-level kits. They also add labor and cost, because layers do not magically align themselves. Shocking, I know.
Finish choices affect appearance and maintenance. Black foam hides shadows and often feels premium. White foam looks clean but shows dirt and dust quickly. Color foam can support package branding, but it may raise minimum order quantity or cost if the color is not standard. Glossy, matte, painted, plated, or soft-touch products should be checked against the foam surface to avoid abrasion, dust transfer, or chemical sensitivity.
Special requirements need to surface early. Anti-static, flame-retardant, food-contact, or medical-adjacent requirements can change material selection, documentation, and lead time. If the product has sustainability claims, review how the insert fits the broader package, including outer cartons, coatings, filler, and end-of-life messaging. For paper-based components, resources from the Forest Stewardship Council can help frame questions about certified materials.
Cost and Pricing Factors Buyers Should Know Before Quoting
Foam insert pricing is driven by material type, thickness, density, sheet yield, number of cavities, cutting complexity, order quantity, sampling, assembly, and freight. That is why one supplier may quote a basic cavity at a friendly unit cost while another quotes a multi-layer EVA kit that makes the room go quiet.
Practical ranges help. Simple foam pads or basic single-cavity inserts at higher volume can land in the low cents to under a dollar per unit, depending on size and material. A thicker EVA insert with multiple cavities, laminated layers, and lower quantity can run from a couple dollars to several dollars per unit. Specialty anti-static or flame-retardant materials may push higher. These are not universal prices. They are guardrails so nobody mistakes a fitted insert for free tissue paper.
Setup costs and unit costs are different animals. Buyers often fixate on the unit price and forget setup, samples, revisions, freight, and assembly labor. A low unit price can still be a bad buy if setup is high and the design needs three revisions. A slightly higher unit price can be cheaper overall if the insert reduces packing time by 20 seconds per order across 10,000 shipments. That is about 55 labor hours saved before anyone argues about damaged returns.
Minimum order quantity is another tradeoff. Lower quantities may be possible, especially for simple cuts, but unit cost usually gets ugly because setup time does not shrink just because the order did. Sheet yield also matters. A design that wastes foam can jump in price even if the product itself is small. Rounded cavities, odd angles, deep cutouts, and widely spaced kit components can reduce how many inserts fit on each sheet.
Cost-saving levers are practical: simplify cavity shapes, reduce unnecessary depth, use standard foam colors, combine parts into one layer where safe, increase order quantity, and provide accurate product files early. If you are also buying boxes, compare the insert with related Custom Packaging Products so the full packaging system is quoted together instead of patched together late.
| Design Choice | Likely Cost Impact | Tradeoff |
|---|---|---|
| Single-layer PE insert | Lower to moderate | Good protection, less premium appearance than EVA |
| Multi-layer EVA insert | Moderate to high | Cleaner presentation, higher material and assembly cost |
| Standard black foam | Usually lower | Premium look, may show dust on light products |
| Custom color foam | Moderate to high | Stronger branding, possible higher MOQ |
| Complex cavity set | Higher | Better organization, more cutting time and waste |
Process, Timeline, and Lead Time From Sample to Production
The typical path is straightforward: submit product dimensions or samples, confirm the packaging goals, choose foam material, create the layout, review a dieline or CAD proof, produce a sample, test fit, revise if needed, then approve bulk production. Straightforward does not mean instant. Packaging has steps because skipping steps is how products show up damaged while everyone pretends to be surprised.
Basic foam layouts can sometimes move through design and sampling in about 5 to 10 business days after complete specs are received. More complex kits, laminated layers, strict tolerances, or specialty materials often need 2 to 4 weeks before production approval. Bulk production may add another 10 to 25 business days depending on quantity, schedule, and finishing. Freight can add days or weeks, especially if the insert is produced with custom printed boxes or rigid packaging overseas.
What slows everything down? Missing product dimensions, unclear box size, late artwork changes, specialty foam, tight tolerances, multi-layer construction, overseas freight, and too many decision-makers. Packaging by committee is still packaging by committee. Every “quick tweak” can reset proofing, sampling, or quoting.
Physical samples matter for high-value, fragile, or irregular products. Measurements help, but real-world fit testing catches the annoying details: a cap that catches on a wall, a cable that lifts the lid, a corner that rubs, a glossy coating that marks, or a finger notch that is too shallow. For shipping performance, buyers can reference test approaches from the International Safe Transit Association, especially for drop, vibration, and distribution simulation thinking.
Expect approval checkpoints: material swatch, digital layout, prototype or pre-production sample, final signoff, mass production, quality control, packing, and shipping. Build a buffer before a launch, trade show, retail delivery, or influencer kit drop. Rush orders exist, but they are not a personality trait.
Common Mistakes That Make Foam Inserts Fail
The biggest mistake is designing the insert after the box is already finalized. If the box is too shallow or too tight, the foam has no room to protect anything properly. A 40 mm product inside a 44 mm internal box leaves almost no space for meaningful top and bottom cushioning. That is not protection. That is optimism with a purchase order.
Another common mistake is measuring only maximum length, width, and height. Products are not rectangles with marketing photos attached. Curves, cables, caps, accessories, protrusions, hinges, fragile surfaces, and labels all affect the cavity. A bottle with a pump top, for example, may need clearance around the actuator and support lower on the shoulder. A small electronic device may need pressure kept away from buttons, ports, and display glass.
Over-tight cavities sound premium until warehouse staff need two thumbs and a prayer to pack each unit. That slows fulfillment and can scuff the product during insertion. Under-tight cavities are just as bad. If the product rattles, the foam is not protecting it. It is traveling with it.
Access points get forgotten constantly. Finger notches, pull tabs, angled cuts, and lift channels matter for smooth, heavy, or delicate products. If the customer has to dig under the item to remove it, the unboxing feels clumsy and the product may be damaged by fingernails, tools, or frustration. Not ideal brand theater.
Foam and product finish can also clash. Abrasive foam against gloss coatings, dark foam dust near light products, chemical sensitivity with certain plastics, or pressure marks on soft finishes can create defects that look like manufacturing problems. Testing should include packing, transport simulation where possible, opening, removing, replacing, and checking for rub marks.
Finally, incomplete specs create bad quotes. Sending one product photo and asking for an accurate price is not quoting. It is a guessing contest with invoices. Suppliers need dimensions, weight, quantity, box specs, material preferences, timeline, shipping destination, and any compliance requirements to give a number worth trusting.
Next Steps to Spec, Test, and Order the Right Insert
Start with the product, not the foam. Gather dimensions, weight, fragility notes, product photos from multiple angles, box dimensions, desired orientation, target quantity, launch date, shipping method, and compliance or material requirements. If you have CAD files, send them. If you have a product sample, send that too. A sample answers questions that a spreadsheet politely ignores.
Decide the insert’s main job. Is it for retail presentation, shipping protection, kit organization, repeatable fulfillment, premium unboxing, or all of those jobs at once? A sales kit for a trade show may prioritize presentation and fast product removal. A heavy tool shipped by parcel may prioritize compression support and drop protection. A cosmetic gift set may need a clean visual layout with consistent spacing and no label contact.
Compare two or three material options instead of asking for every foam under the sun. More options can help; endless options just delay the quote. For example, request EVA for premium presentation, PE for protective transit, and PU if softer cushioning may suit the product. If the item includes electronics, ask about anti-static foam early.
- Send: product sample or CAD file, photos, product dimensions, weight, and finish notes.
- Define: outer box size, product orientation, cavity depth, access points, and presentation goals.
- Confirm: quantity, timeline, shipping destination, and whether assembly is needed.
- Test: pack the item, shake the box, open it, remove and replace the product, check lid closure, and inspect for rubbing.
- Approve: material, layout, prototype, revisions, final sample, and production schedule.
For fragile, heavy, high-value, or unusually shaped products, request a prototype before approving bulk production. Internal testing does not need to be fancy to catch obvious problems. Pack the product, shake the box, check whether anything moved, remove and replace each item, inspect surfaces, and confirm the lid closes without bulging. If the product ships parcel, ask whether a drop or vibration test is appropriate.
If the packaging supports a premium launch, test the unboxing with someone who did not design it. Fresh eyes find awkward details fast.
The insert should be evaluated with the full packaging system, including the box, print, opening style, closure, shipping carton, and any branded packaging structure. Reviewing Custom Packaging Products early can prevent the classic problem of approving a gorgeous box that leaves no room for the foam to do its job.
FAQ
What are custom foam inserts used for?
Custom Foam Inserts hold products in place inside a box, case, mailer, or kit so items do not shift, scratch, collide, or look messy during shipping and unboxing. They are useful for fragile, premium, multi-piece, heavy, or presentation-sensitive products where generic void fill looks cheap or performs inconsistently. They can also improve packing speed because warehouse teams do not have to improvise placement on every order.
How much do cut foam packaging inserts cost?
Pricing depends on foam type, thickness, density, cavity complexity, order quantity, setup requirements, sampling, and whether the insert uses one layer or multiple laminated layers. Simple inserts at higher quantities usually have a much lower unit cost than low-volume, thick, complex EVA or specialty foam inserts. The fastest way to get accurate pricing is to send product dimensions, photos, target quantity, box size, foam preference, and timeline before requesting a quote.
What foam material is best for protective product inserts?
EVA is often used for premium presentation and durable fitted cavities, especially in gift boxes and high-end kits. PE foam is a strong option for protective shipping, reusable inserts, and products that need firmer support. PU foam is softer and can work well for cushioning lighter or delicate items, while anti-static foam should be considered for electronics or sensitive components.
Do I need a product sample to make custom insert packaging?
A physical sample is strongly recommended for irregular, fragile, expensive, or tight-tolerance products because it allows real fit testing. CAD files, dielines, and accurate measurements can work for simpler products, but small details like curves, caps, buttons, cables, and surface finish still matter. If timing is tight, send photos, measurements, and a sample as early as possible so design and quote work can start in parallel.
What is the typical lead time for custom foam packaging inserts?
Lead time varies based on design complexity, sampling, material availability, order quantity, revisions, production schedule, and freight method. Basic inserts can move faster, while multi-layer inserts, specialty foam, or strict tolerance projects need more time for prototyping and approval. Build in extra time before launches, retail deliveries, trade shows, or promotional kit deadlines because late design changes can reset the clock.
Spec custom cut foam inserts like a practical buying decision: define the product, test the fit, compare real costs, and order the insert that protects the item without overbuilding the box.

