Buyer Fit Snapshot
| Best fit | Custom Embossing for Packaging Boxes projects where brand print, material claims, artwork control, MOQ, and repeat-order consistency need to be specified before quoting. |
|---|---|
| Quote inputs | Share finished size, material target, print colors, finish, packing count, annual reorder estimate, ship-to region, and any compliance wording. |
| Proofing check | Approve dieline scale, logo placement, barcode or warning zones, color tolerance, closure strength, and carton packing before bulk production. |
| Main risk | Vague material claims, crowded artwork, missing packing details, or unclear freight terms can make a low unit price expensive after revisions. |
Fast answer: Custom Embossing for Packaging Boxes: Board, Finish, Dieline, and Unit Cost should be specified like a repeatable production item. The safest quote records material, print method, finish, artwork proof, packing count, and reorder notes in one written spec.
Production checks before approval
Compare the actual filled-product size with the drawing, then confirm tolerance on folds, seals, hang holes, label areas, and retail display edges. Reserve space for logos, QR codes, warning copy, and material claims before decorative graphics fill the panel.
Quote comparison points
Review material grade, print process, finish, sampling route, tooling charges, carton quantity, and freight assumptions side by side. A quote is only useful when the supplier can repeat the same color, closure quality, and packing count on the next order.
Custom Embossing for Packaging Boxes: A Practical Guide
A flat carton can disappear fast on a crowded shelf. A raised logo does the opposite. It catches light, then catches a thumb, then hangs around in memory longer than most printed messages ever do. That is the real pull of custom embossing for packaging boxes. Texture gives packaging a pulse. It turns an ordinary surface into something people want to touch, which is usually a decent sign if you are trying to sell something.
Brands like embossing for a simple reason: it changes how the box feels in hand. A raised mark can make custom printed boxes look sharper, more premium, and less disposable. On cosmetics, gift sets, apparel, and specialty food, that small physical cue can carry more weight than a loud design ever could. It quiets the package down and makes it feel considered. That is often the point.
I keep coming back to embossing because it still feels underused. It does not need to shout. It does not need a neon palette or a wall of graphics to prove it is there. It relies on pressure, shadow, and restraint. On retail packaging, that can work better than another glossy flourish nobody asked for. Honestly, that restraint is part of the charm.
One practical note before we go any further: embossing is not magic. It will not rescue weak branding, and it will not fix a muddy layout. But used well, it gives the box a physical presence that print alone cannot fake.
What Is Custom Embossing for Packaging Boxes?
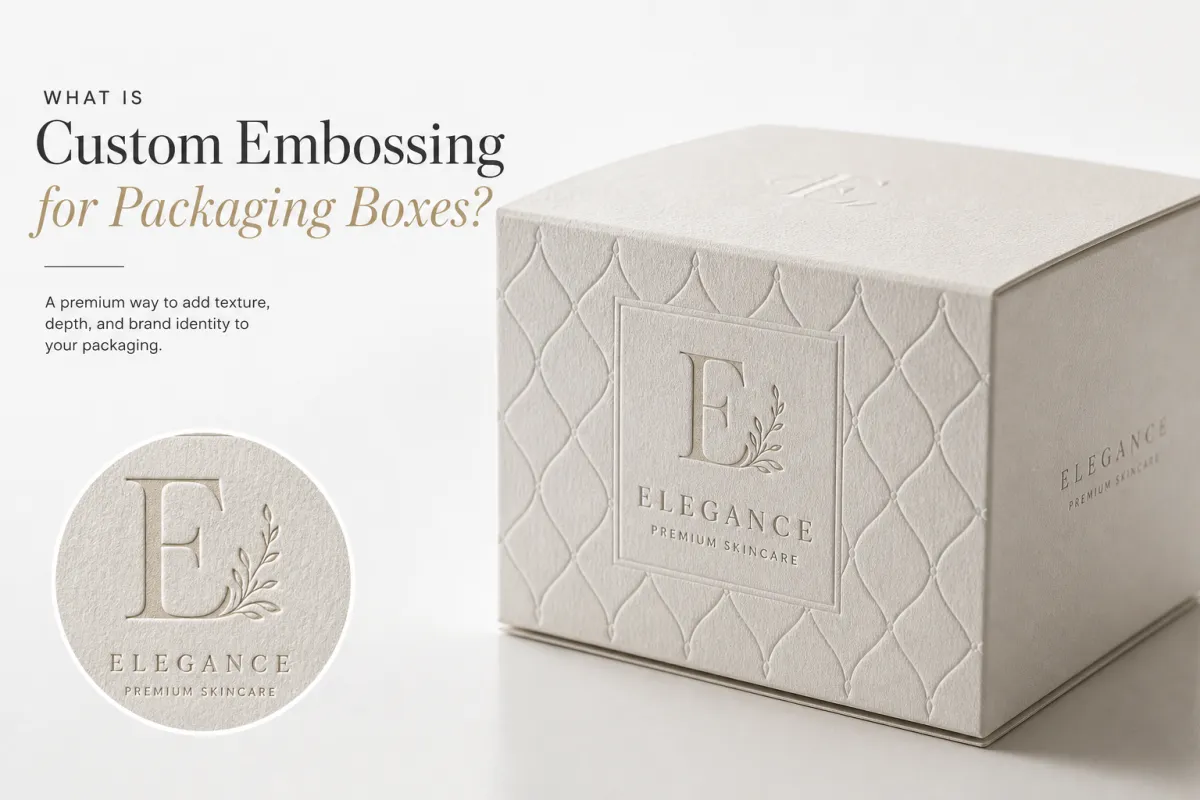
Custom embossing for packaging boxes is the process of pressing a design upward from the paperboard so the image rises above the surface. That design can be a logo, a monogram, a border, a pattern, or a small brand mark tucked into a corner. The effect is visual first, tactile second, and then it lingers because the hand remembers what the eye noticed.
The mechanics are simple enough. A matched die and counter-die squeeze the board and force the selected area to lift. The result depends on the stock, the pressure, and the complexity of the art. Custom embossing for packaging boxes works especially well when a brand wants refinement without piling on ink, foil, or extra decoration. It can stay subtle for skincare and fragrance. It can also go bolder for a seasonal release or a limited-edition carton.
Debossing moves in the other direction. It presses the design into the surface instead of raising it. Some brands use only one of the two. Others combine both to create contrast and depth. A debossed frame around an embossed logo can look polished on rigid boxes or heavy folding cartons. For custom embossing for packaging boxes, the choice usually comes down to brand tone, artwork density, and how much presence the box needs at first touch.
There is a practical side to the finish too. A raised logo can signal luxury. A textured field can suggest craft. A small embossed seal near a flap can signal discipline. In cosmetics and fragrance, that quiet authority matters. In gift packaging, it can make the box feel ready to present without extra wrapping. In apparel, it can lift a plain mailer into a better unboxing experience.
Custom embossing for packaging boxes shows up in launches where the box has to do part of the storytelling. The package is not only a container. It is part of the product experience, and sometimes it is the first thing a customer judges. That first impression is doing a lot of work.
How Custom Embossing for Packaging Boxes Works
The process looks straightforward from the outside. Inside the shop, it is a little more exacting. Custom embossing for packaging boxes usually happens after artwork approval and before final finishing. A die maker builds a matched pair: one side carries the raised image, the other creates the counter-pressure. During the press run, the board is compressed between them and the shape forms.
The usual sequence goes like this: artwork setup, dieline review, die fabrication, press calibration, sample pulls, and production approval. If the box also needs die cutting, folding, gluing, or lamination, the emboss step has to fit into that larger plan. On many jobs, printing happens first, then embossing, then cutting and conversion. That order can shift depending on the board, the artwork, and the press line in use.
- Artwork review: confirm line thickness, logo scale, and the exact area that will be embossed.
- Dieline check: keep the raised image away from folds, glue tabs, and trim edges.
- Tooling: build the emboss die and counter-die to match the approved art.
- Press setup: test pressure, registration, and board response before the main run.
- Sampling: pull a proof and inspect depth, sharpness, and fiber recovery.
- Production: run the full order once the sample is approved.
There are three common approaches. Blind embossing uses no ink or foil in the raised area, so the texture carries the effect on its own. Registered embossing aligns the raised shape with printed artwork, which helps a logo or icon feel precise. A foil-plus-emboss combination adds metallic foil and raised definition together, which is common in premium cosmetics and gifting.
Custom embossing for packaging boxes is not only about pressure. It is about control. Deeper embosses need stronger board, tighter registration, and more careful calibration. If the paperboard is too soft, the image can collapse. If the coating is too rigid, the fibers may crack. If the logo is too intricate, the finished result can lose sharpness. That is why the sample stage matters. A digital mockup can show placement. It cannot show how the light breaks across the raised surface.
Custom Embossing for Packaging Boxes: Key Design Factors
Good embossing starts with the substrate. Custom embossing for packaging boxes depends on board thickness, coating, fiber direction, and surface smoothness. A 16 pt folding carton behaves differently from a 24 pt SBS board or a rigid setup board. Smooth coated stock usually holds cleaner edges. Rough paper or a heavily textured sheet can soften the raised image. If the board is too thin, embossing may mark the back panel or distort the area around the press.
Artwork complexity matters just as much. Bold shapes, larger type, and simplified logos usually emboss more cleanly than tiny serif text or thin rules. If the design has fine detail, ask whether it can be pared back without losing brand recognition. In practice, a logo with fewer nodes often looks better once it is raised. The safest custom embossing for packaging boxes projects are the ones where the designer knows that less detail can create more impact.
Placement changes the tone of the box. A small embossed accent on the lid can feel more refined than a heavy treatment across the front panel. An embossed seal near the top edge can draw the eye without crowding the layout. A full-panel texture can work too, if the board and budget can handle it. The right answer depends on whether the package needs a quiet premium signal or a louder shelf presence.
Packaging design and finishing have to stay in the same conversation. Heavy ink coverage, soft-touch lamination, spot UV, metallic inks, or a large foil area can crowd the emboss or flatten its visibility. A matte finish often helps custom embossing for packaging boxes stand out because light has more room to catch the raised detail. Gloss coatings can still work, but the look shifts and the effect usually becomes less restrained.
"If the emboss is doing all the work, the design is probably right."
That is not a law. It is a useful production instinct. The best custom embossing for packaging boxes tends to look restrained on screen and confident in hand. Not crowded. Not noisy. Just precise.
One more thing: do not ignore the rest of the structure. If the box has die cuts, tuck flaps, glue areas, or scored folds, the embossed zone needs to stay clear of those stress points. A raised logo sitting beside a fold can flatten during conversion. A mark too close to the edge can chip during handling. Small changes at the artwork stage save waste later.
If you are comparing box styles, start with the structure before the finish. Our Custom Packaging Products page is a useful place to compare formats before you decide where custom embossing for packaging boxes should sit on the finished carton.
Custom Embossing for Packaging Boxes: Cost and Pricing
Pricing gets muddy fast, so it helps to keep the breakdown plain. Custom embossing for packaging boxes usually has two cost layers: tooling and production. Tooling covers the die or plate creation. Production covers setup, press time, and the per-box run cost. The number changes with board grade, emboss depth, artwork complexity, and whether the finish is blind embossing or paired with foil, print, or another effect.
Smaller runs usually carry a higher per-unit cost because the setup is spread across fewer boxes. Larger runs absorb the tooling more easily. In many programs, a simple blind emboss on a standard folding carton might add roughly $0.08-$0.20 per unit at higher volumes, while short runs can reach $0.30-$0.90 per unit once tooling and setup are counted. Deeper relief, larger coverage, or combined foil work can push the add-on higher.
A realistic cost model for custom embossing for packaging boxes also depends on how many passes the job needs. One clean emboss pass is cheaper than a multi-stage finish that includes foil stamping, special coating, and a second pressure pass. Tighter inspection requirements can add labor too. That shows up fast in luxury product packaging, where every raised detail has to stay consistent across the order.
Here is a simple comparison buyers can use during budgeting:
| Option | Typical Tooling | Typical Unit Add-On | Best For |
|---|---|---|---|
| Blind emboss | $75-$250 | $0.08-$0.20 | Quiet premium branding, simple logos, minimal artwork |
| Registered emboss | $125-$350 | $0.12-$0.28 | Print-aligned logos, retail packaging, tighter brand control |
| Foil + emboss | $150-$450 | $0.18-$0.40 | Luxury presentation, gift sets, cosmetics, launch kits |
| Deep sculpted emboss | $250-$600+ | $0.20-$0.60+ | Rigid boxes, statement branding, specialty editions |
These numbers are planning ranges, not quotes. They still help frame the conversation. Custom embossing for packaging boxes is often cheaper than adding a complex structural feature, but more expensive than flat print-only decoration. If the budget is tight, ask whether the same visual story can be told with a smaller raised area instead of a full-panel treatment.
Another useful question: should the emboss go on the primary box or on the secondary packaging? For some launches, the outer carton deserves the spend because it creates shelf distinction. For others, the smarter move is to keep the main box simpler and put embossing on a sleeve, insert, or lid panel. That shift can save money without losing the tactile cue.
If the team is still choosing a format, our custom printed boxes options can help line up structure, print coverage, and finish choices before you lock the emboss spec. The finish decision usually gets easier once the box style is clear.
Step-by-Step Process and Timeline
Custom embossing for packaging boxes works best when the schedule is planned in stages instead of treated like a last-minute add-on. Start with a clear brief: box type, target finish, run size, budget band, and the exact brand element that should be raised. If the brief is vague, the sample stage slows down and the project starts drifting.
Next comes prepress. This is where dielines are checked, safe zones are confirmed, and artwork is scaled to the actual panel size. If the emboss lands too close to a score, a flap, or a glue area, the result can fail in production. This is also the moment when a converter may suggest a different board weight or a simpler mark to improve definition. A clean prepress review often saves days later.
Then comes tooling and sampling. A die is built, press pressure is tested, and a proof is pulled. This is the most useful risk-reduction step in custom embossing for packaging boxes because it reveals issues that flat artwork never shows: too much depth, not enough contrast, or a logo that fades after lamination. A lot of buyers underestimate how much a sample can teach them. They really should not.
A realistic timeline often looks like this:
- Artwork approval: 1-3 business days if files are ready.
- Die making: 3-7 business days for straightforward jobs.
- Sampling and revision: 2-5 business days, depending on changes.
- Production run: often 5-10 business days after sample approval.
- Final inspection and shipment: 1-3 business days, depending on logistics.
Simple projects can move quickly. Complex custom embossing for packaging boxes projects can stretch longer if the art keeps changing, if the box uses multiple finishes, or if the board choice needs to be tested twice. I would rather see a buyer add a few days for proofing than force a production run on an untested sample. That is especially true for luxury retail packaging, where a small flaw can drag down the whole presentation.
For sustainability-minded buyers, this stage is also where material choices matter. If you need FSC-certified board, ask for it early and confirm the supply chain paper trail. If transit performance matters, ask whether the finished box should be checked against ISTA transit testing guidance. If you want broader packaging education, the Institute of Packaging Professionals at packaging.org has useful background on formats and finishing. These references are not filler. They help buyers ask sharper questions.
In practice, the best projects treat packaging design, print, and finishing as one conversation. That is true for branded packaging, retail packaging, and custom printed boxes alike. Set the embossing plan early, and the rest of the job usually gets easier.
Custom Embossing for Packaging Boxes: Common Mistakes to Avoid
The first mistake is scale. A logo that looks fine on a screen can become too small once it is raised on board. Thin serif type, tiny symbols, and crowded details often lose definition. For custom embossing for packaging boxes, bigger and cleaner usually wins over clever and tiny. If the mark cannot be read without squinting, it is probably too detailed for this finish.
The second mistake is ignoring the material. A board that prints beautifully can still behave badly under pressure. Coated paperboard, uncoated stock, and heavier rigid materials all respond differently. Some boards crack. Some flatten. Some show a faint reverse impression. That is why sample approval is not optional on anything important. A digital proof is not enough to sign off custom embossing for packaging boxes.
The third mistake is putting the emboss too close to folds, cuts, or glue areas. Those zones already carry stress from die cutting and converting. Add a raised image right on top of them and the panel can distort. Keep enough clearance, especially on tuck-end cartons and sleeve-style product packaging. The safer layouts build breathing room into the dieline instead of forcing a dramatic placement.
The fourth mistake is overloading the finish stack. I see this all the time in premium launches. Teams want embossing, foil, spot UV, heavy ink coverage, and a special coating all on one panel. The result can feel busy instead of premium. Custom embossing for packaging boxes works best when it gets to be the star or at least one disciplined partner, not just another effect fighting for attention.
Quality control has its own trap: bad lighting during review. A raised logo that looks perfect under one light can go soft under another. Ask for samples in bright retail lighting and in normal office conditions. That matters more than many people think, especially for cosmetic cartons and gift packaging where the display environment changes how the finish reads.
Finally, do not assume the same design will work across every box size. A small carton and a larger carton often need different emboss proportions. What feels elegant on a compact box can look weak on a larger panel. Custom embossing for packaging boxes should be adjusted to the final size, not just stretched and sent.
Short version: keep the artwork simple, respect the board, and test the finish before approval. That combination avoids most of the expensive surprises.
Expert Tips and Next Steps for Your Next Run
If you are planning custom embossing for packaging boxes, the smartest move is to compare options before you commit to a single tool. Ask for a finish matrix with two or three board choices, one or two emboss depths, and a flat printed version for comparison. Seeing the embossed sample next to the unembossed version makes the value obvious fast. The difference can be surprisingly dramatic.
Ask your converter for a press-ready checklist. It should cover dieline alignment, minimum line thickness, coating compatibility, fold clearance, and the order of operations for print, embossing, and die cutting. If the team cannot explain how those pieces fit together, the job probably needs more prep. A good checklist keeps the conversation grounded in facts instead of guesswork.
Test the box in real conditions. Hold it, stack it, ship it, and look at it under store lighting. Does the raised mark still read after handling? Does the corner crush the area? Does the emboss still catch the eye after the carton has been packed and unpacked a few times? Custom embossing for packaging boxes should survive real use, not just a photography setup. Otherwise, you are paying for a pretty sample and hoping the rest sorts itself out.
I also recommend asking for a plain comparison sample. One version with the emboss, one without. That makes internal approvals easier, especially if finance or merchandising wants to see whether the premium finish is worth the spend. In many cases, the answer is yes, but it is better to prove that with samples than with enthusiasm.
For buyers still shaping the brief, start with three questions:
- What part of the brand story should the box communicate first?
- How much tactile detail can the budget support at the target volume?
- Which board and finish combination gives the cleanest result in testing?
Those questions push the project into practical territory. That is where custom embossing for packaging boxes earns its keep. It is not just a decoration choice. It is a product packaging choice, a retail packaging choice, and sometimes a package branding choice all at once.
If the goal is to make a box feel more premium without making it louder, embossing is still one of the strongest tools available. Done well, custom embossing for packaging boxes adds depth, restraint, and shelf presence in one move. Done poorly, it wastes money and flattens the story. The difference usually comes down to the sample stage, the board choice, and how much detail you ask the die to carry. For most brands, that is exactly where the smartest custom embossing for packaging boxes decisions get made.
FAQ
What is the difference between embossing and debossing on packaging boxes?
Embossing raises the design above the surface, while debossing presses it inward. Embossing usually feels more prominent at first touch, which is why it is common in custom embossing for packaging boxes that need a stronger premium cue. Debossing can feel quieter and more understated. The better choice depends on the brand mood, the artwork detail, and how strong the paperboard is.
How much does custom embossing for packaging boxes usually cost?
Pricing depends on die making, setup time, board grade, and whether the job is blind embossing or combined with foil or print. Short runs usually cost more per unit because the tooling is spread across fewer boxes. For planning, it helps to ask for separate numbers for tooling, setup, and per-box pricing. That makes the comparison cleaner when custom embossing for packaging boxes is one of several finish options.
How long does the custom embossing process take for packaging boxes?
The timeline usually includes artwork approval, die production, sampling, and the final press run. Simple jobs can move quickly, but complex designs or finish combinations need more proofing and adjustment time. If your launch depends on sample approval or if the design is still changing, build in extra time. Custom embossing for packaging boxes is rarely the step you want to rush at the end.
Does custom embossing for packaging boxes work on all paperboard types?
Not all boards perform the same. Thickness, coating, and fiber structure all affect detail quality. Softer or very thin stock may flatten, crack, or lose sharpness under the embossing press. A production sample is the safest way to confirm that custom embossing for packaging boxes will hold the image cleanly on the exact material you plan to use.
Can custom embossing for packaging boxes be combined with foil stamping or printing?
Yes, embossing is often paired with foil stamping, spot UV, or premium inks for a more layered effect. The order of operations matters because the finishing sequence affects registration and final texture. Keep the artwork simple enough that the combined finishes do not fight each other visually. In many branded packaging projects, the best results come from a restrained combination rather than an overloaded one.

