Buyer Fit Snapshot
| Best fit | Custom Foil Stamping Packaging projects where brand print, material claims, artwork control, MOQ, and repeat-order consistency need to be specified before quoting. |
|---|---|
| Quote inputs | Share finished size, material target, print colors, finish, packing count, annual reorder estimate, ship-to region, and any compliance wording. |
| Proofing check | Approve dieline scale, logo placement, barcode or warning zones, color tolerance, closure strength, and carton packing before bulk production. |
| Main risk | Vague material claims, crowded artwork, missing packing details, or unclear freight terms can make a low unit price expensive after revisions. |
Fast answer: Custom Foil Stamping Packaging: Design, Cost, and Process should be specified like a repeatable production item. The safest quote records material, print method, finish, artwork proof, packing count, and reorder notes in one written spec.
Production checks before approval
Compare the actual filled-product size with the drawing, then confirm tolerance on folds, seals, hang holes, label areas, and retail display edges. Reserve space for logos, QR codes, warning copy, and material claims before decorative graphics fill the panel.
Quote comparison points
Review material grade, print process, finish, sampling route, tooling charges, carton quantity, and freight assumptions side by side. A quote is only useful when the supplier can repeat the same color, closure quality, and packing count on the next order.
Custom Foil Stamping Packaging: Design, Cost, and Process sounds fancy until you hold the first sample under real light. Then it stops being a mood board exercise and starts being a production decision. Two cartons can share the same size, same board, same print, same layout, and still feel like totally different products once one of them catches a clean foil edge.
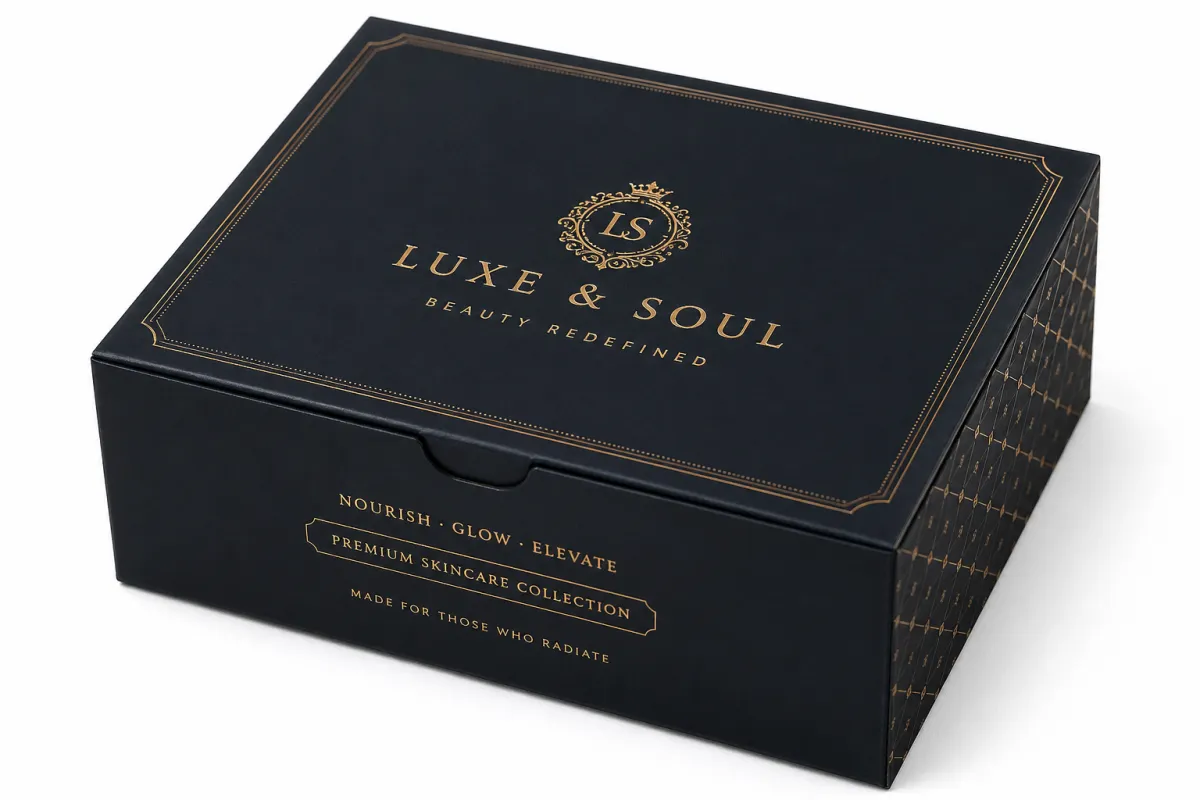
Custom Foil Stamping Packaging is that exact kind of finish. Heat, pressure, and a die transfer a metallic or pigmented layer onto the surface without changing the structure of the box. It is simple in theory and picky in practice. Buyers notice it. Shoppers notice it. Finance notices the bill, which is fair enough. Used well, the finish makes a package feel deliberate instead of generic.
This guide walks through how Custom Foil Stamping Packaging works in production, what drives cost, where projects usually go sideways, and how to judge whether the finish belongs in your next launch. I am also including the stuff people usually learn the hard way: sample checkpoints, material traps, and the kind of detail limits that save a reprint.
What Custom Foil Stamping Packaging Is and Why It Stands Out
custom Foil Stamping Packaging uses a shaped die to transfer foil onto a product packaging surface. Heat activates the release layer in the foil, pressure pushes the design into the substrate, and the decorative layer bonds only where the die touches. The result can be mirror-bright, brushed, matte, pearlescent, or soft and reflective. Compared with simulated metallic print, it usually looks crisper. Compared with plain ink, it reads more premium pretty quickly.
If you want the short version, call it hot foil transfer. Same process. Less explanation. Fewer people staring at you like you just invented a new species of cardboard.
The core mechanism in plain terms
Think of foil stamping as a controlled heat press for packaging. A die is built from the artwork, foil film is loaded into the press, and the machine closes with a specific temperature, dwell time, and pressure setting. Most foil films have three main parts: a carrier film, a release layer, and the decorative layer that stays on the pack. When the setup is right, the transfer is sharp and consistent. When it is not, edges blur, tiny letters fill in, and suddenly everyone is blaming “the material” instead of the setup.
For branded packaging teams, that control is the point. Custom Foil Stamping packaging is less about shine and more about hierarchy. It gives a logo, title, badge, or seal a clear visual rank. That matters in beauty, skincare, nutraceutical, tea, coffee, and gift packaging where the package has to earn trust before the product ever gets opened.
How it differs from metallic ink, embossing, and spot UV
These finishes get mixed up constantly, usually by people who have never had to approve a proof under ugly warehouse lighting. custom foil stamping packaging transfers foil directly onto the stock. Metallic ink prints through standard ink stations and usually looks flatter. Embossing adds depth and texture but no reflective finish unless foil is added too. Spot UV gives selective gloss and contrast, which can be effective, but it does not deliver the same reflective hit as foil.
That difference changes the brand result. If the brief says “clean logo, premium touch, clear contrast,” foil is often the right move. If the brief wants texture only, embossing may do the job better. If the brief wants low-cost contrast across a larger area, spot UV often wins. Plenty of strong packs combine several effects: print underlay, foil, embossing, and die-cut features. That can look great when the system is disciplined. It can also look like somebody kept clicking “premium” until the file got noisy.
Where the value shows up fastest
On shelf, the strongest gains from custom foil stamping packaging usually show up in these places:
- Brand hierarchy clarity: the logo and product name get seen first.
- Unboxing cue: the package feels intentional the moment it is handled.
- Retail lighting performance: reflective contrast reads well in stores and at gift counters.
- Clean shelf separation: the layout stays simple while still feeling elevated.
Most teams overdecorate. Real premium packaging is usually less noisy, not more. The eye should land where you want it. If it has to hunt, the design is doing too much. Custom Packaging Products are easier to compare when the foil has a job instead of wandering around the surface like it pays rent.
One thing I check early, every time: test the foil against the actual coating on the board. Gold and silver can punch too hard on glossy stock. Matte board can make silver feel quieter and more expensive. That balance is part of package branding, not a finishing afterthought.
How Custom Foil Stamping Packaging Works
Production is where most delays and headaches start, because people leave critical choices until the last second. custom foil stamping packaging is not mysterious. It is a sequence. Lock the structure, define the foil zones, confirm the stock, and let the press prove the setup before you run thousands of pieces.
1) Artwork preparation and marking of foil zones
The first file should separate foil from print cleanly. Vector artwork is the standard. Fine details need enough line weight and spacing to survive transfer. The converter needs an exact map of what gets foil and what stays printed. If the artwork arrives with tiny type, rasterized logos, or vague layer names, the job starts behind. That is how “premium” turns into “why does this look fuzzy?”
2) Dieline review and feasibility check
Every format needs a verified dieline. Folding cartons, rigid boxes, sleeves, and inserts all behave differently under foil. For Custom Printed Boxes with wraps or complex folds, this check catches foil that lands on a score line, a glue flap, or a die-cut edge. Put foil across a fold and it can crack. Put it too close to a glue zone and registration shifts. A good preflight saves money and keeps the team from arguing with physics later.
3) Die creation and mounting
Tooling cost starts here. The die may be photopolymer or steel rule, depending on run length, detail, and how clean the edges need to be. Simple logos in short runs can use lighter tooling. Repeated production with fine text usually deserves better tooling. That choice affects consistency. It also affects how often the press operator has to babysit the job, which nobody enjoys.
A lot of teams treat the foil die like a checkbox. It is not. It is the mechanical source of your edge quality, and edge quality is the brand's first impression under fluorescent light.
4) Press setup, foil selection, and temperature profile
Once the die is mounted, the press team sets temperature, dwell time, and pressure. Foil choice changes the result even when the die stays the same. Gold, silver, rose, copper, black, matte, and pearlescent films all behave differently on the same board. Good converters run small samples at a few temperature points before signoff. That is cheaper than discovering the “perfect” setting after 20,000 sheets are already moving.
The release layer matters more than people think. It has to let go cleanly so the decorative layer stays on the board. If the stock is too porous or the coating is unstable, the transfer can look patchy or dull at the edges. A foil line that looks clean on screen can still fail in the real world. Screens are very brave. Paperboard is less impressed.
5) Make-ready and press samples
Make-ready shows whether the job has a future. The press team prints a few sheets, checks alignment under light, and adjusts before the run gets the green light. If the build includes embossing before foil, sequence matters. Poor sequencing can flatten edges or crush detail. Combined finishes need more time because they need more respect. Rush jobs and layered finishes do not get along. They never really have.
6) Full run, inspection, and traceability
After approval, the run moves into production with in-line checks, edge review, and random inspections every 150 to 300 sheets depending on speed and complexity. Many factories log foil batch numbers, board lot numbers, and humidity because those small variables affect adhesion. That matters most on coated imported stocks that behave slightly differently from lot to lot. If your custom foil stamping packaging run spans multiple shifts, traceability is not optional. It is part of the job.
Production lesson that keeps saving people money: if a design uses tiny reversed type or hairline detail, the first problem is usually registration drift, not some dramatic material mystery. Lock the structure first. The polish comes later.
7) Why substrate behavior changes everything
Coated boards usually give the cleanest foil definition. Stable laminated boards can work very well if the top layer is not too soft. Textured papers can look rich, but they need sampling because texture eats light in strange ways. Rigid structures can flex under heat. When that happens, foil edges can lift. Folding cartons often do best with a stable C1S or SBS board that holds finish consistently across the run.
That is why cartons, rigid boxes, sleeves, and inserts are not equal at the foil stage. Same broad category. Different behavior. Different failure points.
Key Factors That Affect Custom Foil Stamping Packaging Cost
Pricing gets messy when teams ask for a unit price before the spec is even locked. That always ends well. custom foil stamping packaging should be priced by tooling, material, complexity, and finishing steps, then checked against order size. Unit cost matters, sure. Total cost matters more.
Primary drivers
The biggest cost drivers are usually:
- Die size and complexity: bigger dies and fine detail raise tooling effort and wear.
- Number of foil colors: one pass is simpler than two or three separate passes.
- Coverage area: a small logo badge costs less than a full top-panel wrap.
- Registration tolerance: close alignment with print, die cutting, and coatings adds handling time.
- Flat stamping vs combined effects: adding embossing, debossing, or layered finishes increases touches per sheet.
Small-looking art can be expensive. A 12 mm logo with dense micro-detail can cost more than a larger mark with open spacing. Detail drives pain. Pain drives price. Very scientific, unfortunately.
Material and structure impact
Rigid boxes, folding cartons, sleeves, and inserts do not price the same way. Rigid boxes need more handling and tighter fixture control. Sleeves can look elegant with foil accents, especially in cosmetics, but their blank handling and die accuracy need care. Inserts often appear cheaper until the adhesive steps and assembly checks show up. Board type, lamination, wrap stock, and surface finish all change waste rate and setup time.
Stock choice also changes the final impression. A 350 gsm board with stable caliper often works well for custom foil stamping packaging because it holds detail without flutter. If the board shifts during dwell, the edges soften and the finish loses its snap.
Run size: where unit economics turn
Short runs carry a higher unit price because setup costs are spread across fewer pieces. A rough pattern looks like this:
- 500 pieces: highest unit cost, useful for trials and early launch checks.
- 1,000 to 3,000 pieces: still pricey, but workable for market tests.
- 5,000 to 10,000 pieces: the first range where unit cost starts behaving.
- Above 10,000: unit cost stabilizes and becomes more sensitive to foil coverage than to labor.
Larger runs also tend to run cleaner because the setup gets dialed in early and stays there longer. Fewer resets. Fewer surprises. Less drama.
Finishing, approvals, and hidden add-ons
Proofs and samples are not extras. They prevent expensive mistakes. A die-proof charge can be avoided only if the first file is perfect. That almost never happens on the first round. Lamination, soft-touch coating, hand assembly, and final quality review can add 10% to 25% depending on complexity. Storage and end-pack format matter too. Carton counts, inner protectors, and shipping arrangement all affect landed cost.
Indicative pricing benchmark
| Packaging configuration | Typical foil build | Indicative cost @1,000 pcs | Indicative cost @5,000 pcs | Indicative cost @15,000 pcs | Lead-time impact |
|---|---|---|---|---|---|
| Simple folding carton, logo spot only | Single-color logo + text, no extra effects | $0.35 - $0.55/unit | $0.22 - $0.34/unit | $0.16 - $0.24/unit | Fastest approval path |
| Rigid box, logo + top frame | Single pass + moderate die size | $0.85 - $1.30/unit | $0.60 - $0.95/unit | $0.48 - $0.78/unit | More mounting and alignment checks |
| Sleeve with border and title stack | Two-tone foil + matte overcoat | $0.70 - $1.05/unit | $0.42 - $0.72/unit | $0.32 - $0.56/unit | Tighter setup, more press checks |
| Custom printed boxes with foil + embossing | Foil + embossing + die line accents | $1.20 - $1.90/unit | $0.85 - $1.35/unit | $0.65 - $1.05/unit | Longer multi-effect sequence |
Those ranges are directional. Geography, foil brand, press schedule, and whether the artwork passes first time all matter. Freight and custom inserts can move the number too. Ask for a quote that lists die fee, material surcharge, make-ready passes, and final inspection time separately. If a supplier refuses to break it out, the quote is doing a little theatre.
Teams that care about sustainability should bring up FSC requirements early and ask for source-chain documentation before final pricing. Using FSC-certified board standards can fit into the packaging plan, especially when retail audits care about paper sourcing.
For shipping durability, use ASTM D4169-style assumptions where risk matters. A gorgeous foil finish that fails a drop test is just expensive trash with good lighting.
Step-by-Step Timeline for Custom Foil Stamping Packaging
A clean custom foil stamping packaging project moves quickly when the decisions are actually decided. Most delays come from late artwork changes, not from the press itself. Timeline depends more on clarity than on machine speed.
1) Concept and brief alignment
Week 1 usually starts with the brand intent: where the eye should land, what must stay quiet, and what date drives the release. Define the build early. Number of colors, foil area, finish stack, carton type, and certifications all belong in the brief. Vagueness is a timeline tax. It gets charged immediately.
2) Artwork and dieline review
Weeks 1 to 2 are for production prep. Separate print, cut, and foil layers. Confirm minimum type size and stroke width with the converter. If the custom foil stamping packaging layout uses reversed type, keep extra weight in the counters and allow more breathing room around the text. Plenty of elegant mockups die here because the line work was never realistic in the first place.
3) Die proofing and sample board
Weeks 2 to 3 are where risk drops fast if the team stays disciplined. Request one or two physical substrate samples and at least one foil proof panel. Simple logo-only jobs can often get a sample back in 1 to 2 business days after die creation. Multi-part packs with sleeves or inserts need more time, usually 3 to 4 business days. Add another day or two if die cutting gets complicated.
4) Material procurement and pre-press checks
Supply delays show up a lot in seasonal windows. Paperboard lots can vary in gloss and caliper even from the same supplier, so lock the lot and grade before press booking. Teams that rely on recognized shipping and quality frameworks, such as ISTA test guidance for packaging resilience, tend to avoid painful reruns later.
5) Press setup and production
Once the proof is signed, setup takes around half a day to a day for a simple pass and up to two days for multi-effect jobs. A basic custom foil stamping packaging logo on a carton can move into regular production in about 4 to 6 business days from approved proof if materials are already on site. A luxury pack with embossing, soft-touch lamination, and tight tolerance targets can need 12 to 18 business days or more once everything is ready.
6) Finishing, packing, and release
Final handling includes edge clean-up, stack control, insertion, and packing prep. If hand assembly is part of the job, build in buffer time. A 10,000-piece run with hand-assembled inserts can lose a day or two if the schedule is too tight. Final inspection usually catches one of two problems: edge transfer variation or small skip marks at fold zones.
Where delays actually happen
Most delays are preventable:
- Artwork is not separated into clear foil layers.
- Foil zones are too small to register consistently.
- Substrate changes after proof without a new risk check.
- Late structure edits after die mounting.
- No final signoff before the run is released.
The teams that miss these steps usually pay for it twice. First in time. Then in rush charges.
Recommended approval workflow
- Step 1: Submit design, structure, and intended foil areas.
- Step 2: Receive feasibility notes and minimum line rules from the converter.
- Step 3: Approve substrate and foil swatches on real sample stock, not on a monitor.
- Step 4: Approve die proof and press sample before scale-up.
- Step 5: Sign one final approval for full production.
That last signoff matters more than people admit. If it is vague, the project drifts. If the production manager, design owner, and brand owner all sign, the job tends to stay on track.
Common Mistakes in Custom Foil Stamping Packaging
Experienced teams still make the same mistakes, just with better vocabulary. The good news is that custom foil stamping packaging forgives a lot if the problems are caught before die lock. Once the press is running, the bill gets less forgiving.
1) Overly fine detail
Tight line spacing and micro typography are the usual troublemakers. Foil transfer has limits. If the gap between lines is too small, the foil fills in and loses clarity, especially on slightly rough boards. A 4-point tagline can look elegant on screen and useless on press. Keep foil text above safe minimums, especially on smaller packs.
2) Using foil everywhere
Too much shine becomes noise. If every side gets the same reflective treatment, the finish stops feeling premium and starts feeling loud. Better hierarchy gives the eye one place to land: logo, line, or motif. Lots of brands think more foil means more luxury. Usually it just means less restraint.
3) Ignoring registration tolerances
If foil touches print edges, deboss lines, and die-cut pockets without buffer, registration becomes the villain. Leave at least 1.0 to 1.5 mm of safety margin where practical, and more when the press is older or the run is long. That matters even more when foil sits beside spot UV or fine print detail.
4) Wrong material choice
Very absorbent, soft, or aggressively textured stock can ruin a clean transfer. An uncoated natural fiber board with deep grain might look warm, but it often refuses sharp detail under the same settings. If that look is part of the brief, run a pilot on the real board with the real press profile. A PDF cannot save bad material behavior.
5) Skipping the substrate sample round
Digital files are not enough for reflective finishes. You need to see how gold behaves on matte versus gloss, and how copper shifts on white versus cream under warm and cool light. Without a sample round, teams approve something that looks great on a screen and looks dead under warehouse lighting. That is a very expensive way to learn basic color behavior.
Another common problem: assuming every supplier reads artwork the same way. They do not. Confirm layer naming, file format, and approval checkpoints in writing before the work starts.
Remember, custom foil stamping packaging is design plus process control. Ignore one side and the job only looks good in theory.
Expert Tips for Better Custom Foil Stamping Packaging
These are the moves that save time, reduce waste, and keep the final pack from looking overcooked. They come from actual launch work, not from a slide deck full of adjectives.
Tip 1: Use foil as a hierarchy tool, not wall decoration
Give each panel one clear job. Foil works best on:
- Main brand mark.
- Product category tag or edition number.
- One geometric or ornamental motif.
That keeps retail packaging readable and intentional. If foil is trying to do every job at once, it ends up doing none of them well.
Tip 2: Test shades, especially by stock type
Foil shades are not neutral across substrates. Matte black on a glossy board looks deeper than matte black on a kraft-like finish. Silver and champagne can look flat on cool whites and richer on warm whites. Real comparison has to happen on final board with the same lamination stack and varnish you plan to use in production.
Request a small sample rack if the budget allows. Gold, silver, one brand color, and one alternate finish can save a full reprint. That is a much cheaper mistake than reworking 5,000 finished packs.
Tip 3: Design with production tolerances in mind
Clean geometry costs less and prints better. Ask for conversion specs early: minimum stroke width, reverse type limits, and safety margins for both foil and die cutting. If the art team keeps nudging curves after proof, the budget goes up. A 0.25 mm line that looks crisp on screen is often too small for actual transfer.
For a family of SKUs, standardize foil modules where you can. Same frame size, same line logic, same foil color. Standardization reduces quoting friction and cuts changeover time later.
Tip 4: Pair finish with strong structure
The best packs often use fewer decorative tricks and a stronger layout. A balanced composition can feel more expensive than a crowded foil surface. If you pair foil with good custom printed boxes, spacing, and clean edge logic, the pack carries confidence without needing extra color noise.
Panel hierarchy, side structure, and fold logic should support where the foil sits. The structure should guide the finish, not fight it.
Tip 5: Align quality checks with timeline
Ask for checkpoints on color, adhesion, and registration before the big run. Early sample approval costs less than fixing a production mistake. Seasonal lines need buffer days, not wishful thinking. Losing one day in proofing is annoying. Losing two weeks to rework is the kind of lesson people remember in budget meetings.
Put the inspection criteria in writing too. Some brands want a 100% visual check. Others accept sampling plus statistical review. High-volume runs usually rely on the second approach.
Next Steps for Custom Foil Stamping Packaging
If you are deciding whether custom foil stamping packaging belongs in the next launch, collect five things first: final brand artwork, carton style, run quantity, substrate preference, and deadline. Those five inputs remove a lot of the fog.
Before you approve full production, ask for a proof and a physical sample. Check foil hue, gloss level, edge definition, and feel in the same environment where the pack will actually live. If the product sells through gift channels, test the sample under at least two light temperatures. Warm white and cool white can produce very different reactions. Customers do not care that your CAD rendering looked nice.
Practical checklist before approval
- Does each foil area support the product hierarchy, or is it just decoration?
- Is the dieline final and free of late structural edits?
- Are run size, expected waste, and per-unit cost assumptions aligned?
- Have all finishing options, including lamination, UV, and assembly, been priced and approved?
- Can the quality team sign off on tolerance and sample results in one pass?
Use that checklist as a simple decision filter and the budget stays sane. If you want to compare options, review the custom printed boxes style, branded packaging message, and shelf goal side by side. That keeps the team from overengineering a pack that only needed one strong decision.
Where this fits your broader packaging strategy
For teams balancing budget, speed, and premium impact, custom foil stamping packaging works best when it sits inside a larger packaging design plan. Alone, it is a finish. In context, it becomes part of the message. That distinction helps when finance asks why a finish costs more than plain print. The answer is not “because it looks fancy.” The answer is that it supports hierarchy, retail performance, and brand recognition when the structure is handled properly.
If the schedule is moving, you can request an initial proposal through requesting a quotation, then schedule a feasibility call before the proof gets locked. If you need help judging samples, bring your production contact in early. One hard question before approval is a lot cheaper than a re-run after approval.
Pick one current SKU and choose one area where a foil accent can improve shelf authority without crowding the layout. Test that in one sample run, then scale only if the finish, handling, and timing all hold up. Measured moves beat flashy ones. That is usually the smart way to start using custom foil stamping packaging without turning the project into a circus. Start with structure and timing, then lock the style. That order keeps the project grounded and the results looking intentional.
Does custom foil stamping packaging justify the investment for your launch?
If the launch depends on shelf authority, and the package has to Stand Out Without looking loud, then yes. If your current packaging already reads clearly, your budget is better spent on logistics and product messaging. That is not weak advice. It is simple math.
The practical test is straightforward: pick your best-performing SKU, apply custom foil stamping packaging on one meaningful brand element, and compare conversion signals across two channels. If the reflective touch improves recognition and keeps the design legible, the premium is usually justified. If the visual gain is subtle and costs spike, skip the finish and keep it for a later phase.
In other words, this finish works best as a targeted signal, not a default upgrade. Think hot foil stamping when you need premium hierarchy, and skip it when you need clean, simple speed.
FAQ
How much does custom foil stamping packaging usually cost?
Cost depends on die size, number of foil colors, coverage area, run length, and the finishing stack, including embossing or lamination. Smaller foil areas and longer runs usually lower the unit price. Short runs and complex artwork push it up fast.
What materials work best for custom foil stamping packaging?
Stable coated stocks, well-finished rigid board, and consistent paperboard usually give the cleanest transfer. Very rough, highly absorbent, or uneven substrates can weaken detail and usually need preproduction testing before full approval.
How long does custom foil stamping packaging take to produce?
Timing depends on artwork readiness, die creation, proof cycles, material availability, and press load. Simple logo-only work can move quickly. Packs with multiple passes, embossing, and structural changes usually need a longer schedule.
Is foil stamping better than embossing or spot UV?
Each finish does a different job. Foil stamping gives reflective premium appeal, embossing adds depth and texture, and spot UV creates selective gloss and contrast. The right choice depends on whether the goal is shine, tactility, depth, or a layered finish.
What artwork setup do I need for custom foil stamping packaging?
Use clean vector artwork, separate foil layers from print layers, and keep fine details simple. Ask the converter for minimum line size and registration tolerance before finalizing the dieline, then approve physical proofs before release.

