Buyer Fit Snapshot
| Best fit | Custom Magnetic Gift Box Assembly projects where brand print, material claims, artwork control, MOQ, and repeat-order consistency need to be specified before quoting. |
|---|---|
| Quote inputs | Share finished size, material target, print colors, finish, packing count, annual reorder estimate, ship-to region, and any compliance wording. |
| Proofing check | Approve dieline scale, logo placement, barcode or warning zones, color tolerance, closure strength, and carton packing before bulk production. |
| Main risk | Vague material claims, crowded artwork, missing packing details, or unclear freight terms can make a low unit price expensive after revisions. |
Fast answer: Custom Magnetic Gift Box Assembly: Structure, Print Proof, Packing, and Reorder Risk should be specified like a repeatable production item. The safest quote records material, print method, finish, artwork proof, packing count, and reorder notes in one written spec.
Production checks before approval
Compare the actual filled-product size with the drawing, then confirm tolerance on folds, seals, hang holes, label areas, and retail display edges. Reserve space for logos, QR codes, warning copy, and material claims before decorative graphics fill the panel.
Quote comparison points
Review material grade, print process, finish, sampling route, tooling charges, carton quantity, and freight assumptions side by side. A quote is only useful when the supplier can repeat the same color, closure quality, and packing count on the next order.
On a press table in a Shenzhen rigid-box workshop, I once watched a plain-looking carton turn into a premium presentation piece with nothing more than board, wrap paper, and two tiny magnets. The line was moving at about 1,200 boxes per shift, and I still remember the sound of that lid closing. Clean. Controlled. Satisfying in a way that probably says too much about me. That is the appeal of Custom Magnetic Gift box assembly. The outside looks calm and simple. The inside is all board calipers, glue lines, magnet polarity, corner folds, and a hundred tiny choices that decide whether the lid lands with a crisp snap or feels lazy in the hand.
If you’ve opened a luxury perfume box, a jewelry box with a ribbon lift, or an influencer kit that looked too good to toss, you’ve already seen custom magnetic gift box assembly doing the job. Brands keep coming back to this format for three reasons: it protects the product, sells the brand story, and makes the unboxing feel intentional instead of random. I’m all for pretty packaging, but only if it actually works. A beautiful box that arrives crushed is just expensive disappointment with a logo on it, and shipping from Dongguan to Los Angeles does not magically fix bad structure.
And yes, there’s a reason the good ones feel expensive before you even see the product. The closure is part engineering, part theater. Tiny stuff. Big impact.
What Custom Magnetic Gift Box Assembly Really Involves
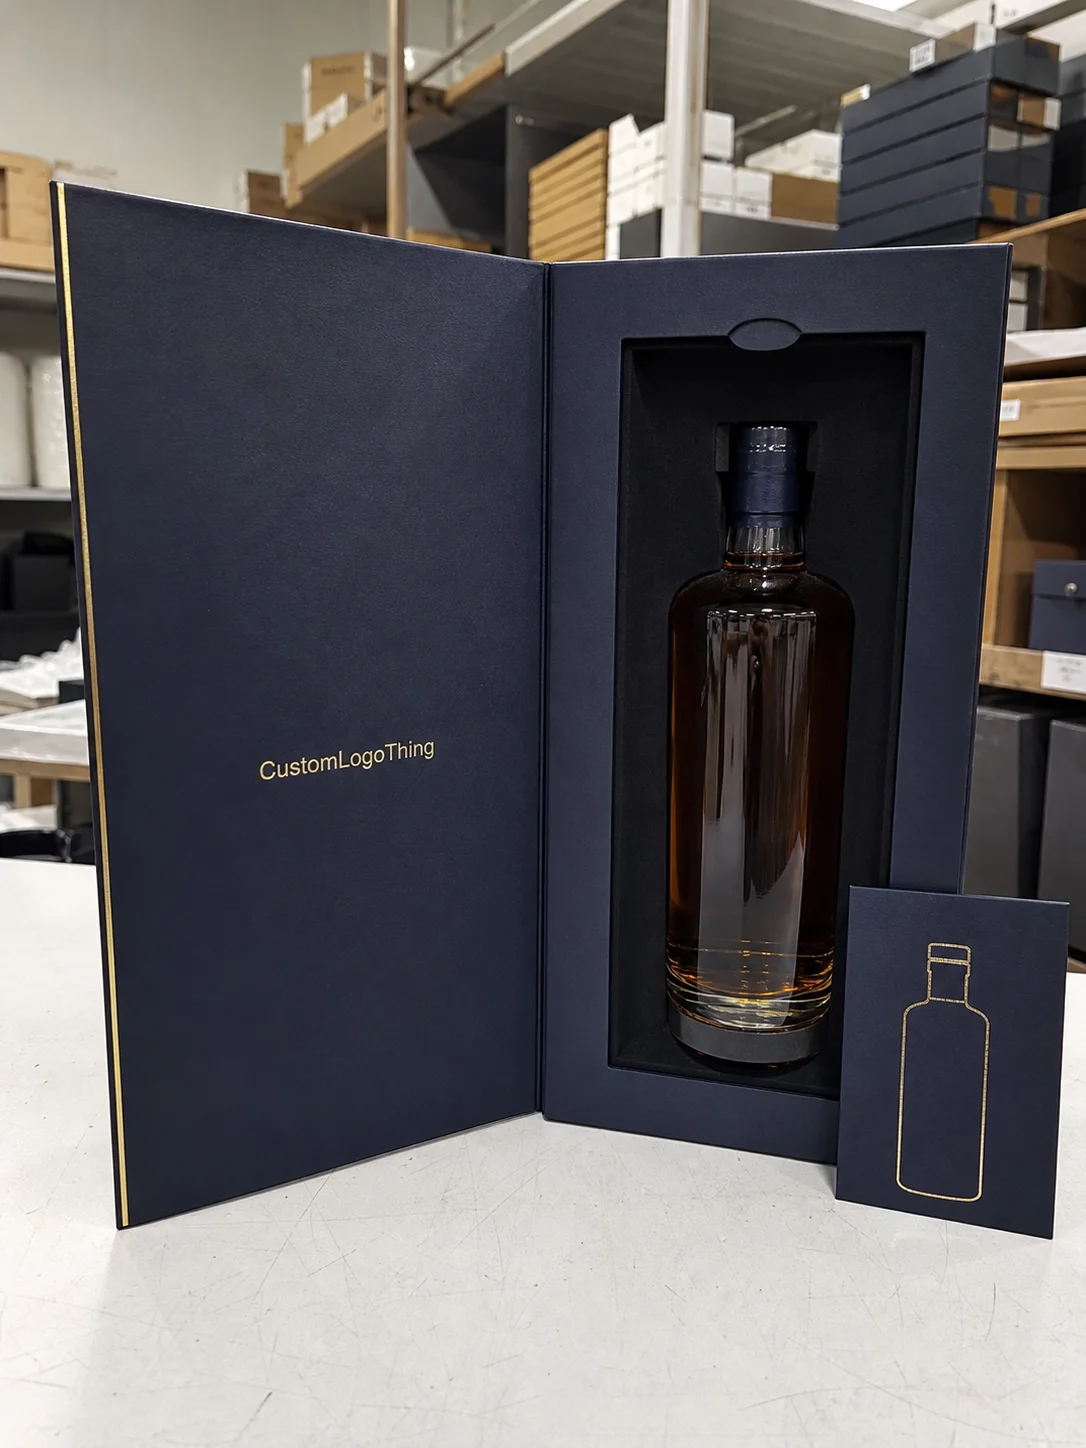
Custom magnetic gift box assembly is a rigid setup box process that combines a chipboard or greyboard shell, a hinged lid, hidden magnets, and a decorative outer wrap such as art paper, textured paper, fabric, or specialty printed stock. The result is a closure box that opens like a small presentation case and shuts with a controlled magnetic pull, usually strong enough to feel premium but not so strong that the lid rips open in transit. For most premium projects, the shell is built from 1.5 mm, 2.0 mm, or 3.0 mm greyboard, while the wrap can be 128 gsm art paper, 157 gsm C2S paper, or a 120 gsm textured stock depending on the finish target.
I’ve heard people call these boxes “just cardboard with a magnet.” Cute. Wrong, though. In a good custom magnetic gift box assembly project, the board thickness, wrap tension, magnet pocket depth, and corner wrap sequence all matter. A one-millimeter mistake can show up as a bulge, a crooked seam, or a lid that never sits fully flat. And once you’ve seen 10,000 boxes on a line in Shenzhen or Dongguan, you stop pretending those little mistakes are little. They turn into rework, and rework turns into margin loss very fast.
These boxes show up anywhere premium presentation matters: luxury cosmetics, apparel, watches, jewelry, corporate gifting, seasonal promotions, premium mailers, and influencer kit packaging. They’re also common in retail packaging where shelf presence matters, because the opening moment can sell as hard as the product itself. I remember one brand manager in a Shanghai showroom telling me, dead serious, that the box had to “feel like a tiny event.” She wasn’t wrong. She also had a launch date in 21 days, which made everyone suddenly very religious about the spec sheet.
What makes it truly custom is the full stack of specifications. Size, structure, print, foil, embossing, debossing, soft-touch lamination, ribbon pulls, EVA foam inserts, molded pulp trays, and magnet strength all live inside the spec sheet. A brand launching scented candles might want a 2 mm greyboard shell wrapped in matte art paper, while a skincare line might ask for foil-stamped branded packaging with a satin ribbon and a die-cut insert tuned to a glass jar’s exact 68 mm diameter. On one fragrance project I handled, the insert cavity tolerance was held to ±1 mm because the bottle neck was narrow and the cap scratched if the tray was too tight.
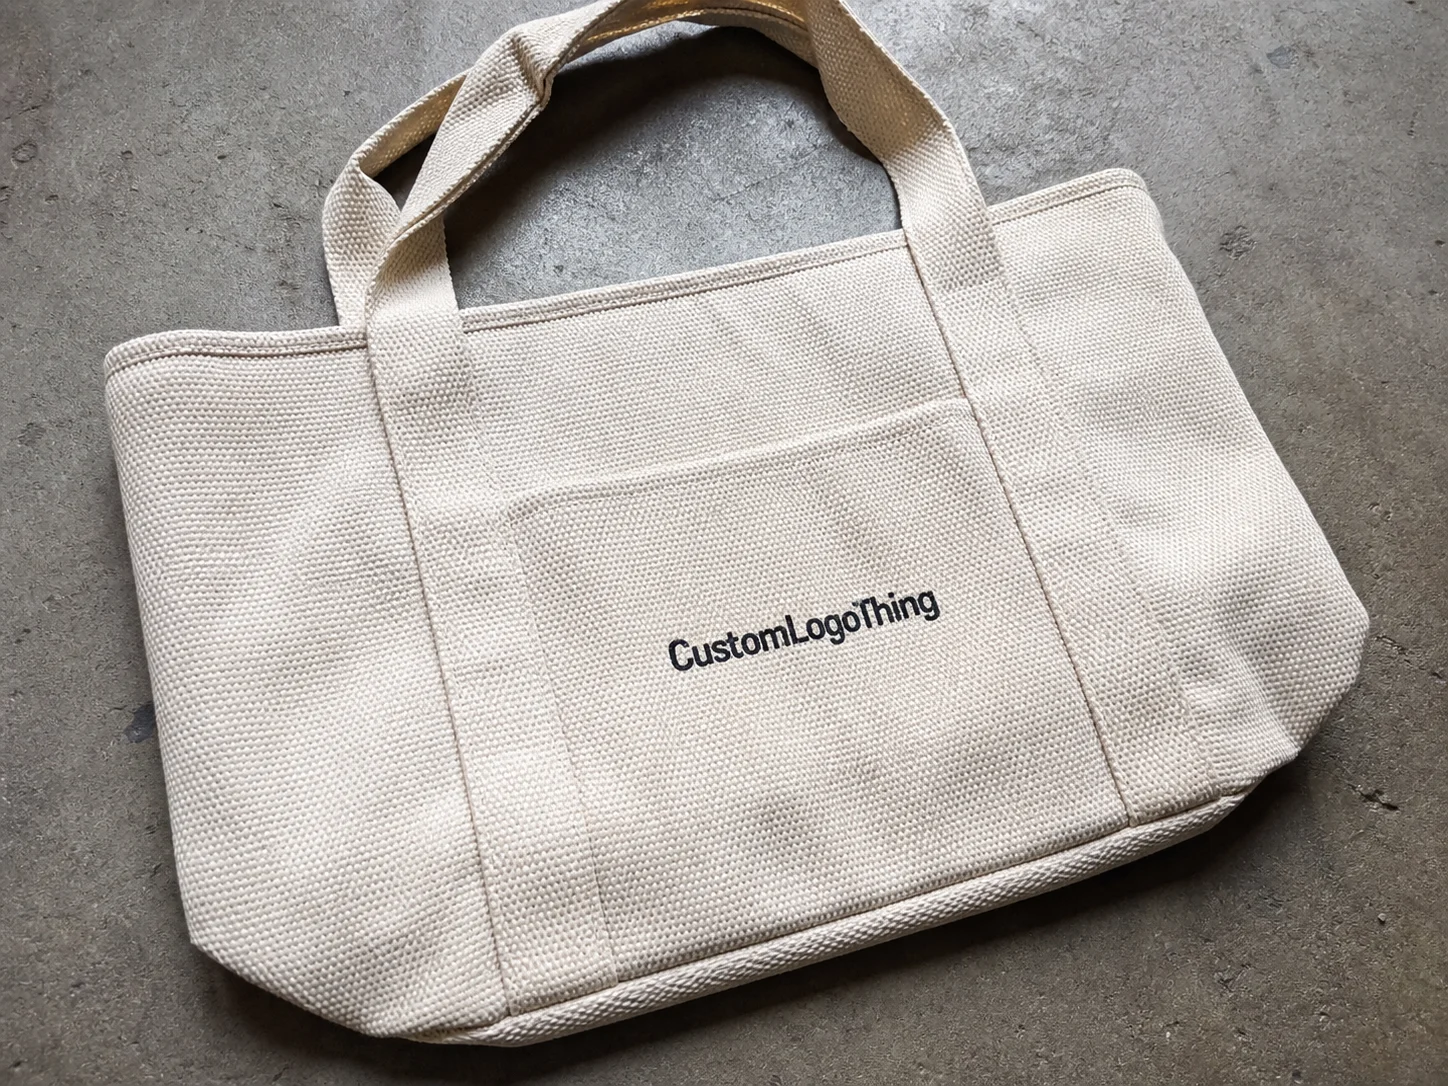
Compared with tuck boxes, folding cartons, or sleeve-and-tray formats, custom magnetic gift box assembly gives a heavier, more giftable feel because the rigid board keeps its shape. Tuck boxes are efficient and great for shipping volume, but they don’t carry the same tactile authority. Sleeve-and-tray packaging can look elegant, yet the reveal feels different. A magnetic closure box feels like a deliberate presentation, and that matters in package branding. It also costs more: a basic folding carton might run $0.15 to $0.35 per unit at 5,000 pieces, while a rigid magnetic box can easily move into the $0.90 to $2.50 range depending on materials and inserts.
One client in a Shanghai showroom told me she wanted the box to “feel like the product already has value before they even touch the product.” That stuck with me. It explains why custom magnetic gift box assembly keeps winning premium product packaging projects, especially when the buyer wants the packaging to do part of the selling before the actual item is even visible.
How Custom Magnetic Gift Box Assembly Works on the Factory Floor
On the factory floor, custom magnetic gift box assembly usually starts with board cutting. Greyboard is die-cut or CNC-cut to the exact shell dimensions, often in the 1.5 mm to 3.0 mm range depending on the product load and the desired hand feel. After cutting, the boards are scored so folds land cleanly, which matters most on the hinge line where repeated opening can expose weak spots if the scoring is too shallow or too deep. A 2.0 mm greyboard shell is common for a midweight skincare set, while a 3.0 mm board is more typical for heavy gift sets or multi-item kits.
The shell is then wrapped with printed paper or specialty material. That wrap may be a 128 gsm art paper for a sharp print surface, a 157 gsm coated sheet for rich color, or a textured paper that hides fingerprints and gives the box a warmer feel. In some premium jobs I’ve handled, we used linen-texture wrap paper from a supplier in Dongguan because the client wanted a subtle grain that matched their fragrance bottle label. For luxury finishes, shops in Guangzhou and Shenzhen often quote soft-touch lamination at a higher rate, around $0.08 to $0.15 per unit on mid-size runs, because the coating line and drying time add cost. Those are the details that turn ordinary custom magnetic gift box assembly into memorable custom printed boxes.
Magnet insertion is one of the most sensitive steps. The magnet needs correct polarity, correct placement, and correct depth so it sits below the surface without telegraphing a bump through the wrap. A typical neodymium disc magnet might be 10 mm by 2 mm or 12 mm by 2 mm, but the exact size depends on lid weight, box width, and closure force. If the magnet is off-center by even 1.5 mm on a narrow box, the closure can pull crooked and leave a visible wrinkle line on the outer panel. On larger book-style boxes, some factories use two 12 mm by 2 mm magnets on the lid and two matching magnets in the base to balance the pull.
Jigs and templates are the quiet heroes here. In a good shop, workers use positioning fixtures, stop blocks, and press tables so each lid lands in the same place every time. I’ve watched experienced assemblers in a Dongguan workshop tap a board edge twice, check the fold with their thumb, and align the insert pocket before the glue skins over. That kind of hand skill still matters, because many premium custom magnetic gift box assembly projects are not fully automated; they depend on steady manual work backed by careful QC. On one line visit, the supervisor told me his team could hold a closure alignment tolerance of about 0.5 mm on a 2,000-piece luxury order, which is exactly the sort of boring precision that makes the final box feel expensive.
Here’s the basic flow most plants follow:
- Cut greyboard to size.
- Score fold lines and hinge points.
- Print or source the outer wrap.
- Apply adhesive to board or wrap.
- Insert magnets in matched polarity.
- Wrap and press the shell.
- Form corners and edge folds.
- Add interior liners, trays, or inserts.
- Inspect closure force and surface finish.
- Pack for drying, curing, and shipping.
That sounds simple until you stand on the line and watch the details bite. A little too much glue can bleed through thin paper. A little too little pressure leaves corner lift. A slightly warped board makes the hinge spring open. In custom magnetic gift box assembly, the job is rarely hard because of one big problem; it gets hard because twenty small decisions all have to land right. I’ve had days in a Shenzhen plant where one “tiny adjustment” turned into a three-hour rescue mission, and the only thing moving faster than the boxes was my caffeine intake.
For standards-minded brands, this is where testing matters. Depending on the shipment profile, teams may reference ISTA test protocols for distribution hazards and drop testing, especially if the box is shipping inside a retail carton or going direct-to-consumer. If you’re building sustainable lines, material choices can also connect to certification pathways through FSC-certified paper sourcing. A lot of clients in Europe now ask for FSC chain-of-custody paperwork before they even talk about foil color, which is fair enough if they’re selling into retail accounts in Germany or the Netherlands.
Key Factors That Affect Quality, Cost, and Pricing
If a buyer asks me why one custom magnetic gift box assembly quote is $0.88 per unit and another is $1.74, I usually start with board thickness, insert complexity, and finish count. Those three items drive more price variation than most people expect, especially when the project requires hand wrapping and multiple inspection points. A 5,000-piece order built in Dongguan with a plain wrap and simple paperboard insert can land near the low end, while a smaller 1,000-piece order with fabric wrap and EVA foam can jump quickly because labor is spread across fewer units.
Board thickness is a major cost driver. A 1.5 mm greyboard shell is lighter and cheaper than a 3 mm rigid board, but it may not deliver the same structure for a heavy product. Magnet grade also matters; a pair of standard discs is cheaper than a stronger neodymium setup, and the stronger setup often needs more accurate placement to avoid excessive snap force. In custom magnetic gift box assembly, stronger is not automatically better; it has to match the product and the user experience. I’ve seen buyers in a Hong Kong sourcing meeting get excited about “extra strong magnets” and then wonder why the lid feels like it’s fighting back. That’s not luxury. That’s a wrestling match.
Print and finish complexity can change the budget fast. A plain black wrap with a single silver foil logo is one thing. A full-color litho wrap with soft-touch lamination, spot UV, embossing, and a printed interior panel is another. Brands sometimes over-decorate the outside and then forget the customer only experiences the box for fifteen seconds. I’d rather see one strong detail done well than five finishes fighting each other. For reference, hot foil stamping in Shenzhen can add roughly $0.03 to $0.12 per unit depending on coverage and run size, while embossing or debossing often adds a separate setup charge.
Order quantity matters just as much. Prototype units are expensive because the setup costs are spread across one or two samples, while a 5,000-piece run spreads labor and preparation across more boxes. On a recent quote review with a cosmetics client, the sample cost landed near $68 for one fully finished structural sample, while the production piece dropped significantly once the run reached 3,000 units. That is normal in custom magnetic gift box assembly, and it’s why sampling is a planning expense, not a nuisance. I’ve also seen a 500-piece trial order cost almost double the per-unit price of a 5,000-piece run, which is why small test quantities are useful but rarely cheap.
Here’s a simple comparison that helps buyers see the tradeoffs:
| Box Style | Typical Build | Relative Cost | Best Use |
|---|---|---|---|
| Simple magnetic closure box | Rigid board, printed wrap, 2 magnets | Moderate | Corporate gifts, cosmetics, small accessories |
| Book-style magnetic box | Hinged spine, deep tray, 2–4 magnets | Higher | Luxury sets, influencer kits, premium launches |
| Magnetic box with EVA insert | Rigid shell, custom foam, specialty wrap | Higher still | Jewelry, electronics, delicate samples |
| Magnetic box with textile or fabric wrap | Rigid shell, fabric exterior, hand finishing | Highest | Ultra-premium gifting, limited editions |
Sampling fees, tooling, and insert development also affect price. A custom EVA insert with multiple cavities may need CNC cutting or a custom knife setup, and the first prototype can cost more than the final production version because the shop is confirming cavity depth, product retention, and lid clearance. In my experience, the cheapest quote is often the one that leaves out the most critical details in custom magnetic gift box assembly. That bargain price? Usually wearing a fake mustache. The quote may look great in a spreadsheet, but it gets very expensive when the factory discovers the tray must be reworked for a 74 mm bottle instead of a 72 mm one.
For teams trying to control spend, I usually suggest a practical split: keep the exterior simple and make one interior moment feel expensive. A matte black wrap with one foil mark and a custom flocked tray can look more premium than an overloaded exterior covered with three print effects that add cost but dilute the design. That kind of disciplined packaging design usually delivers better value, especially if the order is leaving a factory in Shenzhen and headed to a boutique in Singapore or Melbourne.
There are also broad environmental and compliance factors to think through. If your brief includes recyclability or material reduction, the U.S. EPA’s packaging and waste resources at EPA recycling guidance are a useful reference point, especially when you’re comparing paper-based shells, foam inserts, and mixed-material builds. A 2 mm greyboard shell with a paper tray is far easier to recover than a mixed plastic-and-foam structure that belongs in the “why did we do this” pile.
Step-by-Step Custom Magnetic Gift Box Assembly Process
The cleanest custom magnetic gift box assembly projects start with a specification review, not with artwork. I’ve seen too many teams jump straight into graphics and discover later that the product is 2 mm too tall for the cavity, or the lid needs another 6 mm of depth to avoid a crush point on the insert. The real sequence is more disciplined than that, and the best factories in Shenzhen, Dongguan, and Guangzhou will push you to confirm structure before anybody starts arguing about Pantone colors.
1. Specification review and dieline approval
The factory first reviews product dimensions, target quantity, finish options, insert needs, and ship date. Then the structural dieline gets checked for panel size, hinge location, magnet pocket position, and the bleed on every printed panel. A tiny shift in fold allowance can affect the finished box by several millimeters, which sounds small until the lid starts rubbing the side wall during closure. On a 200 mm-wide gift box, even a 1 mm drift can show up visually once the wrap is pressed and the corner folds are locked in.
2. Prototype and sample confirmation
A sample helps verify the feel of the snap, the strength of the hinge, and the depth of the product tray. In one meeting with a premium apparel client in Shanghai, the first prototype looked beautiful but the lid hit the folded scarf edge by less than 3 mm; we adjusted the tray height and the second sample solved it immediately. That is why custom magnetic gift box assembly rewards patient sampling. Rushing this step is how you end up “approving” a problem that will cost you three times more later, especially if the final run is 8,000 pieces and the factory is already booked for the next holiday cycle.
3. Material sourcing and print production
After approval, the shop sources greyboard, wrap paper, magnet stock, ribbon, and any insert material such as EVA foam or molded pulp. Print runs may be offset lithography for high color accuracy, or digital print for smaller batches, depending on quantity and turnaround. Specialty materials sometimes need incoming inspection because a textured paper batch can vary slightly in shade from one pallet to the next. If you specify a 157 gsm C2S wrap in matte black, for example, the supplier may still send a lot that prints slightly warmer than the proof unless you lock the paper lot before production.
4. Die-cutting and board preparation
The greyboard is cut to shape, scored, and stacked flat. If the project uses a one-piece wrap around the outer shell, the wrap is trimmed with precise bleed allowances so corners close without showing raw board edges. Good die-cutting is one of the quiet strengths of premium custom magnetic gift box assembly; bad die-cutting shows up later as crooked corners and uneven panel reveals. A clean die line is not glamorous, but neither is a box with an exposed edge on the front panel.
5. Magnet insertion and polarity control
Magnets are placed in matching pairs, and polarity must be checked every time. Shops often use a simple polarity jig or marked orientation board so one side of the closure does not repel the other. I still remember a run of 2,000 boxes for a skincare client where one pallet had reversed polarity in a small batch; the boxes looked perfect, but the lid “pushed away” instead of closing. That kind of mistake is common enough that every serious custom magnetic gift box assembly line should have a polarity check step, ideally before glue locks the magnet pocket in place.
6. Wrapping, folding, and corner finishing
The wrap is glued and laid onto the board shell, then folded carefully around the edges. Corners need crisp tension without tearing, and the glue must be spread evenly so no dark patch or wrinkle appears after pressing. Some shops use hot-melt adhesives for speed, while others prefer water-based systems for longer open time; the right adhesive depends on the paper, climate, and line speed. In humid months in Guangdong, I’ve seen a line slow from 1,000 pieces a shift to 700 because the paper was reacting too quickly to the glue and the team had to slow down to keep the corners clean.
7. Interior finishing and inserts
Once the shell is formed, the inside gets its own finishing work. That may include paperboard partitions, laminated liners, satin ribbon pulls, EVA foam, molded pulp, or a microfibre cradle. If the product is fragile, the insert should hold it snugly without forcing the item upward into the lid. A tight insert may seem protective, but in custom magnetic gift box assembly it can make the closure feel stiff or even distort the top panel. A jewelry box with a 1.5 mm foam allowance will feel completely different from one with a rigid 3 mm cavity wall, and the wrong choice shows up the first time someone closes the lid in front of a customer.
8. Pressing, drying, and final inspection
Finished boxes are pressed to set the corners and keep the panels flat while the adhesive cures. Depending on glue type and ambient humidity, this can take several hours or longer before packing. Final inspection checks corner squareness, print registration, magnet pull, surface cleanliness, and whether the lid closes evenly on both sides. If the finish includes foil or spot UV, inspectors also check for scuffs and shine consistency under strong light. On premium runs in Guangdong, I’ve seen factories use a 45-degree inspection lamp because a flat office light will miss tiny glue shadows that a customer notices instantly.
That final check matters more than many buyers realize. A box can pass a casual glance and still fail a brand standard because the closure sits 2 mm off center or the insert edge casts a shadow through the wrap. In premium product packaging, those small visual cues influence how expensive the entire item feels, and they do not forgive sloppy execution just because the logo is pretty.
How long does custom magnetic gift box assembly take from sample to production?
The timeline for custom magnetic gift box assembly depends on how much needs to be approved before the run starts. For a straightforward rigid box with a standard insert, I’d usually expect 12 to 15 business days from sample approval to production completion, assuming materials are in stock. Add complex print finishes, specialty paper, or a custom mold, and that window can stretch to 18 or 25 business days. If the job starts with a new structural dieline in Guangzhou and a specialty wrap from a separate mill in Jiangsu, the calendar can stretch even more.
The first stage is design review, which can take 1 to 3 days if the dieline is already clear and the artwork is well prepared. The next stage is prototype development, often 3 to 5 days for a structural sample, or longer if the box includes foil, embossing, or a tricky insert. In my experience, the biggest delay usually comes from waiting on artwork approval, because one small correction to a logo position can ripple through the whole production plan for custom magnetic gift box assembly. A 2 mm logo shift might sound harmless, but if it changes the foil plate, the whole sample queue can move.
Material sourcing can also stretch the schedule. If a client chooses a paper with a custom color or a specialty coating, the supplier may need a separate run. Magnet lead times are usually manageable, but if the project needs a specific size, grade, or plated finish, that can add a few days. The same goes for EVA inserts, which may require CNC setup or tooling adjustment. For example, custom-matched inserts from a supplier in Dongguan may take 3 to 5 extra business days if the cavity layout is unusual or the foam density needs to be changed.
Mass production itself may take 5 to 10 business days for a medium-size run, depending on whether the shop is hand wrapping, semi-automating, or running multiple lines. Then there is drying or curing time, which is easy to overlook but critical in custom magnetic gift box assembly. Stack boxes too early and the edges can dent, the glue can shift, or the wrap can start to lift at the corner seams. On a humid week in Shenzhen, curing may need an extra half-day before the cartons are safe to pack at full density.
Here’s the practical lesson: if your box launch is tied to a holiday sale, trade show, or influencer drop, build buffer time into the schedule. I always advise clients to keep at least a one-week cushion, because even when the box production is on track, shipping lanes, customs inspection, or a reprint on one panel can eat into the calendar faster than people expect. And yes, somehow it always happens on the week you absolutely cannot spare. If the ship date is fixed for a New York launch event on the 15th, do not approve the final sample on the 12th and act surprised when nobody can teleport freight.
A fast sample is useful, but a rushed approval can become a costly mistake. A well-run custom magnetic gift box assembly plan usually includes one round of review, one physical check under real lighting, and enough time for small corrections before the full order starts. If the manufacturer says “we can do it in a day,” ask what they are leaving out. Usually, it is something expensive.
Common Mistakes in Custom Magnetic Gift Box Assembly
The most common problem I see is reversed magnet polarity. It sounds basic, but it still happens when teams move too quickly or skip a polarity board. If one magnet is flipped, the lid may repel instead of close, and the whole box feels wrong in the customer’s hand. In custom magnetic gift box assembly, a single reversed magnet can ruin an otherwise excellent run, especially if the error slips into a 3,000-piece batch before QC catches it.
Uneven glue is another frequent issue. Too much adhesive can stain thin wrap paper or leave a hard ridge that shows through the surface after pressing. Too little adhesive leads to lifted corners, especially on high-humidity days when paper fibers move more than expected. I’ve stood next to line workers in July in Guangdong and watched a perfectly good box develop a corner curl because the glue open time was too short for the heat and line speed. If the wrap is only 128 gsm, it will forgive even less.
Warped board creates a different kind of trouble. If the greyboard absorbs moisture unevenly, the shell may no longer sit square, and the closure becomes unreliable. That is why board storage matters; keeping pallets off the floor and away from damp loading docks can save a lot of grief later. A cheap board might look like savings on paper, but it can create expensive rework in custom magnetic gift box assembly. I’ve seen a 2 mm board lot from a low-cost supplier in East China save $0.02 per unit and then cost ten times that in cleanup labor.
Artwork mistakes show up more often than brands want to admit. Misaligned foil, a logo too close to the fold, or a layout that ignores the hinge movement can turn a luxury design into a production headache. If the mag pockets are too near a heavy design element, the wrap can bulge, and the finish loses that clean “solid block” look people expect from premium packaging design. A foil logo sitting 4 mm too close to the edge can also crack during folding, which is the kind of thing that looks tiny on screen and terrible in a finished box.
Overfilling the box is another trap. If the product or insert is too tight, the lid presses back against the item, which strains the hinge and reduces closure quality. That is especially common with apparel, candles, and skincare sets where the content volume changes slightly from sample to full production. The box may be designed correctly on paper and still fail in practice because the actual product has tolerance spread. A candle that measures 82 mm in one batch and 83.5 mm in the next batch can cause a serious headache if the cavity only allows 1 mm of clearance.
Finally, shipping damage can undo good work. Finished boxes need protection, corner padding, and a sensible carton count per shipper so the faces do not rub together. I’ve seen beautifully made custom magnetic gift box assembly projects arrive with scuffed foil because someone stacked them before the adhesive fully cured or packed them too tightly in a master carton. The box itself was fine; the handling was not. If the shipment is going from Shenzhen to Chicago, a little kraft paper, a divider sheet, and a proper outer carton are not optional extras. They are basic survival.
“A premium box is not just what leaves the factory; it’s what survives the truck ride and still opens with a clean snap.”
Expert Tips for Better Results and a Smoother Build
My first tip is simple: define the product first, then build the box around it. Too many projects start with a beautiful render and end with a cavity that is 4 mm too shallow or an insert that fights the product shape. Good custom magnetic gift box assembly begins with exact product dimensions, product weight, and a clear picture of how the customer will remove and replace the item. If the product weighs 380 grams, say so. If the lid must clear a 12 mm cap, say that too. The box cannot guess.
Second, approve a physical sample under real lighting. A screen can hide texture differences, but a sample on a warehouse table or retail shelf tells the truth about foil glare, soft-touch feel, and print contrast. I once had a client approve a deep navy wrap on monitor swatches, only to change it after seeing the sample in daylight because the black undertone made the logo disappear. That’s normal, and it’s far better to catch it early in custom magnetic gift box assembly. One review in a Shenzhen sample room can save a 5,000-piece mistake later.
Third, think about the opening experience. Thumb notches, ribbon lifts, reveal trays, and controlled resistance all influence how the box feels in use. If the lid opens too stiffly, the customer may think the box is damaged; if it opens too loosely, it loses the premium moment. The best closure boxes have a measured feel, not a random one, and that takes planning in the structural spec. On one luxury watch project, we tested three magnet strengths before landing on the one that opened smoothly but still held shut during a 1-meter drop test.
Here are a few shop-floor habits I trust:
- Mark magnet orientation clearly before insertion.
- Use a reference corner on every press table.
- Check fold pressure at the hinge line before full packing.
- Inspect foil and spot UV under a 45-degree light angle.
- Allow full curing time before shrink wrap or carton loading.
I also tell brands to specify performance, not just appearance. If the box will ship direct to consumer, ask for drop resistance expectations and carton protection. If it will sit on a boutique shelf, ask how it should open after multiple handling cycles. If it is part of seasonal gifting, ask whether the finish needs to tolerate warehouse stacking for 30 days. That kind of detail turns custom magnetic gift box assembly from a pretty idea into a usable packaging system. A supplier in Guangzhou can build you a nice-looking box in a week; building one that survives both a courier van and a retail shelf takes more than optimism.
And yes, sustainability should be part of the conversation. A paper-based shell with a recycled board core, FSC-certified wrap, and a carefully sized insert can reduce excess material while still looking rich. The point is not to make the box plain; the point is to make it intentional. That is usually where branded packaging succeeds, because every layer has a reason to be there. If the insert is molded pulp from a plant in Jiangsu and the outer wrap is FSC-certified paper, that gives the sales team a real story instead of a vague green slogan.
One more thing. Don’t let the sample room fool you into thinking color is “close enough.” Close enough is how reprints happen. And reprints are a headache nobody ordered.
Next Steps for Planning Your Custom Magnetic Gift Box Assembly
If you are planning custom magnetic gift box assembly, gather five things before you ask for a quote: product dimensions, target quantity, desired finish, insert needs, and delivery deadline. With those five details, a manufacturer can usually tell you whether the project is straightforward, cost-sensitive, or likely to need multiple sample rounds. If you can also share product weight, carton count per master case, and whether the shipment is headed to California, London, or Dubai, the estimate gets better very quickly.
I recommend requesting a dieline, a structural sample, and a price quote together. That gives you a clearer picture of cost and construction at the same time, which helps avoid the classic mistake of approving a price before understanding the actual build. A cheap-looking quote can hide expensive revisions later, and in packaging that usually shows up as schedule pain. For example, a supplier might quote $0.95 per unit for 5,000 pieces, but once the insert and foil are added, the real landed cost can move to $1.30 or more. Better to know that before you sign anything.
Build a short approval checklist for yourself or your team:
- Artwork positions confirmed against the dieline.
- Magnet strength matched to box size.
- Closure feel tested by hand.
- Insert fit checked with the actual product.
- Carton packing method approved for transit.
If the design is new, a pilot run or small first order is smart. That is especially true for fragile items, heavy items, or products with unusual shapes. A 300-piece pilot can reveal insert issues, coating scratches, or closure tolerance problems before you commit to a larger production run. In my experience, this is one of the best ways to protect a launch budget while still getting a polished result from custom magnetic gift box assembly. A pilot in Shenzhen or Dongguan can also tell you whether the factory’s manual wrapping team can hold the finish quality you expect at 3,000 pieces.
When you’re ready to compare materials and build styles, browse the Custom Packaging Products catalog to review rigid box formats, insert styles, and finish options. The clearer your starting brief is, the faster a supplier can turn it into a box that closes cleanly, presents beautifully, and ships safely. If you already know you need a 350gsm C1S artboard wrap, a 2 mm greyboard shell, and an EVA insert, you will save yourself several email rounds and probably one mild headache.
The best custom magnetic gift box assembly starts with plain, accurate specifications and ends with a box That Feels Premium every time the lid closes. That sounds simple, but after two decades on factory floors, I can tell you it takes discipline, good material choices, and respect for the people folding, pressing, and checking every corner by hand. It also takes a realistic timeline, because “urgent” is not a substitute for drying time in Dongguan. If you want a clean result, build around the product first, lock the structure before artwork, and leave enough time for one physical sample and one honest QC pass. That’s the move.
Frequently Asked Questions
How does custom magnetic gift box assembly work?
It combines rigid board construction, printed or wrapped outer panels, embedded magnets, and hand-finished folding or pressing. The magnets are aligned during assembly so the lid closes with a precise snap rather than a loose flap. Final inspection checks closure strength, corners, surface finish, and insert fit. For a typical 2,000- to 5,000-piece run in Shenzhen or Dongguan, the process usually includes die cutting, magnet placement, wrapping, pressing, and a final QC pass before shipping.
What affects the price of custom magnetic gift box assembly?
Main drivers include board thickness, print and finish complexity, magnet quality, insert design, labor, and order quantity. Prototype or sample units often cost more per box than mass production because setup time is spread across fewer pieces. Specialty finishes and custom inserts usually raise pricing more than plain outer wraps. As a practical example, a simple magnetic box at 5,000 pieces might land near $0.88 to $1.10 per unit, while a fabric-wrapped version with EVA foam can move above $2.00 per unit.
How long does custom magnetic gift box assembly usually take?
Timing depends on sampling, artwork approval, material sourcing, production, and drying or curing time. Simple builds move faster than detailed boxes with foil, soft-touch lamination, or intricate inserts. Allow extra buffer time for seasonal launches or projects with strict ship dates. In many factories, production is typically 12 to 15 business days from proof approval, and complex projects in Guangzhou, Shenzhen, or Dongguan can take 18 to 25 business days.
What are the most common problems in custom magnetic gift box assembly?
Common issues include reversed magnet polarity, uneven glue, warped board, lifted corners, and misaligned artwork. Poorly sized inserts can also make the lid close awkwardly or damage the product. Shipping damage often happens when finished boxes are packed without enough protection. A lot of these problems start with tiny details, like a 1.5 mm magnet shift or a board lot stored too close to humidity for too long.
How can I make sure my custom magnetic gift box assembly turns out well?
Start with accurate product dimensions and a clear packaging brief before ordering. Review a physical sample for closure feel, print quality, and insert fit under real lighting. Confirm the full production plan, including materials, timeline, and inspection steps, before approving the run. If possible, ask for a pilot run of 300 to 500 pieces, especially for fragile products or new launch packaging.