A custom mylar bag with window sounds simple until the quote lands on your desk and you realize the clear panel changes almost everything: shelf appeal, barrier performance, artwork layout, and even the scrap rate during production. The word “mylar” gets used loosely in packaging, but most buyers are really talking about a laminated pouch built from PET, metallized PET, PE, or a foil-based structure with a transparent section built in.
The real decision is not whether the window can be added. It usually can. The real question is whether the window earns its space. A good pouch has to protect the product, show enough of it to sell, and still leave room for legal copy, branding, and a clean seal. That balance is harder than the mockups make it look.
Window packaging works best when the contents benefit from visual proof. Texture, color, fill level, and freshness cues help shoppers decide faster. That matters on a retail shelf, but it also matters online, where a clear panel can make product photography feel more credible and less staged.
Why a Window Bag Often Outperforms a Blind Pouch
A blind pouch asks the customer to trust the label. A window bag shows evidence. That difference sounds minor, yet it changes how quickly a shopper understands the product and how much confidence they feel before picking it up. In categories crowded with near-identical packaging, that extra information often becomes the deciding factor.
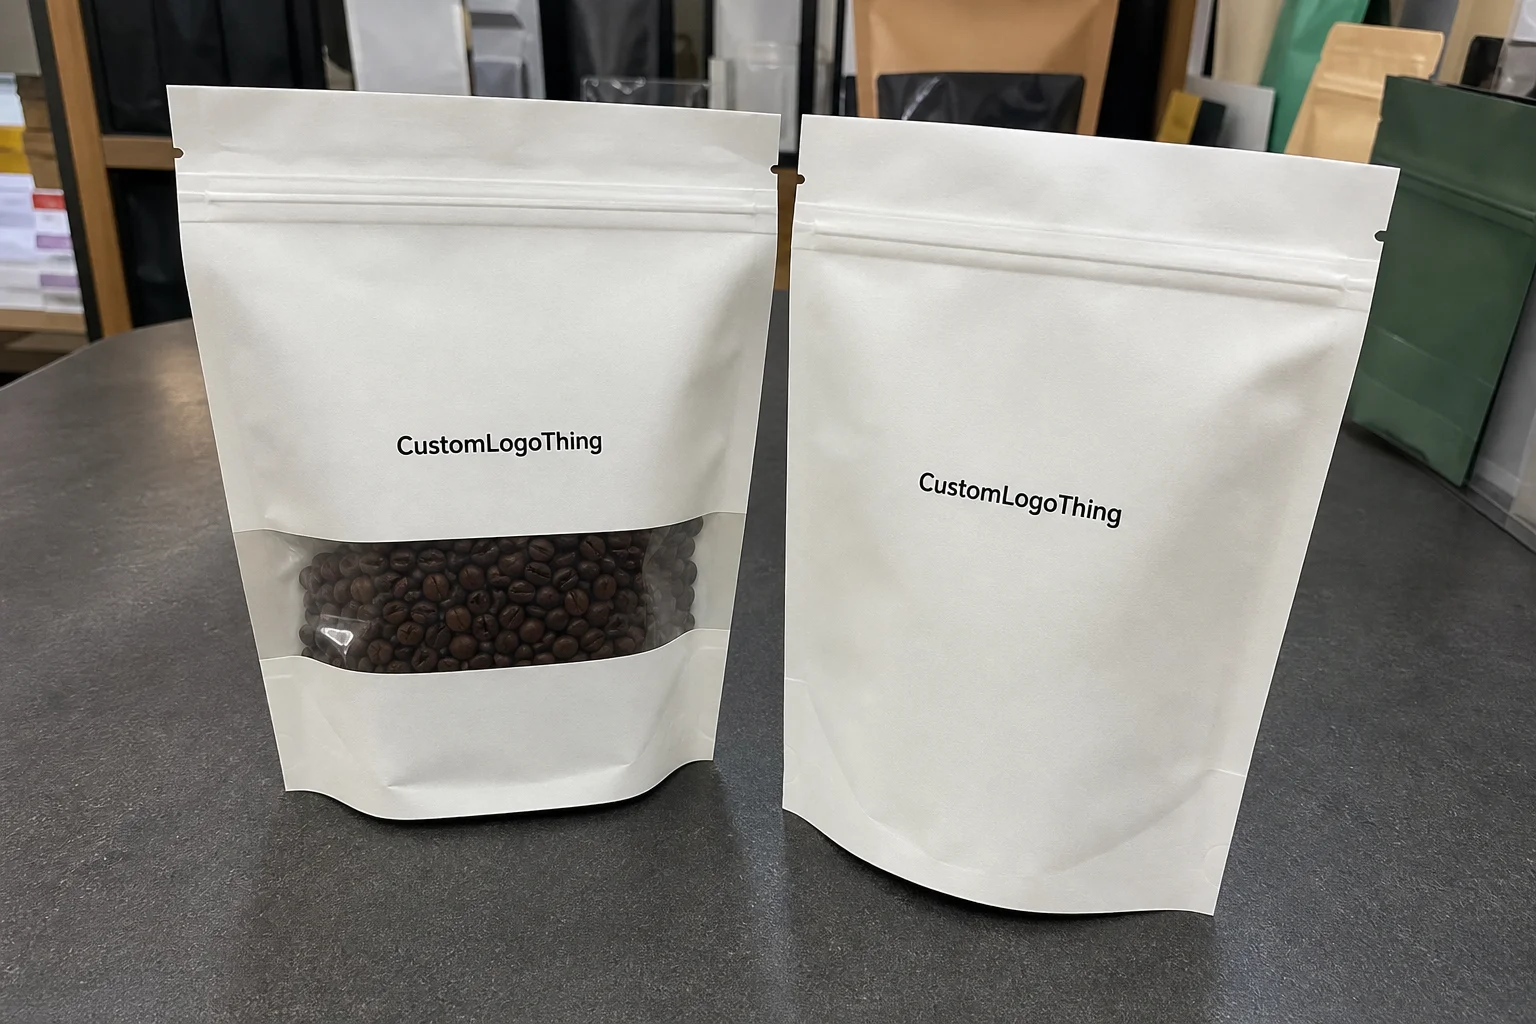
A custom mylar bag with window tends to perform well for snacks, coffee, tea, gummies, herbs, pet treats, bath salts, sample kits, and small retail items where the contents are part of the value. A customer buying coffee beans wants to see roast level. Someone buying candy wants to see color and fill. Pet treat buyers care about shape and freshness. The window turns those details into selling points instead of hidden information.
The effect is practical, not decorative. A bag with a clear panel reduces uncertainty, and reduced uncertainty usually reduces hesitation. That can mean more impulse purchases, fewer abandoned carts for e-commerce listings, and better shelf recognition in stores with tight facings.
A window helps the product speak for itself, but only if the bag still looks intentional. Too much clear area and the packaging can feel exposed or unfinished.
There is a tradeoff, and buyers ignore it at their own risk. Every square inch of clear film is an inch that is no longer carrying ink, barrier material, or light protection. For a dry snack, that may be acceptable. For a light-sensitive herb or aroma-heavy product, it can be a bad compromise. The best designs usually use the smallest clear area that still does the job.
How a Window Pouch Is Built and How It Works
Most window pouches are laminated structures. One layer carries print, one layer provides barrier performance, and the inner layer handles heat sealing. The transparent section is added either as a clear film insert, a die-cut opening backed by film, or a full clear panel, depending on how much visibility the product needs and how much protection the buyer is willing to give up.
The packaging industry often uses “mylar” as a catch-all term, but the structure matters more than the label. A standard retail pouch may use PET/PE for basic use, PET/VMPET/PE for stronger barrier, or foil laminations for products that need better aroma and moisture control. If the contents are fragile, oily, scent-heavy, or reactive to light, the film stack should be chosen around those risks first. Print comes second.
Common window styles include:
- Clear film insert - a transparent section integrated into the laminate without opening the pouch face.
- Die-cut window - an opening in the printed front that exposes a clear layer underneath.
- Full clear panel - maximum visibility, usually used when the product itself is the main visual asset.
- Frosted window - softer visibility and a more subdued presentation.
- Shaped window - a cutout that echoes the logo, product silhouette, or brand motif.
Construction affects function in ways buyers often underestimate. Zipper placement, tear notch position, seal width, and gusset geometry all have to work together. A pouch can look excellent in a mockup and still fail if the seal area is too narrow, the zipper sits too high, or the window runs into the top seal. That is why production drawings matter more than flat artwork.
For many pouch formats, tear notches are placed just below the top seal, and the exact distance depends on the zipper type and sealing equipment. It sounds like a small detail until a customer tears through the wrong section and compromises the reseal. Packaging fails in small places first.
Material, Window Size, and Barrier Specs That Matter
The spec sheet is where window packaging either becomes a useful sales tool or an expensive mistake. Product sensitivity should drive the structure. Coffee needs oxygen control. Gummies need moisture resistance. Herbs need aroma retention. Powdered products need puncture resistance and a dependable seal. Non-food items can sometimes use lighter structures, but only if the product itself allows it.
Window size is partly a merchandising choice and partly a technical one. A larger clear panel gives shoppers more information, which can improve conversion. It also reduces the amount of printed barrier area and can expose more of the contents to light, heat, or handling marks. If the product fades, dries out, softens, or looks unstable in bright light, the window needs to stay modest.
Useful material decisions include:
- Thickness - many retail pouches sit in the 100 to 150 micron range, with heavier structures used for larger fills or sharper product edges.
- Finish - matte creates a softer premium look; gloss increases contrast and color punch.
- Reseal option - zipper, press-to-close, or heat seal only if the product is single-use.
- Barrier stack - standard laminate, metallized film, or foil depending on shelf life needs.
- Window placement - centered, lower third, side-aligned, or shaped to support the brand system.
If the bag is intended for food, supplements, or anything with compliance requirements, the window does not replace labeling obligations. Ingredients, net weight, allergens, barcode space, lot coding, and jurisdiction-specific copy still have to fit. If transit is rough or the product is high value, packaging tests matter too. Organizations such as ISTA publish useful transport testing standards, and those standards are worth thinking about before the order is approved.
Clear, frosted, and tinted windows should also be tested against the actual product color, not just a white-background mockup. A pouch that looks elegant in renderings can look flat, muddy, or overly exposed once filled. That mismatch happens often. What sells in a design file does not always survive contact with real product.
| Window Style | Best For | Visibility | Protection Impact | Typical Use |
|---|---|---|---|---|
| Small clear panel | Snacks, samples, dry goods | Medium | Low | Budget-conscious retail packaging |
| Large clear front | Products where appearance sells the item | High | Medium to high | When the contents are part of the brand story |
| Frosted window | Premium or minimalist branding | Medium | Low to medium | When a softer presentation matters |
| Shaped window | Specialty retail packaging | Medium | Low to medium | When the cutout supports the visual identity |
Cost, Pricing, MOQ, and Unit Cost Drivers
Pricing for a custom mylar bag with window depends on more inputs than most first-time buyers expect. Size, film structure, zipper type, print coverage, finish, and window complexity all move the number. Add custom tooling, unusual dimensions, or specialty barrier needs, and the price can change quickly.
As a rough planning range, simple window pouches at higher quantities can land around $0.18 to $0.45 per unit. Smaller runs or more complex specs can move into the $0.50 to $1.20+ per unit range. Those are planning numbers, not promises. Freight, sampling, tooling, and duties can shift the final landed cost enough to change the economics of the order.
MOQ is usually the second reality check. Many custom pouch programs start around 1,000 to 3,000 pieces, though some suppliers set higher thresholds to keep setup costs manageable. Smaller orders almost always cost more per unit because the setup is spread across fewer bags. That is basic production math, not a pricing trick.
Here is the comparison buyers should actually make before approving a quote.
| Quote Item | What to Check | Why It Matters |
|---|---|---|
| Material stack | PET/PE, metallized film, foil, clear panel type | Drives barrier, appearance, and base cost |
| Print method | Flexo, gravure, digital | Changes setup cost, color consistency, and lead time |
| Closure | Heat seal, zipper, tear notch | Affects usability and unit price |
| Window complexity | Shape, size, placement, clear panel style | Can add tooling and inspection steps |
| Freight | Air, sea, domestic shipping terms | Often the line item that changes the real spend |
If your packaging program includes other formats, such as Custom Packaging Products or custom printed boxes, keep the specs aligned early. Misaligned finishes, colors, or copy hierarchy across SKUs create more rework than most teams budget for. Consistency is cheaper than correction.
Production Steps and Lead Time From Artwork to Delivery
Production usually starts with a brief: product type, fill weight, size, window style, finish, and quantity. After that comes dieline selection, artwork setup, proofing, sampling, production, inspection, and shipment. If the brief is vague, the revision cycle grows. If the brief is clear, everything moves faster and with fewer surprises.
Typical sample timing is often 5 to 10 business days for straightforward mockups, with longer timelines for fully custom structures. Full production often falls in the 12 to 25 business day range after proof approval, depending on material availability, print method, and order size. Special film sourcing, a new cutting tool, or extra review cycles can extend that schedule.
The most common delays are predictable:
- Artwork revisions because the barcode, nutrition panel, or legal copy is too close to the window.
- Window alignment approval when the product needs to show a specific fill level.
- Material sourcing when the barrier spec is not standard stock.
- Slow proof approval because multiple people want another round of edits.
Production-ready files remove a lot of friction. So does a locked spec sheet. If the supplier has to guess at window placement or seal dimensions, the schedule will slip. For launches with a fixed inventory date, that is the difference between an orderly rollout and a scramble for emergency packaging.
For quality control, request a proof that shows the actual window cut, not just a polished flat render. A digital proof is useful for layout. A physical sample is better when the window affects visibility, product centering, or seal behavior. If the product is expensive or delicate, that extra check is worth the time.
Good suppliers also inspect for more than color. Seal integrity, zipper function, alignment tolerance, and film clarity all matter. A pouch can pass visual approval and still fail in use if the seal line is weak or the zipper tracks poorly. The best QC process catches those issues before shipment, not after the customer opens the first box.
How to Order the Right Window Bag Without Regretting It
Start with the product, not the pouch. Define what you are packing, how it behaves, and what needs to remain visible. Then work backward into the film structure and window format.
- Confirm the product type - snack, coffee, powder, gummy, herb, or non-food item.
- Set the barrier requirement - moisture, oxygen, aroma, grease, or basic display.
- Choose the window style - small clear panel, die-cut, frosted, or shaped.
- Pick the finish - matte or gloss, based on the visual tone you want.
- Decide on closure - heat seal only, zipper, or zipper plus tear notch.
- Check artwork space - keep the logo, barcode, and compliance copy out of the window area.
Ask for a proof before you commit to production. Better still, request the dieline and mark the window area directly on the layout. That is the fastest way to avoid the common failure where a logo lands partly on the clear panel and partly on printed film. The design technically fits, but the result looks accidental.
For products that are moisture-sensitive or high value, barrier performance should outrank decorative extras. A pouch that looks stylish but fails to protect the contents is not a good package. It is an expensive label.
Supplier comparison should go beyond unit price. Ask how they handle seal tolerance, color consistency, window alignment, and inspection. A factory that answers technical questions clearly usually has a better production process than one that only repeats “no problem” without specifics.
Also check the actual size against the fill weight. A pouch that is too large can make a product look underfilled, while a pouch that is too tight can distort the seal and create stress on the seams. Both problems show up in the hands of a customer, not on the quote sheet.
Common Mistakes That Waste Budget or Hurt Shelf Appeal
The first mistake is making the window too large. Bigger is not automatically better. A massive clear panel can weaken shelf presence, reduce printable space, and expose the contents to light or handling marks that make the product look less controlled.
The second mistake is layout conflict. If the window cuts through the logo, tagline, or a major visual element, the pouch starts working against the brand. The design should guide the eye, not break the composition. A package that looks “creative” because key elements are split apart usually just looks unfinished.
Another common error is spec mismatch. A light-duty structure can be fine for dry accessories, but not for aroma-sensitive or moisture-sensitive products. The opposite mistake is equally common: spending on a heavy barrier structure for a product that does not need it, then wondering why the unit economics are poor.
Quote confusion causes its own damage. Buyers approve a unit price, then discover setup, tooling, sample, freight, and duties later. The bargain evaporates. Always ask for the full landed cost and confirm what is included before comparing vendors.
If your brand uses several packaging formats, keep the system visually consistent. A window pouch that clashes with the rest of your line, including product packaging and boxes, makes the shelf presentation feel fragmented even when each individual item is attractive.
One more issue deserves mention: overcomplicating the first order. A new shape, a special window, a custom finish, and a low MOQ all at once increase the chances of delays. If speed matters, simplify the first run and introduce complexity after the line is stable.
What to Confirm Before You Request a Quote
Before requesting pricing on a custom mylar bag with window, gather the essentials. A clean brief gets a better quote and fewer revisions.
- Bag dimensions and fill weight
- Product type and sensitivity to moisture, oxygen, aroma, or light
- Preferred material stack
- Window size and style
- Matte or gloss finish
- Zipper, tear notch, or heat seal only
- Target quantity
- Shipping destination and timing expectations
Then ask the questions that actually affect the final number:
- What is the MOQ?
- What is the unit price at different quantities?
- Is there a setup or tooling fee?
- How much are samples?
- What is the lead time after proof approval?
- Are freight and duties included or separate?
- Can you provide a dieline and a production-ready proof?
Once you have those answers, mark the window area on the artwork and review the proof like the launch depends on it. Because it does. A good window pouch is not the fanciest option on the table. It is the one that balances visibility, protection, and cost without creating avoidable production problems.
That is the standard worth using. Everything else is just pretty packaging that may or may not hold up under real use.
What is a custom mylar bag with window used for?
It lets customers see the product while the pouch still carries branding and provides protection. These bags are common for snacks, coffee, candy, supplements, herbs, pet treats, and small retail goods. The window reduces guesswork at shelf and can make online listings feel more credible.
Does a window reduce barrier protection?
It can, depending on the size, placement, and film structure. A larger clear area usually means less printed barrier surface and more exposure to light. A well-designed pouch can still deliver strong moisture and aroma protection, but the material stack has to be chosen for the product, not just the artwork.
What affects the price of a window mylar bag the most?
Size, film structure, print method, window complexity, closure style, and order quantity drive most of the cost. Smaller runs usually carry a higher unit price because setup is spread across fewer bags. Specialty finishes and custom shapes can move the number up quickly.
How long does production usually take?
Lead time depends on how quickly the artwork is approved, whether a new tool is needed, and whether the bag is fully custom or based on an existing format. Sampling is usually faster than full production. Complex window placement or specialty materials can extend the schedule.
What should I ask before placing an order for a window pouch?
Ask for MOQ, unit cost at different quantities, setup fees, sample Cost, Lead Time, and shipping terms. Confirm the exact window size, finish, zipper type, and film structure. Request a proof or dieline before approving production so the window does not interfere with the artwork.