A premium planner can look perfect on the packing bench and still arrive like a clearance-bin item if one corner crushes, one envelope bends, or a printed cover rubs against loose inserts for three states of carrier handling. That is why custom stationery shipping boxes have to work as protective packaging first and branded packaging second, even when the logo, color, and unboxing moment carry real weight.
Stationery is unforgiving. A ceramic mug can hide a light scuff on the bottom; a letterpress invitation suite cannot hide a bent corner. A notebook with a bowed spine feels cheap the second someone opens the parcel. Packaging for paper goods starts with the material’s weaknesses: paper absorbs moisture, stacks shift, edges bruise, and dark ink or foil can mark faster than buyers expect.
What Custom Stationery Shipping Boxes Need to Protect
Custom stationery shipping boxes are not just branded outer cartons with a logo on the lid. They are mailer or shipping formats built around the actual packed product: paper weight, stack height, exposed edges, finish sensitivity, moisture exposure, and the amount of compression the set can tolerate before it starts to warp.
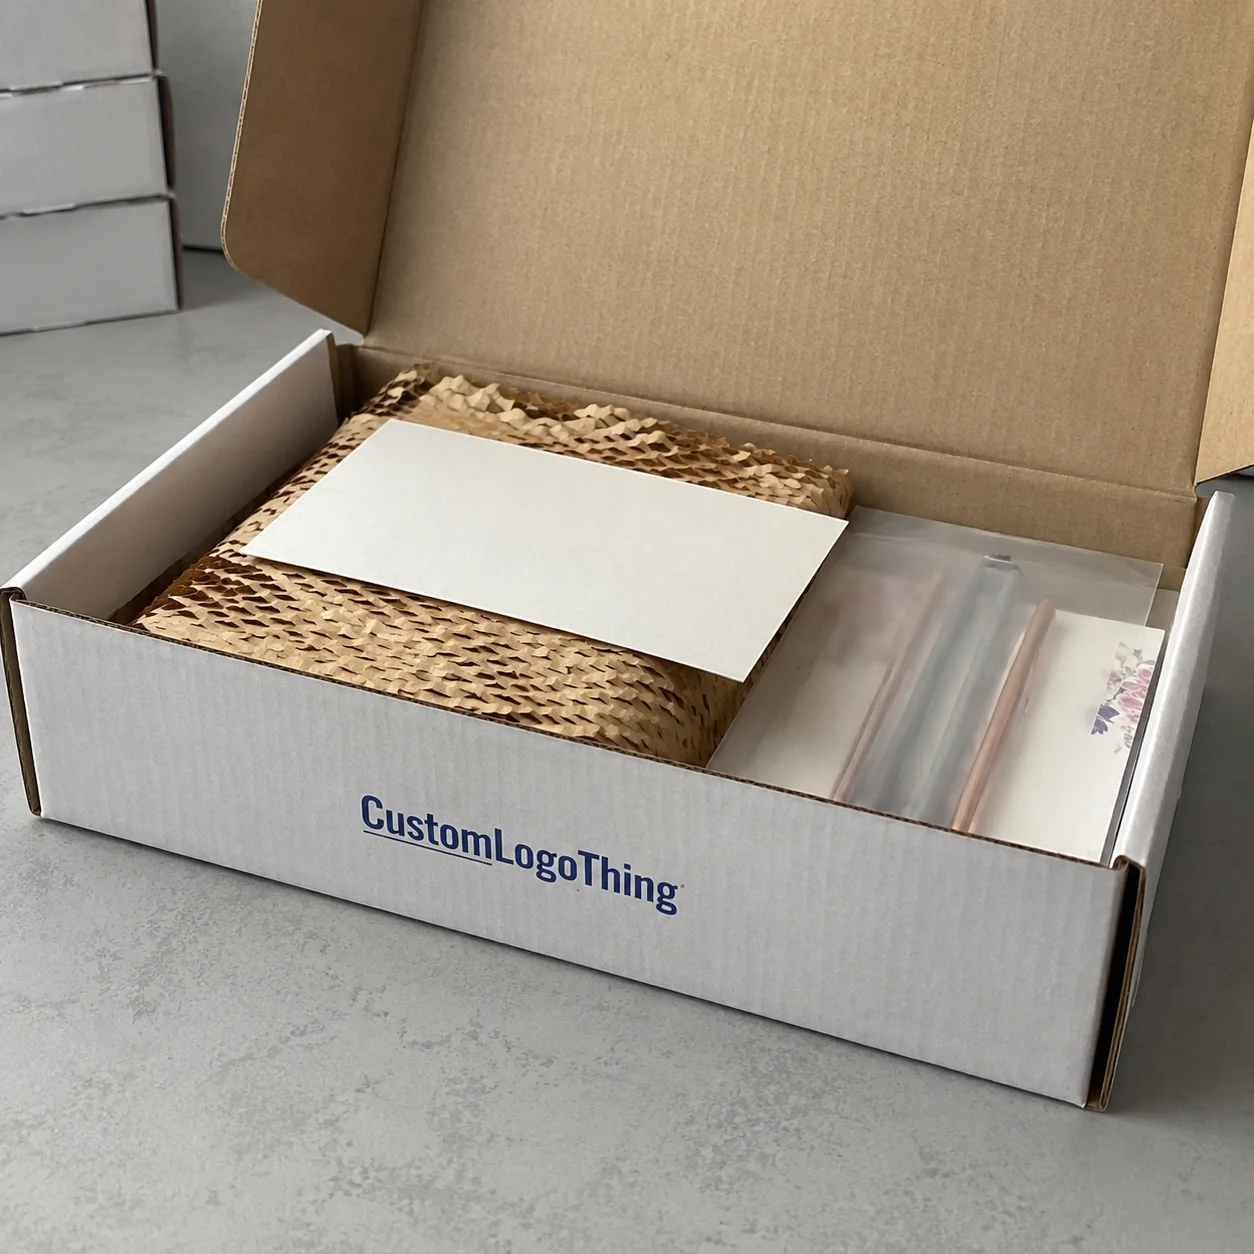
The category is broader than greeting cards. It includes boxed card sets, journals, notebooks, planners, letterpress cards, wedding invitation suites, art prints, branded office sets, sample packs, and subscription stationery kits. Some ship flat and light. Others include pens, wax seals, clips, ribbon, stickers, or small accessories that can dent paper if they move inside the box.
Buyers sometimes blur one distinction that matters: retail packaging sells on a shelf, while shipping packaging survives the parcel network. Retail packaging can prioritize face panels, finishes, and shelf appeal. Shipping packaging has to survive compression, drops, vibration, label placement, tape, conveyor contact, and the casual abuse built into ecommerce logistics.
The common structures each do different work. Corrugated mailer boxes provide a branded reveal and useful edge protection. Tuck-top mailers suit flat sets and lightweight kits. Roll-end front tuck boxes add sidewall strength and a tidy closure. Rigid boxes create a premium presentation, but they usually need a corrugated sleeve or outer shipper. Paperboard cartons can be excellent inner product packaging; they are not automatically parcel-ready.
Packaging floor rule: measure what will ship, not what was designed. The packed height after tissue, envelopes, backing boards, inserts, wraps, and samples is the number that decides whether the box closes cleanly and protects the stationery.
The right box starts with product dimensions and transit risk. Then it moves into material, print, cost, timeline, testing, and ordering decisions. Reverse that order and even attractive Custom Printed Boxes can become expensive once replacements, credits, damaged inventory, and packing labor enter the calculation.
How Stationery Box Structures Work in Transit
Paper goods fail in predictable ways. Corners bend. Notebook spines dent. Coated covers rub against inserts. Uncoated papers wick moisture from damp conditions. Loose contents slide back and forth until the edges feather. Over-tight packing causes a different problem: bowed journals, creased invitations, and pressure marks on textured stock.
Corrugated board helps because it is not a single flat sheet. It uses liners and fluted medium, with an air column between paper layers that absorbs compression and impact better than plain paperboard. E-flute is slim and often used for premium mailers where print appearance matters. B-flute or stronger grades can make sense for heavier kits, bulkier planners, or shipments that need more stacking strength.
Different structures solve different risks. A mailer box works well for a branded unboxing experience and moderate protection. A regular slotted carton is efficient for bulk packs, wholesale shipments, or multiple retail units. A bookfold mailer wraps tightly around flat prints and documents. A telescoping box or sleeve-style system can support a higher-end reveal, especially when the presentation box sits inside a stronger shipper.
Fit matters more than many teams expect. Stationery usually needs controlled compression, not open air. A few millimeters can decide whether a stack stays crisp or shifts during delivery. Too much empty space invites movement. Too little clearance makes packers force the closure, and forced closures often become bent corners.
- Chipboard backers: useful for art prints, invitation suites, and flat card packs that need bending resistance.
- Belly bands and paper wraps: keep stacks aligned without adding much depth.
- Corrugated pads: add corner and surface protection inside a mailer or carton.
- Molded pulp trays: help mixed stationery kits with accessories stay separated.
- Glassine or compostable sleeves: protect delicate print finishes from rub and light moisture exposure.
Branding has to respect the structure. Interior print creates the first reveal and is less exposed to shipping scuffs. Exterior print must share space with shipping labels, barcodes, tape paths, and carrier handling marks. Dark flood coats on the outside can look sharp in a rendering and still show rub quickly, especially on rougher kraft liners.
Sustainability needs the same practical lens. Right-sizing often saves more material and freight than choosing a recycled label while keeping an oversized box and extra void fill. If forestry claims matter to your brand, review standards from the Forest Stewardship Council, and ask suppliers which board grades can support those claims without weakening the structure.
Key Specs to Decide Before You Request a Quote
Before requesting custom stationery shipping boxes, measure the packed product, not just the stationery itself. Include envelopes, tissue, instruction cards, samples, backing boards, belly bands, sleeves, promotional inserts, and any accessory that will sit inside the box. Measurements should be taken after the stack has rested for a few minutes, because wraps and paper bands can relax or expand slightly.
The core specifications are simple, but they need to be accurate: internal length, width, and depth; total product weight; quantity per shipment; desired unboxing style; shipping method; and whether the box is the final mailer or an inner presentation box. If one box has to handle three product counts, say that early. A box sized for six card sets may not protect two card sets unless an insert or pad fills the difference.
Material choices should match the shipment’s job. E-flute corrugated works well for slimmer premium mailers and lighter stationery kits. B-flute or stronger corrugated grades help heavier shipments or subscription boxes with mixed contents. Paperboard can be excellent for inner cartons or retail packaging, often around 300gsm to 450gsm depending on size and finish. Rigid board creates a luxury feel for gift sets, but it still needs parcel protection around it.
Print choices affect cost, timing, and appearance. One-color flexographic printing is efficient for logos, patterns, and simple package branding. Full-color digital printing works for short runs or seasonal artwork. Litho-laminated graphics give a polished retail look, often used when color fidelity and smooth coverage matter. Interior printing can be a smart place to spend budget because the customer sees it at opening, while the print avoids some exterior scuff risk.
Coatings deserve a sober look. Uncoated kraft feels natural, but it may show rub marks, ink variation, and softer detail. Coated white liners hold color more cleanly, though dark artwork should still be scuff tested. Matte finishes look premium but can mark under friction. Gloss can improve color pop, yet it may not suit every stationery brand’s tone.
Artwork files should account for folds, scores, glue areas, and print movement. Keep logos away from fold lines unless the distortion is intentional. Leave clearance for shipping labels and barcodes. Fine typography behaves differently on corrugated than it does on smooth paperboard because flutes, liner texture, and print method all influence detail. A hairline serif that looks elegant on a PDF can fill in during flexo printing.
| Specification Choice | Best Use | Practical Watchout |
|---|---|---|
| E-flute corrugated mailer | Premium flat sets, notebooks, small kits | Confirm edge protection if the product is heavy or loose |
| B-flute corrugated carton | Heavier planners, bulk packs, wholesale orders | Less sleek for unboxing unless paired with stronger print or inserts |
| Paperboard inner carton | Retail packaging inside an outer shipper | Usually not enough for parcel delivery by itself |
| Rigid presentation box | Luxury stationery sets and gifts | Adds cost, assembly time, and often still needs a shipper |
Choose specs based on protection first, then refine the aesthetics. A beautiful print treatment cannot compensate for an undersized or under-graded box, and that lesson gets expensive once orders are already moving through fulfillment.
Cost and Pricing Factors for Stationery Mailer Boxes
Pricing depends on more than size. Unit cost is shaped by board grade, structure complexity, print method, ink coverage, order quantity, tooling, inserts, finishing, packing requirements, and freight. Two boxes with the same outside dimensions can price very differently if one uses plain kraft flexo print and the other uses full-color litho-lamination with a fitted tray.
Common setup costs include cutting dies for custom structures, printing plates for flexographic work, digital setup for short runs, and sample fees for physical prototypes. Litho-laminated graphics add material and process steps. Premium kits may also require hand assembly, kitting, or extra quality checks if the insert order and presentation need to be exact.
Minimum order quantity is not just a supplier preference. Lower quantities help with a launch, limited edition, or seasonal campaign, but the unit price is usually higher because setup time is spread across fewer boxes. Larger runs lower the unit cost, though they add storage responsibility and tie up more cash in packaging inventory.
For planning, a simple one-color printed corrugated mailer in a moderate quantity might land around $0.85 to $2.25 per unit depending on size, board, and print coverage. A more decorated full-color mailer with interior print may run several dollars per unit in smaller runs. Rigid presentation packaging with inserts can move much higher, especially when manual assembly is required. These ranges are not universal; freight, quantity, and finish choices can swing them quickly.
Right-sizing changes total landed cost, not just box cost. A box that is slightly too large can increase dimensional weight, void fill, storage cube, and damage risk. For parcel carriers, a one-inch increase in depth may look harmless on a spec sheet and still push a shipment into a higher billed weight category.
There is a useful tradeoff between branded impact and cost control. One-color print on kraft may be enough for everyday shipments. Full-color interior print can be reserved for gift sets, subscriptions, influencer mailers, or higher-margin product packaging. If you sell through multiple channels, ask whether one structure can support ecommerce shipping, wholesale replenishment, and future stationery sizes with minor insert changes.
A good quoting approach is to request options in tiers:
- Good: stock-size branded mailer with one-color print and a simple paper wrap.
- Better: custom-size corrugated mailer with improved fit, exterior logo, and corrugated pad.
- Best: premium printed mailer with interior graphics, fitted insert, and tested presentation sequence.
The cheapest unit price can become expensive if it causes replacements, customer service credits, poor reviews, or extra packing labor. From a buyer’s point of view, a box that saves $0.18 but adds 20 seconds of folding time may not be the cheaper option at scale.
Process and Timeline From Sample to Delivery
A typical production path starts with product measurements and a packaging brief. From there, the supplier recommends a structure, prepares a quote, creates a dieline, places artwork, sends a proof, produces a sample if needed, moves into production after approval, packs the finished boxes, and ships them to the delivery address.
A dieline is the flat blueprint of the box. It shows cut lines, fold lines, glue areas, panels, print zones, and safety margins. If you are reviewing one for the first time, check orientation carefully. More than one project has gone sideways because the top panel looked correct flat, but the logo faced the wrong way after folding.
Approval stages usually include a digital proof for layout and color placement, a physical sample for fit and structure, and sometimes a production proof for larger or color-sensitive orders. Digital proofs are useful, but they do not prove fit. A plain structural sample can reveal whether the spine dents, the lid bows, or the insert traps a corner before decorated production begins.
Timelines vary by tooling, specialty board availability, print method, finish complexity, sample rounds, artwork readiness, demand season, freight distance, and whether inserts are produced at the same time. Simple printed mailers usually move faster than rigid presentation boxes, multi-part kits, or boxes requiring specialty board and manual assembly.
As a practical planning range, a straightforward printed mailer may take around 10 to 20 business days after proof approval, while sampling and custom inserts can add one to three weeks depending on revisions and material availability. Complex rigid packaging can require longer. Treat those numbers as planning guardrails, not guarantees.
Buyers can reduce delays by sending exact product dimensions, final artwork files, target quantity, shipping destination, launch date, and photos of the packed product at the start. If you already have a preferred carrier service or dimensional weight concern, include that too. It helps the box recommendation land closer to production-ready on the first pass.
Timeline planning should include the fulfillment ramp, not just manufacturing. Teams need time to receive boxes, train packers, load inventory, set up storage locations, and test the packing workflow. A box that arrives on schedule can still create a launch problem if the team needs two days to learn how to fold and pack it consistently.
For broader packaging options, compare Custom Packaging Products before locking into one format, especially if the stationery line includes both flat mailers and boxed gift sets.
Common Mistakes That Damage Stationery Orders
The most common mistake is choosing a box from the flat product size and forgetting the packed height. Envelopes, tissue, inserts, pads, backing boards, and samples add thickness fast. A quarter inch can be the difference between a clean tuck and a lid pressing into the top card.
Overpacking creates its own trouble. Too much pressure from wraps, tight belly bands, or a shallow mailer can bow notebooks and crease invitation corners. Textured cotton papers, soft-touch covers, and foil-stamped pieces may show compression marks if the pack is squeezed hard enough during closure.
Artwork mistakes are just as common. Logos placed across fold lines may break visually. Fine reversed text on rough kraft can fill in. Dark exterior coverage may show rub and scuffs after conveyor handling. Shipping label space is often forgotten, which forces fulfillment teams to cover the package branding the company paid to print.
Material mismatches cause bigger failures. A paperboard carton may look beautiful as retail packaging, but it can collapse or dent as a standalone shipper for heavier orders. A lightweight mailer grade may feel premium in hand yet lack enough edge crush resistance for stacked cartons, long transit lanes, or mixed contents.
Transit testing should not be skipped for launches, subscriptions, and gift sets. Formal test methods from groups such as the International Safe Transit Association are helpful for higher-volume programs, but even a basic internal test is better than guessing. Shake the pack. Drop it from table height on corners and edges. Send a few trial shipments through the actual carrier route if time allows.
Fulfillment mistakes add hidden cost. Boxes that are slow to fold, hard to close, confusing to pack, or dependent on extra tape can raise labor cost and create inconsistent customer experiences. If one packer folds the side tabs differently from another, the customer may receive two very different versions of the same brand experience.
Document a packing standard with photos. Show product orientation, insert order, tissue fold, label placement, tape position, and quality checks. For stationery, consistency matters because customers often buy for gifts, events, and business use. The package has to look intentional every time.
Next Steps Before You Order Your Stationery Boxes
Before ordering custom stationery shipping boxes, build a simple pre-order checklist. Measure the full packed product stack. Weigh the shipment. Photograph the intended packing arrangement. Decide whether the box is a shipper, an inner presentation box, or both. Define the unboxing goal in plain language: efficient, premium, giftable, subscription-ready, or flexible enough for both retail and ecommerce.
A specification sheet does not need to be fancy. It should include internal dimensions, material preference, print locations, color count, order quantity, delivery address, launch deadline, sustainability goals, and carrier restrictions. If the box must work with a shipping label of a certain size, state that early. If the product will ship in hot, humid, or rainy regions, mention moisture concerns.
Order or build a plain structural sample before committing to decorated production, especially for fragile papers, premium finishes, subscription kits, and mixed accessories. A white or kraft sample without print can still answer the most important questions: does it fit, does it protect, does it fold quickly, and does it present the product cleanly?
Basic testing is straightforward. Shake the packed sample and listen for movement. Inspect all four corners after handling. Place a mock shipping label on the box and make sure it does not cover important artwork. Time how long it takes to pack one order. Stack several filled boxes on a shelf for a day or two. If the project matters, send a small real-world carrier shipment and inspect what comes back.
Compare quote options by total landed value, not only unit price. Include setup charges, freight, storage, packing labor, damage prevention, and whether the same structure can support future stationery sizes. If your program is moving from envelopes into boxed ecommerce shipping, Custom Shipping Boxes are usually the better starting point than trying to stretch a retail carton into a parcel role. For soft goods or non-crush-sensitive accessories sold alongside stationery, Custom Poly Mailers may still have a place, but paper products usually need more rigid support.
Gather dimensions, photos, quantity, artwork, and shipping goals before requesting custom stationery shipping boxes. Better starting information leads to a better first recommendation, fewer sample rounds, and a packaging choice that protects both the product and the brand.
FAQ
What are custom stationery shipping boxes usually made from?
Most are made from corrugated board because it protects paper goods from bending, corner impact, and compression better than plain paperboard. Slim premium mailers often use E-flute corrugated, while heavier kits may need stronger corrugated grades or added pads. Paperboard or rigid boxes can be used as inner presentation packaging, but they often need an outer shipper for parcel delivery.
How do I choose the right size for stationery mailer boxes?
Measure the complete packed set, including envelopes, inserts, wraps, backing boards, samples, and any accessories. Leave enough room for easy packing and protection, but avoid excess space that lets the product slide during transit. If the stationery is flat and delicate, consider a snug mailer with a backer or insert rather than a deep box with loose fill.
Do custom stationery boxes need inserts or padding?
Inserts or pads are helpful when the product can shift, when corners are exposed, or when mixed items such as pens, clips, or wax seals are included. Flat stationery may only need a chipboard backer, paper wrap, or corrugated pad, while premium kits may need a fitted tray. The goal is controlled movement, clean presentation, and edge protection without over-compressing the paper.
What affects the price of custom stationery shipping packaging?
Main pricing factors include box size, corrugated grade, order quantity, print method, ink coverage, tooling, inserts, finishing, assembly, and freight. Short runs usually have a higher unit cost because setup is spread across fewer boxes. Right-sized packaging can lower total cost by reducing dimensional weight, void fill, damage, and packing time.
How early should I start planning custom stationery shipping boxes?
Start before finalizing a launch date, especially if the box needs a custom size, printed artwork, inserts, or physical sampling. Have product dimensions, quantity, artwork, delivery location, and deadline ready before requesting a quote. Build in time for sample review, artwork revisions, production, freight, and fulfillment testing.


