Why candle labels fail or succeed in the first five seconds
A candle label gets only a moment to prove it belongs on the shelf. In that short window, the shopper is reading the scent, checking the brand, and deciding whether the product feels finished or improvised. That is why custom stickers for candles do more than decorate a jar. They carry the first impression, the product identity, and often the safety and retail information that makes the line usable in the real world.
Candle packaging is harder on labels than many first-time buyers expect. Jars may arrive with light dust or fragrance residue, tins can flex slightly, and glass often has enough curvature to stress a label edge. Heat from filling, shipping vibration, and repeated handling all work against adhesion. A design that looks perfect on a flat digital proof can still fail once it meets a warm vessel or a glossy surface with a little oil on it.
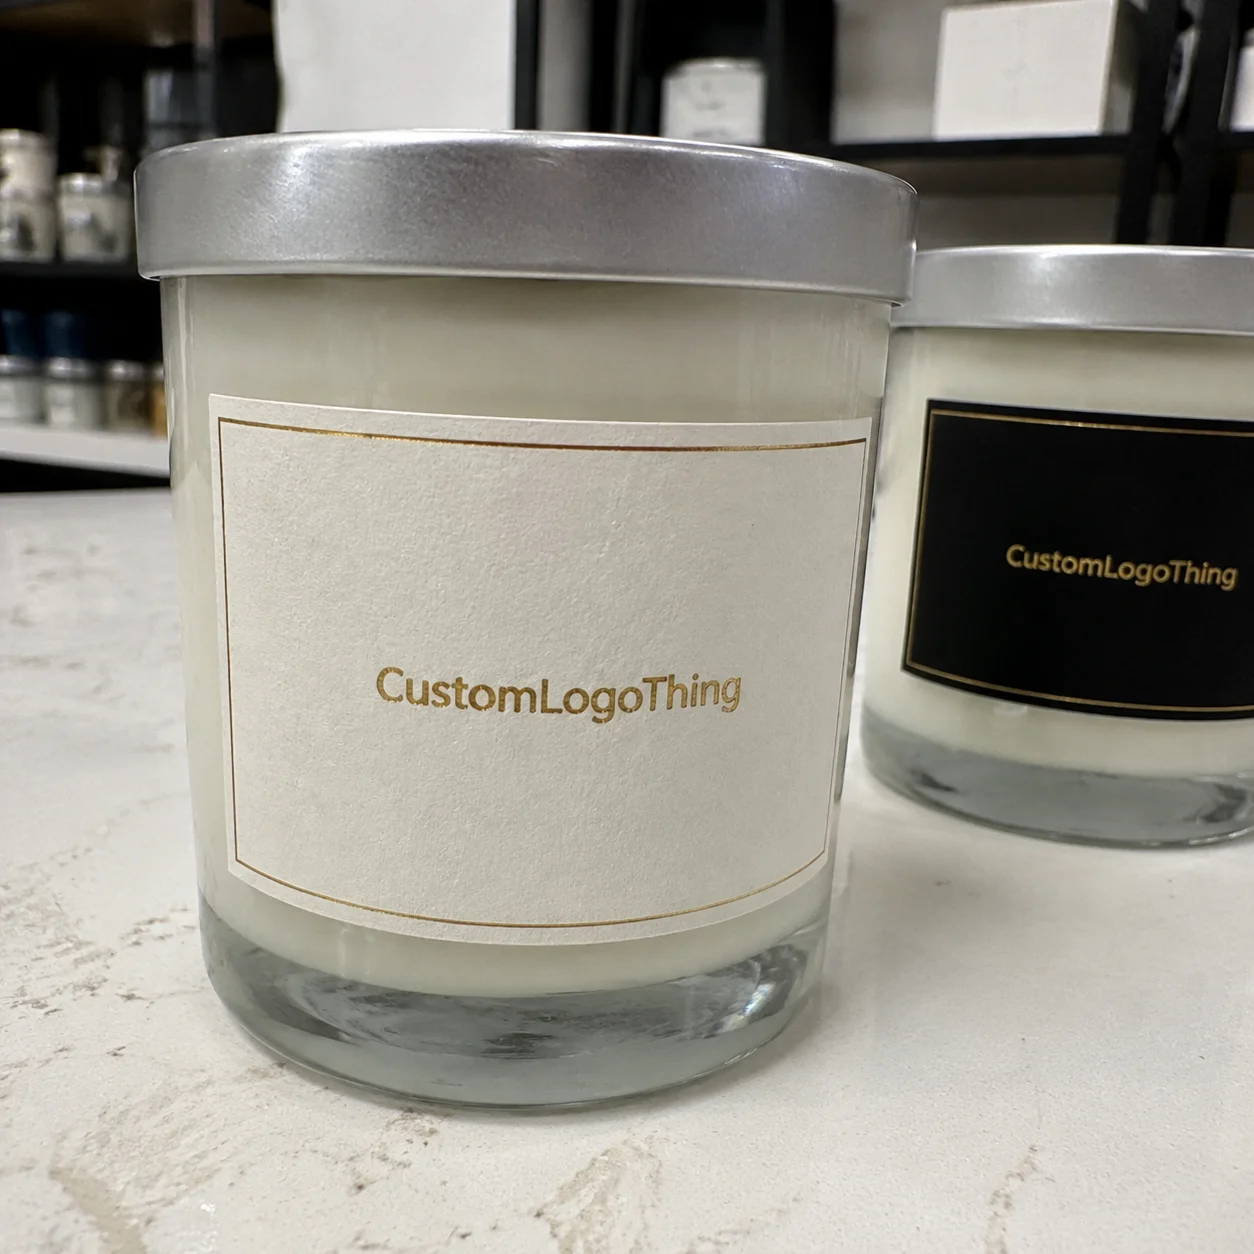
From a buyer’s perspective, the label has to do several jobs at once. It identifies the scent, reinforces the brand, leaves room for warning copy, and helps the candle feel like part of a coordinated product line. The best candle labels are built around the container first and the artwork second, because fit and material choice usually determine whether the finished piece looks polished or temporary.
That practical detail matters more than most marketing language. A label that survives transport, lights cleanly under store lighting, and still looks aligned after a customer handles the jar tends to sell the product better than one that only photographs well. The difference is usually not dramatic design; it is correct material, correct adhesive, and enough attention to the vessel itself.
How candle sticker materials and adhesives work
Material choice sets the tone for both appearance and durability. Paper can work well for short runs, lower price points, and rustic branding, especially on dry indoor shelves where the label will not face much moisture. It is also easy to print and often the most economical choice. The tradeoff is that paper shows wear sooner when humidity rises or when the candle jar is touched often.
BOPP, which is a polypropylene film, is a common step up for candle packaging because it resists moisture and scuffing better than paper. It also tends to hold color well and stays visually cleaner on glass jars and tins. Specialty films and textured stocks can support premium lines, but they should be chosen for a reason, not because they sound upscale. A tactile paper with a linen or felt finish can be beautiful, though it may not be the best pick for a candle that will be boxed, shipped, and handled frequently.
The adhesive matters just as much as the face stock. Glass, metal, painted jars, and coated lids do not all accept labels the same way. Adhesive needs to wet out properly on the surface, and that bond weakens if the container carries dust, oil, wax haze, or even fingerprints. A clean container is not optional. In production, a label that should have held can start to lift at the corners simply because the vessel was not prepared carefully enough.
Finish changes both look and performance. Matte tends to soften the design and can support a handmade or natural brand voice. Gloss sharpens color and contrast, which helps if the candle needs to stand out on a dense retail shelf. Soft-touch can feel premium, though it often costs more and shows certain types of scuffing differently than harder coatings. Clear lamination or another protective layer is worth considering when labels will be packed tightly, shipped long distances, or handled in stores where abrasion is likely.
Removable adhesive has a real place in candle packaging, especially for seasonal scents, test launches, and reusable vessels. It allows the label to peel away more cleanly and can be useful when the jar itself is part of the product value. That said, removable does not mean fragile. It simply means the adhesive is tuned for a cleaner release rather than a stronger long-term hold. For retail candles that need a durable shelf presence, permanent adhesive is usually the safer choice.
| Option | Best use | Typical strengths | Common tradeoff |
|---|---|---|---|
| Paper label | Short runs, dry shelves, rustic brands | Lower cost, easy printability | Less moisture resistance |
| BOPP / polypropylene | Glass jars, tins, higher handling | Moisture resistance, scuff resistance | Usually costs more than paper |
| Specialty textured stock | Luxury lines, artisanal collections | Distinct look and tactile feel | Can raise unit price and limit finishing choices |
| Removable adhesive | Seasonal or reusable vessels | Cleaner removal, flexible testing | Less aggressive long-term hold |
If the candle line uses more than one package component, it helps to think beyond the jar label alone. Matching the jar sticker with lid seals, box labels, or insert tags keeps the product line visually consistent, and the same material logic should carry through to any Custom Labels & Tags used elsewhere in the set.
Key design, material, and cost factors
Vessel shape is usually the first spec that determines whether a label job will be easy or fussy. A straight-sided jar gives more room for placement and allows the label to sit flatter. A tall cylinder, a short tin, or a heavily curved glass container narrows the useful area and may require a smaller format or a different adhesive approach. The best measurements are taken from the actual container, not a stock template, because small differences in curvature can change how the edge behaves after application.
Print method and finish both affect cost. A simple one- or two-color label on paper is often the least expensive path. A full-color label on BOPP with matte lamination usually costs more, but it also reads as more complete and survives handling better. Custom Die Cuts, clear stocks with precise registration, and specialty shapes add setup work, so they deserve to be used when they support the brand rather than just adding novelty.
Quantity drives price in a way that is easy to overlook at the start. Short runs usually carry a higher unit price because setup is spread across fewer labels. As volume rises, the cost per piece tends to drop, especially when the artwork and size stay the same across reorder cycles. For straightforward digital production, moderate-volume orders may land around $0.18 to $0.35 per label, while specialty stock, added finishing, or unusual shapes can push pricing higher.
Content planning affects both cost and usability. A candle label may need the scent name, net weight, warnings, ingredients or materials, batch coding, and barcodes depending on the sales channel. Crowding that information into a label that is already too small usually makes the package harder to read, not more complete. Good packaging work is about spacing and hierarchy as much as decoration, especially if the product will sit in a retail setting where customers are reading from arm’s length.
What usually drives the quote
- Stock choice: paper, BOPP, textured paper, or specialty film.
- Format: sheet-fed for smaller jobs, roll labels for faster hand or machine application.
- Finish: no coating, matte, gloss, soft-touch, or lamination.
- Shape: standard rectangle is simplest; custom die cuts cost more.
- Quantity: more units generally lower the per-label price.
For brands that bundle candles with gift sets or secondary packaging, coordinating the label order with Custom Packaging Products can reduce the number of separate decisions. The visual language stays more consistent, and the material choices are easier to compare across jars, cartons, and inserts.
Process and timeline from proof to production
The cleanest production process begins with correct measurements and final artwork. A supplier will usually need the vessel dimensions, the preferred stock, the adhesive type, and whether application will be done by hand or by machine. That information shapes the proof and helps avoid rework later. If the project includes multiple scents or sizes, it is worth organizing the information up front instead of sending it piecemeal.
Proofing is where many orders slow down. Missing dielines, low-resolution images, and late copy edits are common causes of delay. Candle brands often underestimate how much time disappears when a scent name changes after layout approval or when warning text is still being edited after the design is already close to production. Final text should be settled before proof approval, because even a small change can alter spacing and label balance.
Standard digital jobs can move quickly once approved. More complex orders take longer, especially when they involve specialty finishes, unusual shapes, multiple SKUs, or material sourcing. A realistic timeline for a simple run is often 12 to 15 business days after final approval, while specialty work may take longer depending on stock availability and finishing steps.
Shipping and application should be part of the timeline, not an afterthought. Some coatings benefit from a short curing period before packing, and busy seasons can affect scheduling. If the candles are going to retail or fulfillment, it makes sense to leave time for receiving, inspection, and a small application test before committing the full order to production.
“A candle label looks premium when the fit is right, the finish supports the product, and the adhesive matches the vessel. The artwork matters, but the physical build decides whether the design survives contact with the real package.”
Step-by-step guide to ordering labels that fit your candles
- Measure the vessel carefully. Record the usable flat area, the curve, the lid space, and any embossing or seams that could affect placement.
- Choose the label location. Front panel, wraparound, bottom label, lid seal, or a coordinated set across multiple surfaces all create different production needs.
- Match the material to the container. Glass, metal tins, painted jars, and coated surfaces each call for different face stock and adhesive strength.
- Build for readability. Keep the scent name, brand name, and safety copy clear, with enough contrast to read well on tinted, frosted, or metallic containers.
- Request a proof or sample. Check size, color, edge alignment, and peel performance before approving the full order.
That sequence keeps custom stickers for candles from turning into a guessing game. It also gives the printer fewer unknowns, which usually means fewer revisions and a smoother path from concept to production.
Common mistakes that make candle labels look cheap
Paper stock is often used where it should not be. On dry shelves, it can perform well enough, but in warmer rooms or humid storage conditions it may curl, wrinkle, or stain sooner than expected. The other side of the problem is overbuilding. Some labels try to say too much in too little space, which leaves the layout crowded and makes the candle look less expensive than it really is.
Container finish creates more trouble than many buyers expect. Lightly oily glass, dusty vessels, textured surfaces, and highly curved jars all affect adhesion. If the label shape was sized from a generic template rather than the actual vessel, corners may lift or stretch in ways that are hard to fix later. Contrast is another common miss. Artwork that looks strong on a white monitor can disappear on frosted glass, amber jars, or metallic tins if it was never checked under store lighting.
Skipping sample testing is one of the most expensive mistakes in candle packaging. A label can pass a digital proof and still trap bubbles, scuff when boxed, or peel when the jar warms slightly. A quick test on the actual vessel saves time, and it gives a much clearer picture of how the adhesive and finish will behave once the product is in circulation.
Expert tips for stronger shelf appeal and faster approvals
Finish should support the brand story rather than compete with it. Matte often suits calm, handmade, or ingredient-led candles. Gloss can help saturated color and sharper contrast stand out. Clear labels can feel modern and minimal when the jar itself is part of the design. None of those choices is inherently better; the right answer depends on how the candle is priced and how it is expected to be used.
Color planning matters across a candle family. If each scent has a different visual system, the line becomes harder to shop. A consistent color code for lavender, cedar, citrus, and vanilla makes the assortment easier to scan and helps the shelf look organized rather than random. That kind of structure is simple, but it often improves both presentation and reorder consistency.
For hand-applied labels, leave a little tolerance in the design. A few millimeters of margin can make application much easier and reduce waste. Vector files, outlined fonts, and organized layers also speed proofing, because they reduce the number of technical corrections before production can begin. Small setup improvements like these are rarely visible to the end customer, but they are visible in the order cycle.
Brands using unusual glass, richer fragrance oils, or premium coatings should ask for a sample before committing to volume. Some finishes look elegant but show scuffing more quickly than expected. Others hold up beautifully but read too plain for a premium line. Material samples solve that problem early. If the candle label needs to sit within a wider packaging system, bring the same color logic into inserts, tags, and any secondary carton so the line feels intentional.
Next steps for a better candle packaging order
Start by auditing the jars, lids, and label positions already in use. If the vessel range changes by size or season, each one should be measured separately rather than forced into a single template. Gather scent names, warning text, quantity targets, barcode needs, and any batch code requirements before requesting pricing. That makes quotes easier to compare and reduces the chance of late revisions.
It is also worth comparing at least two material options for the top-selling candle size. In some cases, the lower-cost option is enough for a short seasonal run. In others, the more durable stock is the smarter choice for the core retail line because it better handles handling, shipping, and repeat customer contact. If the vessel is new or the finish is unfamiliar, a sample or short proof run is usually worth the time.
The most reliable packaging process is straightforward: confirm the specs, approve the proof, test the application, and plan inventory around reorder timing instead of waiting until stock runs low. That approach keeps production calmer and reduces expensive last-minute fixes. It also turns custom stickers for candles into part of a repeatable packaging system instead of a rush item at the end of the workflow.
For broader standards and sustainability references, useful sources include the ISTA packaging test standards, the EPA for materials and environmental guidance, and the FSC for responsibly sourced paper discussions when paper-based components are part of the label strategy.
What are the best custom stickers for candles on glass jars?
BOPP or polypropylene usually performs well on glass because it resists moisture, oils, and scuffing better than plain paper. The adhesive should be chosen for clean, dry glass, and the finish should match the look you want on the shelf.
How much do custom stickers for candles usually cost?
Price depends on quantity, stock, finish, shape, and whether the order is printed on sheets or rolls. Unit cost usually falls as volume rises, while specialty materials and laminations add to the total.
How long does it take to produce candle stickers?
Simple digital jobs can move quickly once artwork is approved. Custom shapes, samples, specialty stocks, and added finishing steps extend the timeline, so plan around proofing before production starts.
Should candle labels be removable or permanent?
Permanent adhesive is usually the better choice for retail candles that need a lasting branded look. Removable adhesive makes more sense for test products, seasonal scents, or jars meant to be reused.
How do I keep candle labels from peeling?
Start with a clean, dry vessel and avoid applying labels to oily or dusty surfaces. Match the label stock and adhesive to the container material, and test a sample before full production.