Buy Custom Warranty Void Stickers That Protect Gear
A returned router can look perfect from the outside: clean housing, original screws, no obvious pry marks. Then the seal tells the real story. Custom warranty void stickers are tamper-evident labels designed to leave visible proof when someone opens, removes, lifts, picks, or transfers a protected product area. For service teams, that evidence is often the difference between a documented warranty review and a guess.
What Custom Warranty Void Stickers Actually Do
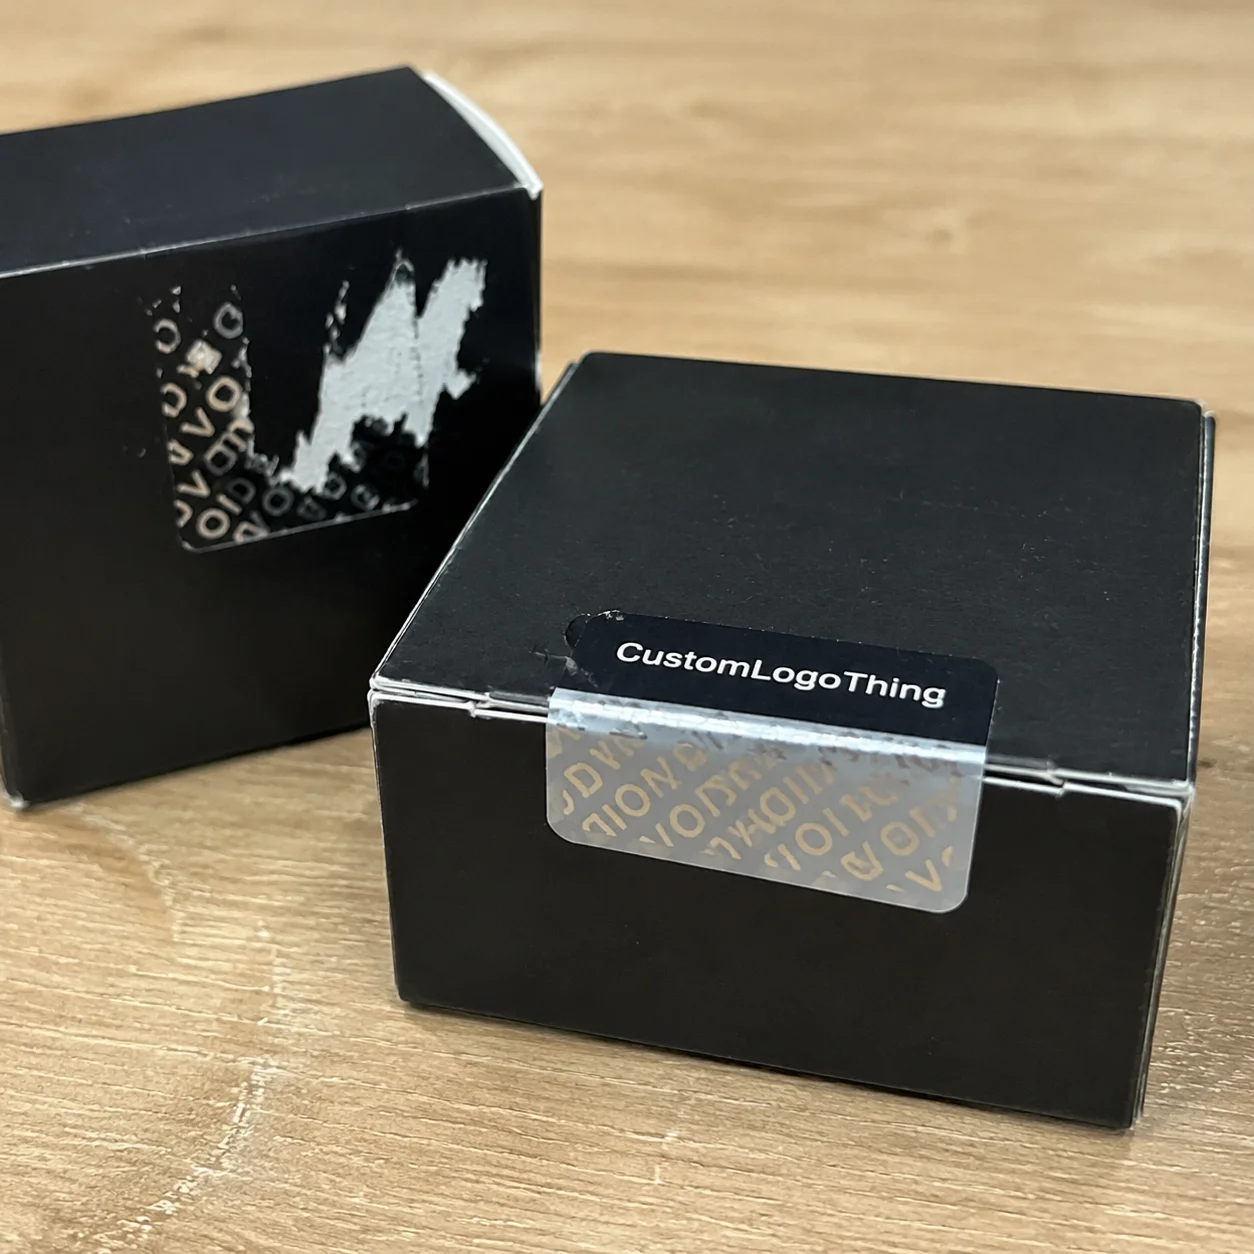
The core job is simple, but it is often misunderstood. A warranty seal does not stop tampering like a lock, metal clip, or molded enclosure latch. It creates an evidence trail: a VOID message, fractured film, torn security cut, or damaged label surface that supports warranty decisions, repair intake, rental equipment control, and customer communication.
There are several common formats. Residue-transfer labels leave VOID text, a checkerboard pattern, or a custom message on the product while the lifted film shows matching evidence. Non-transfer labels reveal a message in the face film without leaving much residue on the part. Destructible vinyl breaks into small pieces when someone tries to remove it. Security slits or engineered kiss cuts weaken the label so it tears if picked from an edge.
These labels are most useful on electronics housings, service panels, access screws, battery doors, calibration ports, rental equipment, sealed accessories, and serialized components. They also appear on repair kits and boxed spare parts, especially where branded packaging and product packaging need to support the same service policy.
The best sticker is not just the one that looks official. It is the one matched to the surface, the use environment, and the type of tamper evidence the business needs to document. A glossy silver seal may look sharp, but if it lifts from textured polypropylene after two days in a hot warehouse, it has failed its real job.
How Tamper-Evident Adhesives and Face Stocks Work
A pressure-sensitive security label is built in layers: face stock, adhesive, release liner, print layer, and sometimes a security coating or engineered split layer. That split layer controls how the label fails when lifted. Good tamper evidence is planned failure, not random damage.
Residue-transfer labels rely on a balance between film strength, adhesive anchorage, and release pattern. When the label is removed, part of the VOID message stays on the product and part remains visible on the film. Clean reapplication becomes difficult because the label no longer looks untouched, even if someone presses it back down carefully.
Destructible materials behave differently. Brittle vinyl or fragile film fractures into chips and flakes, which helps on rigid surfaces where residue is not wanted or where a service team needs quick visual proof. Security slits add another layer of control. Small cuts placed near edges, screws, seams, or access doors make the sticker tear before it can be lifted in one piece.
Surface energy matters more than many buyers expect. Smooth powder-coated metal, molded ABS, polycarbonate, glass, painted housings, and textured plastics all accept adhesive differently. Low-surface-energy plastics such as polypropylene and polyethylene can be stubborn, and rubberized coatings can be worse. A spec sheet helps narrow the field. A sample test on the actual product is more reliable.
Heat, cold, humidity, UV exposure, oils, cleaning chemicals, abrasion, and flexing can all change performance. A label that bonds well at 72°F in an office may behave differently on a warm power supply, an outdoor tool case, or a device wiped with isopropyl alcohol before service. Strong permanent adhesive is not the same as good tamper evidence. The right failure mode matters more than raw stickiness.
Practical rule: If the label must prove access to a protected area, test the tamper response after the same dwell time, temperature swing, cleaning process, and handling that the real product will see.
Key Specs to Decide Before You Order
Start with size and shape. A 0.35-inch screw-cover seal, a 1-by-3-inch seam label, and a wraparound battery-door seal all behave differently. Small circles can be hard to apply by hand without edge contamination. Long labels can bridge uneven gaps. Wraparound labels need enough flexibility to stay bonded across a corner without curling.
Material choice comes next. PET films are common for clean, durable labels with sharp printing. Destructible vinyl works well when break-apart evidence is the goal. Paper-based security labels may be acceptable for short-term indoor use, though they usually lack the durability of film. Specialty films may be needed for elevated heat, chemical exposure, outdoor UV, or frequent handling.
Adhesive selection should follow the actual part, not a generic catalog description. Options may include standard permanent, high-tack, low-surface-energy, freezer-grade, removable tamper-evident, and high-temperature adhesives. A low-surface-energy adhesive may be needed on polypropylene housings. A cleaner non-residue construction may be better on leased equipment that must be refurbished later.
Custom warranty void stickers can also carry useful service data. Logos, warning text, brand colors, support URLs, QR codes, barcodes, serial numbers, batch codes, and sequential numbering can turn the label into both a security marker and a workflow tool. If labels are scanned at repair intake, protect barcode contrast and quiet zones. A pretty design that fails scanning is not a finished design.
Finish options affect function as much as appearance. Gloss film looks crisp and official. Matte film reduces glare. Clear labels blend into the product. Silver film has a security feel, holographic film adds visual complexity, and opaque white film gives strong contrast for small type. If labels sit near retail packaging, Custom Printed Boxes, or other package branding elements, keep the look consistent without sacrificing readability.
Before requesting a quote, build a short spec sheet: application surface, label size, order quantity, artwork file, numbering needs, indoor or outdoor exposure, temperature range, roll or sheet format, and desired tamper response. For shipping-tested products, it can also help to understand distribution hazards; organizations such as ISTA publish packaging test methods that help teams think about vibration, compression, and transit handling.
Pricing, MOQ, and Unit Cost Drivers
Pricing is shaped by material, adhesive system, label size, colors, finishing, serialization, die cutting, order quantity, and packaging format. Artwork matters, but it is rarely the only cost driver. A one-color black VOID label on a stock rectangle is a different project from a four-color silver PET label with serialized QR codes and barcode inspection.
Minimum order quantity depends on construction. Smaller digital batches may be economical for straightforward labels, while specialty tamper-evident films, custom dies, holographic effects, chemical-resistant laminates, or sequential numbering can push the MOQ higher. In practice, the best quantity is often the one that covers the first production run plus a controlled service reserve.
Unit cost drops with volume because setup, proofing, press calibration, material waste, matrix stripping, and die-cutting time are spread across more labels. A small run may carry a noticeable setup share. A larger run uses more raw material, but the fixed work gets diluted.
| Label Option | Typical Use | Common Cost Drivers | Buyer Notes |
|---|---|---|---|
| Residue-transfer PET | Electronics housings, panels, screw access | VOID pattern, film color, adhesive type, print colors | Good all-around choice when residue evidence is acceptable |
| Destructible vinyl | Rigid surfaces, calibration points, equipment tags | Fragile face stock, die shape, application size | Useful when broken pieces are clearer than residue |
| Serialized security label | Repair intake, rental tracking, regulated components | Variable data, barcode verification, numbering file setup | Plan for readable codes and clean data handoff |
| Specialty high-tack seal | Textured plastic, low-energy surfaces, outdoor equipment | Adhesive upgrade, sample testing, longer material sourcing | Worth testing before a full production order |
As a broad planning range, simple custom warranty seal stickers may land around $0.04-$0.12 each at higher quantities, while smaller runs, specialty films, variable data, or difficult adhesives can push pricing into the $0.18-$0.45 range or more. That is not a universal quote; label size, print method, and material availability can swing the number quickly.
Premium adders include QR code testing, barcode verification, custom shapes, tight registration, special liners, low-surface-energy adhesives, high-temperature adhesives, and chemical-resistant laminates. Do not buy only on the lowest sticker price. A cheap seal that falls off in transit, fails to void cleanly, or cannot be scanned by service teams can cost far more than the savings on the roll.
A quote-ready checklist should include target quantity, reorder expectations, finished size, roll direction, core size, artwork file, numbering range, surface type, indoor or outdoor use, and sample testing needs. Samples are a cost-control step, not a delay tactic. Confirming adhesion before production helps avoid reprints, rush freight, and mismatched materials.
Process, Timeline, and Production Steps
A clean ordering flow starts with the use case. Define what the seal protects, confirm the surface and environment, choose the tamper-evident construction, submit artwork, review a proof, approve samples if needed, move into production, and receive finished rolls or sheets. Basic sequence. Major payoff.
Artwork preparation should be tidy. Vector logos, clean warning text, barcode-safe contrast, bleed, and correct numbering files help prevent delays before press setup. QR codes need enough quiet zone and print contrast to scan after finishing. If the sticker is part of a broader packaging design system, keep the logo, color, and tone aligned with your Custom Labels & Tags while giving the warning message enough space to be read fast.
A digital proof confirms layout, finished size, colors, numbering format, and copy. It does not replace physical testing when adhesive performance is critical. Proofs show what will be printed; samples show whether the construction works on the product.
For sample testing, apply labels to the real surface using the same pressure and prep method planned for production. Many pressure-sensitive adhesives need 24 to 72 hours of dwell to build bond strength, though some constructions show useful early results sooner. After dwell, lift the label under realistic conditions. Check whether the adhesive stays down, whether the VOID message releases clearly, whether edges lift, and whether attempted reapplication looks suspicious.
Production usually includes material selection, printing, optional coating or lamination, die cutting, matrix removal, rewinding or sheeting, quality checks, and packing. Serialized runs add file handling and inspection steps. Large quantities may also need staged production or roll labeling so warehouse and assembly teams can control lot usage.
Lead time varies. A simple repeat order on an approved material may move quickly, while a first-time project with specialty film, custom dies, serialization, barcode inspection, sample approval, or artwork revisions needs more room. Many projects benefit from planning 2 to 4 weeks from early specification to finished labels, especially if testing is involved. Plan backward from product launch, service kit assembly, or fulfillment date so the label is approved before hardware or packaging lines need it.
Common Mistakes That Make Security Labels Fail
The first mistake is applying labels to dirty, oily, dusty, or freshly molded surfaces. Even premium adhesive can fail if silicone residue, mold release agents, fingerprints, powder, or cleaning fluids remain on the product. Surface prep does not need to be elaborate. It needs to be consistent.
Skipping dwell time causes another round of bad decisions. Many pressure-sensitive adhesives strengthen after application, so immediate peel testing may not show final bond performance. If a team applies a label and rips it off 30 seconds later, they may reject a material that would have worked properly after a day.
Wrong-surface matching creates headaches that look like label defects. Textured plastic, rubberized coatings, powder coat, curved housings, and flexible parts can create edge lift. A label bridging a deep gap, sharp corner, moving joint, hot vent, or flexing battery door may tear prematurely or peel without actual tampering. Placement should be tested just like material.
Design can hurt performance too. Tiny warning text, cramped QR codes, low-contrast colors, and busy backgrounds reduce readability. A warranty seal should look credible in one glance. If a service technician needs a magnifier to read the serial number, the design is working against the process.
Policy mismatch is less physical but just as real. Wording such as “Warranty void if removed” should reflect the company’s actual warranty review process, customer service scripts, and applicable consumer rules. In some markets, warranty language deserves legal review before printing. Honest alignment protects both the buyer and the brand.
If a seal fails, troubleshoot in order: surface prep, application pressure, temperature, dwell time, material match, and placement. Do not assume the adhesive is defective until those basics are checked. Most label failures in production planning trace back to process and surface problems, not mysterious adhesive chemistry.
Next Steps for Choosing the Right Warranty Seal
Start with the product, not the catalog. Gather surface details, decide what kind of tamper evidence is acceptable, choose label placement, define artwork and numbering needs, then request material recommendations. A buyer who can say “matte black ABS housing, indoor use, occasional alcohol wipe, 1-by-0.5-inch label over two screws” will get better guidance than someone asking only for a “strong sticker.”
Create a small test map with two or three constructions on the same product surface. Apply them by the same method, using the same hand pressure or fixture expected in assembly. Check them after a realistic dwell period, then photograph the label before removal, after lifting, and after attempted reapplication. Those photos help engineering, service, purchasing, and quality teams agree on the best option without relying on memory.
Prepare an efficient inquiry with product photos, approximate dimensions, annual usage, expected order quantity, indoor or outdoor exposure, temperature range, cleaning chemicals, and whether residue is allowed. If sustainability documentation matters for the broader product packaging program, ask suppliers what can be documented; resources from groups such as FSC can also help teams understand paper sourcing claims for related packaging components.
Think about service workflow. Serial numbers, QR codes, or batch codes can connect a tamper event to a repair ticket, product lot, rental record, or customer file. That can make the sticker more valuable than a warning message alone. If the same launch includes cartons, inserts, sleeves, or retail packaging, review the full set of Custom Packaging Products so the security label does not feel like an afterthought next to the rest of the brand system.
Custom warranty void stickers work best when they are treated as a small engineered packaging component, not a decoration added late in production. Match the material to the surface, give the adhesive time to work, keep the design readable, and test before scaling. That is the practical path to a warranty seal that protects gear, supports service decisions, and still looks right on the finished product.
FAQ
What are custom warranty void labels used for?
They show visible evidence when someone opens, removes, or interferes with a protected area such as a service panel, screw cover, electronics housing, or sealed accessory. They support warranty review, repair intake, rental equipment control, and customer service documentation, but the wording should match the company’s actual warranty policy. They can also include branding, warning text, serial numbers, QR codes, or barcodes to connect the seal to a product record or service workflow.
Do custom tamper-evident warranty stickers work on plastic?
Yes, but plastic type matters. ABS, polycarbonate, polypropylene, polyethylene, rubberized coatings, and textured plastics all bond differently. Low-surface-energy plastics often need a specialized adhesive, and molded parts may need cleaning to remove release agents before application. The safest approach is to test sample labels on the actual plastic part after a proper dwell period.
Can warranty void stickers be removed cleanly?
Some residue-transfer stickers intentionally leave a VOID message or pattern on the surface, while destructible labels break apart instead of lifting cleanly. If clean surface removal is important, ask about non-residue tamper-evident films, but confirm they still provide the level of evidence your team needs. Heat, solvents, and careful picking can affect some labels, so test against realistic tampering attempts before committing to a material.
How much do custom warranty seal stickers cost?
Cost depends on material, adhesive, size, print colors, finishing, serialization, order quantity, and whether a custom die or specialty film is required. Unit cost usually decreases at higher quantities because setup, proofing, die cutting, and waste are spread across more labels. A useful quote request includes size, quantity, surface type, artwork, numbering needs, use environment, and roll or sheet preference.
How long does it take to produce custom warranty void stickers?
Timeline depends on proof approval, material availability, sample testing, custom die needs, serialization, and total production quantity. Simple repeat orders are usually faster than first-time projects that require material testing or artwork revisions. Plan enough time to test labels on the real product surface before full production, especially for electronics, outdoor equipment, or textured plastic housings.


