Buyer Fit Snapshot
| Best fit | To Packaging Dielines projects where brand print, material claims, artwork control, MOQ, and repeat-order consistency need to be specified before quoting. |
|---|---|
| Quote inputs | Share finished size, material target, print colors, finish, packing count, annual reorder estimate, ship-to region, and any compliance wording. |
| Proofing check | Approve dieline scale, logo placement, barcode or warning zones, color tolerance, closure strength, and carton packing before bulk production. |
| Main risk | Vague material claims, crowded artwork, missing packing details, or unclear freight terms can make a low unit price expensive after revisions. |
Fast answer: To Packaging Dielines: Material, Print, Proofing, and Reorder Risk should be specified like a repeatable production item. The safest quote records material, print method, finish, artwork proof, packing count, and reorder notes in one written spec.
Production checks before approval
Compare the actual filled-product size with the drawing, then confirm tolerance on folds, seals, hang holes, label areas, and retail display edges. Reserve space for logos, QR codes, warning copy, and material claims before decorative graphics fill the panel.
Quote comparison points
Review material grade, print process, finish, sampling route, tooling charges, carton quantity, and freight assumptions side by side. A quote is only useful when the supplier can repeat the same color, closure quality, and packing count on the next order.
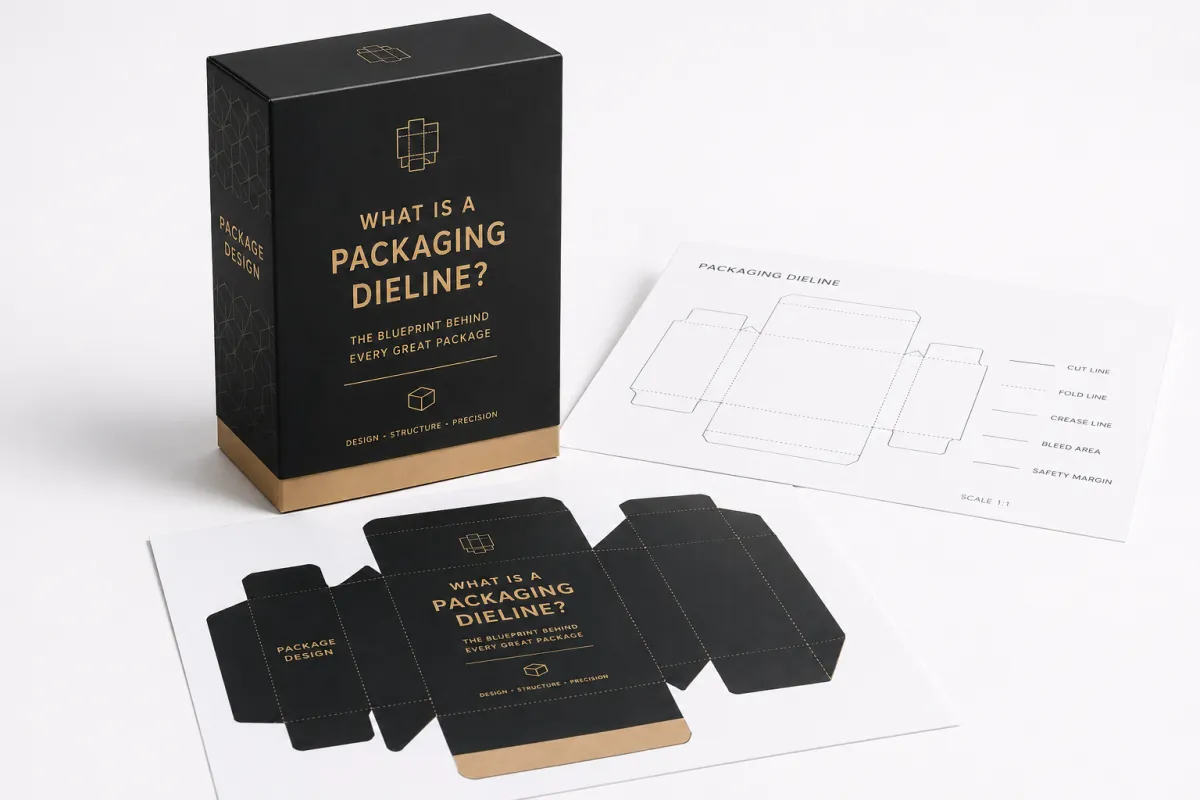
What Is a Packaging Dieline?
The first time I watched a premium mailer box fail on press, the artwork had already been approved, the foil file was clean, and the guide to packaging dielines had been treated like a formality instead of the file that keeps the structure honest. A 1.2 mm drift on a tuck flap turned into 3,000 delayed cartons, a loud floor in a Dongguan converting plant, and a buyer who went from relaxed to visibly irritated between the approval call and the first sample check. I have seen that kind of failure more than once in factories from Dongguan to Suzhou, and it almost always starts the same way: somebody assumes the dieline is decoration rather than the blueprint that makes the package fold, close, and ship correctly. That still amazes me, because the dieline is usually the quiet file doing the heavy lifting while everyone else is admiring the mockup.
A dieline is the flat technical drawing for a package. It maps the cut lines, fold lines, glue zones, perforations, bleed, safe areas, and structural panels before the board becomes a carton, sleeve, tray, folder, or rigid setup. In practical terms, the guide to packaging dielines is the bridge between creative intent and manufacturing reality in places like Dongguan, Shenzhen, and Ningbo, where a 0.5 mm adjustment can change how a box rides through a folder-gluer. It tells the designer where artwork can safely live, and it tells the printer or converter where the knife, score, adhesive, and finishing processes need to land so the package opens, folds, and closes without fighting the line. I still remember an early project where a client called the dieline "that gray outline," which made me cringe a little, then we fixed the box and the name at the same time.
More people rely on the dieline than most brands realize. Designers use it to place graphics on the correct panel. Prepress teams use it to check bleed, varnish, registration, and line weights. Structural engineers build around board caliper, flute direction, closure logic, and shipping demands, often choosing 350gsm C1S artboard for folding cartons or 24pt SBS for heavier retail packs. The printer or converter uses it to confirm that a folded carton, mailer box, or rigid shell behaves like the proof promised. Miss the guide to packaging dielines at any one of those points, and the cost usually shows up as a reprint, a rework, or a delayed launch, each one expensive in its own unpleasant way. I have had mornings where one bad file turned an otherwise quiet production schedule into a detective story nobody wanted to star in.
"The box looked beautiful on the screen. On the line, it was 2 mm short and 2,400 units later we were still waiting for a fix."
That is why this guide to packaging dielines belongs at the start of the project, before the creative team has fallen in love with a mockup that cannot survive a real press run in Guangzhou or Ho Chi Minh City. I am going to walk through the structure, the cost factors, the production timeline, and the mistakes that quietly drain budgets. If you are building branded packaging, retail packaging, or Custom Printed Boxes, a little structural discipline prevents a lot of regret. It also saves you from that special kind of silence that happens when everyone in the room realizes the box cannot actually close.
Guide to Packaging Dielines in Production
In production, the guide to packaging dielines is about physics first and aesthetics second, and that becomes obvious the first time a folder-gluer is set up for a run of 10,000 cartons in Dongguan. Every line on the template has a job. Cut lines tell the die where to slice. Fold lines tell the board where to score. Perforations control tear behavior for display openings or tear strips. Glue flaps set aside the areas that must stay clear of print, foil, varnish, or heavy coating so adhesive can bond properly. Bleed extends artwork beyond trim so no white edge appears after cutting. Safe margins keep text, logos, and barcodes out of danger. I know that sounds methodical, but that is exactly why packaging gets expensive when people skip this part and hope the box will work itself out.
- Cut line: the outer contour the die trims, usually placed on a dedicated locked layer in a spot color such as magenta or red.
- Fold line: the score path, typically dashed, where the board bends without cracking or splitting.
- Glue area: the zone that stays free of ink, foil, varnish, and heavy coating so the adhesive has a clean bond.
- Bleed: commonly 1/8 inch or 3 mm, depending on the printer, board, and market; I often ask for 3 mm to 5 mm on export cartons headed to the U.S. or EU.
- Safe zone: usually 1/8 to 1/4 inch inside trim, though I often ask for 3 mm to 5 mm minimum on smaller cartons or sleeves.
Once the flat dieline turns into a finished package, each panel takes on a different job in real space. The front panel becomes the shelf hero. A side panel may carry ingredients, a QR code, or a compliance note. The top tuck flap often disappears behind the shelf lip, which is exactly why a good guide to packaging dielines refuses to pretend that every surface deserves equal visual weight. In retail packaging at a 1.2-meter shelf height, the first three seconds often decide more than the back panel ever will, and I have watched buyers make a decision with the speed and confidence of someone choosing coffee at 6:45 a.m. in a train station kiosk.
I learned that lesson beside a converter in Dongguan, where a cosmetics client had approved a rigid box with a 0.5 mm internal cradle tolerance and a lid magnet that landed 1.2 mm off center. The sample looked expensive, but the lip caught during closure because the board thickness measured 28pt instead of the assumed 24pt. The fix was plain and technical, not glamorous: a new CAD file, a revised score depth, and another day on the line. The guide to packaging dielines is full of that kind of detail, and that is exactly why it saves money. It also saves tempers, which, if you have spent time near a hot press line in Guangzhou, you know can get thin very quickly.
Structural variables change the layout quickly. A 16pt SBS folding carton behaves differently from a 350gsm C1S artboard, and a micro-flute mailer on E-flute stock behaves differently again. Grain direction matters because board resists bending differently along each axis. Tuck flaps need room. Locking tabs need clearance. Windows need bridge space. Inserts need tolerance, often 1.5 mm to 3 mm depending on paperboard or molded pulp. If you are designing a mailer box or sleeve, the guide to packaging dielines should be checked against the actual board specification, not a guess that sounded reasonable in a meeting. I am biased here, but I think paper math deserves more respect than it usually gets.
If you want a deeper benchmark on transit abuse, I still point teams toward the ISTA distribution testing standards. A package that survives a drop sequence, vibration run, and compression test is doing real work, not just looking polished in a pitch deck. For paper sourcing, the FSC system is worth checking when sustainability claims need to stand up under a retail buyer's scrutiny, especially for branded packaging that will be examined beside competing SKUs. I have had buyers in Singapore and Los Angeles ask for those credentials after a meeting and then act surprised that the carton spec mattered too. The joy of packaging, apparently, is that everyone wants the trophy and nobody wants the blueprint.
What Affects Packaging Dieline Cost and Pricing?
Pricing for the guide to packaging dielines does not come from nowhere. It follows structure, revision count, and the amount of technical work needed to get the file ready for production. A simple folding carton dieline may start around $50 to $150 if the printer already has a base template. A Custom Rigid Box, insert tray, or multi-part display structure can run $200 to $500+, especially if the CAD team has to build it from scratch in Esko ArtiosCAD or revise it twice after the client changes the product dimensions. In some Shanghai and Shenzhen shops, the same CAD desk may bill a custom structural file at $0.15 per unit for 5,000 pieces if the tooling and carton price are bundled, while a fully bespoke structure is quoted separately. That price spread surprises people until they see how many decisions are buried inside what looks like "just a box."
Revision work is the part nobody enjoys discussing, yet it is usually the part that changes the final invoice. A late change to bottle height, lid style, closure depth, or insert shape can trigger another proof cycle, another measurement pass, and another round of artwork resizing. I once watched a beverage brand add a 6 mm neck ring after approving the structure, which forced the carton height up by 8 mm and turned a $120 dieline into a $410 rework because the artwork had already been imposed. The guide to packaging dielines is affordable when the specs stay fixed. It gets expensive fast when the specs drift after approval. And yes, that is usually when someone says, "Can we just nudge everything over a little?" which is the packaging equivalent of asking a carpenter to rebuild stairs without a tape measure.
Some printers include a basic dieline at no charge if you are ordering a stock-style folding carton or a common mailer box. That sounds generous until you realize the free file is often a modification of an existing structure, not a custom engineering job. Once you need special windows, magnets, perforations, embossing registers, or a nested insert, the structural work is usually billed separately. That is normal. A good CAD designer in Dongguan or Ningbo is not a charity, and I would rather pay $250 for a correct template than save $100 and spend $1,800 fixing a bad run. That is not me being dramatic; that is me being tired of seeing avoidable invoices.
The table below gives a practical way to think about the guide to packaging dielines across common project types. The numbers are not universal, because every converter prices labor differently, but they are close enough to budget without pretending the box will design itself. If your supplier is quoting on a 2,000-piece luxury run in Guangzhou, the structure may cost more per unit than a 20,000-piece folding carton line in Ningbo, and that difference is usually tied to setup time rather than the drawing alone.
| Package Type | Typical Dieline Cost | Complexity Drivers | Best Use Case |
|---|---|---|---|
| Standard folding carton | $50 to $150 | Few panels, simple tuck ends, stock board | Cosmetics, supplements, small consumer goods |
| Mailer box | $100 to $250 | Interlocking flaps, ship-ready geometry, branding across lid and sides | E-commerce, subscription kits, product packaging |
| Rigid box | $200 to $500+ | Wrapped board, inserts, magnets, tight tolerances | Luxury retail packaging, gifting, premium launches |
| Display or tray structure | $250 to $500+ | Perforations, load-bearing panels, shelf presence, tear-away features | Point-of-sale displays, club-store promotions |
The hidden cost is rarely the dieline itself. It is the domino effect that follows a bad file. A wrong template can force new plates, a second sample, a delayed shipment, and a warehouse reschedule that hits labor, freight, and retail launch timing. I have seen a $75 template create a $6,000 headache because the team approved packaging design before checking flute thickness on an E-flute mailer headed to Chicago. That is why the guide to packaging dielines starts with structure, not with a pretty render in a PDF. Pretty renderings are lovely, but they will not save you when the carton is 4 mm too shallow and everyone pretends not to notice it until the sample arrives.
If you are buying custom printed boxes through Custom Packaging Products, ask whether the structural file, revision allowance, and sample round are included in the quote. Those three details tell you more than a glossy sales pitch ever will. One supplier may offer a low dieline fee and charge for every adjustment after version two. Another may roll a basic structure into the carton price but bill separately for physical proofs. Same box, different math, different headache. I have spent enough time in supplier calls to know that the cheapest line item is often the one with the most footnotes.
Packaging Dieline Process and Timeline
The guide to packaging dielines works best when the brief is clean and complete. I want product dimensions, closure style, board spec, finish, shipping method, and shelf goals before anyone opens Illustrator. If the product is 92 mm wide, 58 mm deep, and 142 mm tall, say that. If the carton needs a 24pt SBS build with matte aqueous coating and a 3 mm glue flap, say that too. If the target market is the U.K., the EU, or a California retail launch, say that as well, because compliance and barcode placement can change the layout. Guessing at the start is how teams buy problems they could have avoided with five minutes of measurement. I sound stubborn about this because I have earned that stubbornness the hard way.
The process usually moves in five steps: structural draft, internal review, artwork fit check, proofing, and final sign-off. A straightforward folding carton can turn around in 2 to 10 business days if all dimensions are locked. More complex custom packaging, especially rigid boxes or inserts with multiple sample rounds, can take 1 to 3 weeks. In many Guangdong factories, the practical window is 12 to 15 business days from proof approval once the CAD file, board, and finishing are confirmed. The guide to packaging dielines is not slow because people are careless. It is slow because the box has to fold, carry, and close correctly without embarrassing anyone on the production floor. If you have ever watched a line supervisor hold up a misaligned carton and just stare at it for a beat too long, you know the feeling I mean.
Delays usually come from ordinary things. Missing measurements add a day. Late size changes add another. Waiting on a sample from the client side can stall a build by 48 hours or more. I once had a brand send a bottle photo instead of caliper measurements, then ask why the template was wrong. The answer was plain: a photo does not tell you whether the shoulder radius is 4.5 mm or 7 mm, and it certainly does not tell you whether the cap needs 12 mm of headroom. The guide to packaging dielines rewards specifics and punishes assumptions. It is not rude about it, but it is absolutely uncompromising.
A physical mockup matters because a flat PDF cannot tell you how the box feels in a human hand. A carton may technically close, yet the tuck flap may pop open after a 15 mm compression shift. A mailer box may fit on screen and still buckle when packed with 1.2 kg of product. That is why I recommend at least one white dummy, even on modest orders. A $75 sample is cheap compared with 5,000 units and a warehouse manager trying to explain why the cartons will not stay shut. I have met that warehouse manager in a distribution center outside Shenzhen. He was not amused, and neither would I have been.
How Do You Know If a Packaging Dieline Is Print-Ready?
A packaging dieline is print-ready when the structure, measurements, and artwork all agree before the press ever starts moving. The quickest check is simple: the die-cut template matches the product dimensions, the score lines are placed for the actual board thickness, and the bleed, safe zones, and barcode clear space are all accounted for in the layout. If any one of those pieces is missing, the guide to packaging dielines is not ready for production yet, even if the mockup looks polished on screen. A pretty file that folds badly is still a bad file.
Print-ready artwork also needs the practical details that prepress teams depend on. Keep spot colors named clearly, separate the structural layer from the design layer, and confirm where foil, embossing, soft-touch lamination, or spot UV will sit on the final carton. I like to print a 100% proof, fold it by hand, and test closure pressure before I approve anything that will go into a folder-gluer or die-cutting line. That single habit catches more mistakes than any long email thread ever will. The guide to packaging dielines becomes much easier to trust once the die-cut template has survived a real fold test.
If you want one fast rule, use this: if the package cannot close cleanly, scan cleanly, and ship cleanly from a sample, it is not print-ready yet. A packaging dieline is only finished when the manufacturing team, the designer, and the product all fit the same plan. That is the point where the guide to packaging dielines stops being theory and starts behaving like a production tool. I have seen a lot of projects saved by that discipline, and almost none saved by hope.
Step-by-Step Guide to Packaging Dielines
A practical guide to packaging dielines begins with measurement, not mood boards. Measure the product first, then decide the packed dimensions. If the jar is 68 mm across and 94 mm tall, build the box around that plus board thickness, insert space, and a small handling tolerance. I have watched a beautiful launch derail because the creative team chose a square carton for a cylindrical bottle and discovered, too late, that the neck interfered with the top tuck. Pretty is not a dimension. I wish it were, but the board does not care how elegant the render looks on a laptop.
Step 1: Choose the structure. Pick the right format for the job. A tuck-end carton works for light retail goods. A sleeve adds brand theater. A mailer box handles shipping abuse better. A rigid box signals premium value, usually at a higher unit cost. Inserts, trays, and hang-tabs solve different problems, and the board choice matters too: 350gsm C1S artboard for a cosmetic carton, 24pt SBS for a premium sleeve, or E-flute for shipping. If you are unsure, the guide to packaging dielines should be paired with a sample library in a Shenzhen or Dongguan showroom, because holding three box styles in your hand beats arguing over a mockup file for 40 minutes. I would pick the sample library every time; people get much less philosophical after they physically fold a box.
Step 2: Build or request the template. The structural file can come from your printer, your converter, or a CAD designer. Every panel should be labeled clearly: front, back, side A, side B, glue flap, top tuck, bottom tuck, and orientation marks. I like a locked structure layer with a distinct color system so nobody accidentally drags a fold line while placing artwork. The guide to packaging dielines is much easier to follow when the file is organized like engineering, not like decorative chaos. Once, a designer sent me a file with the dieline on top of a shadow layer, and I nearly laughed out loud, not because it was funny, but because it was the kind of mess that always shows up at 4:55 p.m. before a factory cutoff in Guangzhou.
Step 3: Add technical rules early. Bleed, safe zones, barcode clear space, and finish callouts belong in the file before approval. A UPC usually needs a quiet zone around it, and foil areas need register notes so the press team knows where to expect variation. If the design includes spot UV, embossing, or soft-touch lamination, mark those layers clearly. One misread layer can add a full day of prepress cleanup, and I have seen that happen on a run of 12,000 units because the designer flattened the dieline into the art file. That was a long day, the kind where everyone suddenly becomes very interested in coffee and nobody makes eye contact with the proofing station.
Step 4: Test the fold. Print the file, cut it, fold it, and check it with a white dummy or sample run. Does the flap stay closed? Does the insert hold the product at the right depth? Does the logo cross a score line in a way that makes it look split in half? If yes, fix it before production. The guide to packaging dielines becomes useful at exactly this stage, because the sample tells the truth when a screen view refuses to. Screens are polite. Cardboard is not.
Step 5: Lock the final version. Save the approved dieline, the measurement sheet, the proof number, and the sample photos in one folder. Write the board spec down, including thickness, coating, and grain direction. On a reorder, that record can shave an hour off the setup call and maybe one revision cycle off the schedule. If you sell recurring product packaging or seasonal retail packaging, that archive becomes pure profit over time. I have seen teams lose half a day hunting for the "real final" file because five versions were called final, which is a deeply human and deeply irritating habit.
- Use version names like Carton_A_Rev03_Approved instead of vague file names like "final-final-use-this-one."
- Keep the dieline on a locked layer so artwork edits do not disturb the structure.
- Ask the converter to confirm panel orientation before you release plates.
- Store a photo of the folded sample beside the PDF so future teams can see the intended build.
One of my favorite supplier negotiations involved a rigid shoulder box for a haircare client in Ningbo. The factory wanted to charge $320 for a custom insert template and another $60 for a second mockup. The client complained for ten minutes, then approved both after I explained that the insert had to hold a 240 ml bottle upright during transit and still look good under store lights. That is the kind of detail the guide to packaging dielines never skips: function first, then polish. Also, the bottle was heavier than it looked, which is another lesson packaging loves to teach in the least convenient way possible.
Common Packaging Dieline Mistakes That Cost Money
The biggest mistake in the guide to packaging dielines is ignoring board thickness and grain direction until after the artwork is finished. I have seen folds crack on 18pt board because the score was too shallow, and I have seen closures drift because the grain ran the wrong way on a long panel. A 0.25 mm mismatch sounds small in a meeting. On a machine, it becomes a shipment problem with very little patience attached. It is amazing how quickly "close enough" stops being comforting once the cutter starts making decisions.
Another classic problem is placing text, barcodes, or logos too close to trim lines and fold scores. A barcode that sits 2 mm inside a fold may scan fine on screen and fail in a real package because the printed bars distort once the board bends. The same goes for legal copy, expiry details, and nutritional information. The guide to packaging dielines exists partly to stop teams from treating every panel like a safe zone. It is not. A box is a series of moving parts, and every part wants to ruin your day if you get careless.
Designing artwork before the structure is locked is expensive optimism. A cosmetic brand once asked me to make a carton "fit later" after the label design was already approved. The product was 7 mm taller than the first sample, and the new height pushed the top panel into the brand mark. The revised dieline cost $180, the extra proof cost $45, and the launch slipped by 4 business days. That is a cheap lesson only if you do not count the retail window that disappeared with it. I still remember the sigh from their marketing lead when the shelf date had to move, not a dramatic sigh, just the kind that says, "We all knew better and did it anyway."
Mixing up cut lines and fold lines is another. I have opened files where the structural layer was flattened into the artwork, and the prepress team had to untangle three colors of linework before they could make plates. If your printer has to guess whether a line is meant to be knife, score, or glue, you are inviting delay. The guide to packaging dielines should make those conventions obvious, not mysterious. Confusion in a packaging file is like handing someone a wrench and hoping they know whether it is for tightening or demolition.
Skipping proof approval is where budgets get wrecked. A lot of people assume the first press run will sort out alignment, but a machine does not fix a bad structure. It just reproduces the mistake faster. If the proof is wrong by 1.5 mm, production will still be wrong by 1.5 mm, only now there are thousands of units involved. The guide to packaging dielines rewards patience. That patience can feel inconvenient, and it still beats an expensive mistake. I know, nobody enjoys being the person saying "hold the run." But I have also never met anyone who regretted stopping a bad print job in time.
- Wrong board spec: 24pt in the file, 28pt on the line, which changes flap fit and closure pressure.
- Ignored tolerance: 1 mm or 2 mm can ruin inserts, lids, or locking tabs.
- Barcode crowding: no quiet zone means scanning problems and retail rejection risk.
- Premature approval: signing off before the fold test guarantees expensive surprises.
Most packaging design problems are not creative problems. They are coordination problems. A brand team wants shelf impact, a designer wants the layout to sing, and a converter wants the file to behave on a real line in Dongguan or Huizhou. The guide to packaging dielines is the structure that keeps those three jobs from colliding. When the structure is clear, everyone gets to argue about the right things instead of the expensive things.
Expert Tips and Next Steps for a Better Dieline
Keep the dieline on its own locked layer and use clear color conventions. I like one color for cut, one for score, one for perforation, and a separate note layer for glue or coating. That sounds fussy until somebody opens the file at 7:40 a.m. in a Guangzhou prepress room and needs to know whether a dotted line is a tear strip or a registration mark. The guide to packaging dielines works better when the file can be read by people who did not create it. In real life, that usually means the person reading it is tired, moving quickly, and not in the mood to decode creative ambiguity.
Ask for a physical mockup or a 3D render before you approve a large run. One $75 sample can save a $3,500 mistake on a 10,000-unit order, and on a 50,000-unit seasonal launch that number climbs fast. I have seen buyers spend more time arguing over the cost of a prototype than they spent reviewing the actual structure. That approach works badly in packaging. The guide to packaging dielines is a lot cheaper than a warehouse full of cartons that do not close properly. If you have never seen 800 boxes sitting open like disappointed little mouths, trust me, it is not a comforting sight.
Compare the final proof against the spec sheet one last time. Line by line. Check bleed, UPC placement, fold alignment, adhesive notes, finish callouts, and the final board thickness. If the spec says 3 mm bleed and the proof shows 2 mm, stop. If the print says matte aqueous but the sample feels like soft-touch, ask why. A good guide to packaging dielines is about every detail that affects the final package, not only the die itself. I am all for trusting the process, but I trust the ruler more.
Save everything in one place. The approved PDF, the CAD file, the measurement notes, the sample photos, and the revision log should live together. The next reorder will move faster, and your team will not have to rediscover the same structure from scratch. If you are managing multiple SKUs, the archive at Custom Packaging Products stays organized instead of turning into a scavenger hunt across email threads and desktop folders. Good file hygiene is dull. It also saves money. Dull and profitable is a better combo than exciting and expensive, at least in packaging.
Your next move is simple: gather the specs, choose the structure, request a quote, and build the first proof with your converter before artwork goes live. If you do that, the guide to packaging dielines becomes a production tool instead of a fire drill. That difference shows up immediately on the factory floor, where one 1 mm decision can decide whether 5,000 cartons ship on time or sit under a tarp waiting for a redo. I have seen both outcomes in factories from Dongguan to Ningbo, and only one of them makes anyone sleep well.
FAQ
What is a packaging dieline in simple terms?
It is the flat blueprint that shows where a package will cut, fold, and glue. The guide to packaging dielines treats it as a production file, not just a design template, because it keeps artwork aligned after the box is assembled. If you have ever tried to force a flat carton into shape without that blueprint, you already know why the file matters.
How do I know if my packaging dieline is print-ready?
Check that the dimensions match the product, the closure works with the chosen board thickness, and the file includes bleed, safe zones, and barcode clear space. I also recommend a physical sample, because a screen preview cannot tell you whether the guide to packaging dielines will hold up in real use. The box should not require optimism to function.
How much does a packaging dieline usually cost?
A basic folding carton dieline often starts around $50 to $150. More complex rigid boxes, inserts, or custom displays can land in the $200 to $500+ range, and a bundled structure on a 5,000-piece run may work out to about $0.15 per unit once tooling and setup are factored in. Ask whether revisions and sample rounds are included, because that is where budgets usually get wrecked. The dieline itself is rarely the expensive part; the revisions are.
How long does the packaging dieline process take?
A straightforward structural file can be turned around in 2 to 10 business days. Custom projects with multiple revisions or sample rounds may take 1 to 3 weeks, and many factories in Guangdong will quote 12 to 15 business days from proof approval for a clean run. The fastest way to slow the guide to packaging dielines is changing specs after the structure is already drafted. I have watched that happen enough times to say this with feeling: pick the measurements once, then protect them.
What is the most common mistake in packaging dielines?
The biggest mistake is ignoring fit, fold behavior, or board thickness until after artwork is finished. Teams also forget to proof the physical sample before print approval. Treat the guide to packaging dielines like engineering first and artwork second, and you avoid most expensive problems. That one habit alone has saved more launches than any flashy design trick I have seen.
If you are building branded packaging, retail packaging, or custom printed boxes, the safest path is simple: lock the structure, test the fold, and approve the proof with discipline. That is the kind of guide to packaging dielines that saves real money, and I have seen the difference on factory floors where one 1 mm decision can decide whether 5,000 cartons ship on time or sit under a tarp waiting for a redo.