Buyer Fit Snapshot
| Best fit | Package Candles Safely projects where brand print, material claims, artwork control, MOQ, and repeat-order consistency need to be specified before quoting. |
|---|---|
| Quote inputs | Share finished size, material target, print colors, finish, packing count, annual reorder estimate, ship-to region, and any compliance wording. |
| Proofing check | Approve dieline scale, logo placement, barcode or warning zones, color tolerance, closure strength, and carton packing before bulk production. |
| Main risk | Vague material claims, crowded artwork, missing packing details, or unclear freight terms can make a low unit price expensive after revisions. |
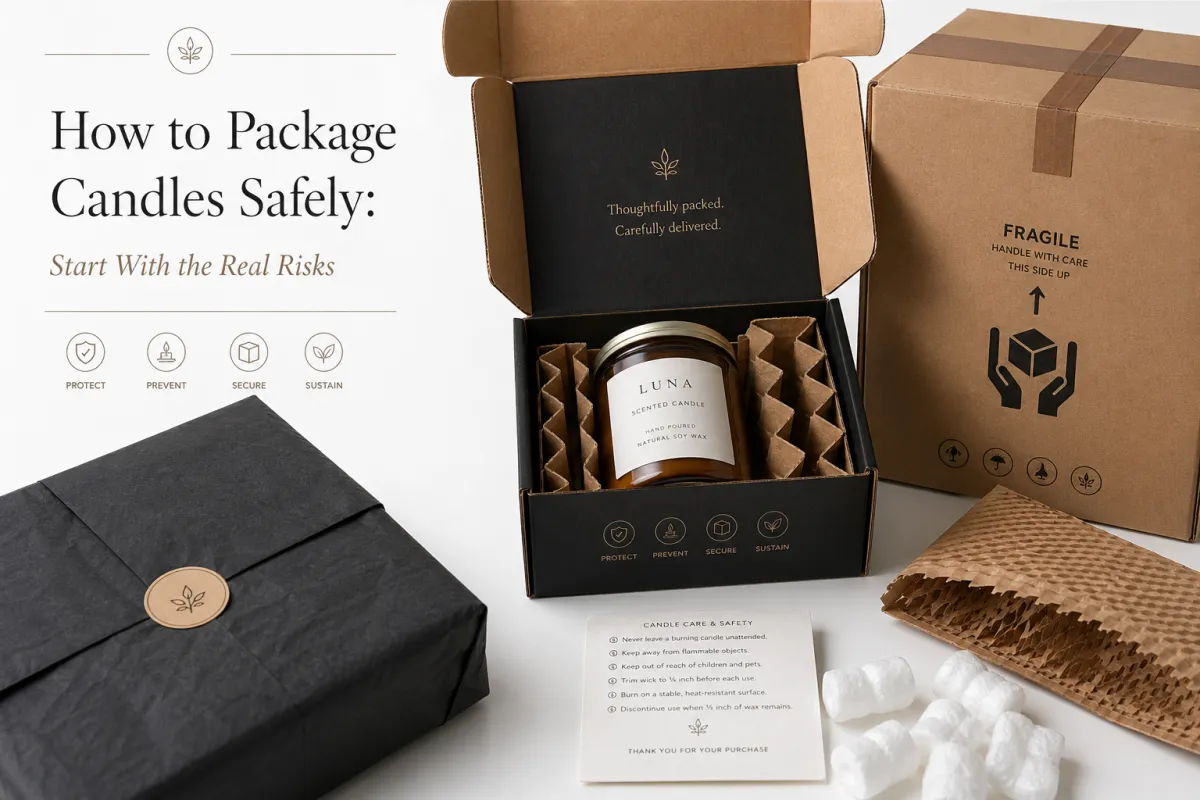
Fast answer: Package Candles Safely: Retail Fit, Compliance Space, Print, and Cost should be specified like a repeatable production item. The safest quote records material, print method, finish, artwork proof, packing count, and reorder notes in one written spec.
Production checks before approval
Compare the actual filled-product size with the drawing, then confirm tolerance on folds, seals, hang holes, label areas, and retail display edges. Reserve space for logos, QR codes, warning copy, and material claims before decorative graphics fill the panel.
Quote comparison points
Review material grade, print process, finish, sampling route, tooling charges, carton quantity, and freight assumptions side by side. A quote is only useful when the supplier can repeat the same color, closure quality, and packing count on the next order.
How to Package Candles Safely: Packaging Tips That Work
Knowing how to package candles safely is usually the difference between a clean delivery and a return label nobody wanted to pay for. I still remember a line in Shenzhen where a 1 mm fit change on a 12 oz glass jar cut breakage from 6.8% to 0.9% in a 1,200-piece trial, and the fix was a molded pulp insert that cost $0.18 per unit. That was not a flashy improvement. It was the kind of small, specific adjustment that protects margin, keeps customers calm, and makes a warehouse stop bleeding money on preventable damage. I am gonna be picky about those small details, because the small details are usually where the money hides, and that is the practical side of how to package candles safely.
Candles fail in more ways than cracked glass. Lids loosen, labels scuff, wax softens in a hot trailer, and boxes give the jar room to rattle until the product arrives with a story written all over it. I watched a premium candle brand in Dongguan lose more money on replacements than on paid media because the box looked elegant and protected almost nothing. How to package candles safely is not a design mood board. It is a working system that has to survive vibration, pressure, heat, and a tired packer at the end of a 9-hour shift. I have seen that tired packer too, staring at a stack of 500 cartons like the boxes personally offended them, and that is the part of how to package candles safely that keeps the whole system honest.
That system has layers. The inner fit keeps the candle from moving, the outer carton absorbs abuse, and the warehouse process decides whether the plan actually holds up once people start packing orders at speed. I will walk through how to package candles safely from the inside out, using the materials, test methods, and failure points that matter on a real shipping floor. And yes, I am going to be annoyingly specific, because vague packaging advice is how people end up with broken jars and a very bad afternoon.
How to Package Candles Safely: Start With the Real Risks
Most candle damage is predictable once you know where to look. Broken glass gets the attention, but lid chatter, label abrasion, wax scuffing, and heat distortion often cause the most frustration. I have seen a bamboo lid arrive perfectly intact while the foil label had a two-inch scrape down the side because the jar shifted just enough to turn one edge into sandpaper. How to package candles safely means protecting every exposed surface, not only the glass body. If the customer opens the box and sees a scuffed label, they do not care that the jar survived. They just know it looks like the candle lost a fight, and that is why how to package candles safely includes label protection too.
Safe packaging is not only a shipping concern. It affects shelf appeal, brand trust, and the economics of the entire order. A candle can arrive intact and still feel cheap if the insert wrinkles the label or the carton crushes at the corners. On one retail project in Nashville, a brand manager told me, "I can live with a 20-cent insert. I cannot live with a $14 candle that looks like it lost a fight with a forklift." She was right, and the math backed her up. I could not have said it better, and I did not try, because she had already nailed it.
"We changed one insert dimension by 1.5 mm and stopped half the lid movement overnight." A production supervisor in Dongguan said that after we watched 400 sample packs bounce through a pallet test on a 32 ECT trial carton. The fix was tiny. The payoff was not.
When I talk about how to package candles safely, I tell clients to think like a carrier, not like a designer. Carriers drop parcels, stack them tightly, and expose them to miles of vibration inside trucks and sortation systems. A parcel that survives a gentle handoff can still fail in a 30-inch tumble test or under 40 pounds of compression in a trailer. That is why I lean on ISTA testing protocols and ASTM-style drop and vibration thinking, especially for heavier jars, gift sets, and anything with a loose lid. I have never met a courier who promised to baby your candle, so I stopped expecting miracles a long time ago.
The failure pattern is simple: movement, impact, and pressure. If the jar can move even 3 to 5 mm, vibration has enough space to build energy. If the outer carton has weak flaps or a low edge crush rating, stacking pressure starts doing the damage before the box reaches a porch. How to package candles safely starts with removing those three failure points before spending another dollar on foil stamping, ribbon, or printed sleeves. A pretty box that breaks is just an expensive apology.
How do you package candles safely during shipping and storage?
The packaging stack has four jobs: hold the candle still, protect the finish, survive the outer carton, and keep the order presentable when the customer opens it. I like to break how to package candles safely into four layers: inner protection, retail box or wrap, outer corrugated carton, and void fill only where it actually earns its keep. If every gap needs stuffing, the box is already too large. I have seen people try to solve a bad fit with more tissue paper, and frankly, that is how you end up creating a craft project instead of a shipping system. That layered approach is the backbone of how to package candles safely.
Inner protection does most of the real work. Molded pulp, corrugated partitions, die-cut inserts, and custom paperboard trays can immobilize the jar so the lid does not knock around and the label does not scuff. For a 10 oz candle in a straight-sided glass jar, I usually want at least two contact points on the body and one at the shoulder or lid area. That holds the product still without pressing so hard that the label starts to wrinkle. I prefer inserts that behave like a calm handshake, not a bear hug.
Outer protection matters just as much. A single-wall carton may work for a 6 oz tin, while a 14 oz thick-wall glass candle often needs a 32 ECT or 44 ECT board spec depending on the lane and stack height. Tape matters too. I have seen a well-designed package fail because the warehouse used flimsy 1-inch office tape instead of 2-inch packing tape with a proper H seal. That is not a packaging theory problem. That is a process mistake, and it is the kind of thing that makes me mutter under my breath at a packing table.
Sampling is where how to package candles safely becomes real. I never approve a candle pack-out from a CAD rendering alone. I want a physical sample, a shake test, a 24-inch drop test on corners and edges, and a quick check for lid movement after the package sits in a warm room for a few hours. If the customer is in Arizona and your warehouse is in Tennessee, that heat difference exposes weak fit fast. I have seen a perfect sample turn into a sloppy one after two hours in a warm staging area, which is why I trust room temperature about as much as I trust a shipping promise made during lunch.
At the fulfillment level, consistency matters more than almost anything else. One team member can pack 200 units an hour with a clear SOP, but if the next person adds an extra sheet of tissue or forgets a spacer, breakage starts climbing. I watched a six-person pack line in Shenzhen lose an entire afternoon because one case pack instruction was copied from a different SKU with a wider jar neck. The fix was not expensive. The correction was a one-page packing standard and a labeled sample board that the team could check in seconds. That kind of thing sounds dull until you realize it saved the week.
If you are trying to master how to package candles safely, build for the worst realistic day, not the calmest one. Picture a rough carrier handoff, a warm warehouse, a box stacked under 30 pounds of other cartons, and a packer moving fast at 4:30 p.m. because the truck is waiting. Packaging that survives that day usually survives the easier ones too. I trust the ugly scenario because the ugly scenario is the one that keeps showing up uninvited.
Key Factors That Decide Candle Packaging Performance
The product itself drives a lot of the answer to how to package candles safely. A 7 oz soy candle in a tin is not the same as a 16 oz luxury jar with a weighted base and a metal lid. Glass thickness, jar shape, fill weight, lid material, and label finish all change the packaging choice. A 3 mm glass wall and a 5 mm glass wall behave very differently when a parcel hits the floor from 30 inches. I have had to remind more than one brand that a heavier jar is not "just a bigger candle"; it is a different problem with different failure points. Those differences are central to how to package candles safely.
One factory visit in Guangzhou taught me that shoulder shape matters almost as much as jar size. We had two 12 oz candles that looked similar on paper, but one had a squared shoulder and the other had a rounded shoulder. The rounded version needed a deeper insert lip because the lid sat higher by 4 mm. Without that change, the lid shifted enough to rub the ink on the top label. It was a $0.12 correction that prevented a lot of angry emails and a much louder return rate. I still remember holding both jars side by side and thinking, "Well, that is annoying," before we fixed it.
Environment is the other half of the equation. Summer trucks can sit above 110 F, especially in a linehaul trailer parked on asphalt in Texas or Southern California, and wax can soften enough to pick up impression marks from tissue or paperboard. Humidity is less dramatic, but at 70% relative humidity, weak paperboard can lose stiffness and curl at the edges. If your package looks fine in a cool office and fails in a hot warehouse, the design did not pass. It only passed the office fantasy version of the test, which is not much use to anyone.
Different business models need different answers. A DTC mailer box usually needs more protection from parcel abuse and a cleaner unboxing moment. A retail-ready carton may need shelf presence, barcode space, and a hang tag or tear strip. Gift sets often need nested inserts and stronger crush resistance because multiple candles ride inside one unit. Subscription shipments need compact, repeatable pack-outs because the box size cannot change every month. How to package candles safely depends on the lane, not only the candle. I have seen brands try to force one package style across three channels and then act surprised when the numbers start complaining.
Branding can add value, but it should never weaken the structure. A rigid setup with foil stamping can look expensive, yet if the candle rattles inside, the illusion lasts only until the first customer opens the box. I would rather see a clean kraft mailer with FSC-certified board than a fancy presentation box that shatters at the corners. For brands that care about paper sourcing, FSC-certified materials provide a real sustainability story instead of a vague promise. Honestly, I trust plain board that performs more than a glossy box that only knows how to look pretty on a pitch deck.
The honest part is simple: too much time gets spent debating print finishes while clearance measurements go unchecked. If the jar has 1.5 mm of side play, the design is not ready. If the insert compresses the lid edge, the design is not ready. That is the unglamorous truth behind how to package candles safely. It is not glamorous, but it is the difference between a package that travels and one that merely poses for photos.
Step-by-Step Guide to Package Candles Safely
Step 1: Measure the candle exactly. Do not round. Measure jar diameter at the widest point, height with the lid on, shoulder width, label thickness, and any decorative extras like a dust cover or charm. Exact means exact enough to catch a 2 mm mismatch. I have seen that tiny gap change the entire pack-out. One time a lid sat just proud of the jar by less than 2 mm, and that tiny annoyance turned into a whole insert redesign because the top flap kept kissing the lid edge. Exact measurements are the starting line for how to package candles safely.
Step 2: Identify the weak points. Glass rim, lid edge, label corner, exposed wax at the top, and any metallic finish are the usual suspects. If the candle is 9 oz and the label wraps around a seam, that seam needs protection from scuffing. If the lid is loose by even 1 mm, you need a top restraint. This is the point where how to package candles safely stops being abstract and turns into a checklist the warehouse can actually use. I like checklists because they remove a lot of wishful thinking, and packaging teams do not need more wishful thinking.
Step 3: Pick the protection method. Molded pulp is strong, tidy, and usually efficient for repeated SKUs. Corrugate partitions work well for set packaging and can be inexpensive at scale. Foam protects well, but it carries a different brand feel and is harder to explain in a sustainability story. Tissue paper looks elegant, but by itself it is mostly decoration. For a single glass jar going Direct to Consumer, I usually start with a die-cut insert or molded pulp before I reach for bubble wrap. Bubble wrap has its place, sure, but it also has a way of looking like you ran out of ideas halfway through the project.
Step 4: Build a sample pack-out. I want one sample that is intentionally a little loose and one that is intentionally a little tight. Then I test both. Shake it. Drop it. Turn it upside down. Put it in a warm room for four hours and check for wax marking or lid migration. The best answer to how to package candles safely is usually the sample that feels dull in the hand and boring in the box. Boring is a compliment here. Boring is the point. Boring means the candle is not rattling around like loose hardware in a drawer.
"If I can hear it move, I can break it." A warehouse lead in Nashville said that after we cut the void space from 18 mm to 6 mm on a candle gift set. He was not being poetic. He was being exact.
Step 5: Confirm the production rules. Write the pack-out in plain language: one insert, one jar centered, lid facing up, top cushion flush, seal with 2-inch tape, apply label on the long face, and keep the barcode visible. If your fulfillment team has to improvise, inconsistency shows up fast. If you have multiple SKUs, make a sample board with photos and exact dimensions. I have watched a 20-minute briefing prevent a month of errors. That may sound dramatic, but anyone who has cleaned up after bad pack instructions knows it is not.
Step 6: Test the lane you actually sell into. A candle shipped 40 miles by local courier does not face the same abuse as one shipped 1,800 miles through parcel hubs. I always ask where the worst 10% of orders go, because that lane tells the truth. How to package candles safely is not about the easy route. It is about the ugly route your customers only describe after something breaks. That is the route that teaches you what really matters.
Cost and Pricing: What Safe Candle Packaging Really Costs
People ask for a cheap answer to how to package candles safely, and I usually give them a better one: spend a few cents now or spend dollars later on breakage, shipping, and customer support. The right packaging does cost money, but the wrong packaging costs more in slower ways. Returns hide inside margin erosion, replacement shipments, and the time someone spends calming down a customer who just opened a shattered box. I have had those emails land in my inbox, and they are never cheerful. That is why how to package candles safely is rarely the cheapest-looking option at first glance.
| Packaging option | Typical unit cost | Best use case | Notes |
|---|---|---|---|
| Kraft mailer with paper fill | $0.22 to $0.38 | Light 6 oz to 8 oz candles | Simple, but only works if the jar fits snugly and the fill stays centered |
| Molded pulp insert | $0.18 to $0.42 | Most DTC glass candles | Good immobilization, clean look, and strong value at 2,000+ units |
| Corrugated partition box | $0.30 to $0.65 | Gift sets and multi-candle packs | Works well when the candles share a carton and need separation |
| Rigid box with custom insert | $0.85 to $1.60 | Premium retail and gifting | Higher presentation value, but setup and board costs are real |
| Bubble wrap plus standard carton | $0.12 to $0.28 | Low-budget internal use | Cheap, fast, and often too loose for premium customer-facing orders |
That table covers materials, not the whole bill. Setup costs matter too. A custom insert might need a $180 sample run, a $250 to $600 tooling charge, and one or two revision rounds before it is ready. If your first order is 5,000 units, the setup fee gets spread out. If your first order is 300 units, the same setup suddenly looks expensive. That is why how to package candles safely is partly a volume question. The unit cost matters, but the volume math often decides whether the idea makes any sense at all.
On one Shenzhen quote I reviewed, a molded pulp insert landed at $0.18 per unit on a 10,000-piece run, but the sample development took 11 business days and two fit revisions. The brand had been losing about $4.80 per damaged order once replacement shipping, support time, and discount credits were counted. The few extra cents on packaging were cheaper every time. That is one of those moments where the spreadsheet finally stops arguing and just admits the packaging team was right.
Rush work changes the math. If you need a sample in 3 business days instead of 10, or production in 8 days instead of 15, expect to pay more. Factories do not move machines with optimism; they move them with overtime and scheduling fees. I have paid a supplier in Shenzhen a premium just to hold a die-cutting window open while we waited for final artwork, and that money was well spent because it kept launch on track. Launch dates have a way of becoming very serious very quickly.
The blunt version of how to package candles safely is this: if a $0.24 upgrade prevents even one broken candle on a $16 order, it can pay for itself before you finish the first case pack. If you sell 1,000 units a month, that math gets loud fast. And if you have ever had to explain a wave of broken orders to sales, finance, and customer service in the same meeting, you already know the noise I mean.
Common Mistakes When You Package Candles Safely
The most common mistake is oversized packaging. A candle box with 10 mm of extra space on every side looks harmless on the bench and disastrous after 500 miles of sorting belts. Movement builds damage. That is why how to package candles safely usually means tighter fit, not fancier graphics. Too much empty space is basically an invitation for chaos, and it is a big reason how to package candles safely starts with fit, not decoration.
Another classic mistake is confusing pretty with protective. I once reviewed a luxury candle set with embossed sleeves, soft-touch lamination, and a beautiful matte finish. It looked expensive. It also collapsed on the lower right corner because the board was too light for the jar weight. The brand had spent $1.40 on aesthetics and under $0.30 on structure. That is backward. Painfully backward. And yes, I said so out loud in the room.
Over-wrapping creates its own problems. Wrap a jar too tightly and you can crush the lid, bend the label edge, or leave a pressure mark in soft wax. Under-wrap it, and the candle slides around like a marble in a tin cup. The sweet spot is just enough restraint to hold the jar still without squeezing the product. How to package candles safely is a fit problem, not a padding contest. More material is not always better, which is a hard lesson for people who think the answer to everything is "just add more filler."
"The box passed visual inspection, then failed the shake test in 5 seconds." A buyer said that after a contract packer used a one-size-fits-all insert for three different candle heights. The order looked fine until we heard the lid chatter.
Skipping testing is another expensive habit. A lot of brands stop after one clean sample and assume the lane is solved. It is not. Drop tests, compression checks, and temperature checks exist for a reason. If you never Compare 32 ECT versus 44 ECT, or cold pallet versus warm pallet, you are gambling with the first customer complaint. I have seen that movie. It ends with a credit memo and a very annoyed founder asking why the "good sample" failed in real life.
Poor warehouse execution can ruin good design too. If there is no written SOP, the same candle may get packed three different ways in one week. If the tape pattern changes, if the void fill is inconsistent, or if the team forgets to orient the jar upright, your breakage data becomes junk. The fix is not glamorous: a printed instruction sheet, one labeled sample, and a supervisor who checks the first 10 orders of the shift. I know, not exciting. Also effective.
Ignoring climate deserves its own mention. A candle with a wax surface that looks perfect at 68 F can soften in a hot truck and pick up marks from a stiff insert. If you sell during warm months, confirm that the packaging survives at least a few hours above room temperature. That small check often separates decent packaging from packaging that truly understands how to package candles safely. Heat is rude. Packaging needs to be ruder back.
Expert Tips and Next Steps for Safer Candle Packaging
Standardize insert sizes across similar SKUs whenever you can. A 10 oz jar and a 12 oz jar may not need completely different systems if the base diameter, lid height, and center of gravity are close enough. That approach saves money on tooling, speeds up reorders, and makes training easier. I have seen one brand cut three insert versions down to one family of dies and save nearly $1,200 on the second production run. That is the kind of unglamorous win I will always cheer for.
Keep the candle centered. That sounds obvious until you watch a pack line on a Friday afternoon. Centered products absorb impact better because the force distributes more evenly through the carton and insert. Off-center products usually hit one wall first, then start the chain reaction. If you remember nothing else about how to package candles safely, remember that center placement is cheap insurance. It is the packaging equivalent of putting your keys in the same bowl every day so you do not spend 12 minutes searching for them later.
Use one protection system across similar SKUs whenever the fit window allows it. A single packing method for 8 oz, 10 oz, and 12 oz jars may not be perfect for each one, but it can be good enough when the dimensions stay close. The operational win matters. Your warehouse does not need three training documents, three sample boards, and three different ways to make a mistake. It gets one repeatable method, which matters a lot when a temp worker is packing 200 orders before lunch. I have worked with teams that had to guess their way through pack-outs, and nobody enjoys that circus.
My test plan stays simple because simple gets repeated. Pick your top-selling candle, order two or three sample builds, and run them through a drop test, a shake test, and a short heat check. Compare breakage, pack speed, and cost side by side. Do not ask only which one looks better. Ask which one survives better and costs less over 1,000 shipments. That is how how to package candles safely becomes a business decision instead of a design preference. It also saves you from the classic trap of loving a package that is beautiful, expensive, and wrong.
If you are working with custom boards, ask your supplier for real specifications, not marketing fluff. I want board grade, insert thickness, glue points, compression targets, and lead time in business days. A 350gsm C1S retail sleeve with a die-cut paperboard insert can look beautiful, but if it adds 7 seconds to pack time and causes lid rub on a glossy finish, I would rather simplify it. Pretty is not the point. How to package candles safely is the point. The candle has to survive the trip before it can impress anybody on the unboxing table.
Here is the next move I would make this week: audit the current candle package, find the weakest point, fix that part first, and then retest the same lane with 25 to 50 units. If breakage stays at zero and pack-out time does not jump by more than 10%, you are moving the right direction. If not, revise the insert, tighten the box, or change the outer carton before scaling. That is the practical answer to how to package candles safely, and it is usually the cheapest one too. I know it sounds almost too simple, but simple is what survives contact with a busy warehouse.
Start small, measure everything, and keep the system boring. The brands that master how to package candles safely are the ones that ship fewer apologies, fewer replacements, and fewer burned dollars. That is the work. Do that first, then scale the candle line once the packaging survives a proper test batch. I have a lot of respect for brands that can resist the urge to make packaging cute at the expense of common sense.
How do you package candles safely for shipping?
Use a snug inner fit so the candle cannot move more than 1 to 2 mm inside the box, protect the jar and lid with a molded pulp insert or die-cut board tray, and place the packed candle into a corrugated outer carton that can handle drops and stack pressure. That three-layer setup is the backbone of how to package candles safely. If the candle can rattle, the box is not ready.
What is the best box style for how to package candles safely?
A strong mailer box works well for direct-to-consumer orders, while a rigid box suits premium gift sets and retail presentation. For heavier glass jars, double-wall corrugate is often the safer choice. The best box is the one that keeps the candle centered without crushing the product. In my experience, "prettiest" and "best" are rarely the same thing.
Should I use bubble wrap or molded pulp inserts for candles?
Bubble wrap is quick and cheap, but it can shift and looks less premium. Molded pulp or custom inserts usually give better immobilization and a cleaner presentation. If you care about repeatable pack-out quality, molded pulp usually wins the argument about how to package candles safely. Bubble wrap can be fine in a pinch, but I would not build a brand around it.
How much does it cost to package candles safely?
Simple protective packaging can stay in the $0.22 to $0.38 range, while custom inserts and premium boxes can push the unit cost much higher. A few cents more per unit is often cheaper than replacing broken candles, paying return shipping, and eating support time. The first order also may carry $180 to $600 in setup or tooling costs. That sounds annoying until you compare it with a pile of damaged orders and a stack of apology emails.
How long does it take to develop safe candle packaging?
Stock-based packaging can be ready quickly, sometimes in under a week if the dimensions are already known. Custom packaging usually needs sampling, fit checks, and at least one revision round, so I would plan for 2 to 4 weeks depending on the carton type and print method. Time spent testing is cheaper than discovering the problem after launch. I would much rather spend an extra week now than spend the next month explaining why the candles arrived looking bruised.