A clean patch can still look off if the beanie body fights it. Stretch the knit too far, choose a loose surface, or place the logo too high, and the result feels accidental instead of deliberate. That is why a Logo Patch Beanies material and sizing guide should start with the base fabric, not the decoration.
Buyers are usually deciding on a small production system: the knit body, the patch material, the attachment method, and the fit around the cuff and crown. Those choices control how sharp the logo reads, how it wears, and how consistent the run stays from sample to bulk order.
Logo patch beanies material and sizing guide: start here
The safest approach is to treat the beanie and patch as one product. A patch that looks perfect on a flat proof can bow, shrink visually, or lift once it is mounted on knit. A soft body can make a crisp logo look muddy if the surface is too loose or too textured.
That is why size and material have to be reviewed together. Low-stretch acrylic behaves differently from a relaxed rib knit. A 2.5-inch patch can look balanced on one style and crowded on another. The logo is only part of the equation; the rest is geometry, knit tension, and how the fabric settles after wear.
Decoration methods also behave differently on headwear than on bags or jackets. Beanies flex every time they are pulled on, folded, or packed. If the attachment method cannot handle that movement, the edges can lift long before the rest of the product shows wear.
How knit body choice changes patch adhesion and look
Standard acrylic is still the most common base because it is stable, widely available, and smooth enough for woven or embroidered patches to hold a defined edge. Recycled acrylic behaves similarly, though the yarn may read slightly heathered or textured, which can soften color contrast next to the patch.
Wool blends feel warmer and often look more premium, but they usually cost more by about $0.75-$1.50 per unit at mid-volume. That premium makes sense for cold-weather retail, yet wool can be less forgiving if the patch is oversized or highly detailed.
Cotton blends are softer and more breathable, but they are less common for cold-weather programs because they do not trap heat as well. If the beanie is meant for lifestyle wear rather than winter utility, cotton can work. For outdoor promos or team orders, acrylic is usually the safer baseline.
Texture matters more than mockups show. A tighter rib knit gives the patch a flatter landing zone and helps edges stay crisp. A looser gauge or thicker crown can create small waves under the patch, and those waves distort straight lines first. That is why simpler shapes often outperform intricate silhouettes on knit headwear.
Practical rule: the softer and more elastic the body, the simpler the patch should be. Tiny text, sharp corners, and dense outlines may look fine in artwork software, then become crowded once the beanie stretches.
Attachment method matters just as much as the base. Sew-on construction is the most reliable option for flexible headwear because the patch is physically anchored to the knit. Stitched perimeter finishes also help it sit flatter over time. Iron-on can work on smoother bodies, but heat-activated adhesives are not ideal for an item that will be stretched and washed repeatedly.
For QC, check stitch density, edge fray, and how the patch bends when the beanie is stretched to wearing size. If a corner lifts or the base fabric puckers around the perimeter, the combination needs adjustment. A polished photo proof will not catch that; a stretched sample will.
Cost and pricing factors that shape your quote
The main price drivers are patch material, decoration method, number of thread colors, body quality, order quantity, and whether the patch shape needs extra setup. A simple woven or embroidered patch on a standard acrylic body can land around $2.75-$5.25 per unit at 500-1,000 pieces. Smaller runs, more intricate construction, or premium bodies can move that range to roughly $5.50-$8.50.
Those numbers reflect setup time, material waste, and the amount of manual handling before the first finished piece ships. If the run is split into two colorways or two patch styles, the unit price often rises 15%-30% on lower counts because the line has to stop and reset. Custom yarn dyeing, special edge stitching, and complex die-cut shapes can push the quote higher.
| Beanie body | Typical price impact at mid-volume | Look and feel | Best use |
|---|---|---|---|
| Standard acrylic rib knit | Base cost | Stable, smooth enough for most patches | Everyday retail, teams, promotions |
| Recycled acrylic | +$0.20-$0.45 per unit | Similar performance with a recycled-material story | Brands highlighting sustainability credentials |
| Wool blend | +$0.75-$1.50 per unit | Warmer, more premium hand feel | Cold-weather retail and higher perceived value |
| Cotton blend | +$0.40-$0.90 per unit | Soft, breathable, lighter structure | Milder climates, lifestyle collections |
Where savings usually come from is simple: keep the patch shape basic, reduce the number of colors, and stay with a standard body instead of a custom dye lot. Retail packaging can also move the quote more than expected. A plain kraft paper hang tag, FSC-certified paper inserts, and corrugated cardboard master cases are cheaper than custom packouts and easier to repeat on future orders. If you need a benchmark for shipment testing, the ISTA standards are a useful reference for drop, vibration, and compression testing.
MOQ matters too. A first run of 500 pieces still needs programming, sampling, approval, and trimming, so low-count orders carry a higher per-unit cost. When the quantity drops far enough, setup becomes a larger part of the total than the materials themselves.
Process, turnaround, and production steps
A clean production cycle usually follows the same path: artwork review, patch file prep, material approval, sample or proof approval, bulk production, then final inspection and packing. On a simple order with stock materials, turnaround can land around 12-15 business days after proof approval, plus transit time. When the order needs custom patch construction, special yarn dyeing, or multiple approvals, three to four weeks is more realistic.
Most delays happen before bulk production starts. Low-resolution artwork creates digitizing questions. Missing dimensions trigger another round of mockups. If placement is not defined early, the patch may be approved at one size and then feel wrong once it is mounted on a real cuffed beanie. The art can be right while the physical result is not.
Private labeling and retail-ready packaging add more steps. Woven size tabs, Custom Hang Tags, and FSC-certified paper components are manageable, but each one needs approval. If the order ships in corrugated cardboard cases, ask for packout details in writing: units per case, carton count, and whether the product needs extra compression protection.
“The smoothest orders are usually the ones where the body, patch size, placement, and color references are decided before the quote gets finalized.”
That is less about perfection and more about sequence. If the basic decisions are fixed, the factory spends less time guessing and more time producing. The schedule becomes visible instead of elastic.
A useful QC check is to verify the first article against the approved measurement sheet, not just against the artwork. Compare the actual patch width, cuff depth, and distance from the fold. Measure the stretch too. A beanie that looks correct flat can shift noticeably once it is pulled onto a head form or stretched by hand.
Sizing rules for fit, placement, and wearer comfort
Beanie sizing is broader than width alone. The flat measurement matters, but so does the stretch range and how the cuff is built. A typical cuffed adult beanie may measure about 9-10.5 inches flat and stretch into roughly an 18-22 inch wearable circumference, depending on yarn and knit tension. Youth sizes are smaller, often around 8-9 inches flat. That difference is enough to make one patch look balanced on an adult body and oversized on a smaller one.
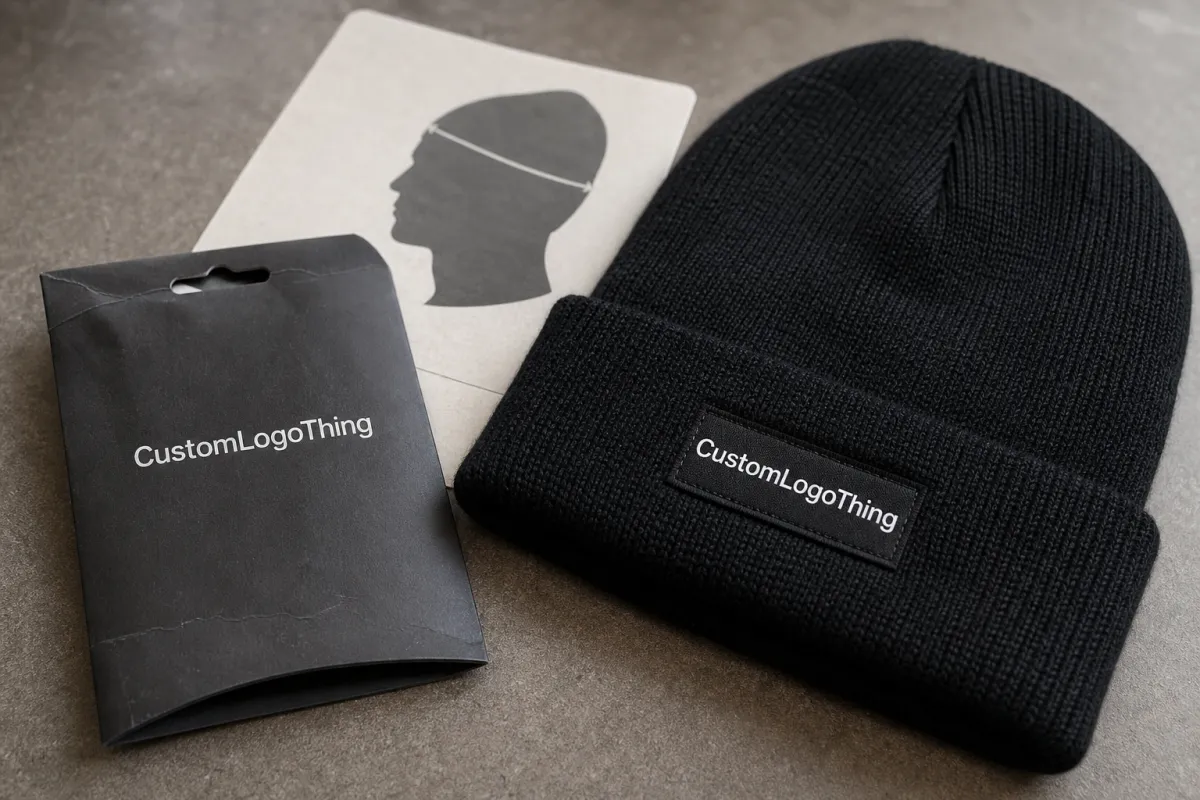
Placement needs the same discipline. On a cuffed beanie, the front patch usually sits about 0.75-1.25 inches above the cuff fold so it reads centered without climbing too high onto the crown. On a slouch style, the logo may need to sit slightly higher because the fabric settles after wear. If the patch is too wide, it dominates the front. If it is too narrow, the logo disappears into the texture.
Most front patches look balanced somewhere between 2.25 and 3.25 inches wide on standard adult bodies. That is not a law; it is a practical band that usually works for simple marks, initials, and compact logos. Detailed logos may need more room, while minimal symbols can sit comfortably smaller. The real question is whether the mark still reads after the beanie stretches and the cuff is adjusted.
Good approval habit: check the patch on a stretched sample, not just a flat mockup. Flat art hides real-world fit problems very well.
Mixed-size programs need extra care. If youth and adult pieces share one design, the smaller size often needs a reduced patch width or a simplified version of the mark. One size across everything sounds efficient, but it can make the youth units look heavy and the adult units under-scaled. Separate size logic is often the cleaner solution.
Common mistakes that distort patch beanies
The most common mistake is choosing patch dimensions from a screen rendering without accounting for knit stretch. That is how a logo that looked bold in the file starts reading small in hand, or a circle turns slightly oval once the beanie is worn. The cure is simple: test the logo on the actual body style at the actual size before approving the run.
Another mistake is overloading a small patch with detail. Fine type, tiny lines, and intricate outlines can work on a jacket back or tote, but on a beanie they often blur or crowd the border. Buyers can get trapped by the mockup because the monitor makes everything look sharper than the finished piece will. If the artwork depends on precision, give it more room or simplify the mark.
Color mismatch is another frequent issue. Yarn, patch base, and thread do not always match exactly when approved separately. On heathered recycled acrylic, a patch color can read warmer or flatter than it does on a solid body. The safest move is to view the materials together before bulk production, especially when the order includes multiple colorways or printed packaging elements.
Measurement drift creates another category of problem. A half-inch change in cuff depth or patch height can alter the front profile. A sample should not be treated like a display piece; it should be treated as a production reference. Write the measurements down, then carry them into the bulk order.
There is also a habit worth breaking: approving a sample based only on front-facing appearance. Turn the beanie over, stretch the cuff, and inspect the patch edge from the side. Loose threads, uneven perimeter stitching, and adhesive bleed are easier to spot from an angle than head-on.
Expert checks before you order
Before requesting pricing, build a simple spec sheet. Include the target beanie style, body material, patch size, logo file, backing method, color references, quantity, and placement notes. If retail presentation matters, add packaging details too: hang tag stock, FSC-certified paper requirements, recycled components, and whether corrugated cardboard cases need a specific pack count.
Ask for a sample or visual proof when the artwork is detailed, the quantity is large, or fit needs to be exact for team distribution or retail shelves. A proof is not a formality. It is the moment to catch a patch that is too small, too busy, too high, or too wide for the body. If the supplier can show the patch on the actual beanie style, that is better than a standalone artwork file because it reveals scale and texture together.
Confirm the production plan in writing: body material, patch type, placement, unit count, shipping expectations, and approval deadline. That one habit prevents most avoidable surprises. It also makes quotes easier to compare because you are looking at the same materials, the same sizing logic, and the same finish level.
Quality control does not need to be complicated, but it does need to be specific. Check patch centering against the cuff fold, compare both sides for symmetry, inspect thread tension, and verify that packaging matches the agreed packout. If the order is meant to be repeatable, save the approved measurement sheet. Repeat programs fail when the first sample is approved verbally and the second run is judged from memory.
For buyers building a repeatable logo patch Beanies Material and Sizing guide, the most reliable approach is simple: choose the body first, lock the patch size second, confirm placement third, then approve one complete spec before production begins. That sequence reduces errors and keeps the finished piece looking intentional.
What patch material works best for logo patch beanies on acrylic knits?
A smoother patch base usually sits cleanest on acrylic because the knit surface is consistent and holds shape well. If the beanie has a lot of stretch, keep the patch shape simple so the logo does not warp at the edges. Sew-on or stitched perimeter finishes usually stay secure longer than purely adhesive options.
How do I choose the right logo patch beanie size for adult and youth fits?
Measure the beanie flat and compare it to the finished circumference range you want the wearer to feel. Use a smaller patch for youth sizes so the front does not look crowded or heavy on the cuff. For adult sizes, increase patch width only when the logo needs more room to stay readable from a short distance.
What drives the price of custom logo patch beanies most often?
Patch complexity, number of colors, body material, and order quantity usually move the price more than the logo shape alone. Lower MOQs generally raise unit cost because setup is spread over fewer pieces. Special finishes, custom colors, and multiple size splits can add extra production steps and cost.
How long does the process and turnaround usually take for patch beanies?
Turnaround depends on artwork readiness, approval speed, and whether the patch or beanie body needs custom setup. Simple orders with standard materials usually move faster than orders requiring samples, revisions, or special trim. The fastest path is to approve artwork, size, and placement before production starts.
What should I send when I request a quote for logo patch beanies material and sizing guide specs?
Send the logo file, target patch size, beanie color, intended audience, quantity, and any placement notes. Include a note on whether you want sew-on, adhesive, or mixed construction so the vendor can price accurately. If you have a deadline, share it early so the quote reflects the real production timeline.


