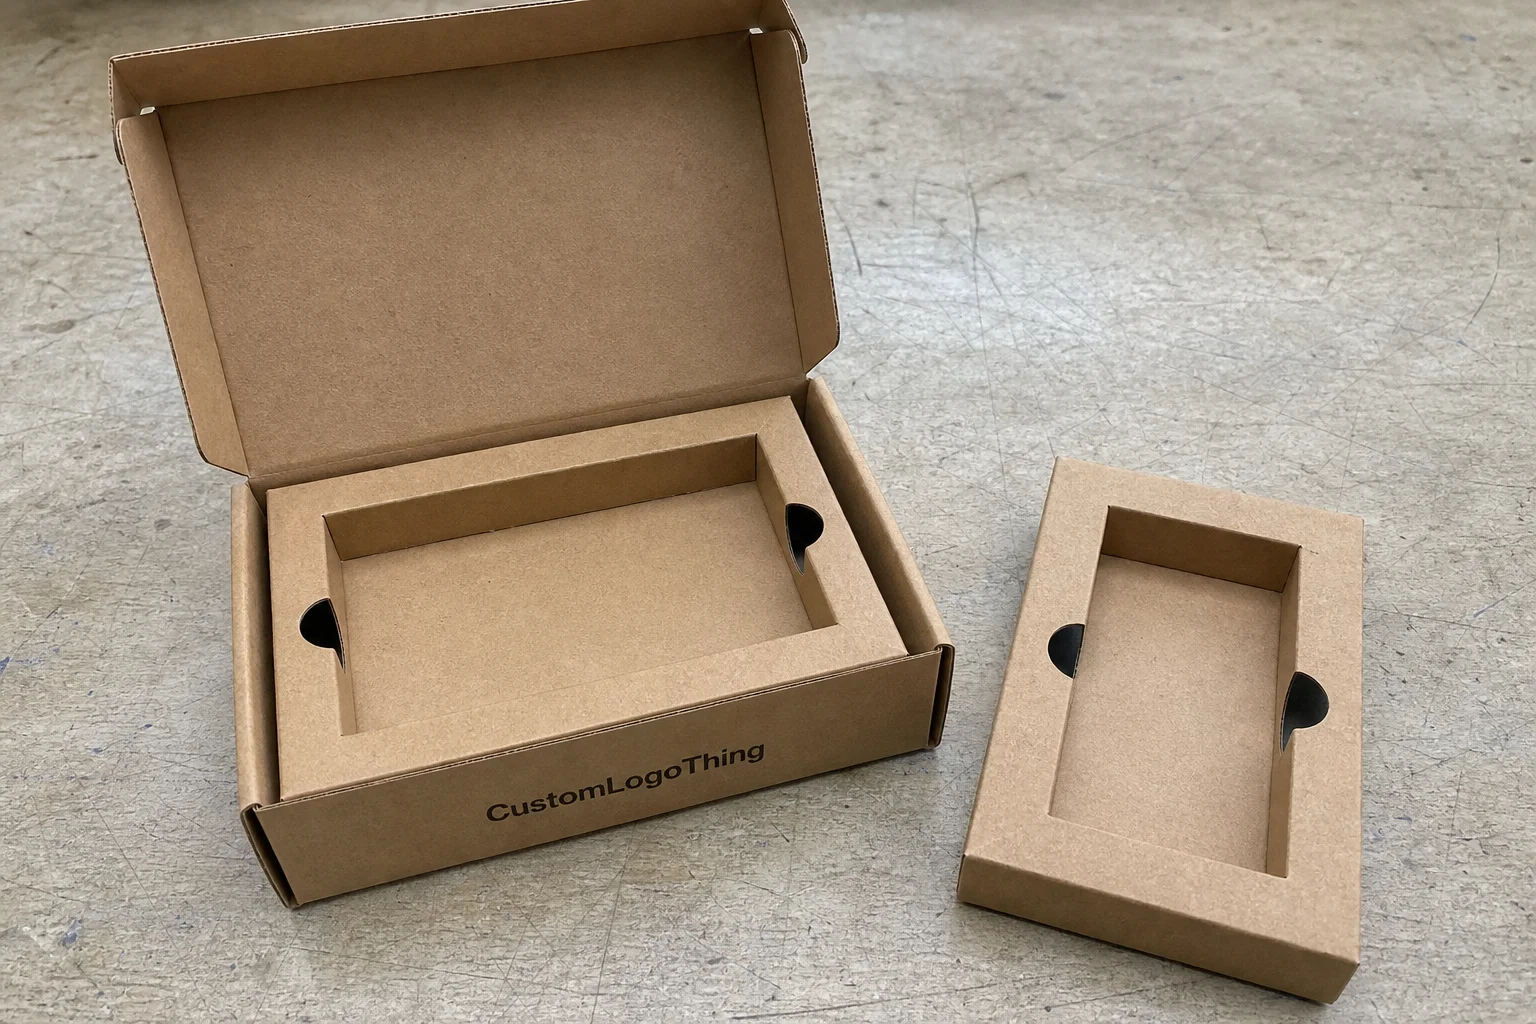
Most product damage in transit starts with movement, not crushing. That is why custom cardboard packaging inserts can protect a premium item better than a heavier outer box, if the fit is right. A cavity that is only a few millimeters too loose can let a bottle, device, or accessory kit rattle enough to scuff corners, loosen closures, or wear through a finish before the carton ever looks damaged.
Why custom cardboard packaging inserts fail before the outer box does
The usual mistake is treating the shipper as the whole protection plan. It is not. The outer carton mainly handles crush and stacking loads. The insert handles position, orientation, and contact points. If those contact points are wrong, the product can arrive in one piece and still fail from the buyer’s point of view.
That shows up most often in Premium Retail Packaging. The box prints well, the structure looks clean, and the insert looks neat on screen. Then transit testing reveals the weak spot: the item shifted a few millimeters, a corner rubbed the board, and the unboxing now includes a mark that should never have been there. More board in the outer carton rarely fixes that. A better insert usually does.
That is the real job of the insert. It is not filler and it is not decoration. It is part of the packaging system, and it affects both protection and pack-out speed. A good design supports the item, blocks side-to-side motion, and gives the assembler an obvious orientation so the line does not stall. If the first touch feels sloppy, the brand reads as careless even when the product itself is fine.
For buyers, the math is straightforward: fewer returns, fewer damaged units, fewer errors on the packing line. That is a better business case than simply specifying a thicker carton. Thickness alone does not solve motion. If the insert has to work with a mailer, a shelf box, or an outer shipper, the internal geometry still has to do the heavy lifting.
In broader programs, inserts are usually specified alongside outer shippers from Custom Shipping Boxes or folded into a wider packaging line under Custom Packaging Products. The key is to treat the insert as a structural component, not an afterthought.
How custom cardboard packaging inserts stop product movement
Good inserts create fixed contact points. Those points spread load, reduce vibration transfer, and keep the product from bouncing into corners or lid walls. The principle sounds simple. The geometry is not. A flat cavity that merely fits is not the same thing as a structure that actively locks the product in place.
Different formats solve different problems. Die-cut corrugated works well for heavier products with defined edges. Layered chipboard is often better for premium retail packaging where presentation matters as much as hold. Fold-and-lock structures help when the pack-out must stay fast and the orientation needs to be obvious. Partition-style layouts suit sets, bundles, and accessory packs that need separation more than cushioning.
The best choice depends on how the item behaves in transit, not just on footprint dimensions. A slim cosmetic device and a glass bottle can share the same length and width, yet their risks are completely different. One needs edge restraint. The other needs neck support and vertical hold-down. That is why custom cardboard packaging inserts often outperform a generic cavity cut to the right outline but the wrong depth.
There is also a production benefit buyers care about. A clear insert design speeds assembly and reduces variation. That matters in contract manufacturing, subscription kits, and retail runs built by hand. If the packer has to guess which side goes up or which flap folds first, mistakes start creeping in immediately.
For validation, many teams use ISTA-style test logic, then adapt the spec to the real distribution lane. Standards such as 3A or 2A are a useful starting point, but they are not a substitute for understanding the actual carton, product weight, and shipping method. A well-specified insert does more than protect. It gives the product a stable position and makes the whole pack feel intentional.
Material, sizing, and finish choices that change performance
The material spec can make a weak design look smarter than it is, or make a smart design fail under load. For custom cardboard packaging inserts, the main variables are board grade, thickness, flute structure, score quality, and how much print or coating the surface carries. A lighter board can work well if the geometry is efficient. A heavier board can still fail if the fit is sloppy.
Typical options include 18pt to 24pt chipboard for retail presentation, and single-wall corrugated such as E-flute or B-flute when the insert needs more crush resistance. Natural kraft gives a clean, recyclable look. Bleached white board reads more premium in presentation-focused packs. Coated surfaces can improve graphics and logo clarity, but they do not automatically improve protection. Finish should follow the product, handling conditions, and brand standard, not the mood board.
Fit matters just as much as board choice. I would check product weight, accessory count, lid depth, total stack height, and whether the item ships alone or inside a mailer plus outer carton. A design that works in a shelf box may fail in a transit carton because the lid compresses the product more than expected. Add clearance for tabs, pull features, handles, and uneven surfaces like pump heads, charging cables, or cap shoulders.
If sustainability is part of the brief, ask for FSC-certified board and verify chain of custody through FSC if the buyer requires it. That does not make the insert mechanically better, but it can matter for procurement, retail compliance, and packaging claims. It also avoids late-stage material swaps that slow the project down.
A useful rule: use the lightest board that still holds shape under vibration and compression. Anything heavier than that adds freight, cost, and waste without necessarily improving performance. More material is not the same thing as better engineering.
Process and turnaround: from dieline to first sample
The path from concept to production is straightforward, but each step has a failure point. Start with exact product measurements, move to a structural concept, then a dieline, then prototype approval, then prepress checks, then the production run. Skip one of those steps and the cost usually shows up later as rework or a delayed launch.
Measurement is not just length, width, and height. You also need protrusions, rounded corners, fragile zones, and any accessory space that the main item shares. If the product includes a charger, strap, manual, or sample insert, the cavity layout has to account for all of it. A box that fits the main product perfectly can still be wrong once the full kit is packed.
For timing, a simple insert can sometimes move from dieline to first sample in about 5 to 8 business days. More complex cuts, printed surfaces, fold-and-lock construction, or revisions can stretch that to 10 to 15 business days before an approved sample is ready. Production after approval often runs another 12 to 18 business days, depending on plant load, board availability, and how many changes were made during proofing. Those are working ranges, not promises.
If the insert lets the product travel, the outer box is just carrying the problem.
Buyers Should Ask for prototype photos, exact sample dimensions, assembly notes, and a written approval checklist. That checklist should cover print placement, board grade, glue or lock style, and any special fold sequence. It keeps sample review practical instead of subjective. The goal is to confirm that the structure can be built the same way every time, not just that it looks good in one photo.
This is also the stage where teams decide whether the insert is a one-off structure or part of a larger packaging design platform that can be reused across SKUs. Reuse helps only if the geometry is close enough to avoid wasted void space. Reusing the wrong insert is just a neat way to repeat the wrong answer.
Cost, pricing, and MOQ factors that shape your quote
Pricing for custom cardboard packaging inserts comes down to a handful of variables buyers can control: board grade, cut complexity, print count, labor intensity, and order volume. A clean one-piece insert with a simple die line usually costs less than a multi-part assembly with heavy scoring and printed interior surfaces. If you want a better quote, reduce part count before you chase a thinner paper spec.
Minimum order quantity matters because tooling, setup, and make-ready costs are spread across the run. That is why a small launch can look expensive on a unit basis even when the structure is simple. At 5,000 units, a die-cut corrugated insert might land around $0.18 to $0.42 per unit depending on board and print. A chipboard retail insert could sit around $0.12 to $0.30. More complex fold-and-lock or multi-layer builds can push into the $0.35 to $0.80 range, especially if assembly labor is part of the quote. Lower quantities can move those numbers fast.
Compare quotes carefully. Ask whether tooling, prototype samples, freight, and packaging for shipment are included or billed separately. Two quotes that look close can diverge materially once those items are added back in. If one supplier includes finished-pack shipment and another excludes it, the cheaper line item may be the more expensive order.
| Insert style | Typical material | Best use | Indicative unit cost at 5,000 pcs |
|---|---|---|---|
| Die-cut corrugated | E-flute or B-flute | Heavier products, better crush resistance | $0.18-$0.42 |
| Layered chipboard | 18pt-24pt SBS or CCNB | Premium retail packaging, clean presentation | $0.12-$0.30 |
| Fold-and-lock chipboard | 18pt-24pt board | Fast assembly, compact kits | $0.15-$0.34 |
| Partition-style insert | Chipboard or corrugated | Multi-item sets and accessory packs | $0.10-$0.25 |
The point is not to chase the lowest number. The point is to compare value against failure risk, labor, and presentation. In many cases, a slightly better spec reduces returns enough to justify the difference. That is the cleaner way to evaluate product packaging economics.
Common mistakes that create damage, waste, and rework
The most common mistake is measuring the product and ignoring everything around it. Accessory space, handle clearance, and how the item behaves under vibration all matter. A perfectly cut cavity that ignores a cable, cap, or shoulder profile can create pressure points that only show up in transit testing.
Another error is overengineering. A thicker board or extra layer is not always the answer. Often the real fix is a tighter structure, a better fold sequence, or a different board direction. Too much material can make the insert harder to assemble, more expensive to ship, and no better at holding the product.
There is also the design that looks right in CAD and wrong on the packing line. Mixed SKU pack-outs expose weak instructions quickly. So do weak tear lines, unclear orientation, and inserts that require workers to guess which face should sit up. If the packer has to think too much, variation follows. Variation turns into damage.
Many teams underestimate finish and print behavior. Heavy ink coverage can affect the recycled look of natural kraft board and can overpower a restrained premium style. If the goal is a clean result, less printing can be the better move. That is especially true in branded packaging, where texture and structure carry part of the design.
Finally, do not approve a sample only because it fits. Fit is the first gate, not the last one. A pack-out trial, a drop test, and a simple vibration-style transit check tell you whether the structure is stable enough for reality. A sample that passes the eye test but fails the line test is not a usable spec.
Next steps to lock in a production-ready spec
Before asking for a quote, gather three inputs: exact product dimensions, target order quantity, and the shipping environment. That sounds basic because it is. Those three details remove most of the back-and-forth that slows packaging projects. A direct-to-consumer shipper needs different retention than a shelf-ready retail pack that moves through controlled distribution.
Then request a sample and test it in a way that reflects the real lane. A transit check, a drop test, and a timed pack-out trial will tell you more than a polished render ever will. If the structure protects well but slows the line, that is a production problem. If it packs fast but allows motion, that is a protection problem. Either way, the sample should answer both questions.
My recommendation is practical: compare two material options, confirm the printed or unprinted finish, and approve the structure only after the sample proves that custom cardboard packaging inserts meet protection and cost goals at the same time. That is the standard that matters. Anything less is just a box with a cavity.
Frequently Asked Questions
How do custom cardboard packaging inserts compare with foam or pulp inserts?
Cardboard is usually easier to die-cut, print, and recycle in common waste streams, which makes it a strong choice for presentation-focused retail and e-commerce packs. Foam can handle harsher impacts, but cardboard often wins on cost, freight efficiency, and brand appearance when the product shape is predictable. Molded pulp can be a strong option too, but it usually needs different tooling and a different approach to surface finish.
What measurements do I need to quote cardboard packaging inserts accurately?
Provide the exact product dimensions, weight, accessory count, and any protrusions that need clearance so the insert is designed around the real packed item. Add the carton inside dimensions and the shipping method, because a design that fits a shelf box may fail inside a mailer or transit carton. If there is a lid, hinge, closure, or pull tab, include those details as well.
What is the typical sample and production timeline for packaging inserts?
Simple structures can move from quote to sample quickly, but complex cuts, print approval, or multiple revisions can extend the timeline substantially. Ask for a clear schedule covering dieline creation, prototype approval, and production run timing so lead time does not become a surprise. If your launch date is fixed, build in buffer time for a second sample.
What drives the unit cost of custom cardboard packaging inserts?
Unit cost is mainly shaped by board grade, number of cuts, print complexity, assembly time, and order quantity. Smaller runs usually cost more per unit, while cleaner geometry and fewer print passes can bring the price down without hurting performance. Freight and make-ready charges matter too, especially on low-volume orders.
How should I test custom cardboard packaging inserts before launch?
Run a fit check, a drop test, and a vibration-style transit test to confirm the product stays centered and protected in realistic handling conditions. Also time the pack-out process, because a strong design that slows labor can still be the wrong choice for production. If the insert needs a special fold sequence, have multiple packers build it to catch variation early.
For most buyers, the real decision is not whether the insert looks nice. It is whether the structure protects the product, keeps labor under control, and supports the brand without adding avoidable cost. If those three points hold, custom cardboard packaging inserts are doing their job.


