A small spacing error in cut lettering can make a polished storefront, product display, or branded package look slightly wrong, even when the vinyl film itself is excellent. That is the quiet risk with custom vinyl letter stickers: they appear simple, but the finished result depends on clean artwork, correct sizing, suitable adhesive, and steady installation.
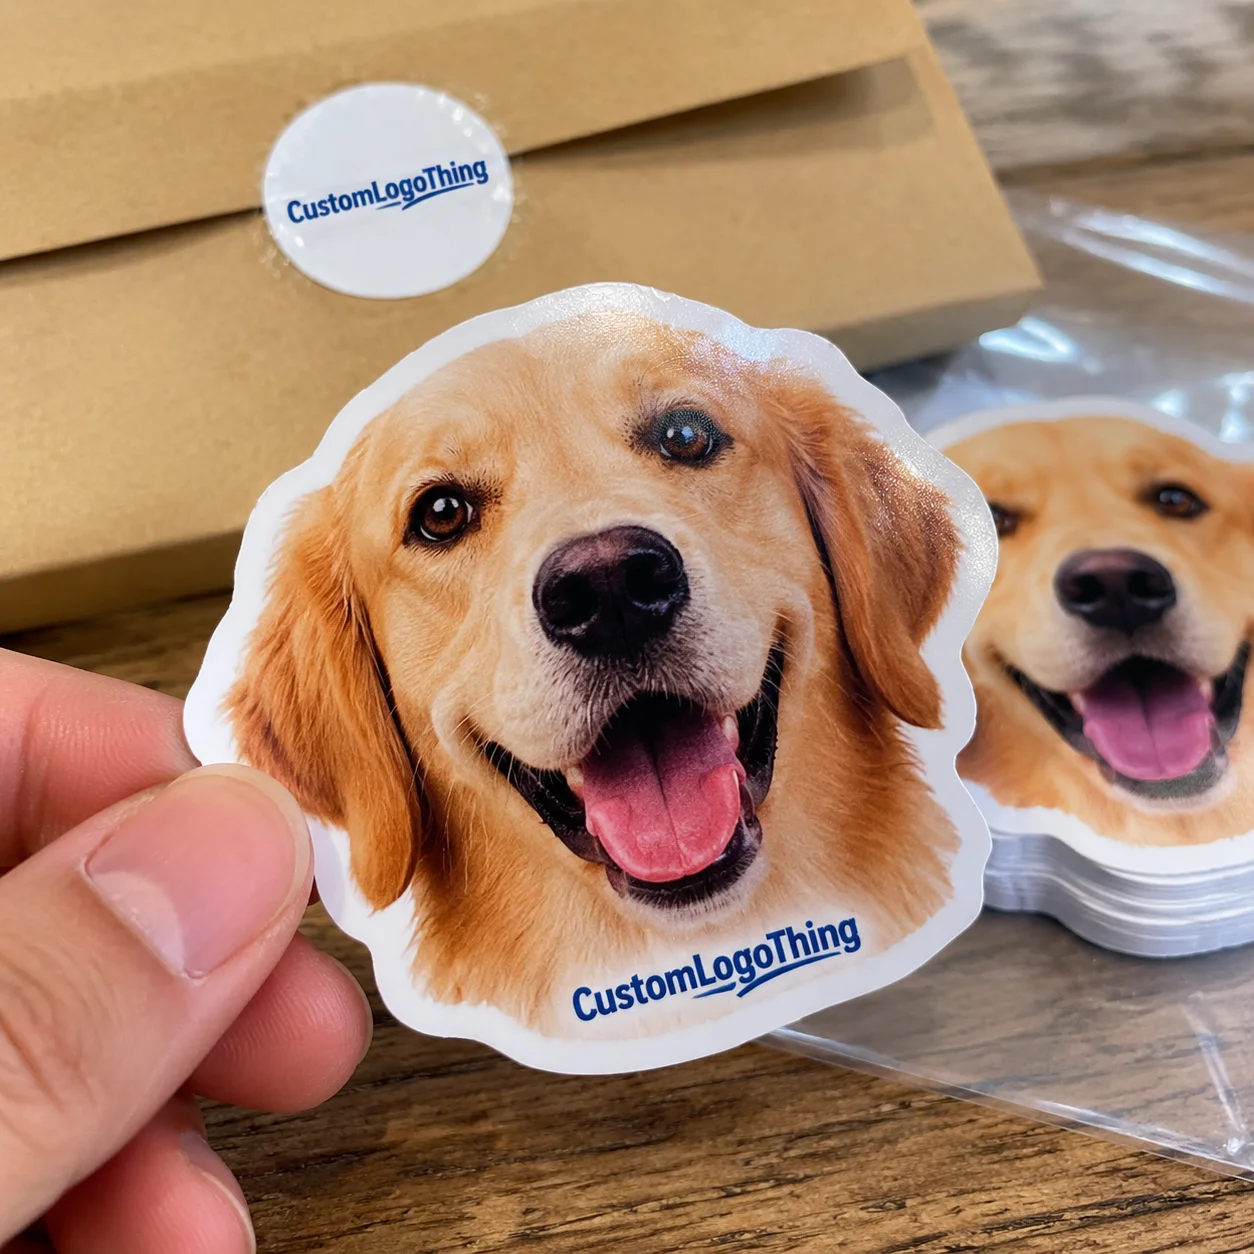
Vinyl letter stickers are individually cut letters, numbers, and simple shapes made from adhesive vinyl, usually supplied with transfer tape so the full layout installs as one aligned piece. They are not the same as printed stickers. Cut vinyl uses the color of the film itself; printed stickers reproduce full-color graphics, gradients, photographs, shadows, and detailed packaging artwork.
What Custom Vinyl Letter Stickers Are and Where They Work Best

Cut vinyl lettering works best when the design is mostly text, a solid-color logo, a simple icon, store hours, directional wording, product category labeling, or clean display copy. Think retail windows, shipping boxes, product bins, POP displays, event signage, equipment labels, acrylic risers, sample kits, and short-run branded surfaces where crisp edges matter more than full-color imagery.
Packaging teams often use vinyl lettering for temporary branding, prototype displays, trade show fixtures, and small batches where producing new Custom Labels & Tags is not practical yet. It can dress up plain cartons, retail packaging mockups, or Custom Printed Boxes during early sales presentations, provided the surface is smooth enough for the adhesive to make reliable contact.
Surface selection does much of the work. Smooth glass, coated paperboard, painted metal, acrylic, many rigid plastics, and finished wood are usually reasonable candidates after cleaning. Heavy texture, dust, wax, condensation, fresh paint, silicone coatings, and low-surface-energy plastics such as some polyethylene or polypropylene parts can reduce bond strength. Many failed lettering jobs are not true vinyl failures; they trace back to surface, sizing, or artwork choices that were not settled before production.
Practical rule: if the surface feels dusty, oily, heavily textured, rubbery, or flexible, do not assume standard vinyl will behave well. Share the surface details before quoting.
Vinyl lettering also has a visual advantage that printed labels cannot always match. Because the background vinyl is removed, the letters sit directly on the surface. On glass, acrylic, painted displays, and coated cartons, that can look cleaner than applying a rectangular label with a visible edge.
There are limits. Cut vinyl is not the right answer for photographic graphics, complex illustrations, tiny legal copy, soft shadows, multi-tone effects, or exact process-color artwork. If the design needs more than a few solid shapes, printed decals may be more stable, cheaper to install, and easier to repeat across a large program.
How Cut Vinyl Lettering Is Made From Artwork to Finished Decal
Production starts with vector artwork. Each letter or shape needs to be defined by paths the cutter can follow, not by pixels from a low-resolution screenshot. AI, EPS, SVG, and properly prepared PDF files are usually easiest to review. Fonts should be outlined so letter shapes and spacing do not shift when the file is opened on another system.
The basic flow is direct: artwork review, finished size confirmation, vinyl selection, machine cutting, weeding, transfer tape application, trimming, quality check, and packing. The cutter does not print ink. It scores the vinyl film and adhesive liner along the vector paths, then an operator removes the unwanted vinyl by hand.
That hand step is called weeding. It means pulling away the background vinyl around the words and removing the centers of letters such as A, O, P, R, D, and small punctuation marks. A 12-inch-wide block-letter decal may weed quickly. A 12-inch-wide distressed script with tiny interior cuts can take several times longer and may still be less durable after installation.
Transfer tape is the carrier layer applied over the weeded design. It keeps spacing intact during installation, which matters for long phrases, multiple lines, small dots, and separated letter components. Paper transfer tape is common and grips well during handling. Clear transfer tape helps with visual placement, although it may behave differently with wet application methods.
Two-color or three-color lettering can be made by cutting each vinyl color separately. Sometimes the colors are layered before shipment. Other times, they are supplied as separate installation pieces so the installer can register them on the surface. Layering adds labor, increases registration risk, and creates thicker edges, so it should solve a real design need rather than serve as the default.
Minimum detail limits deserve respect. Very tiny type, thin strokes under roughly 1/16 inch, distressed edges, and delicate script tails can tear during weeding or lift after application. Small lettering is possible, but the font, material, adhesive, and viewing distance need to agree with each other.
Common finishing choices include matte, gloss, metallic, removable, permanent, outdoor-rated film, clear transfer tape, paper transfer tape, and individually trimmed decals for kit packing or retail use. If the decals are part of broader Custom Packaging Products, confirm how they should be packed: bulk stacked, individually bagged, bundled by location, or inserted into sample kits.
Key Material, Size, Color, and Adhesive Factors to Decide Early
The surface and environment should guide the vinyl choice before the final design is locked. A window decal facing afternoon sun, a wall phrase in a leased retail space, a label on powder-coated equipment, and a short-run product packaging mockup ask different things from the film and adhesive.
Indoor vinyl is generally selected for controlled spaces with limited UV exposure and light cleaning. Outdoor-rated vinyl is built for sunlight, moisture, temperature swings, and longer exposure. Permanent adhesive is chosen when the decal should stay put; removable vinyl is better for seasonal displays, promotions, leased spaces, and surfaces where clean removal matters. Removable does not mean risk-free. Painted walls, older coatings, and delicate finishes should still be tested.
Finish changes both appearance and function. Gloss vinyl gives strong contrast and works well on glass, especially for storefront hours or promotional wording. Matte vinyl reduces glare and can look more refined on retail fixtures, coated cartons, and display boards. Metallic, frosted, fluorescent, or specialty films can add accent value, but they may carry higher minimums, longer lead times, or narrower color choices.
| Option | Best Use | Typical Cost Impact | Buyer Watchout |
|---|---|---|---|
| Standard indoor vinyl | Walls, displays, sample kits, short-term package branding | Baseline | Limited outdoor durability |
| Outdoor-rated vinyl | Windows, vehicles, exterior signs, equipment | Often 15%–40% higher | Needs proper cleaning and installation temperature |
| Removable adhesive | Promotions, leased spaces, temporary retail packaging displays | Often 10%–35% higher | Surface testing is still recommended |
| Metallic or specialty film | Accent lettering, premium displays, limited runs | Often 25%–75% higher | Color range and availability may be limited |
Size should be decided by viewing distance and installation area, not just by what fits in a file. A 1-inch letter may read well at arm’s length on a product bin, while a window message viewed from 15 feet away may need 3-inch to 5-inch letters. On boxes, check the actual panel dimensions, folds, tape zones, handle cutouts, and corners before sizing the decal.
Color selection goes beyond brand matching. Contrast against the surface, day and night visibility, lighting conditions, transparency on glass, and the customer’s normal viewing angle all matter. White lettering can look sharp on a dark display but disappear against a bright window during certain daylight hours. Black lettering can read clearly on glass from outside but feel heavy on a small package mockup.
If a brand color needs to match exactly and the vinyl film library does not offer a close option, printed decals may be the better answer. For brand systems tied to FSC-certified paperboard or sustainability claims, keep the messaging accurate and consult resources such as the Forest Stewardship Council before using certification language on packaging or displays.
Artwork should be supplied as vector paths with fonts outlined, minimum stroke thickness checked, and spacing reviewed at final size. Texture effects, shadows, gradients, and photographic details do not translate to cut vinyl unless they are simplified into solid shapes.
Pricing, MOQ, and Quote Details That Affect Unit Cost
Pricing for custom vinyl letter stickers is driven by finished size, material, color count, complexity, weeding time, quantity, finishing, packing method, and rush handling. Two decals with the same outside dimensions can price very differently if one uses plain 2-inch block letters and the other uses thin script, distressed edges, and twenty small interior cuts.
As a broad planning range, simple one-color decals around 4 x 10 inches might land near $1.20–$3.50 each at 100 pieces, depending on film, weeding difficulty, and packing. At 500 pieces, that same general style might fall closer to $0.75–$1.80 each. Large window phrases, specialty films, or individually bagged retail-ready pieces can move well above those ranges. Artwork complexity can swing labor faster than many buyers expect.
MOQ is practical rather than mysterious. Small runs may be possible, even 10 or 25 pieces, but setup, artwork review, file prep, material loading, machine calibration, and quality checks still exist. Unit cost usually improves as quantity rises because those fixed steps spread across more decals.
Multi-color lettering changes the quote structure. Each color may need to be cut separately, weeded separately, aligned, and either layered or supplied as a separate install piece. If exact registration is critical, the supplier may recommend printed decals instead, especially for small logos or tight multi-color marks.
Material upgrades affect price as well. Outdoor-rated film, removable adhesive, metallic finishes, specialty colors, laminated printed alternatives, and extra-wide format requirements can all change the unit cost. Packing can matter almost as much as the film. A bulk stack of 250 decals is cheaper to prepare than 250 individually trimmed decals sorted into 25 store kits.
For an accurate quote, provide finished size, quantity, surface type, indoor or outdoor use, color count, artwork file, installation location, deadline, and packing requirements. Compare quotes by specification, not just by the lowest number. Transfer tape type, vinyl grade, artwork cleanup, and packing method all affect how the finished lettering performs on the actual surface.
Production Process and Timeline From Proof to Shipment
A clean order flow usually starts with inquiry, artwork review, quoting, proof approval, material confirmation, production scheduling, cutting, weeding, transfer taping, inspection, packing, and shipment. For straightforward one-color vinyl lettering, production may take about 5–10 business days after proof approval. More complex jobs, layered colors, specialty films, or kit packing can require 10–15 business days or more.
The proof stage is where the buyer should slow down. Confirm spelling, dimensions, line breaks, spacing, color, orientation, and whether the decal applies to the outside of glass or reads through from the inside. Inside-glass application needs mirrored artwork so the message reads correctly from the viewing side.
Approval speed matters because production normally cannot begin until specifications and artwork are locked. Even a small wording change can alter cut paths, material yield, weeding time, and transfer tape size. If a landlord, retail manager, legal team, or event manager needs to approve the wording, build that review time into the schedule before promising an install date.
Timeline variables include order quantity, font complexity, material availability, special colors, layered vinyl, individual trimming, store-by-store packing, shipping method, and seasonal production volume. Production time and transit time are separate. A five-business-day production window does not mean the decals arrive at your location in five business days.
Rush orders can work for simple one-color lettering, especially if the material is in stock and the artwork is production-ready. Rushing a design with tiny weeding details or a large multi-location packout creates quality risk. Cutting is fast; weeding, transfer taping, inspection, and packing still take human time.
For shipping durability, decals should be packed flat when practical, or rolled around a suitable core for larger pieces. Tight rolling can stress transfer tape, especially in cold weather. For broader logistics and transit testing context on packaged goods, the International Safe Transit Association is a useful authority on distribution handling standards.
Step-by-Step Guide to Ordering and Installing Vinyl Letter Decals
Start by measuring the application area. Include safe margins around edges, seams, handles, folds, window frames, box flaps, hardware, and any raised feature that could interrupt installation. On product packaging, measure the finished panel after folding, not only the flat dieline, because crease allowances and glue flaps can change the usable area.
- Choose the message hierarchy. Decide what should be seen first: brand name, store hours, tagline, product category, QR code companion label, directional wording, or compliance note.
- Prepare vector artwork. Outline fonts, check spelling, simplify thin details, and confirm whether the design should ship as one full decal or several smaller pieces.
- Confirm final size. Review total width, total height, line spacing, and margins, not only the height of the tallest letter.
- Clean the surface. Use a suitable residue-free cleaner, remove oils and dust, and let the surface dry fully before installation.
- Install with steady pressure. Position with tape, hinge the transfer, peel the backing, squeegee from the center outward, and remove transfer tape slowly at a low angle.
Dry application is common for smaller decals and packaging surfaces. It gives immediate placement and avoids moisture trapped under the film. A plastic squeegee with a felt edge helps apply firm, even pressure without scratching the transfer tape or surface.
Wet application may be considered for larger smooth glass or acrylic surfaces, but not every vinyl, adhesive, or transfer tape is suited for it. Paper transfer tape can wrinkle or lose strength when wet, and some adhesives need dry contact to build a proper bond. If wet installation is planned, say so before production.
Temperature is another practical detail. Many vinyl films apply best in a moderate range, often around room temperature rather than on very cold glass or a hot exterior panel. Cold vinyl can feel stiff; overheated surfaces can make placement less forgiving. If the installation site is a storefront, warehouse, cooler area, or outdoor event structure, ask whether the planned conditions fit the selected film.
After installation, avoid picking edges and give the adhesive time to build bond. Many pressure-sensitive adhesives continue to strengthen over 24–72 hours depending on temperature, surface energy, and pressure. Clean gently, especially around tiny details, sharp corners, and thin strokes. Early lifting in those areas is a signal to review surface prep, size, or font choice before the next run.
Common Mistakes That Make Letter Stickers Harder to Use
The first mistake is ordering lettering too small for the font style. A clean sans serif may cut well at a modest size, while a delicate serif, distressed typeface, or script may fail at the same height. Readability also suffers. Customers do not stand where the designer’s monitor sits; they view signage from walking distance, odd angles, and changing light.
Script fonts are a common trap. They can look beautiful in a brand deck but cause trouble when they include tiny dots, thin tails, disconnected flourishes, and narrow bridges between letters. Those details can lift during transfer or cleaning. If script is non-negotiable, increase the size and ask for a production review before approving the proof.
Another mistake is sending only a screenshot, flattened JPG, or low-resolution logo. A cutter needs paths. A fuzzy image can be redrawn, but that adds time and may introduce small differences from the original mark. For retail packaging or product packaging programs with multiple assets, keep approved vector logo files organized before ordering.
Surface mismatch creates many preventable failures. Standard adhesive may struggle on textured walls, powder-coated parts, silicone-treated packaging, unclean glass, flexible mailers, or surfaces that bend during handling. Vinyl likes stable, clean, smooth surfaces. If the surface flexes every time a box is opened or a pouch is squeezed, the lettering may crack or lift.
Measuring only text height is another expensive habit. Total width, line spacing, transfer tape border, safe margins, and the way lettering sits inside the actual panel all affect the finished look. For custom vinyl letter stickers used on boxes, displays, or windows, a straight-on photo with rough dimensions marked directly on it can prevent a surprising number of errors.
Skipping proof review leads to rework if spelling, sizing, inside-glass orientation, or color assumptions are wrong. Also, avoid installing immediately after a cold shipment arrives. Let the vinyl acclimate to room temperature so the film and adhesive handle properly. Cold vinyl can feel stiff, and transfer tape may release differently than expected.
Next Steps Before You Request Artwork Review or a Quote
Before contacting a supplier, gather the details that shape the job: final wording, quantity, finished size, surface material, indoor or outdoor use, installation location, color preference, deadline, and artwork file. If the lettering is part of a branded packaging rollout, include how many versions are needed and whether each version ships to one location or multiple sites.
- Take a straight-on photo of the application area with approximate dimensions marked, especially for windows, walls, display fixtures, box panels, and multi-location retail rollouts.
- Rank the main priority before quoting: lowest unit cost, fastest turnaround, easiest installation, clean removability, outdoor durability, exact brand color, or premium finish.
- Group similar decals into one request, such as window phrases, box labels, department names, product bin wording, or event signs.
- Ask for material guidance if the decal will face sunlight, moisture, refrigeration, frequent handling, cleaning chemicals, or planned removal after a promotion.
- Request installation notes if the lettering is large, layered, multi-piece, or being installed by store staff rather than a professional installer.
Good suppliers can often spot savings when similar decals are quoted together. Shared material, common heights, grouped colors, and efficient sheet layouts can reduce waste. That is especially useful for package branding projects where one campaign may include window lettering, display messaging, and labels for sample kits.
Ask for a recommendation rather than specifying blindly if the surface is unusual. Sunlight, moisture, refrigeration, frequent handling, and removal requirements all influence material choice. A decal on a chilled beverage case is not the same as a decal on a dry coated carton, even if the artwork looks identical.
The best results come from ordinary discipline: real surface details, clean vector artwork, accurate measurements, and a clear deadline before production begins. Do that groundwork early, and the finished lettering has a much better chance of looking crisp, installing cleanly, and supporting the space or package the way it was meant to.
FAQs
Are custom vinyl letter stickers better than printed stickers for text?
They are usually better for clean, solid-color text because each letter is cut from colored vinyl and applied with transfer tape for crisp edges. Printed stickers are better when the design needs gradients, photos, many colors, fine texture, or exact full-color artwork. For simple logos, store hours, box labeling, and display messages, cut vinyl lettering often looks cleaner and more integrated with the surface.
What artwork file works best for custom vinyl lettering?
Vector files such as AI, EPS, SVG, or print-ready PDF are preferred because the cutter follows paths rather than pixels. Fonts should be outlined or supplied with the file so spacing and letter shapes do not change during production. Screenshots, low-resolution JPGs, and flattened images may require artwork cleanup before they can be cut accurately.
How small can vinyl letter decals be?
Minimum size depends on the font, stroke thickness, material, and adhesive, not just the overall decal dimensions. Tiny type, thin serifs, distressed edges, and small punctuation can be difficult to weed and may lift after installation. For best readability, size lettering based on viewing distance and ask the supplier to flag any details that are too fine to cut cleanly.
Can vinyl letter stickers be used outdoors?
Yes, if the correct outdoor-rated vinyl and adhesive are selected for sunlight, moisture, temperature changes, and cleaning exposure. Outdoor life depends on the vinyl grade, color, surface preparation, installation quality, and how much UV or abrasion the decal receives. For demanding exterior use, share the exact surface and exposure conditions before production so the material can be matched properly.
How do I remove custom vinyl letter decals without damaging the surface?
Warm the vinyl gently, lift an edge, and peel slowly at a low angle to reduce stress on the surface. Use an adhesive remover that is safe for the underlying material, then clean and dry the area thoroughly. Removable vinyl is the better choice when decals are intended for short-term promotions, leased spaces, or seasonal displays.