Pelican Case Custom Foam Inserts: Buy Better Protection
A hard case can survive a shoulder-height drop and still let the expensive gear inside take a beating. That is the gap pelican case Custom Foam Inserts are designed to close: not just padding, but controlled positioning that manages vibration, impact, abrasion, and repeatable packing.
Most buyers already know why Pelican cases are popular. The shell is tough. The latches hold. The gasket helps resist dust and moisture. But the shell only handles the outside threat. If a camera body, optic, medical device, test meter, drone controller, sales sample, or precision tool can shift even 20 millimeters in transit, the case may look untouched while the item inside collects edge damage, finish scuffs, bent connectors, or calibration problems.
Pelican Case Custom Foam Inserts: What They Actually Solve
Pelican case Custom Foam Inserts are CNC-cut, waterjet-cut, laser-cut, or die-cut foam pieces made to fit a specific case model and a specific set of contents. The case handles crush, stacking pressure, rough handling, dust, and moisture exposure. The insert handles contact points, compression, spacing, orientation, and loading discipline.
That distinction matters. A case is a container. A fitted insert turns it into a protective system.
In practice, the insert does several jobs at once. It keeps tools from striking one another. It stops electronics from sliding against hard edges. It creates a visual inventory board so a technician can spot missing parts in seconds instead of digging through loose accessories. It can also make a sales kit look organized and deliberate, which matters when the case is opened in front of buyers, distributors, engineers, inspectors, or field teams.
Common applications include field service kits, diagnostic instruments, drones and controllers, firearms accessories, medical devices, trade show samples, robotics components, lenses, batteries, cables, rugged tablets, and compact product demo sets. Some projects are mostly about protection. Others lean into branded packaging or presentation value, especially when the case is part of a broader Custom Packaging Products program.
The buying decision usually comes down to six variables: fit, foam material, cutting method, design process, Cost, and Timeline. Get those right and the insert feels almost boring in the best possible way. It works every time.
Practical rule: a good insert should make the correct packing method obvious. If a user has to think too hard about where each piece goes, the layout still needs work.
How Custom Foam Inserts Work Inside a Hard Case
A foam insert should hold the product securely enough to prevent travel, but not so tightly that the user has to wrestle with it. That balance is easy to miss. A cavity that grips perfectly during a bench test may become irritating after 40 field removals per week, especially with gloves, wet hands, cold fingers, or delicate finishes.
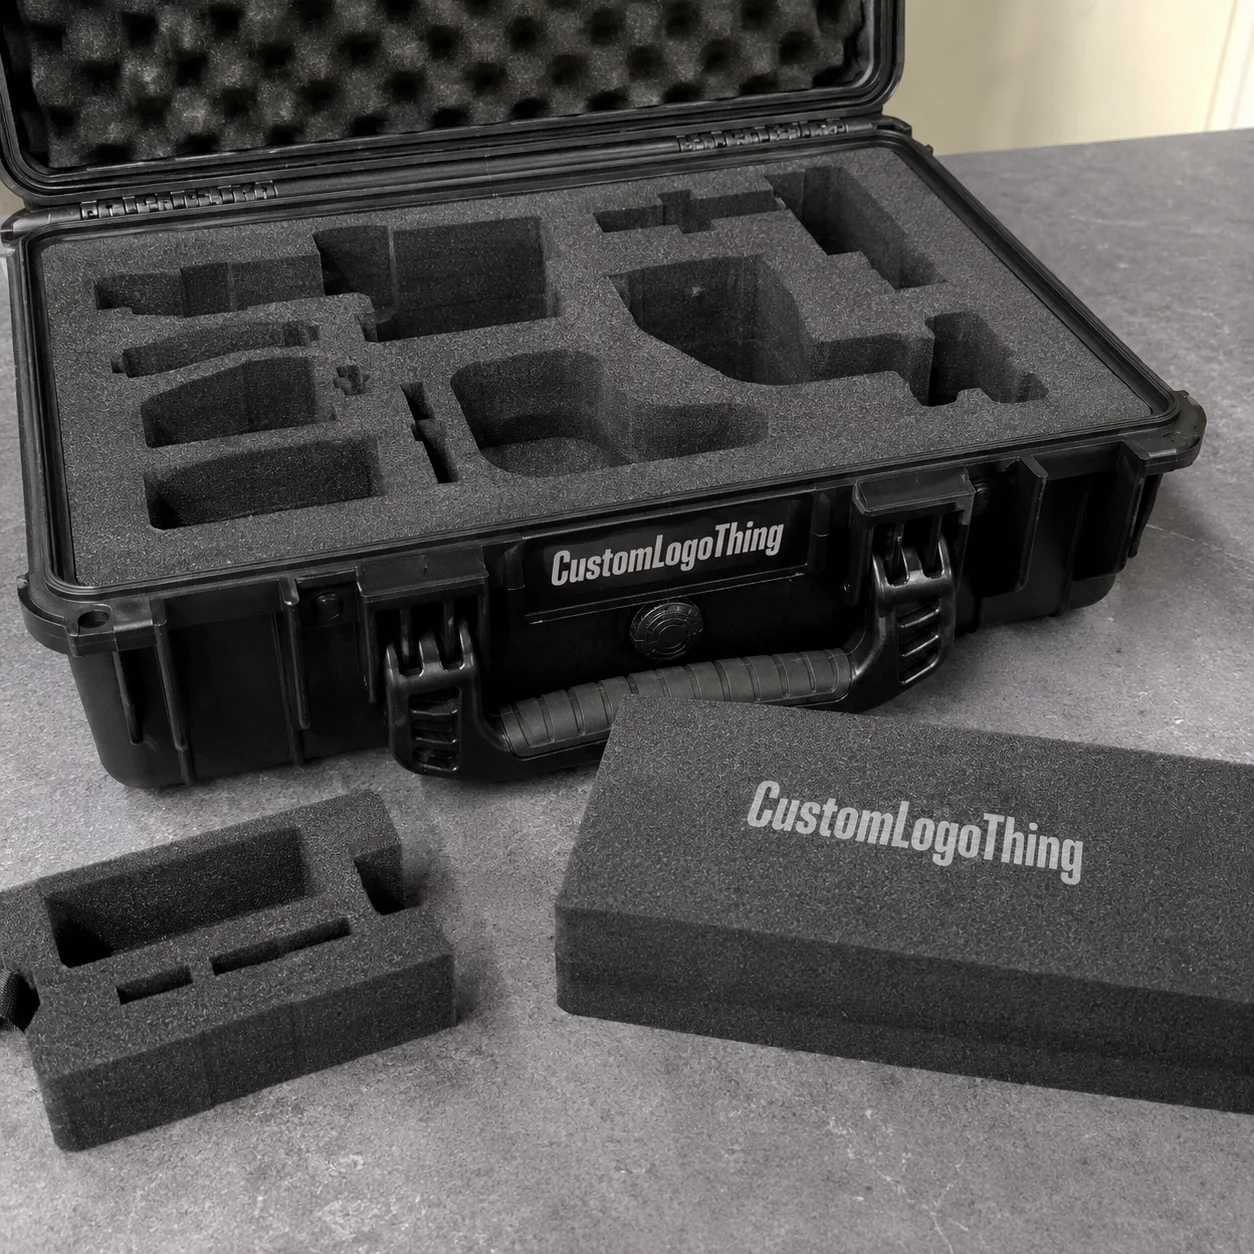
The basic design language includes cavities, finger notches, relief cuts, layered builds, pull tabs, lid foam, bottom pads, and shadow-board layouts. These are not decorative details. A finger notch gives the hand a place to enter the pocket. A relief cut protects a protruding connector or adjustment knob. Lid foam can reduce upward movement when the case is closed. A color top sheet can turn the insert into a fast inventory-control tool.
A simple single-layer insert might have five or six pockets cut through a 2-inch sheet of polyethylene foam. That can work well for flat tools or uniform items. More complex kits often need multiple layers. A 3.5-inch-tall meter, a 1-inch cable reel, and a fragile lens cap should not all sit at the same depth just because they share the same case.
Layered foam allows different cavities to stop at different depths, so each item sits proud enough to grab while still being supported underneath. The goal is not maximum tightness. The goal is controlled movement, easy access, and protection where the item actually needs it.
Compression fit is where experience shows. Foam can be designed to slightly grip the item, but the allowance depends on foam density, item weight, finish, and use frequency. Heavy steel tools may need denser foam, deeper pockets, reinforced corners, and wider walls between cavities. Gloss-coated parts may need a softer touch or more clearance to reduce scuffing. A high-cycle service kit may need conservative spacing because thin foam walls fatigue and tear over time.
Cut files can come from CAD drawings, physical samples, 3D scans, digital outlines, or carefully measured photographs. For rectangular items, hand measurements may be enough. For molded grips, curved optics, irregular assemblies, and products with fragile protrusions, physical samples or scan data often save revision time.
Good packaging design accounts for more than shape. It considers fast visual inventory, correct orientation, easy removal, lid clearance, weight distribution, and repeatable repacking after the fifth job of the day.
Foam Materials, Density, and Fit Decisions That Matter
Foam is not one material. It is a family of materials with different cell structures, firmness levels, surface feel, moisture resistance, and service life. The wrong foam can make a clean-looking insert fail early. The right foam can keep working for years in a truck, lab, jobsite, clean assembly area, or sales environment.
| Foam Type | Typical Use | Buyer Notes |
|---|---|---|
| Polyethylene foam | Field kits, tools, instruments, rugged transport | Durable, moisture resistant, good load support, often economical for repeat use |
| EVA foam | Presentation kits, premium inserts, branded sales cases | Firm feel, clean edge appearance, useful for crisp layouts and visual organization |
| Polyurethane foam | Lightweight delicate items, cushioning pads, lid foam | Softer cushioning, but more likely to tear or deform under heavy tools or frequent use |
| Cross-linked polyethylene | Cleaner presentation, durable protection, specialty applications | Fine cell structure, smooth finish, usually higher cost than basic polyethylene |
| Anti-static or conductive foam | Electronics, sensors, circuit boards, test equipment | Helps manage electrostatic discharge concerns when specified correctly |
Polyethylene foam is a strong default for many Pelican case inserts because it resists moisture, supports weight well, and holds up to repeated handling. For tool kits and field instruments, densities around 1.7 to 4.0 lb/ft³ are common starting points, though the right density depends on weight distribution, cavity geometry, and how often the kit is used.
Denser is not automatically better. Too firm, and the insert can scuff sensitive finishes or make removal harder. Too soft, and pockets loosen, corners tear, or heavy items gradually sink into the foam.
EVA foam has a cleaner, firmer, more premium feel. It is often used for executive demo kits, branded packaging programs, sales cases, and product packaging where the edge quality is part of the visual message. Laminated EVA with a contrasting top layer can create a shadow-board effect, helping users identify missing pieces quickly.
Polyurethane foam is softer and cushions delicate items nicely, especially as lid foam or light-duty cradling material. It deserves caution in heavy hand-tool kits or high-cycle service cases. Under repeated concentrated loads, it can compress, tear, and lose shape faster than polyethylene.
Electronics need a more careful specification. Anti-static or conductive foam may be needed for circuit boards, sensors, meters, or components sensitive to electrostatic discharge. If electrostatic control is part of the requirement, ask for the foam grade and handling assumptions up front. “Black foam” does not automatically mean ESD-safe.
For broader packaging guidance, standards groups such as ISTA are useful references for transport testing principles, even though every case project still needs its own risk review.
Thickness and cavity depth also matter. A 3-inch insert is not better if the user cannot grab the part. A dense layout is not better if it leaves only 3 millimeters of foam between heavy items. Color, lamination, and contrast layers can help with inventory control, but they should support the workflow rather than dress up a weak layout.
Process and Timeline: From Gear Measurements to Finished Inserts
The cutting step is rarely the slowest part of a custom foam job. The schedule usually depends on how complete and accurate the starting information is. A confirmed case model, finalized gear list, clean measurements, and quick proof approval can move a project along smoothly. Missing dimensions, late item changes, and uncertain case models do the opposite.
A typical process looks like this:
- Confirm the exact Pelican case model or internal dimensions.
- Identify every item going into the kit, including accessories that stay attached.
- Measure, photograph, scan, trace, or send physical samples of the gear.
- Choose the foam material, thickness, color, and layer strategy.
- Build the layout and create a proof for review.
- Approve a drawing, prototype, or sample depending on complexity.
- Cut production inserts, inspect fit, pack, and ship.
The information a manufacturer needs is practical: case model number, item length, width, height, weight, photos from multiple angles, quantity, branding needs, and usage environment. Straight-down photos are helpful, but side photos are often just as valuable because many products have uneven heights, handles, feet, knobs, lens hoods, caps, or cable strain reliefs.
Physical samples are worth sending when a few millimeters matter. Irregular tools, molded grips, curved optics, fragile medical assemblies, and products with odd center-of-gravity issues are good examples. If the part is expensive or difficult to ship, accurate CAD data or 3D scan files can help, but the design team still needs to understand which surfaces can be compressed and which should float freely.
Proofing is not a formality. A 2D drawing can show cavity placement, spacing, and orientation. A more complex layered insert may need depth callouts, stack-up notes, lid clearance notes, or prototype review before production. For a simple layout, the proof may be straightforward. For a dense kit with 25 pieces and multiple depths, one extra review round is cheaper than cutting the wrong stack.
Typical timelines vary by design queue, material availability, sampling needs, cutting method, order quantity, and shipping method. As a planning range, simple foam-only inserts may move through design and production in about 7 to 15 business days after clean approval. Sampled or specialty-material projects may need 3 to 6 weeks.
That range is not a promise. It is a practical way to schedule. Accurate measurements and a frozen gear list shorten lead time more reliably than trying to rush the cutter after approval.
Cost and Pricing Factors for Custom Case Foam
Pricing for pelican case Custom Foam Inserts is usually built from design time, material type, foam thickness, number of layers, cutting complexity, order quantity, finishing, and packing or kitting requirements. One large rectangle with five tool pockets is a different job from a dense multi-layer insert with 40 cavities, tight tolerances, finger pulls, logo engraving, and laminated color sheets.
The first insert carries the most engineering work. Someone has to create the cut file, define the depth strategy, nest the parts efficiently on foam sheets, prepare the approval drawing, and think through how items will be removed by hand. That setup and programming time is spread across the order quantity.
A one-piece prototype may look expensive per unit because it carries the full design burden. A repeat order of 100 inserts can often reduce the unit cost because the file already exists and production can be planned more efficiently.
As a broad estimating guide, simple replacement inserts for common case sizes may land around $45 to $150 each in small quantities. Complex multi-layer assemblies can run $150 to $400 or more per insert depending on size, material, finishing, tolerance needs, and approval requirements. Prototype or design charges may be separate, especially for irregular gear.
Larger batches can change the math substantially. If repeat demand is likely, quote several quantities, such as 10, 50, and 100 pieces, instead of assuming the first small-run price represents the long-term cost.
Material drives cost too. Basic polyethylene is often more economical than premium EVA, laminated color builds, cross-linked polyethylene, anti-static foam, or specialty grades. Add-ons also affect the quote: logo engraving, adhesive lamination, labels, individual bagging, assembly, drop testing support, case-and-foam kitting, or integration with custom printed boxes for outer shipping or retail packaging.
Testing may belong in the discussion for high-value gear. A case insert is not automatically qualified because it looks snug. Some buyers run internal drop checks, while others reference formal distribution testing concepts from organizations like ISTA or environmental packaging considerations from the EPA Sustainable Materials Management program. The right level depends on product value, shipping method, liability, and how the case will actually be handled.
For a useful quote, provide the case model, quantity, item list, photos, known foam preference, delivery target, and whether you need foam only or complete case-and-foam assembly. If existing product packaging, sales collateral, labels, chargers, or branded components must fit in the case, include those dimensions too.
Common Mistakes That Make Inserts Hard to Use
The biggest mistake is designing only around the outline of the item instead of designing around the hand that removes and replaces it. A beautiful CAD layout can still be miserable in the field if every pocket is too tight, too deep, or blocked by neighboring parts.
Pockets that are too tight slow people down and can damage delicate finishes. Pockets that are too shallow let products ride above the foam and hit the lid. Pockets that are too deep protect the item but make removal awkward, especially for flat tools, batteries, and small accessories.
A well-placed thumb scoop or finger notch often decides whether a kit gets used correctly. Without it, people start repacking the case any way they can.
Heavy items need room. Placing a dense metal tool too close to a thin foam wall, case edge, hinge side, or latch side can create a failure point. Repeated handling loads the same area again and again. After enough cycles, the wall can split or the pocket can loosen. More material between cavities may look less efficient on screen, but it often gives the insert a longer service life.
Cramming too much into one case is another common problem. Dense layouts can look impressive during approval, then become frustrating once cables, batteries, and small accessories start crossing paths. Inventory is harder when every cavity looks similar. It is also easier to put a similar-looking component in the wrong pocket if orientation is not obvious.
Foam selection can go wrong in both directions. Soft foam under heavy tools can tear or take a set. Hard foam around polished optics, coated parts, or painted samples can create scuffs over time. If the kit travels often, small rubbing motions during vibration matter. For expensive products, one scuffed surface can cost more than the insert upgrade would have.
Late changes are painful. Changing the gear list after proof approval can restart layout work, affect material usage, increase cost, and delay production. Freeze the kit before ordering. If a future accessory is likely, say so early; the insert can sometimes be designed with a planned blank pocket or modular section.
Next Steps Before You Request a Quote
Before asking for pricing, empty the kit onto a clean table and confirm the exact Pelican case model. Remove anything that does not actually need to travel in the case. Then group the remaining items by how they are used: setup tools, primary device, power, cables, spare parts, paperwork, calibration pieces, or safety accessories.
Workflow should drive the layout, not just the outline of the foam.
Take one straight-down photo of the full proposed layout with a ruler or tape measure visible. Then photograph each item individually from the top and side. Capture the maximum length, width, and height, including caps, knobs, handles, cables, covers, and protrusions that remain attached during transport. Weights are useful too, especially for heavy tools, batteries, or instruments with uneven load distribution.
- Confirm the case model and internal dimensions if available.
- List every item, including accessories, cables, and protective covers.
- Mark fragile areas, polished surfaces, connectors, lenses, and handles.
- Identify high-use items that should be easiest to grab.
- Decide whether the goal is protection, presentation, inventory speed, ESD safety, cleanliness, or lowest practical cost.
- Note quantity, delivery target, branding needs, and whether you need foam only or full case assembly.
If the case supports a broader sales or launch program, align the insert with the larger package branding system, including labels, inserts, sleeves, or outer cartons. You can also review related Case Studies to think through how protection, presentation, and workflow fit together across different packaging formats.
The best Pelican case Custom Foam Inserts tend to disappear after the first use. The gear drops into the right place. The user can see what is missing. Nothing rattles. The case closes without a fight. That outcome depends less on a dramatic material choice and more on careful measurement, honest spacing, realistic tolerances, and a layout built for the way the kit is handled outside the conference room.
FAQ
How do I measure gear for Pelican case foam inserts?
Measure the maximum length, width, and height of each item, including knobs, handles, caps, cables, protective covers, and any accessories that stay attached during transport. Take straight-down photos with a ruler in frame, plus side photos for uneven heights, curved profiles, or protruding parts. For high-value or irregular gear, physical samples or 3D scan data may produce a more accurate cavity than hand measurements alone.
What foam is best for custom Pelican case inserts?
Polyethylene foam is a strong default for durable field cases, tools, and instruments because it resists moisture and supports heavier loads. EVA is often chosen for a firmer, cleaner, more presentation-grade insert. Anti-static or conductive foam should be considered for sensitive electronics, circuit boards, sensors, and test equipment where electrostatic discharge is a concern.
How much do pelican case custom foam inserts cost?
Cost depends on foam material, thickness, number of layers, cutting complexity, quantity, and whether design or sampling is included. Simple layouts may cost around $45 to $150 each in small quantities, while complex multi-layer assemblies can reach $150 to $400 or more per insert. Larger quantities usually reduce the unit cost because design and setup time are spread across more inserts.
Can custom foam inserts be made for an existing Pelican case?
Yes, inserts can usually be made for an existing case if the exact case model or internal dimensions are known. The manufacturer may ask for photos, measurements, or the physical case if the model is older, modified, or uncertain. Existing pick-and-pluck foam should be removed before fitting a properly cut replacement insert.
How long does it take to make custom foam for a Pelican case?
Lead time depends on design complexity, material availability, proof approval, order quantity, and shipping requirements. Simple projects may take about 7 to 15 business days after approval, while sampled or specialty-material projects may need 3 to 6 weeks. Revisions, missing dimensions, specialty materials, or late changes to the kit can extend the timeline.


