A Pelican case can survive a punishing trip in a truck, aircraft hold, warehouse cage, or service van. The shell is the obvious hero: latches, gasket, molded body, pressure valve, wheels on some models. But the shell does not stop a camera lens, torque wrench, optic, controller, medical device, or sales sample from shifting inside the box.
That is the job of pelican Custom Foam Inserts. They turn a tough empty case into a controlled packaging system: every part has a home, every cavity has a reason, and the person packing the kit does not have to guess where anything belongs.
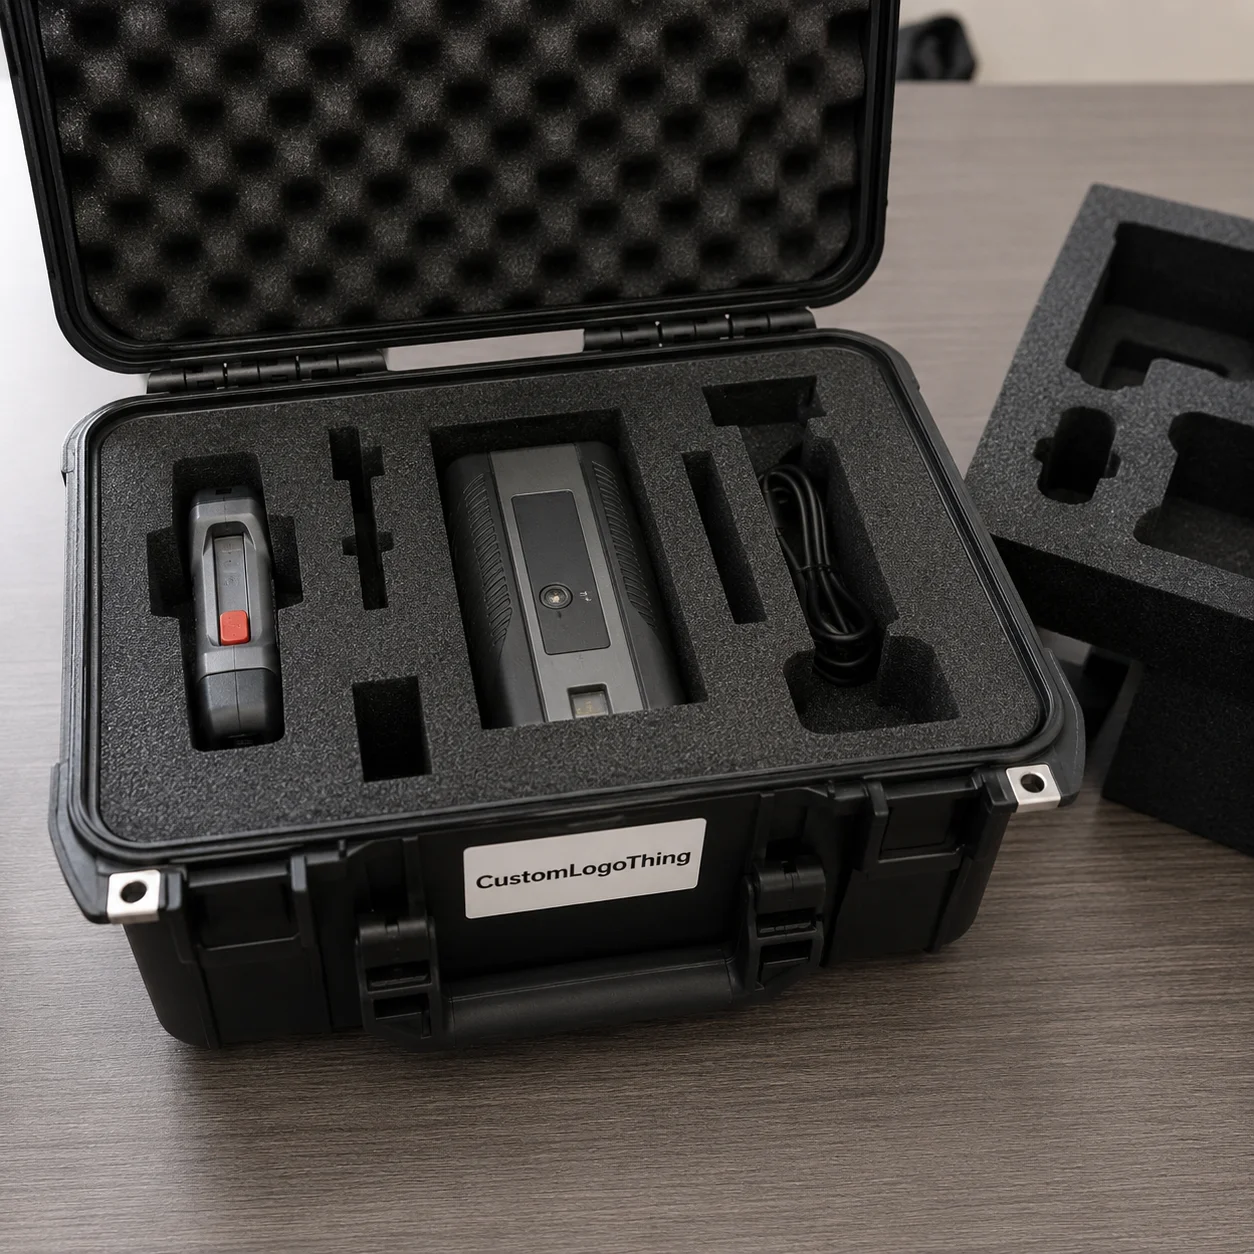
What Pelican Custom Foam Inserts Actually Do
Pelican Custom Foam Inserts are cut for a specific Pelican case model and a specific set of contents. A small handheld case, a rolling transport case, and a deep equipment case may all use foam, but they do not use it the same way. The insert has to match the internal case geometry first, then the shape, weight, fragility, and handling pattern of the gear.
The common mistake is thinking of foam as “holes in padding.” It is more active than that. Foam controls movement, separates parts, prevents item-to-item contact, makes packing repeatable, and often improves the reveal when a buyer, inspector, field technician, or sales rep opens the lid. The shell provides the hard barrier. The insert manages position.
Several construction methods are used, and none is automatically best. Pick-and-pluck foam is the off-the-shelf option. It is useful for changing kits, prototypes, and tight budgets, but the cubes can loosen after repeated use, especially around heavy or sharp-edged items. Layered die-cut foam can suit repeat shapes and larger quantities. CNC-routed foam allows clean cavities, controlled depths, finger scoops, channels, and pockets. Waterjet-cut foam can produce precise profiles across many foam grades. Laminated multi-layer inserts make it possible to combine densities, colors, and depths for better access and inventory control.
Common uses include tools, electronics, optics, cameras, demo kits, medical devices, field instruments, trade show samples, and sales kits. Some buyers need rough-service protection above all else. Others need the open case to look almost like branded packaging because it supports a product demonstration. Both goals are valid. They simply lead to different choices.
Practical callout: A good insert is not merely snug. It is quick to pack, easy to inspect, and durable enough for the number of trips the kit is expected to make.
The useful design work happens in the details: foam grade, wall thickness, cavity depth, finger access, lid pressure, labeling, and whether the layout still makes sense after the fiftieth repack.
How Case Foam Protects Gear in Transit
Foam protects by compressing in a controlled way. Simple sentence. Complicated result.
If a cavity is too large, the item gains speed before it hits the foam wall. If the wall is too thin, energy transfers through the foam and into the next item. If the density is wrong, the part may bottom out during impact or become difficult to remove because the pocket grips too hard. The failure can look small at first: a scuffed coating, a bent connector, a lens cap pressed too tightly, a cracked plastic tab. Multiply that by repeated trips, and the insert starts to matter as much as the case.
For many tool and equipment kits, the goal is not pillow-soft cushioning. It is controlled restraint. Snug pockets stop sliding, reduce corner impact, prevent abrasion, and keep metal tools away from coated surfaces, screens, glass, and electronics. A practical layout often leaves at least 3/8 inch to 1 inch of foam between cavities, depending on item weight, case size, foam type, and expected handling. Heavy parts need more structure than lightweight samples.
Material selection changes the result. Polyurethane foam can feel soft and forgiving, but it may tear or wear faster under sharp tools or high-frequency removals. Polyethylene foam is firmer, tougher, and common for industrial equipment inserts. EVA foam has a dense, clean appearance and good durability, which makes it popular for premium kits and presentation cases. Cross-linked polyethylene has a finer cell structure and a more polished surface. For electronics, anti-static or conductive foam may be required, especially for exposed boards, sensors, or sensitive components.
Clearance is one of the quiet tests of competence. Too tight, and the user fights the foam every time. That can stress knobs, connectors, glass, molded tabs, or calibrated surfaces. Too loose, and the item rattles. For hand-packed kits, designers often add finger notches, pull tabs, relief cuts, or routed scoops so parts can be removed without prying at the foam wall. If users wear gloves, those access features need to grow.
Repeat use changes the specification. A case that ships once to a trade show is not the same project as a service kit opened 20 times a week. If the kit is mission-critical, it may be worth discussing test methods from groups such as the International Safe Transit Association, even when formal lab testing is not required. ISTA-style thinking pushes the right questions: drop orientation, vibration, compression, stack pressure, and the real handling path from packout to use.
Key Fit Factors: Case Model, Load, and Finish
Start with the case model. Always.
Pelican interiors vary by series, footprint, lid depth, base depth, wheel wells, molded ribs, handle areas, and corner geometry. Two cases that look similar online may have different usable foam space once molded features and lid interference are considered. A part number is better than a description such as “medium Pelican case.”
The contents list comes next. That means item dimensions, weights, fragile zones, switches, protruding handles, cable exits, chargers, spare batteries, documents, accessories, and preferred packing orientation. A caliper helps for small instruments. A tape measure may be enough for larger tools. For irregular parts, photos from the top, side, front, and angled views usually tell more than one straight-on image.
Cavity depth matters as much as outline shape. One layer may work for flat tools, compact meters, small optics, or molded samples. A bottom pad can add cushioning under heavy parts. A lid pad can limit vertical movement, but it must be used carefully. Too much top pressure can press buttons, rub coated surfaces, or load a fragile display. Multi-layer construction is useful when small accessories need to sit above or below larger components.
Real objects rarely behave like rectangles. Rubber grips bulge. Molded housings have draft angles. Hand tools have curves and balance points. Cables change shape depending on how they are coiled. Rounded corners may require a traced template, a sample product, or a digital drawing. For tight-tolerance pockets, a physical sample is often the cleanest route because the insert maker can check fit instead of interpreting a flat measurement.
Finish choices range from plain black foam to presentation-grade builds with color-contrasting layers, branded top sheets, engraved labels, routed finger scoops, or printed cavity markers. A bright underlayer can show missing parts immediately. A labeled pocket can reduce packing errors. A logo treatment can support package branding when the case is part of a sales kit rather than only a shipping tool.
| Insert Style | Best Fit | Typical Strength | Common Tradeoff |
|---|---|---|---|
| Pick-and-pluck foam | Temporary kits, changing tools, early prototypes | Low starting cost and fast setup | Can loosen, tear, or look rough after repeated use |
| CNC-routed polyethylene | Tools, field equipment, demo kits | Durable pockets with controlled depth | Requires accurate layout approval before cutting |
| EVA laminated foam | Premium presentation, sales samples, optics | Clean finish, firm support, color contrast | Higher material and finishing cost |
| Anti-static foam insert | Electronics, sensors, circuit boards | Helps manage electrostatic discharge risk | Material choice depends on the actual ESD requirement |
A strong insert balances four things: protection, packing speed, inventory visibility, and visual impression. If the case opens in front of a customer, it becomes part of the product packaging experience, not just a protective accessory. Teams building a larger launch kit may also coordinate foam with related Custom Packaging Products, such as custom printed boxes, sleeves, cartons, or companion packaging.
Process and Timeline from Measurements to Finished Foam
The workflow usually begins with the Pelican case model and a complete item list. From there, the insert maker reviews dimensions, weights, photos, and use conditions, then recommends a foam type and layout direction. A drawing or digital layout is prepared for approval. For complex or high-value kits, a prototype or first article may be cut before full production. Finished units are cut, assembled if laminated, inspected, packed, and shipped.
Good input saves days. Provide the case part number, item list, photos from several angles, length-width-height measurements, approximate weights, quantity, branding needs, shipping destination, and deadline. If an item has a delicate lens, screen, switch, connector, sharp edge, or calibrated surface, mark it clearly. Those zones may need relief, extra clearance, or a different orientation.
A physical sample is not always required. Simple rectangular parts, standard tools, and flat accessories can often be designed from accurate measurements and clear photos. Samples become much more useful for irregular housings, expensive instruments, fragile components, tight nesting, molded grips, and kits with many small accessories. If sending every part is not practical, send the hardest-to-measure items first.
Digital layout approval deserves attention. Should the meter face upward or sideways? Does the charger need to be visible, or can it sit below a tray? Is there label space next to each cavity? Can a gloved hand pull out the heaviest tool? Will a missing part be obvious during inventory checks? These choices affect daily use long after the cut file is approved.
Timeline depends on design complexity, sample availability, material selection, revision rounds, quantity, and finishing steps. A straightforward insert with complete measurements moves faster than a multi-layer kit with 30 cavities, color lamination, labels, and late item changes. Many custom foam projects fall into a practical range of several business days for layout and proofing, followed by production time based on queue, quantity, and materials. Specialty foam, anti-static material, unusual colors, or branded finishing can add sourcing time.
Speed comes from discipline. Freeze the item list early. Label measurements clearly. Approve drawings promptly. Avoid changing batteries, chargers, cables, or accessory count after cut files are released. One added power adapter can shift an entire layout, especially in a compact case with tight spacing.
Cost and Pricing Factors for Custom Foam Inserts
Pricing for pelican Custom Foam Inserts usually reflects design time, foam material, thickness, number of layers, cutting method, quantity, finishing, and whether a prototype is needed. A two-pocket insert for one instrument and one charger is not the same project as a technical field kit with 30 cavities, lift-out trays, contrast layers, and labels, even if both fit the same case model.
Material has a measurable effect. Higher-density polyethylene generally costs more than basic soft foam, but it may last longer under heavy tools. EVA gives a cleaner presentation and firmer feel, often at a higher price point. Cross-linked polyethylene improves appearance and surface quality. Anti-static or conductive foam adds cost because the material must meet a specific performance need. Specialty colors and laminated top sheets can raise both material and labor.
Setup matters as much as sheet cost. Short runs carry more design and programming cost per insert because the drawing, toolpath, and first article work are spread over fewer pieces. Repeat orders may improve because cut files are saved and the production path is known, though foam pricing and availability can still change. Minimum order quantities depend on material sourcing, sheet yield, cutting setup, and production efficiency. The right MOQ should match how the kits are actually used, not simply chase the lowest unit price.
| Cost Driver | Lower-Cost Direction | Higher-Cost Direction | Buyer Tip |
|---|---|---|---|
| Foam type | Standard polyethylene or polyurethane | EVA, cross-linked, anti-static, specialty colors | Choose by load and use frequency, not color alone |
| Cavity count | Few simple pockets | Many tight pockets with varied depths | Group small accessories where individual pockets add little value |
| Layers | Single layer plus lid pad | Laminated stack, lift-out trays, color reveal | Use layers where they improve access, protection, or inspection |
| Quantity | Larger repeat run | One-off or very short run | Ask whether cut files are saved for reorders |
| Finish | Plain foam | Labels, engraving, logo layer, presentation layout | Match finish to whether customers will see the kit |
Price ranges vary widely because the inserts vary widely. A simple replacement-style insert may be a modest add-on to the case. A complex laminated build with routed depths, labels, color reveal, and first-article review can cost several times more. The most reliable quote starts with the case model, quantity, item dimensions, photos, desired foam performance, delivery location, deadline, and any labeling or branding requirements.
Sustainability questions come up more often now, especially for repeat programs. Foam is not as straightforward to recycle as paperboard, so buyers should be realistic about durability, expected service life, and replacement frequency. For paper-based companion packaging, resources from the Forest Stewardship Council can help teams understand responsible sourcing claims. For foam inserts, the lower-waste answer is often damage prevention: Choose the Right case size, avoid overbuilding, and make the insert durable enough that it does not need frequent replacement.
Common Mistakes That Lead to Loose or Crushed Gear
The first mistake is tracing items loosely by hand and treating the sketch like a production drawing. A rough outline misses rounded edges, rubber overmold, removable parts, cable strain reliefs, and the way a user actually grabs the item. A marker trace can help start the conversation, but it should not replace measured dimensions or a checked layout.
The second mistake is choosing foam by color or softness alone. Soft feels protective in the hand, yet it may compress too easily under a heavy tool. Firm foam can look durable, but if the cavity is too tight around a fragile item, it can load the wrong surface. Density, cell structure, thickness, and item weight have to work together.
Spacing is another common failure point. Thin foam walls between heavy items can tear, fold, or transfer impact. As a practical rule, the heavier the item and the rougher the handling, the more foam web you want between pockets and around the case perimeter. Small accessories can sit closer together. A wrench, battery pack, optic, or meter needs more room.
Lid contact gets ignored more than it should. Tall items may rub against lid foam. Toggle switches may get pressed. Lens caps can take pressure. Delicate faces can be loaded during transport if the top pad is too aggressive. Checking total stack height against base and lid depth is a basic quality-control step, but it prevents a surprising number of field complaints.
Layout mistakes can be just as costly as material mistakes. Frequently used accessories should not be buried under a tray unless there is a strong reason. Heavy items should not sit near weak edges if the case has room to move them inward. Pockets should not be so tight that users damage the foam during removal. A clean-looking layout on screen still has to work for hands, gloves, time pressure, and imperfect repacking.
Late kit changes cause avoidable pain. Add one charger after approval, and the whole arrangement may shift. Add a spare battery, and the lid clearance may change. Swap a cable for a longer one, and the coil pocket may no longer fit. For custom Pelican case foam, the right time to finalize the kit is before the drawing is approved, not after the cutting file is released.
Build a Spec That Gets Quoted Cleanly
A clean quote starts with a clean spec. Confirm the Pelican case model first, then count every item in the kit. Photograph each item from several angles. Measure length, width, and height, and note weight where it affects cushioning or wall spacing. Mark fragile areas such as screens, lenses, connectors, calibrated surfaces, sharp tips, and protruding switches.
Next, group items by priority. Separate must-protect items from small accessories, documents, chargers, spare parts, cables, consumables, and anything likely to change later. If a part is handled every day, it deserves easier access than a backup cable used once a month. If a missing item would create a field failure, consider a contrasting underlayer or labeled pocket so the absence is obvious.
Decide the performance goal before requesting a quote. Is the case mainly for rugged field protection? Clean sales presentation? Inventory control? Fast technician access? A mix of all four? The answer affects foam density, cavity spacing, layer structure, color, and finish. A sales demo kit may justify a polished EVA top layer and logo treatment. A service kit may be better served by tough polyethylene, larger finger scoops, and obvious missing-tool visibility.
- Case details: Pelican model number, interior depth, and whether the case already has lid foam or bottom foam.
- Item details: Complete list, dimensions, weights, photos, fragile zones, and preferred orientation.
- Use details: Shipping frequency, field handling, glove use, expected trip count, and whether customers see the open case.
- Finish details: Color contrast, logo treatment, labeled cavities, lift-out trays, removable layers, and room for future accessories.
- Timing details: Quantity, deadline, shipping destination, sample availability, and approval contact.
Review the first layout slowly. Check access, spacing, orientation, lid clearance, empty pocket visibility, and whether the packing order feels natural. If the case supports a broader product launch or branded packaging program, align the insert with outer cartons, sleeves, or other Custom Packaging Products so the kit feels intentional instead of assembled from unrelated parts.
The fastest path to reliable pelican Custom Foam Inserts is not complicated: clear case model, complete item list, honest use conditions, accurate measurements, and prompt approval on the final layout. Get those pieces right, and the case stops being just a rugged box. It becomes a repeatable protection system that keeps gear organized, presentable, and ready for the next job.
FAQs
How do I know which foam is best for Pelican case inserts?
Match the foam to item weight, fragility, and use frequency rather than appearance alone. Polyethylene and EVA are common for durable tool and equipment inserts, while softer polyurethane may suit lighter cushioning or presentation needs. For electronics, confirm whether anti-static or conductive foam is required.
Can pelican custom foam inserts be made without sending physical samples?
Yes, many simple projects can start from accurate dimensions, photos, case model details, and a complete item list. Physical samples are more helpful for irregular shapes, expensive equipment, tight tolerances, or kits with many small accessories. A digital layout approval step helps catch orientation and access issues before cutting.
What affects the cost of custom foam inserts for Pelican cases?
Main cost drivers include foam type, thickness, number of layers, cavity complexity, quantity, cutting method, and finishing details. Short runs usually carry more setup cost per insert than larger repeat orders. Accurate dimensions and a stable item list help avoid redesign costs.
How long does it take to produce Pelican foam inserts?
Timeline depends on design complexity, sample needs, material availability, approval speed, quantity, and finishing requirements. Simple layouts move faster when the case model, measurements, and photos are complete from the start. Late changes after layout approval can extend turnaround because cut files may need revision.
Are custom Pelican case foam inserts better than pick-and-pluck foam?
Custom inserts usually provide cleaner fit, better long-term durability, improved presentation, and more repeatable packing. Pick-and-pluck foam can work for temporary, low-cost, or changing setups, but it may loosen or tear with repeated use. For valuable equipment, field kits, or customer-facing samples, custom-cut foam is usually the more controlled option.


