Pet treat rigid boxes material guide: why first impressions mislead
The pet treat Rigid Boxes Material guide usually starts in the wrong place. Buyers look at the print, the foil, or the shelf sparkle, then assume the package is strong because it feels expensive on day one. That shortcut causes trouble later. The part that carries the most weight is the material stack underneath the graphics, not the artwork sitting on top of it.
I’ve sat through enough packaging reviews to see this pattern play out: a sample looks polished under studio lighting, everyone nods, and then the first production run reveals corner wear, a lid that loosens after storage, or an insert that lets the product wander around like it owns the place. A rigid box can deliver a premium unboxing moment and still fail in the real world if the wrap scuffs easily, the glue line weakens under humidity, or the insert lets the treats shift during handling.
Pet products add a second layer of pressure. Treats are sold on trust. Shoppers are not only asking, "Does this look good?" They are also wondering, sometimes without saying it out loud, "Will this stay clean, intact, and believable after it sits on a shelf, rides in a delivery truck, or gets handled by warehouse teams?" The packaging does a lot of quiet work before anyone opens the lid.
That is why the Pet Treat Rigid Boxes material guide matters as much as print design. A biscuit box, a jerky assortment, and a soft-chew gift set do not stress packaging in the same way. One may need stiffness because of weight. Another may need stronger resistance to aroma migration. Another may need an insert that keeps individually wrapped pieces from crashing around inside the cavity. The outer look can hide a weak structure for a while, but not forever.
Here is the core question this guide answers: which materials protect the product, support the brand story, and stay inside budget without turning the box into overbuilt excess? That is a practical question, not a theoretical one. Most buyers do not need the heaviest board available. They need a package that matches the product, the channel, and the promise. If you are comparing specs now, a quick scan of Custom Packaging Products early in the process can clarify which structures even belong in the conversation.
One more point often gets missed. Shelf life is not only a formula issue. Package choice affects how much humidity, odor, grease, and handling the product endures before the consumer opens it. A rigid box is usually secondary packaging, not the primary barrier, yet it still influences perceived freshness and real protection. That is where this pet treat Rigid Boxes Material guide earns its keep: it separates visual polish from structural performance.
A premium-looking pet box that cannot tolerate humidity or repeated handling is not premium. It is merely decorated.
After reading this guide, you will be able to compare board, wrap, and insert choices with more confidence, read a quote without missing hidden cost drivers, and ask suppliers sharper questions. That is a better starting point than choosing a finish because it photographs well.
How the material stack works in pet treat rigid boxes
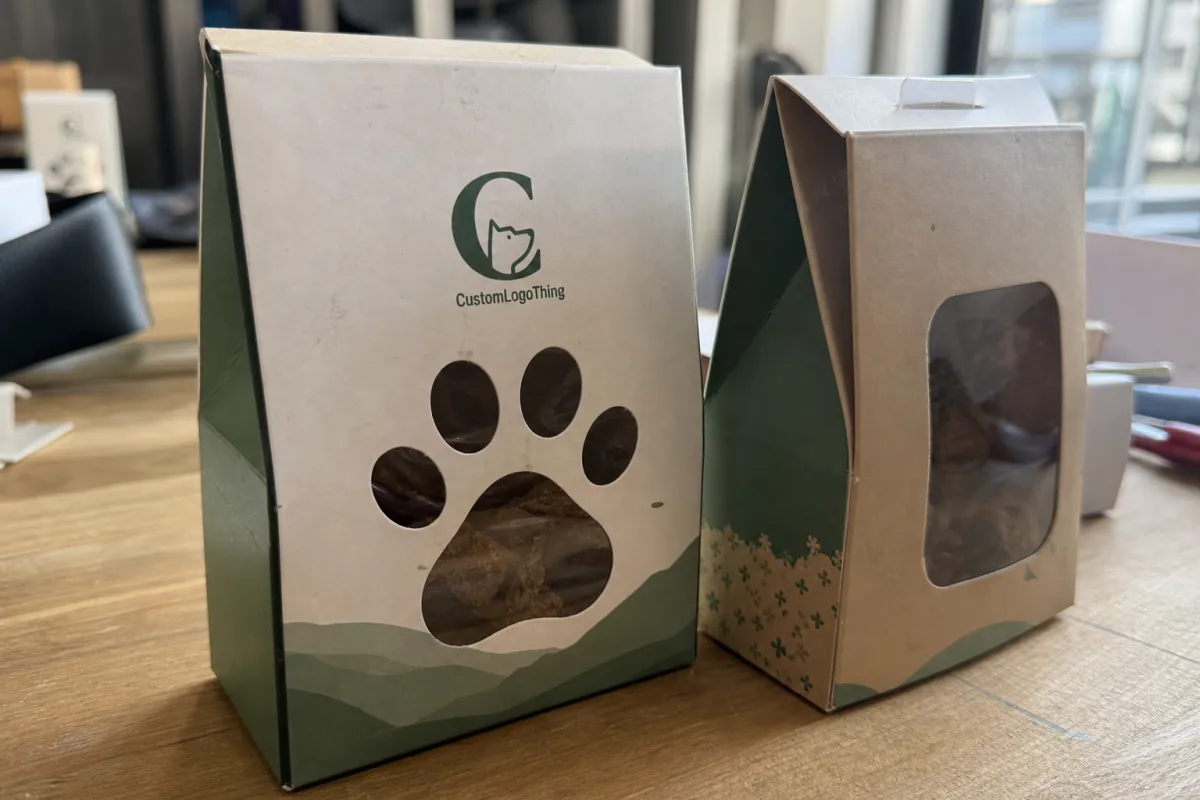
To understand the pet treat Rigid Boxes Material guide, start with the stack itself. A rigid box is not one material. It is a system. The core is usually a thick paperboard or greyboard shell, often in the 1.5 mm to 3.0 mm range depending on size and load. Around that core sits an exterior wrap, which may be coated art paper, kraft paper, specialty textured paper, or another decorative stock. Inside, you may also have an insert, tray, liner, or cavity structure that keeps the treats positioned correctly.
The board creates the shape and stiffness. Thicker board usually means better crush resistance and cleaner edge definition, but it also adds weight and can push freight costs higher. A small retail box for bite-sized treats may do fine with a mid-weight board. A large subscription gift pack, especially one that is reused or shipped through multiple hands, may justify a heavier core. The point is not to buy the thickest option. The point is to Buy the Right one.
The wrap does more than decorate. It affects how sharp the print looks, how well the corners hold, how much scuffing appears in transit, and how the box feels in the hand. A glossy wrap can show fingerprints. A soft-touch finish can feel luxurious but may mark more easily if the packaging is stacked tightly or handled often. A kraft paper wrap can support an earthy, natural position, especially if the brand wants a recycled materials story that feels honest rather than overdesigned.
The insert matters just as much. For pet treats, insert design can be a quiet performance issue. A loose biscuit inside a large cavity can rattle and chip. Individual treat pockets can protect form and make the opening ritual feel cleaner. A flat paperboard tray can work for a pouch-based assortment. Molded pulp can be useful if the brand wants a lower-plastic direction and a more tactile reveal. Foam alternatives exist, but they are not the default choice for a brand that wants a recycled or biodegradable packaging message.
Think about the treat itself. Soft chews can compress and shed aroma. Jerky can carry grease. Crunchy biscuits can break and create dust. Seasonal assortments can combine several shapes, which means one cavity rarely solves the whole problem. The outer rigid shell does not need to do every job, but the shell, wrap, and insert need to act as one package system. That is the real lesson behind the pet treat rigid boxes material guide.
For buyers who want a structure that aligns with sourcing goals, ask whether the board is FSC certified and whether the fiber content includes post-consumer waste where the design allows it. Fiber-based structures can be a smart fit, but only if the adhesive, finish, and insert choice do not undermine the recycling story. If the treats will touch the inner surface, also ask about food-safe inks, coatings, and any migration limits that apply in your market. The pretty outer layer does not excuse a weak compliance answer.
One practical note that saves headaches: if the box is meant to carry aroma-heavy or oily treats, the outer look alone is not enough. You may need an inner pouch, liner, or barrier film inside the retail pack so the product does not stain the wrap or leak scent into nearby inventory. That kind of detail is boring on a spec sheet and absolutely essential in real life.
Pet treat rigid boxes material guide: board, wrap, and insert choices
This part of the pet treat rigid boxes material guide is where the numbers matter. Buyers tend to ask for "premium" packaging, but premium is not a specification. Board grade is. Wrap stock is. Insert construction is. Finish choice is. If those parts are not defined, quotes become fuzzy and the final box often drifts away from the expectation.
Here is a practical way to compare the common options:
| Component | Typical options | Best fit | Cost impact | Practical note |
|---|---|---|---|---|
| Board core | 1.5 mm, 2.0 mm, 2.5 mm greyboard | Small retail packs, mid-size cartons, gift sets | Low to medium | Heavier board improves stiffness, but not every treat box needs the thickest build |
| Exterior wrap | Coated art paper, kraft paper, textured paper | High-color graphics, natural positioning, premium tactile feel | Low to medium | Kraft paper supports an earthy look; coated paper usually prints sharper |
| Insert | Paperboard tray, molded pulp, cavity insert, divider card | Assortments, shaped treats, pouch sets, gift kits | Medium to high | Insert complexity often adds labor faster than buyers expect |
| Finish | Matte, gloss, anti-scuff, embossing, foil | Retail display, premium gifting, repeat handling | Low to high | Anti-scuff matte is often a safer choice than a delicate decorative finish |
Board choice should follow the product weight and the channel. Lightweight treat pouches do not need the same shell as a box that contains multiple rigid inserts or a dense assortment. A mid-weight board often gives the best balance for the most common pet treat ranges. If the format is large, reused, or displayed for a long time, stepping up the board can make sense. If the format is small and sold in a tight retail environment, excess board may only add cost and freight without improving the buyer's experience.
Wrap choice is where brand storytelling becomes visible. Coated art paper is a strong choice for clean graphics, precise color, and finishes like foil or embossing. Kraft paper helps brands project a more natural tone, which can fit treats marketed around simple ingredients or responsible sourcing. Textured papers can add depth, but they also bring risk if the texture traps dust or slows production. A good pet treat rigid boxes material guide should treat the wrap as a performance surface, not only a visual one.
Insert choice depends on how the treats are packed. For individual pieces, cavities keep the product from moving and create a neat reveal. For mixed assortments, dividers can preserve separation without excessive material use. For pouches or sachets, a flat support tray may be enough. Molded pulp is increasingly attractive because it can support recycled materials goals and reduce plastic content. Still, molded pulp is not automatically the right answer. It needs to fit the product geometry, the expected stacking pressure, and the moisture conditions.
Finishes deserve a hard look because the best-looking sample can become the worst-performing production run. Gloss can create strong shelf pop, but it may highlight scuffs. Soft-touch feels rich, yet it can mark during packing. Embossing adds tactility, but it also increases tooling and approval complexity. A light matte with anti-scuff protection is often a safer commercial choice than a finish that looks dramatic under studio lights and disappointing under warehouse conditions.
Sustainability is not a single switch. A box made from recycled materials can still be inefficient if it uses too much board or a complicated insert. A more modest structure built with FSC certified fiber can sometimes be the cleaner choice. If a buyer wants biodegradable packaging language, the entire system needs scrutiny: board, wrap, adhesive, liner, and any coating. An attractive label on the outside is not enough, and pretending otherwise is where a lot of good intentions get messy.
One more practical filter helps here: choose the lightest structure that still protects the product and carries the brand promise. In plain language, do not pay for stiffness you are not using. That approach keeps the pet treat rigid boxes material guide grounded in performance instead of trend pressure. It also reduces the chance of over-specifying the box just because it looks impressive in a sample room.
Process and timeline: sampling, approval, and production steps
A good pet treat rigid boxes material guide should also explain how the project moves from idea to finished goods. The fastest way to lose time is to treat sampling as a formality. It is not. Sampling is where you discover whether the board has enough rigidity, whether the wrap color matches the brand, whether the insert actually holds the product, and whether the closure feels clean after repeated opening.
The typical workflow starts with dimensions and product weight. Then comes structure selection. After that, the supplier builds a sample or dummy, often followed by a printed proof or a prototype depending on the complexity. Approval then moves through artwork, dieline checks, finish confirmation, and production scheduling. Clean, low-complexity projects can move in roughly 12-15 business days after final proof approval, while custom structures, specialty wraps, foil, or embossing often need more time.
Sampling deserves special attention because it catches the problems that can hide in a spec sheet. A box may look fine on screen and still fail because the corner wrap lifts, the lid fit is too tight, or the insert creates pressure points that crush delicate treats. If the box must travel in a corrugated cardboard master shipper, it is smart to confirm that the outer case and inner pack have been considered together. A strong retail box inside a weak shipper is still a weak system.
Timeline also depends on how many people need to approve the job. Packaging teams, compliance reviewers, marketing, and sometimes finance all want a say. One late change to the artwork can push the whole run, and one change to the insert can trigger a new sample. If the buyer side is fast, the project usually stays on track. If decisions are spread across too many people, the schedule stretches without the factory doing anything differently.
There is a reason standards matter. If the finished package needs to survive transport abuse, the outer shipper may be tested under protocols such as ISTA transit testing. That is not necessary for every retail pack, yet it remains a sensible reference point for teams who want fewer surprises in the distribution chain. The pet treat rigid boxes material guide is not only about appearance; it is about predictable performance from proof to pallet.
If a supplier tells you a complex build can ship as fast as a plain tuck carton, be cautious. Rigid boxes require assembly, wrapping, drying time, and more handling. Add hot stamping, specialty texture, or multiple insert parts, and the schedule grows naturally. There is no mystery in that. There is only physics, labor, and approval time.
It also helps to remember that a prototype is not just a prettier version of the final box. It is a decision tool. The goal is to learn something specific from each sample: does the lid feel secure, does the wrap hold at the corners, does the insert protect the treat form, and does the package still feel honest after a few handling cycles? If the sample is only being judged for looks, the project is missing half the value of the test.
Cost and pricing: how material choices change unit cost
Pricing is where the pet treat rigid boxes material guide becomes useful for buyers who need to defend a spend. The quote rarely changes because of one dramatic line item. It changes because of several small decisions that stack up. Board thickness, wrap stock, insert complexity, decoration methods, and order volume all influence the unit cost.
For a common run of 5,000 pieces, a simple rigid box with moderate board, a coated wrap, and a basic paperboard insert might land in a broad range around $0.18-$0.28 per unit, depending on size and print coverage. Add soft-touch lamination, foil, embossing, or a complex molded insert, and the number can move meaningfully higher. Larger orders tend to spread setup costs more efficiently, while smaller runs absorb more of the tooling burden per box.
There is a hidden cost on both ends of the spectrum. Overbuilding wastes money before the box reaches the shelf. Underbuilding often costs money after the box ships. That can show up as product damage, damaged corners on arrival, a box that feels cheap in a premium channel, or returns tied to broken seals and poor presentation. A cheap quote is not always cheap in total cost.
MOQ matters too. Many rigid box suppliers price setup, die cutting, wrapping, and insert tooling across the order. If the minimum quantity is low, those fixed costs weigh more heavily on each unit. If you want a more exact picture, ask for line-item pricing. A supplier should be able to separate the structure, wrap, finish, insert, and tooling so you can see where the money is going. That is especially helpful when comparing a kraft paper build against a coated printed build, or a paperboard tray against a molded pulp option.
Here is a buyer habit that pays off: request two or three versions side by side. For example, compare a 2.0 mm board with a matte wrap, a 2.5 mm board with a soft-touch wrap, and a 2.0 mm board with a kraft exterior and molded pulp insert. The goal is not to make the spec perfect in theory. The goal is to see how feel, protection, and price shift together. That is a better commercial conversation than asking for "the best" box.
For teams mapping packaging spend across the portfolio, it can help to review the available Custom Packaging Products before locking a direction. Seeing the range makes tradeoffs easier to defend internally. It also makes the pet treat rigid boxes material guide feel less abstract and more like a working buying tool.
One more pricing point: special finishes do not only add material cost. They add labor. Foil stamping, embossing, and spot coatings can slow a line or require extra checks. That is why a quote may jump more than the finish sample suggests. The box is a physical product, not just a visual concept, so labor and handling matter just as much as the finish itself.
In practice, the cheapest quote usually omits something, whether that is a stronger insert, a better wrap, or enough time for careful assembly. The more transparent the breakdown, the easier it is to tell whether the savings are real or just pushed into another part of the project.
Common mistakes buyers make when specifying materials
Even experienced buyers miss things. The most common error in the pet treat rigid boxes material guide conversation is assuming the thickest board is automatically the best board. That is not how packaging works. A heavier core may feel reassuring, but if the product is lightweight, the box may end up costlier and harder to ship without adding any real value. Sometimes the smartest move is the modest one.
Another mistake is choosing a finish that photographs well but behaves badly in the warehouse. Certain glossy coatings show every rub mark. Some soft-touch surfaces look beautiful on a one-off sample and then scuff during packing or retail handling. Texture can help a brand stand apart, but heavy texture can also collect dust or make dirt more visible. A finish should be selected for how the box lives, not only how it looks on a mockup.
Humidity is another quiet problem. Pet products often move through distribution spaces that are not perfectly controlled. Warm loading docks, damp storage, and repeated handling can stress adhesives and wraps. A box that feels crisp in the sample room may perform differently after a few days in poor storage conditions. This is why the materials in a pet treat rigid boxes material guide should always be discussed alongside the supply chain environment.
Insert mismatch causes more frustration than people expect. A product that shifts inside the cavity can dent corners, bruise delicate treats, or make the opening feel messy. A divider that is too tight can slow packing and create crushing pressure. A tray that is too shallow can let the product ride upward when the lid opens. In other words, the insert is not an accessory. It is part of the performance.
Vague specifications create their own tax. If a buyer asks for a "premium pet box" without defining board, wrap, finish, insert, or quantity, each supplier will fill in the blanks differently. That produces quote confusion, sample churn, and sometimes disagreement later when the shipped box does not match the mental picture. Better specs produce better comparisons. Better comparisons produce better buying decisions.
If the packaging brief is vague, the supplier is forced to guess. Guessing is expensive.
There is also an environmental mistake worth calling out. Some teams chase a recycled or biodegradable packaging message but specify a build that is too complex for the product. A clean fiber-based box with a simple insert may be a stronger sustainability story than a decorative structure that uses more material than necessary. Recycled materials are only part of the picture. Material efficiency matters too.
Finally, do not ignore the outer shipping system. A beautiful rigid box can still arrive damaged if the shipper is weak. Corrugated cardboard master cases, proper void fill, and sensible pallet stacking are part of the packaging system. The retail box is only one layer of protection, and pretending otherwise is usually how damage claims sneak in.
One honest warning: if your treats are oily, aromatic, or sensitive to moisture, do not assume a standard decorative build will behave well without testing. I’ve seen otherwise solid packaging specs stumble because nobody checked the interaction between product, liner, and storage conditions. That kind of miss is avoidable, but only if the brief asks the right questions up front.
Pet treat rigid boxes material guide: next steps and quote checks
The best way to use this pet treat rigid boxes material guide is to turn it into a working brief. Start with the product itself. Confirm the dimensions, weight, and whether the treats are loose, bagged, or individually nested. Then rank your priorities. Is the top concern shelf impact, stiffness, sustainability, or cost control? Pick the first two. Trying to maximize all four usually creates a spec that is more expensive than necessary.
Then ask suppliers for two or three material options side by side. One option might use coated art paper, another might use kraft paper, and a third might use a paper-based, FSC certified build with a molded pulp insert. Compare them on feel, protection, unit cost, and production time. A comparison like that makes the decision easier because it shows tradeoffs instead of hiding them.
A clean quote checklist should include the board spec, wrap type, insert type, finish, MOQ, tooling, and production timeline. If a supplier gives you a single lump-sum number without detail, ask for a line-item breakdown. You do not need a dissertation. You need visibility. The more exact the brief, the less room there is for surprise charges later.
It also helps to think about the package in one sentence. For example: "This box should feel premium, protect the treats from movement, and stay within a target cost that supports retail margins." That sentence forces priorities into the open. From there, the pet treat rigid boxes material guide becomes a decision framework, not a theory lesson.
My practical recommendation is simple: choose the lightest structure that still protects the treats and supports the brand promise. That usually means avoiding unnecessary board thickness, using a wrap that matches the visual goal, and selecting an insert that holds the product without excess material. If the packaging has to support a natural-positioned product, kraft paper and recycled materials may fit. If the line needs premium shelf presence, a coated wrap with a restrained finish may be better. If the product must move through hard logistics, the outer shipper may matter as much as the retail box.
Before you send a quote request, review the available Custom Packaging Products and note which details actually matter for your line. That step saves time and gives your supplier a more accurate starting point. More important, it keeps the pet treat rigid boxes material guide tied to real business choices rather than wishful thinking.
Use this pet treat rigid boxes material guide as the brief before the quote arrives, not after. Lock the board, wrap, insert, finish, and shipper assumptions early, then test a sample under the conditions the box will actually face. That one habit usually saves money, shortens back-and-forth, and leads to a package that looks good, holds up, and feels honest the moment a buyer picks it up.
What board thickness is best for pet treat rigid boxes?
For most retail pet treats, a mid-weight rigid board gives the best balance of stiffness, cost, and handling. Heavier board is worth considering for large formats, gift sets, or boxes that will be reused, but the thickest option is not automatically the right one. The product weight, distribution path, and insert design should guide the call.
Are recyclable materials strong enough for pet treat rigid boxes?
Yes, if the board, wrap, and insert are engineered together instead of treated as separate choices. Paper-based recyclable structures can perform well when the product is not exposed to excessive moisture, heavy compression, or poor storage conditions. The adhesive and coating choices matter too, so the recyclability claim should match the full build and not just the board core.
Which finish works best for greasy or aromatic pet treats?
A scuff-resistant matte or coated wrap usually performs better than a delicate decorative finish. If odor or oil migration is a concern, the insert and inner liner matter as much as the outer decoration, because the box is only one part of the protection system. In some cases, the real fix is an internal barrier layer, not a prettier outside finish.
How long does sampling and production usually take for pet treat rigid boxes?
Simple structures move faster, while custom inserts, special finishes, and new tooling add more steps. Fast approval from the buyer side is often the biggest factor in keeping the timeline on track, especially when multiple departments need sign-off. A clean, uncomplicated job can move in roughly 12-15 business days after final proof approval, but more intricate builds need more breathing room.
How can I compare quotes without missing hidden material costs?
Ask each supplier to list board, wrap, insert, finish, tooling, and MOQ separately. Compare samples alongside the quote, because the cheapest number can hide weaker materials or extra labor assumptions that only show up later in production. If the supplier cannot break down the pricing, the quote is not detailed enough to make a confident decision.


