Printed Labels for Jars: Specs, Costs, and Turnaround
Printed Labels for Jars look simple until condensation, handling, or transit exposes a weak choice. The jar may be fine and the label may still fail first, usually at an edge, corner, or seam where moisture and abrasion concentrate.
The practical way to evaluate jar labels is as a production system, not a decoration. Face stock, adhesive, finish, die shape, and print method all need to match the container and its environment. If one part is off, the label can lift, wrinkle, smear, or dull before the product is even opened.
For short runs, seasonal SKUs, private label launches, and products that change artwork often, labels usually make more sense than direct print or shrink sleeves. They keep the program flexible without locking you into a container-specific process.
For buyers comparing jar packaging against broader label formats, the wider Custom Labels & Tags category is the better place to compare construction, not just price.
Printed Labels for Jars: what buyers usually miss
The first mistake is assuming the jar itself is the hard part. Straight-sided glass is forgiving. Tapered glass, faceted plastic, narrow-neck jars, and embossed panels are less forgiving. Add refrigeration, damp hands, or oil residue from the filling line and the label spec starts doing more work than the artwork.
A reliable label comes down to five choices: face stock, adhesive, finish, size and shape, and print method. Buyers often focus on only one of those, which is how a simple reorder turns into a reprint.
Printed Labels for Jars also fit the economics of small and mid-size orders. Digital printing avoids large inventory commitments, which matters for food, cosmetics, candles, specialty condiments, and private label runs where one SKU may move faster than another.
The real question is not whether the label looks premium in a mockup. It is whether it survives shipping, shelf display, cold storage, hand wiping, and repackaging. A label that fails in a cooler is not premium. It is expensive.
If the product will ever be chilled, assume condensation will find the weakest spec.
How the label sticks, prints, and holds up
Start at the top of the stack and work downward. The printable face stock sits on the adhesive, which sits on the liner, and many jobs also include a protective varnish or laminate. That stack determines whether the label looks good on day one and after the jar has been handled, chilled, and wiped down.
Paper is the lowest-cost option and still has a real place. It works for dry pantry jars, shelf-stable goods, candles, and artisan products with a warm look. Its weakness is moisture. Once condensation or heavy handling enters the equation, paper is usually the first surface to show wear.
BOPP is the common workhorse for jar labels because it resists moisture better than paper without pushing the price into a premium tier. It suits refrigerated food, personal care products, and jars that will be touched often. Polyester is tougher and more dimensionally stable, which matters when the jar sees temperature swings, harsher handling, or freezer-adjacent conditions.
Adhesive choice matters just as much as face stock. Standard permanent adhesive is fine for dry shelf items, but cold-rated or high-tack adhesive is usually safer for chilled jars, curved surfaces, or lightly textured containers. Removable adhesive can work for temporary promotions or reusable jars, though it is a poor match for most consumer products that need the label to stay put.
Print method changes both economics and appearance. Digital printing is efficient for short and mid-size runs, especially when artwork changes frequently or multiple SKUs share one structure. Flexographic printing usually becomes the better unit-cost option at higher volumes because setup is spread across more labels.
Finish should be chosen for the environment, not only the brand mood. Matte gives a quieter, more natural look. Gloss boosts color contrast and helps darker artwork stand out. Soft-touch can feel premium, but it also adds cost and may be unnecessary where durability matters more than tactile effect.
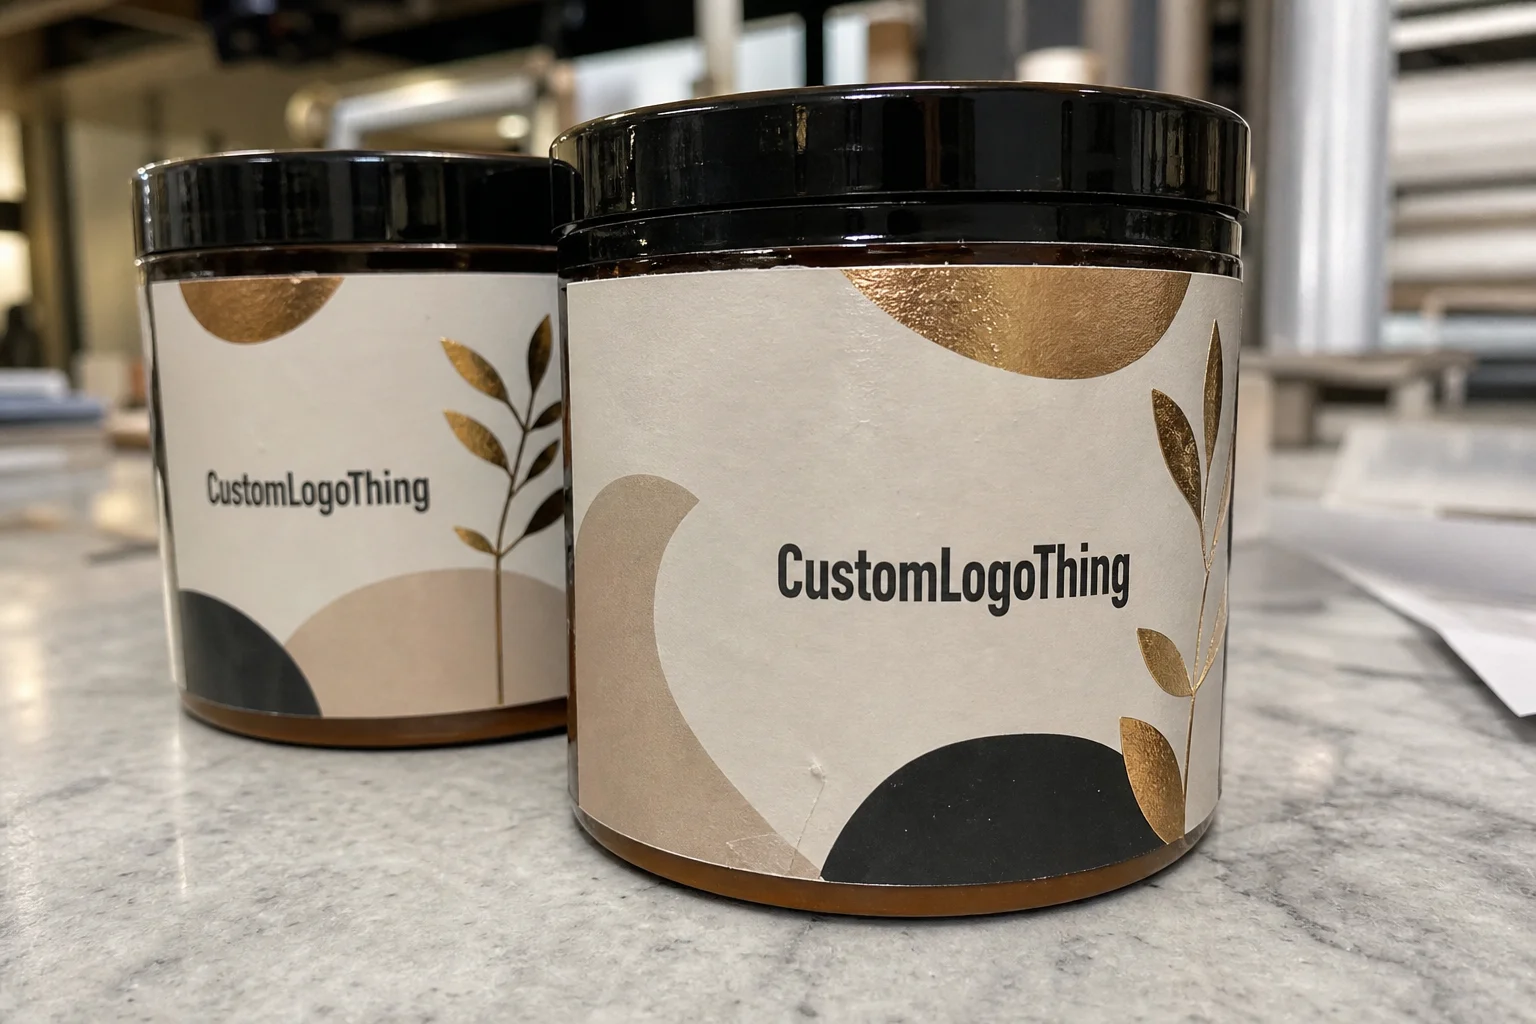
Size, shape, and artwork: the specs that control fit
Jar geometry changes the label more than many buyers expect. A straight wall gives a clean canvas. A taper steals width at the seam. Facets create points where an edge can lift. Rounded shoulders and recessed panels reduce usable height.
Measure the actual label panel, not just the jar diameter. That means the circumference where the label will sit, the usable height between shoulder and base curve, the seam location if it wraps, and any embossing or texture on the surface. If the label is hand-applied, leave room for placement tolerance.
For a clean spec set, document these points before artwork is finalized:
- Jar diameter or wrap circumference at the label zone
- Usable label height after shoulders, lips, and base curves are accounted for
- Seam position for full-wrap labels
- Any ridge, recess, emboss, or texture that affects adhesion
- Whether the label will be applied by hand or by machine
Shape is both a design choice and a production choice. Rectangles are efficient and easy to place. Rounded corners reduce edge lift and usually age better under handling. Circles work well on small jars where front-panel branding is enough. Custom Die Cuts can create stronger shelf identity, but they add tooling and can slow the job.
Artwork is where avoidable cost enters the order. Use the right bleed, keep type inside the safe area, and send vector logos whenever possible. Check font size at final print size, not just on a monitor. Color is another trap: screen color, CMYK output, stock, and finish all affect the final result. If a brand color matters, get a proof and review it under the same lighting the jars will see on shelf.
One useful habit is to review the label against the actual jar before approving production. A design can look balanced in a layout file and still sit too close to the shoulder or seam once it wraps the container.
Cost and MOQ: what drives unit price
Pricing for printed labels for jars comes down to a short list: quantity, material, finish, size, shape, print complexity, adhesive, and whether the job needs a custom die. Asking for a unit price before those details are clear usually produces a quote that is technically correct and practically useless.
Small runs cost more per label because setup is spread across fewer pieces. That is normal. Once quantity increases, unit cost usually drops quickly, then levels off when setup costs have been absorbed. Compare like with like: a paper label for a dry pantry jar is not the same product as a waterproof film label designed for refrigerated storage.
| Option | Typical use | Rough unit price range | Notes |
|---|---|---|---|
| Paper label | Dry shelf jars, pantry items, low-moisture use | $0.04-$0.12 | Lowest cost, natural appearance, weakest against condensation |
| BOPP film | Refrigerated jars, food, personal care, frequent handling | $0.07-$0.18 | Common balance of price and moisture resistance |
| Polyester or specialty film | Harsher environments, premium durability, cold storage | $0.12-$0.30 | Higher cost, better stability, useful when label failure is costly |
| Textured or premium finish | Gift sets, premium retail jars, higher-margin lines | $0.10-$0.28 | Shelf presence improves, but only if the spend fits the product margin |
MOQ also varies by supplier and process. Some vendors quote by total label count, some by roll count, and some by print area or press time. Digital work may begin around a few hundred labels. Flexographic runs usually make more sense at higher quantities, often 5,000 pieces or more, because the setup cost is justified only when the press stays busy long enough.
If the order needs a custom die, specialty adhesive, or unusual film, expect either a setup charge or a higher unit rate. That reflects the actual manufacturing requirement.
Process and turnaround: from proof to shipment
The production flow is predictable: quote, artwork review, proof approval, press setup, print, finishing, quality check, and packing. Delays usually happen before the press starts. Missing dielines, late copy changes, unclear material specs, and back-and-forth over label size can add more time than the print run itself.
A useful proof should show dimensions, shape, finish, quantity, and any handling requirement that affects use. If the jars are refrigerated, frozen, or exposed to moisture-heavy handling, that needs to be stated early.
Typical lead times vary, but the pattern is stable. A clean digital job can often move from proof approval to shipment in about 5 to 10 business days. Flexo jobs and custom-die orders usually need more time, often 10 to 15 business days or longer if the setup is complex or the order includes specialty finishing. Add freight time separately.
There is a tradeoff between speed and choice. Faster turnaround can narrow material options. Specialty adhesives, premium laminates, and unusual die cuts often need more time to source and prepare.
For packaging programs that include more than one SKU, keep the approved spec tied to the container record. Saving the exact dimensions and print notes with your custom label specs prevents the next reorder from becoming a new project.
For shipping-sensitive work, it helps to think in the direction of established transport testing such as the standards published by ISTA. The label is not the parcel, but it faces the same handling environment.
Common mistakes that cause peeling, bubbling, and reprints
The most common failure is simple: a label is selected for a dry shelf jar, then the product goes into a cold or humid environment. The adhesive never had a fair chance. If paper stock is also in the mix, the problem shows up faster.
Size errors create their own damage. Too wide, and the label can wrinkle at the seam or buckle over a taper. Too tall, and it may run into the shoulder or base curve, which pulls corners loose. Too small, and the jar looks underdressed.
Artwork errors are equally expensive. Low-resolution files, missing bleed, text too close to the cut line, or the wrong color mode can turn into clipped edges, muddy type, and visible misalignment. These are production defects, not just cosmetic issues.
The more subtle problem is assuming a good mockup equals a good label. A render does not show condensation, oil residue, or how a hand-applied label behaves on a slightly curved surface. A label can be beautiful in design review and still fail in real use.
A label that only survives the mockup is not ready for production.
Expert tips for a cleaner, more reliable order
Test one or two sample jars before committing to a full run, especially if the container is new or the product will live in a wet environment. Chill the jar, wipe it, inspect the corners, and check for edge lift after a few hours. That quick test catches more problems than most buyers expect.
Choose finish for the use case, not for habit. Matte and uncoated looks suit natural products, but if the jar will sit in a fridge, near cooking oils, or inside a warehouse with temperature swings, a film label with the right adhesive is usually the better answer.
Keep a repeat-order spec sheet. Store the approved jar dimensions, label dimensions, material, adhesive, finish, quantity, and any color notes together. A clean record reduces quoting time, avoids inconsistent reorders, and makes it easier to compare one supplier's pricing against another's.
If sustainability matters, ask for real material specs rather than broad claims. FSC-certified paper can make sense for some brands; see FSC for chain-of-custody context. But sustainability language does not replace performance.
Keep a reference sample from the approved run. Tape it to the spec sheet, photograph it, and note the approval date. That habit reduces confusion on the next reorder, especially when the person placing the order is not the person who approved the first one.
For multi-item packaging programs, consistency across label stock and finish can matter as much as the individual jar label. Matching the material language across sizes gives the line a more coherent look and makes procurement cleaner.
Next steps: measure, proof, and place the first run
Start with the container. Measure the label panel, confirm the curve, determine whether the jar will sit in a dry, refrigerated, or damp environment, and choose the substrate and adhesive from there. If the jar shape is unusual, do not guess.
Then lock the artwork size and request a proof that shows the exact dimensions, quantity, finish, and turnaround window. Check the details that actually affect outcome: adhesion, material, cut shape, placement on the jar, and whether the finish matches the intended shelf environment.
For cold-case, freezer, or high-moisture use, a pilot order is cheap insurance. Ten bad labels cost little. Ten thousand bad labels can erase margin and create a scheduling problem for the next production cycle.
Keep the approved spec package with your printed labels for jars order so the next run is faster, cleaner, and easier to price. A disciplined spec sheet saves money, shortens approval time, and keeps the label from becoming the weak point in the package.
What material works best for printed labels for jars that get cold or damp?
Film stocks such as BOPP or polyester are the safer choice when refrigeration, condensation, or damp handling are part of the use case. Paper works for dry shelf products, but it is usually the first surface to fail when moisture appears. Pair the stock with an adhesive rated for the temperature and surface condition of the jar.
How much do custom jar labels usually cost per label?
Price moves with quantity, material, finish, size, shape, and adhesive type. A plain paper label for a dry pantry item will sit well below a waterproof film label with a premium finish. The cleanest comparison is between labels with the same size and performance requirements.
What file format should I send for jar label printing?
Vector files such as AI, EPS, or PDF are preferred because they keep text and cut lines sharp. Include bleed, safe area, and outlined fonts if the artwork is not already production-ready. If the label wraps a curved jar, send the dieline or exact dimensions so the layout can be checked before print.
Will printed labels for jars hold up in a fridge or freezer?
Fridge use is common, but the label needs the right adhesive and usually a film face stock to resist condensation. Freezer use is stricter and often calls for cold-rated adhesive plus a material that stays stable at low temperatures. A sample test is the safest way to confirm performance because jar surface texture and moisture exposure can change the result.
How long does proofing and production usually take?
Proofing can be quick if the artwork and dimensions are complete. Production time depends on quantity, material, finish, and whether the order uses a custom die or specialty adhesive. The fastest way to lose time is to keep changing specs after proof approval, so the better move is to finalize the details before the run starts.


