Buyer Fit Snapshot
| Best fit | Printed Paper Inserts for Boxes projects where brand print, material claims, artwork control, MOQ, and repeat-order consistency need to be specified before quoting. |
|---|---|
| Quote inputs | Share finished size, material target, print colors, finish, packing count, annual reorder estimate, ship-to region, and any compliance wording. |
| Proofing check | Approve dieline scale, logo placement, barcode or warning zones, color tolerance, closure strength, and carton packing before bulk production. |
| Main risk | Vague material claims, crowded artwork, missing packing details, or unclear freight terms can make a low unit price expensive after revisions. |
Fast answer: Printed Paper Inserts for Boxes: Branding, Cost, and Fit should be specified like a repeatable production item. The safest quote records material, print method, finish, artwork proof, packing count, and reorder notes in one written spec.
Production checks before approval
Compare the actual filled-product size with the drawing, then confirm tolerance on folds, seals, hang holes, label areas, and retail display edges. Reserve space for logos, QR codes, warning copy, and material claims before decorative graphics fill the panel.
Quote comparison points
Review material grade, print process, finish, sampling route, tooling charges, carton quantity, and freight assumptions side by side. A quote is only useful when the supplier can repeat the same color, closure quality, and packing count on the next order.
Printed paper inserts for boxes do a lot more than sit there and look organized. They shape the first physical impression, keep products from rattling around, and help a package feel intentional instead of slapped together five minutes before pickup. I have seen brands spend a small fortune on outer cartons, then ruin the whole thing with a flimsy insert that shifts in transit. That is the part people miss. The insert is not filler. It is part of the product experience.
They are also one of the easiest packaging components to get wrong because they sit in that awkward middle ground between structure and branding. Too thin, and the product moves. Too busy, and the inside of the box turns into a junk drawer with a logo on it. Too expensive, and the margin starts bleeding for no good reason. Printed paper inserts for boxes need to earn their keep. If they do that, they are worth every penny.
For brands that want better presentation without jumping straight to rigid packaging or molded components, printed paper inserts for boxes are usually the sensible move. They are lighter than a heavy formed tray, easier to print on than foam, and more flexible across product lines than most teams expect. That does not make them magical. It just makes them useful in a very practical way.
What Printed Paper Inserts for Boxes Really Change
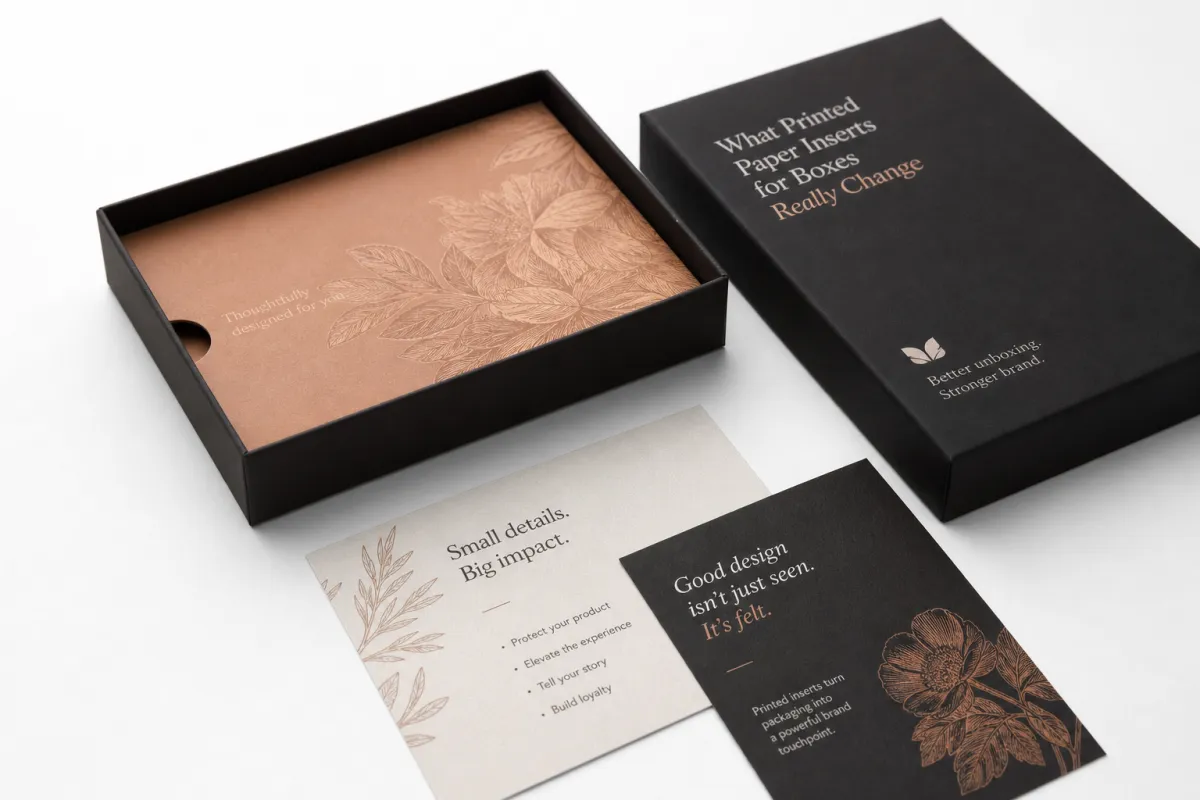
Printed paper inserts for boxes change how a product lands in the customer’s hands. That sounds simple because it is. The insert controls movement, frames the contents, and tells the buyer where to look first. Without that structure, even a nice product can feel scattered. With it, the whole pack-out feels cleaner. Not fancy for the sake of fancy. Clean. Clear. Done right.
The biggest mistake I see is treating the insert like decoration. Pretty graphics do not stop a bottle from tipping over or a cable from tangling with a charger. Printed paper inserts for boxes can reduce scuffing, separate accessories, and keep the customer from opening the box and immediately wondering what goes where. That matters in e-commerce returns, retail presentation, and subscription kits alike. One damaged shipment can wipe out the savings from a dozen cheap insert specs. That is not theory. That is packaging math.
“If the insert does not control movement, the graphics are just expensive decoration.”
There is also a trust factor here that brands underestimate. A structured insert makes the product feel packed with intent. It signals that someone checked the details. Customers do not usually say, “Ah yes, this is 18pt SBS with a precise score line,” but they do notice when the package opens neatly and everything is where it should be. They notice when it does not. They always notice that part.
Printed paper inserts for boxes can also support instructions, QR codes, warnings, and product labeling without adding a separate card that gets tossed aside or lost in the bottom of the bag. For kits, starter sets, and bundled products, that extra clarity cuts down on support emails and confused first-time users. It is a small upgrade that pays back faster than people think. Kinda boring on paper. Extremely useful in real life.
For many businesses, the insert is the sweet spot between cheap and overbuilt. Printed paper inserts for boxes cost less and weigh less than molded alternatives, but they can still carry branding and structure in a way plain tissue or loose fill never will. That is why they show up so often in launches that need to look polished without turning packaging into a budget sinkhole.
- Protection: keep parts from moving, rubbing, or tipping in transit.
- Presentation: make the unboxing feel orderly and deliberate.
- Education: add setup notes, QR codes, or component labels.
- Efficiency: reduce packing confusion for multi-item kits.
How Printed Paper Inserts for Boxes Work in Packaging
Printed paper inserts for boxes work because they handle two jobs at once: they hold the product, and they communicate with the person opening the box. That second part gets ignored way too often. A flat sheet can act as a branded liner or instruction panel. A folded wrap can hold a product in place while creating a nicer reveal. A die-cut holder can lock individual pieces into their own spaces. Printed paper inserts for boxes are not one thing. They are a family of structures, and each one behaves differently once weight, friction, and shipping vibration enter the picture.
The format matters. Flat sheets are the least complex and usually the cheapest. They are a good fit when the insert is mostly about branding or instructions, not restraint. Folded wraps add body and can create sleeves or pockets. Die-cut holders are better for repeatable product shapes because the cutouts create a snug fit without adding a ton of bulk. Layered trays step things up a notch when the package needs a more premium reveal or has to separate several parts. Printed paper inserts for boxes are not interchangeable across these formats, even if the renders look similar on a screen.
Print placement changes the experience more than teams expect. A full-bleed insert can turn the inside of the box into a stage. A single logo mark can feel restrained and upscale. A simple instruction panel can cut support questions for products that need setup, charging, or assembly before first use. QR codes fit naturally here, especially if they lead to setup videos, care instructions, or warranty registration. Put the information where the customer is already looking. That is the point.
Fit is where a lot of projects fall apart. A print file can look great and still fail once the product is loaded. If the board is too flexible, the product shifts. If the cavity is too generous, the insert floats and loses control. If the box is oversized, the structure stops doing the one job it was supposed to do. And if the shipping lane is rough, you need the insert to work with the carton, not just sit inside it and hope for the best. Printed paper inserts for boxes should be designed with the carton dimensions, product geometry, and pack-out sequence from the start, not after the artwork is already approved.
From an operations angle, printed paper inserts for boxes help standardize packing. The person on the line knows where each component goes. The customer knows what to remove first. The warehouse knows how the closure should land. That kind of consistency saves time in ways that do not look dramatic on a spreadsheet until you multiply them across thousands of units. A few seconds per box is a real number when the order volume is real.
- Measure the product and carton together, not separately.
- Decide whether the insert should hold, separate, instruct, or do all three.
- Choose the structure based on weight, fragility, and assembly time.
- Check the print areas against fold lines and cutouts before approval.
For brands still shaping the outer packaging, it helps to compare insert options alongside the box structure itself through Custom Packaging Products. That keeps the insert from turning into a last-minute patch job.
Key Factors That Shape Design, Material, and Fit
Material choice is where printed paper inserts for boxes either start making sense or start getting expensive for the wrong reasons. Lighter papers in the 100gsm to 150gsm range work for wraps, liners, and instruction panels. Heavier paperboard, usually in the 14pt to 24pt range, makes more sense when the insert needs structure. For tighter cavity control or heavier products, brands often move toward 18pt SBS, 20pt C1S, or similar paperboard grades. The goal is enough stiffness to support the product without making the carton hard to close. If the insert fights the box, somebody missed the spec.
Fragility changes the brief. A cosmetic set, a small electronics kit, and a food sampler do not need the same insert logic. Printed paper inserts for boxes for a lightweight retail item may care more about presentation and brand feel. A fragile product may need deeper pockets, stronger folds, or a layered structure that spreads pressure out more evenly. Temperature and humidity matter too. Certain adhesives, coatings, and inks behave differently in warm warehouses or damp freight lanes. That is the stuff that never shows up in a polished mockup and absolutely shows up in the warehouse.
Branding choices are practical too. Color fidelity can shift depending on the stock, so the palette should be checked against the actual paper, not just a monitor. Logo placement should account for where the customer opens the box and which panel they see first. Copy tone matters. A technical product might need short step-by-step labels. A lifestyle brand might want a clean, quiet reveal. Printed paper inserts for boxes can support either style, but the content needs to fit the space without turning into a wall of text that nobody reads.
Sustainability should be handled honestly, not as a marketing sticker slapped on later. A paper insert is not automatically recyclable just because it is paper. Coatings, laminations, foil, heavy inks, and some adhesives all affect how a package can be processed after use. If curbside recycling matters, the stock and finish should be checked against local recycling rules. The U.S. EPA has general guidance at EPA recycling guidance, but local systems still vary. FSC certification can also help teams document fiber sourcing, especially when procurement needs a paper trail for reporting.
That is why printed paper inserts for boxes deserve more than a surface-level review. A buyer who only looks at print finish may miss fold memory, stiffness, or sourcing implications. A buyer who only looks at sustainability may miss the fact that a flimsy insert can increase breakage and create more waste than it saves. The better spec balances protection, appearance, compliance, and end-of-life handling. All four. Not just the one that sounds best in a meeting.
- Stock weight: lighter for wraps, heavier for structure and pockets.
- Coating: choose carefully if recycling or writeability matters.
- Coverage: dense graphics can raise cost and affect drying time.
- Tolerance: leave enough room for the product to fit without scraping.
- Market needs: align the spec across regions if the SKU ships widely.
If the insert is part of a broader packaging refresh, it helps to see how it fits into the rest of the system through Custom Packaging Products. Printed paper inserts for boxes work best when carton size, insert style, and product dimensions are treated as one conversation.
Printed Paper Inserts for Boxes: Cost and Pricing
Printed paper inserts for boxes are usually cheaper than buyers fear and more expensive than buyers hope. Both of those things can be true at once. Pricing depends on size, stock, print coverage, die cutting, finishing, and order quantity. A simple printed sheet can be very affordable. A custom die-cut board insert with multiple folds and tight fit tolerances can move into a completely different price bracket. And yes, a tiny test run often feels expensive because the setup costs get spread over fewer units. Nobody likes that part, but it is how the math works.
Setup cost is the first thing to understand. There may be dieline work, plate prep, digital setup, sampling, and artwork checks. After that, unit pricing takes over. As a planning range, a 500-piece run may land anywhere from roughly $0.55 to $1.80 per insert depending on complexity, while a 5,000-piece run can drop into the $0.08 to $0.75 range for many common paper insert formats. Printed paper inserts for boxes with full-bleed graphics, special folding, or multi-cavity structures usually sit toward the higher end. Those are planning numbers, not quotes, so treat them like a map, not a promise.
The cheaper quote is not always the lower total cost. Printed paper inserts for boxes can reduce damage claims, speed up pack-out, and cut down on customer confusion. If an insert prevents even one return or replacement shipment in a small batch, it can easily beat the difference between two vendors. That is the part spreadsheet shoppers sometimes miss. Packaging cost is not just the invoice. It is the invoice plus labor, damage, freight, support, and the mess created when the product arrives loose in the box.
| Insert format | Typical use | Approx. unit cost at 5,000 | Best fit |
|---|---|---|---|
| Flat printed sheet | Branding, instructions, light separation | $0.08-$0.18 | Simple kits and lightweight products |
| Folded wrap | Product wrap, pocket, or sleeve | $0.12-$0.26 | Sets, samples, and retail presentation |
| Die-cut holder | Secure placement for individual items | $0.20-$0.48 | Fragile goods and multi-part kits |
| Layered tray | Premium reveal, compartment control | $0.30-$0.75 | Higher-end launches and subscription boxes |
There is one caveat that deserves a loud callout: print coverage changes everything faster than people expect. Dark backgrounds use more ink and can require more press time. Heavy finishing adds cost. Complex die cuts slow production. Printed paper inserts for boxes can also create hidden costs if the file needs several revisions, the dieline changes late, or the sample does not fit and has to be rebuilt. Freight and storage can matter too, especially if the inserts are bulky or the production happens in multiple phases.
Compared with molded pulp or foam, paper inserts may look more expensive if you only compare cushioning. That comparison is incomplete. Foam may outperform in some shock scenarios. Molded pulp may win on rough handling. Printed paper inserts for boxes often win on presentation, weight, recycling optics, and artwork flexibility. The best choice depends on what failure would actually hurt the brand most: damage, labor, unboxing quality, or disposal concerns.
The smarter pricing question is not, “How cheap can this be?” It is, “What combination of fit, finish, and conversion speed gives the best total package cost?” That version of the question usually saves money and headaches.
Step-by-Step Process and Timeline for Printed Paper Inserts for Boxes
Printed paper inserts for boxes move faster when the brief is specific. The cleanest projects start with a single job: protect, organize, educate, or elevate the reveal. Once that job is clear, everything else gets easier to manage. A vague brief leads to vague dimensions, and vague dimensions usually lead to delays. Printed paper inserts for boxes are not complicated, but they do reward precision. A lot.
- Define the goal: decide whether the insert is mainly for holding, separating, branding, or instruction.
- Measure the product: record length, width, depth, weight, and any protruding features.
- Measure the box: confirm the inner dimensions, not just the outer carton size.
- Choose the structure: flat sheet, wrap, die-cut holder, or layered tray.
- Build the dieline: place folds, scores, and cutouts against the product shape.
- Approve artwork: verify logo placement, copy, QR codes, and bleed margins.
- Review a sample: check fit, assembly time, and visual impact in a real carton.
- Run production: release the approved file and monitor first-run consistency.
For straightforward printed paper inserts for boxes, the lead time can be fairly short. Once final artwork and dimensions are approved, a simple run may take about 7 to 10 business days. More complex die-cut or folded structures often need 12 to 20 business days, especially if the vendor is also building a custom cutting form. Sampling can add 2 to 5 business days, sometimes more if a revision is needed. That is normal. It is also a lot cheaper than discovering a fit problem after 10,000 units have already been printed.
Sampling is the step buyers should protect most carefully. A sample shows whether the insert holds the product too tightly, too loosely, or at the wrong angle. It also reveals whether the print contrast is strong enough, whether the board cracks along the score, and whether the packer can assemble it without frustration. Printed paper inserts for boxes often look fine on a dieline and only become usable once they are folded, handled, and loaded with the actual product. That real-world test is where the savings show up.
If the package needs shipping validation, this is also the place to think about transit testing. ISTA test protocols are a common reference point for package engineers, and the organization’s material is worth reviewing at ISTA standards. Printed paper inserts for boxes do not replace shipping tests, but they can be part of a package system checked against real drop and vibration conditions. That matters for products with sharp edges, layered components, or fragile finishes.
A practical launch sequence often starts with one SKU before the insert is rolled across the catalog. That approach lowers risk. A pilot run of 500 to 1,000 units can expose issues that never show up in a PDF: creasing, product migration, print glare, or assembly time that is too slow for the line. Printed paper inserts for boxes are easier to scale once the first version has proven itself in the box, in the warehouse, and in the customer’s hands.
When the process is disciplined, printed paper inserts for boxes stop feeling like a custom art project and start acting like a repeatable packaging component.
Common Mistakes With Printed Paper Inserts for Boxes
Printed paper inserts for boxes fail for surprisingly ordinary reasons. The most common one is designing for looks alone. A render may show a clean interior and a beautiful color block, but if the insert does not hold the product securely during transit, the package still fails. Printed paper inserts for boxes have to survive handling, packing, shipping, and opening. A pretty layout that shifts inside the carton is not a solution. It is an expensive draft.
Another frequent mistake is vague measurement. “Fits the product” is not a specification. Buyers need exact dimensions, product weight, wall thickness if relevant, and a note about what should be visible when the box opens. Even a few millimeters matter when the cavity is snug. Printed paper inserts for boxes are precision components in disguise. The more detail the brief includes, the fewer revisions the project usually needs. That saves time and, more importantly, keeps everybody from pretending they knew what they were doing on the first pass.
Too much copy can also ruin the result. Printed paper inserts for boxes are tempting places to cram in brand history, legal copy, care instructions, QR codes, and a full thank-you letter. The problem is that the insert gets crowded fast. If the customer has to hunt for the product or strain to read the copy, the package feels busier and less premium. A good rule is to keep the insert focused on the one most useful message. Anything else should earn its space.
Skipping sampling is another expensive habit. Printed paper inserts for boxes often show their weaknesses only after folding, loading, and shipping. The score may crack. The cavity may be shallow. The product may lift under pressure. The assembly may take longer than expected. A sample is the cheapest insurance policy in the project. It is not glamorous, but it is usually the thing that keeps a launch from sliding sideways.
There is also a materials mistake that shows up constantly: choosing a stock that looks premium but behaves badly. Some coatings reduce fold quality. Some heavy inks make the surface less flexible. Some thinner boards are fine for print but too weak for structure. Printed paper inserts for boxes have to balance appearance and function. If the material is beautiful but awkward to assemble, the warehouse team will feel that problem before the customer ever sees it.
- Designing only for the camera: a package must also work in transit.
- Ignoring assembly time: slow pack-out erases savings fast.
- Overcrowding the panel: more copy is not always better copy.
- Using the wrong stock: stiffness and fold behavior matter as much as print quality.
- Skipping a test pack: one sample can expose issues that a proof never will.
Printed paper inserts for boxes also get blamed for problems that really belong to the carton. If the outer box is undersized, too weak, or poorly scored, the insert cannot save it. If the carton is too large, the insert may need extra structure just to keep the product centered. The package should be treated as a system, not as separate decorative parts. That is the boring truth, and it is usually the correct one.
Expert Tips and Next Steps for Printed Paper Inserts for Boxes
The best printed paper inserts for boxes usually start with one clear job. That is the first expert tip. Do not ask one insert to solve five packaging problems at once. If the insert is meant to organize the contents, build for compartments and visibility. If it is meant to educate, keep the messaging short and place it where the customer sees it first. If it is meant to elevate the reveal, use print contrast, clean folds, and a disciplined layout. Printed paper inserts for boxes work best when the design has a single priority and the rest of the decisions support it.
A second tip is to buy with a checklist, not a feeling. The checklist should include inner box dimensions, product weight, fragile points, desired print coverage, fold style, finish preferences, and the acceptable damage rate. For many projects, it also helps to record how long assembly can take per unit. A structure that saves five cents but adds ten seconds of labor may not actually be the cheaper option. Printed paper inserts for boxes need to be judged on the line as well as on the invoice.
A third tip is to ask for three things before placing a larger order: one sample, one revised quote, and one shipping test. That sequence gives a practical view of the project from three angles. The sample shows fit. The revised quote shows the cost impact of any changes. The shipping test shows whether the insert survives reality. Printed paper inserts for boxes can look similar across suppliers, but pack-out behavior is often what separates a good result from a frustrating one.
Brands comparing inserts with other packaging components should also think about the outer packaging family around it. Sometimes the right move is a cleaner carton with a stronger insert. Sometimes the better choice is a slightly sturdier box and a simpler insert. Either way, the relationship matters. If you are still selecting the carton format, the rest of the package can be aligned through Custom Packaging Products so the insert, the board, and the closure all support the same customer experience.
There is a practical buying pattern that works well for printed paper Inserts for Boxes: pilot first, scale second. Start with one SKU, confirm the fit, track damage rates, and then roll the spec into the rest of the line. That approach reduces risk and gives the team better data. It also makes it easier to defend the packaging choice internally, because the result is no longer theoretical. It is measured in fewer returns, cleaner pack-outs, and a better opening moment.
Printed paper inserts for boxes are not about adding paper for its own sake. They are about shaping the customer’s first hands-on experience while keeping the product secure and the process efficient. When the spec is right, printed paper inserts for boxes can improve presentation, reduce damage, and make every opening feel deliberate without pushing the package into a much more expensive category. If you are evaluating your next launch, choose the insert format, confirm the spec, and pilot the first order before scaling printed paper inserts for boxes across the line.
How much do printed paper inserts for boxes usually cost?
Pricing for printed paper inserts for boxes usually depends on size, paper stock, print coverage, die cutting, and order quantity. Small runs cost more per piece because setup is spread across fewer units, while larger runs are usually much more efficient. Ask for both setup pricing and unit pricing so you can compare a short-run test with a scale-up scenario before you commit to printed paper inserts for boxes.
What paper stock works best for printed paper inserts for boxes?
The best stock for printed paper inserts for boxes depends on what the insert is supposed to do. Lighter paper works well for wraps, liners, and instruction panels, while heavier paperboard is better for holding shape and creating compartments. Ask for samples so you can check stiffness, print quality, and fold behavior before approving printed paper inserts for boxes for production.
Are printed paper inserts for boxes better than foam or molded pulp?
Printed paper inserts for boxes are often the better choice when branding, recyclability, and a premium printed experience matter most. Foam may protect fragile products better in some situations, and molded pulp can add stronger cushioning. The right option depends on product fragility, shipping conditions, and how much presentation matters inside the carton. For many brands, printed paper inserts for boxes strike the best balance.
How long does it take to produce printed paper inserts for boxes?
Lead time for printed paper inserts for boxes depends on proofing speed, material availability, and whether the structure needs a custom die or complex folding. Simple projects can move in about 7 to 10 business days after approval, while more involved inserts often take longer. Sampling adds time, but it usually prevents costlier production errors later, which makes printed paper inserts for boxes easier to manage at scale.
Can printed paper inserts for boxes improve the unboxing experience?
Yes, printed paper inserts for boxes can improve the unboxing experience by guiding the reveal, organizing the contents, and making the package feel intentional rather than generic. They can also support instructions, brand story, and product hierarchy without adding a separate insert card. The strongest results come from fit, print, and function working together, which is why printed paper inserts for boxes remain such a useful packaging choice.


