Water labels printing looks like a small finishing detail until you put the garment on and realize how much the inside construction affects the whole wearing experience. A scratchy sewn tag can make a good tee feel cheap, while a flat printed label can make the same shirt feel cleaner, softer, and better considered. That is why buyers keep moving toward this format: it improves comfort, carries branding, and reduces the chance that customers cut the label out the moment they get home.
For custom apparel buyers, the real questions are rarely about whether the label can be printed. They are about durability, wash life, lead time, and whether the quote still makes sense once setup, artwork cleanup, and sample approvals are added in. The job gets easier when you treat water labels printing like a production spec instead of a decorative extra.
What Water Labels Printing Really Means for Clothing
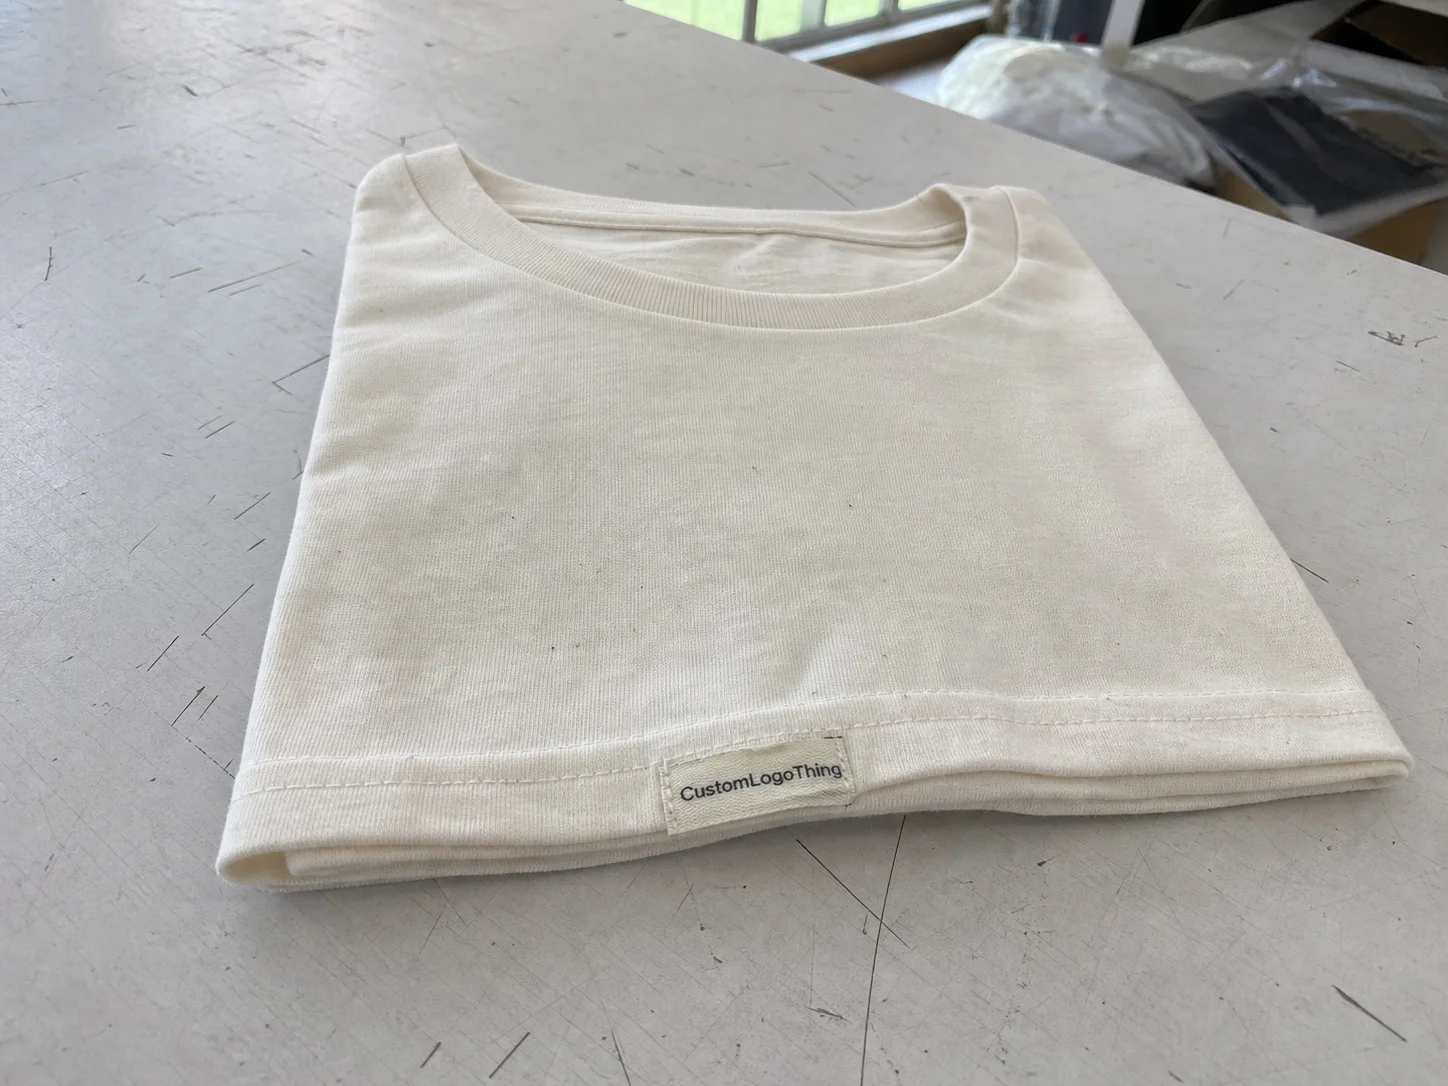
In practical terms, water labels printing means applying brand information directly onto fabric so the inside of the garment stays flat, soft, and unobtrusive. It is common on T-shirts, kidswear, loungewear, lightweight knitwear, and performance pieces where comfort matters as much as appearance. The label might carry a logo, size, care instructions, fabric content, or all three, depending on the garment and the market it is sold into.
The effect on perception is larger than many brands expect. A clean printed neck label gives the inside of a garment a finished look, while a stiff sewn tag can make even a well-made product feel less refined. That difference shows up in returns, customer reviews, and repeat purchase behavior, especially on basics where the inside finish is one of the few tactile signals buyers actually notice.
Brands also use printed labels because the format helps standardize branding across styles. If you are running multiple SKUs, a flat printed mark is easier to keep visually consistent than a mix of woven tags, heat transfers, and sew-in labels. For small runs, it can also remove one extra component from the production chain, which is useful when schedules are already tight.
“If the inside of the garment irritates the wearer, the label becomes the product problem, not a minor finishing detail.”
That is the buyer reality. Water labels printing is not about adding decoration. It is a choice that affects comfort, production flow, and how polished the garment feels when it reaches the shelf or the mailbox.
For brands building a broader branding system, printed apparel labels often sit alongside other garment identity pieces such as Custom Labels & Tags. The best results usually come from thinking about the full label set together, not as separate one-off purchases.
How the Print Transfers Onto Fabric and Stays Put
The process varies by supplier and material, but the basic sequence is familiar: artwork is prepared, colors are separated if needed, the design is printed or transferred, and then the print is cured or bonded so it holds under wear and laundering. The details matter more than the buzzwords. A label that looks crisp in a proof but cracks after a few washes is a failed production choice, even if the first sample looked attractive.
For short runs and detailed artwork, digital printing is often the easiest path. Screen printing is still widely used where color density and repeatability matter more than tiny tonal variation. Some related printed components may use offset or flexographic methods, but the label system has to match the garment, the fabric surface, and the wear environment. There is no universal process that fits every application.
The main performance question is whether the print can flex with the textile without lifting, fading, or cracking. On stretch knits, that means the ink system or transfer layer needs some tolerance for movement. On cotton jersey, softness and edge finish matter a great deal. On heavier garments, you may have more room for structure, but that does not remove the need for a clean hand feel.
Several variables decide how well the label performs:
- Base fabric - cotton, polyester, blends, and stretch knits all behave differently.
- Ink or transfer system - some are softer, while others resist abrasion better.
- Curing method - heat, pressure, and dwell time affect bond strength.
- Placement - neck, side seam, or outer panel changes wear and wash exposure.
- Garment use - fashion basics and athletic apparel do not face the same stress.
If the garment is going to be washed often, stretched, or worn close to the skin, ask for wash testing on the actual textile rather than a similar-looking substitute. That sounds obvious, but many issues show up only after the label is placed on the real fabric. A proof that holds on a smooth swatch can behave very differently on a rib knit or a heavily dyed garment.
For buyers who evaluate suppliers by process control, it helps to ask what type of wash or rub testing is available before production. The ISTA site is useful as a general reference point for testing discipline, even though garment labels are a different category from shipping packs. The larger lesson is the same: test the finished system, not just the artwork.
Cost, MOQ, and Quote Drivers Buyers Should Compare
Pricing for water labels printing is driven by a narrow but very practical set of variables. Size, number of colors, placement, run quantity, and finishing requirements usually matter more than anything else. If the label needs folding, cutting, sorting by size, or packing into separate sets, the unit cost rises quickly because those are all real handling steps, not abstract extras.
For reference, a simple one-color neck print on a larger run may land around $0.12-$0.25 per unit. A more detailed multi-color application, custom placement, or a smaller order can push the price to $0.28-$0.60 per unit or higher. These are realistic buyer ranges, not guarantees. Artwork complexity, fabric behavior, and sample requests can move the quote in either direction.
MOQ tends to cause the most confusion. A supplier may look expensive on a 500-piece order and very efficient on a 5,000-piece order, but the difference is mostly setup economics. The same prepress, proofing, and production preparation has to happen either way. When fewer units absorb those costs, the price per piece rises. That is normal and usually unavoidable.
The comparison only makes sense if you ask for a full breakdown. A clean quote should show unit price, setup cost, proofing charges, sample fees, and any packaging or sorting requirements. If one supplier includes a digital proof and another charges separately for it, the lower number can disappear fast once the real scope is clear. Buyers lose time when they compare only the headline unit price and ignore what sits underneath it.
| Order Type | Typical Unit Cost | Best For | Main Tradeoff |
|---|---|---|---|
| Simple one-color run, 5,000+ pcs | $0.12-$0.25 | Core basics, repeat styles | Lowest unit price, but higher total commitment |
| Mid-size multi-color run, 1,000-3,000 pcs | $0.18-$0.40 | Seasonal drops, mixed apparel lines | More setup cost per piece |
| Small custom run, under 1,000 pcs | $0.28-$0.60+ | Sampling, limited editions, test launches | Higher unit cost, less room for error |
One more detail worth checking: ask whether sample charges are credited back on the final order. Some suppliers apply them to production, some do not. That single line in the quote can change the effective cost more than a minor unit-price difference. If your brand also buys broader garment branding or packaging support, reviewing Manufacturing Capabilities can help you understand whether the production setup matches the finish level you expect.
Production Steps, Timeline, and Proof Approval
The production sequence is usually straightforward on paper, but delays happen when artwork is incomplete or placement is not clearly defined. Most of the time, the problem is not the print run itself. It is the gap between what the buyer imagined and what the file actually says.
- Request specs and pricing.
- Submit artwork, dimensions, and placement notes.
- Review the digital proof or strike-off.
- Approve the sample if one is required.
- Run production.
- Inspect for consistency and finish quality.
- Pack and ship.
For clean, standard jobs, many suppliers can turn production around in 7-12 business days after proof approval, with shipping added afterward. More complex orders take longer, especially if they need revisions, color matching, or a physical sample round. Buyers often underestimate that proofing can be the longest part of the schedule when files are not final.
Proof approval deserves careful attention. Small text can disappear at label size, thin lines can break up, and a brand color that looks fine on screen may read differently once it sits on a dyed fabric. That matters most on black, navy, heather gray, or textured materials, where contrast and edge definition are less forgiving.
Late changes are the fastest way to stretch a timeline. So is vague placement language. “Somewhere near the neck” is not a specification. A usable brief should say where the label sits, how far from seams or hanger loops it needs to be, and whether the print must align with an internal care seam or another garment construction feature. The more exact the placement note, the fewer surprises later.
For quality control, ask for the sample on the same textile construction you plan to sell. A label that works on a generic swatch may still fail on the real garment if the fabric has more stretch, a different dye load, or a more pronounced texture. ASTM-style testing practices are useful as a mindset even when the exact standards vary by product type. The goal is consistency, not guesswork.
Spec Choices That Change Feel, Stretch, and Wash Life
The final feel of the label is shaped by a handful of specification choices that can be easy to overlook during sourcing. Fabric type, label size, edge finish, placement, and print system all influence whether the inside of the garment feels soft and clean or slightly off, even if the artwork itself is correct.
Lightweight garments usually need a softer, more flexible treatment. Performance wear has to tolerate movement, sweat, and frequent washing, so stretch recovery and crack resistance become more important. Heavier garments can handle more structure, but buyers still notice rough edges or stiff hand feel. A label that works technically but feels unpleasant is still a poor choice.
The most useful decisions are the ones that balance comfort and durability:
- Soft hand feel vs. maximum durability - a label rarely optimizes both at once.
- Color system - CMYK helps with full-color art; spot colors are stronger for brand matching.
- Edge treatment - cleaner edges reduce curling and lifting.
- Stretch behavior - more stretch means more attention to crack resistance.
- Garment category - a fashion tee and an athletic top do not need the same construction.
Finish also changes perception. A matte surface often feels more restrained and premium on certain fabrics, while a glossier finish can improve visibility on dark materials. Neither is universally better. A treatment that looks clean on smooth jersey may look wrong on ribbed cotton or a textured knit, so the garment itself should guide the choice.
Do not approve a print on a random swatch and assume the bulk run will match. The actual garment construction matters. Dye density, knit structure, and stretch recovery can all change how the label reads and how it survives laundering. Buyers who skip that check usually discover the problem only after the labels are already in production.
If a collection includes several styles, ask whether one spec can work across them all. Sometimes a shared setup simplifies ordering and keeps the branding consistent. Sometimes it creates a comfort issue on one garment and a durability issue on another. Forcing one label type across very different fabrics usually costs more in the long run than splitting the spec properly at the start.
For brands that care about the broader packaging story as well, it can be worth checking whether the supplier supports responsible material choices or related certification needs in paper-based components. If your apparel line includes printed collateral outside the garment, FSC is a useful reference for wood-based and paper sourcing standards.
Common Ordering Mistakes That Cause Reprints
The most common failure is simple: artwork that looks fine on a monitor becomes unreadable at label size. Tiny text, hairline rules, and detailed logos often need to be simplified before production. If the mark only works at a larger size, it is not the right mark for the label.
Another expensive mistake is approving a proof without checking actual placement and contrast. A logo can look centered on screen and still sit too high, too low, or too close to a seam once it is applied to the garment. Stretch can also change proportions, which matters if the label includes care copy, size information, or a lockup that depends on clean spacing.
Other ordering errors show up in operations rather than artwork:
- Ordering too few units and paying for a second setup.
- Mixing label specs across styles without documenting the differences.
- Skipping wash testing until after the full run has shipped.
- Sending several logo versions and expecting the supplier to guess the right one.
Quote drift is common when buyers underestimate how many versions the order actually needs. One style, two sizes, three colorways, and two fabrics can become a messy production matrix very quickly. If the labeling plan is not defined early, the quote usually rises later because the supplier has to protect against errors across the most demanding version.
A smart habit is to request a short sample run or strike-off before committing to full production if the label is new or the textile is unusual. That small extra step is usually cheaper than a reprint. Reprints are always more expensive than the note that would have prevented them.
What to Prepare Before You Request Samples
Better information produces better quotes. That is true for most garment sourcing, and it is especially true for water labels printing, where a small change in file quality or fabric type can affect both price and performance.
Before requesting samples or a quote, prepare a file packet with the following:
- Final logo artwork in vector format if possible.
- Label dimensions in millimeters or inches.
- Garment type and fabric content.
- Color targets, including Pantone references if available.
- Placement notes with measurements if the location matters.
- Quantity splits by size, style, or colorway.
- Target delivery date so lead time can be judged realistically.
Ask for pricing at multiple quantity breaks, not just the run size you hope to order. Check whether the setup fee includes proofing, and ask if the proof is digital only or if a physical sample costs extra. Those details make a bigger difference than many first-time buyers expect. A quote that looks lower at first glance can become the more expensive option once all the line items are included.
Artwork quality matters too. Clean vector files keep the process controlled and reduce back-and-forth. A low-resolution JPEG with small type forces extra cleanup, and cleanup is a labor step, not a favor. That often means added cost or added time, sometimes both.
Once a sample is in hand, test it on the actual garment, then wash it. Check readability, hand feel, stretch recovery, and edge durability. If the print peels, cracks, or feels irritating, revise the spec before moving forward. Bulk production rarely fixes a weak sample; it usually magnifies the problem.
For Brands That Need a low-profile but polished way to present identity inside the garment, water labels printing can be a practical upgrade. It is cleaner than sewn tags, usually more comfortable, and often easier to standardize across a line. The best outcomes come from treating it as a technical finishing decision, not an afterthought.
Is water labels printing softer than sewn neck tags?
Usually yes, because there is no folded fabric tag rubbing against the skin. The comfort improvement is most noticeable on lightweight or fitted garments, where a sewn tag can become the first thing people notice.
How long does water labels printing take after artwork approval?
Simple runs can move quickly after proof approval, but revision cycles often slow the job down. Ask separately for proof time, production time, and shipping time so you do not confuse turnaround with transit.
What affects the price of water labels printing the most?
Quantity, size, color count, and special handling usually drive most of the unit cost. Art cleanup, sample requests, and split sizing can also push the quote higher.
Will water labels printing hold up in the wash?
It should, if the method matches the fabric and the label is properly applied or cured. Always test the final garment, because wash performance depends on both the label spec and the textile underneath it.
What files do I need before ordering water labels printing?
A clean vector logo, final dimensions, color references, and placement notes will save time. If you have multiple sizes or garment types, list them up front so the supplier can quote accurately.