Order Woven Labels for Beanies Retail Branding Buyers Trust
Why Woven Labels Beanies Retail Branding Starts Before the Beanie Hits the Shelf
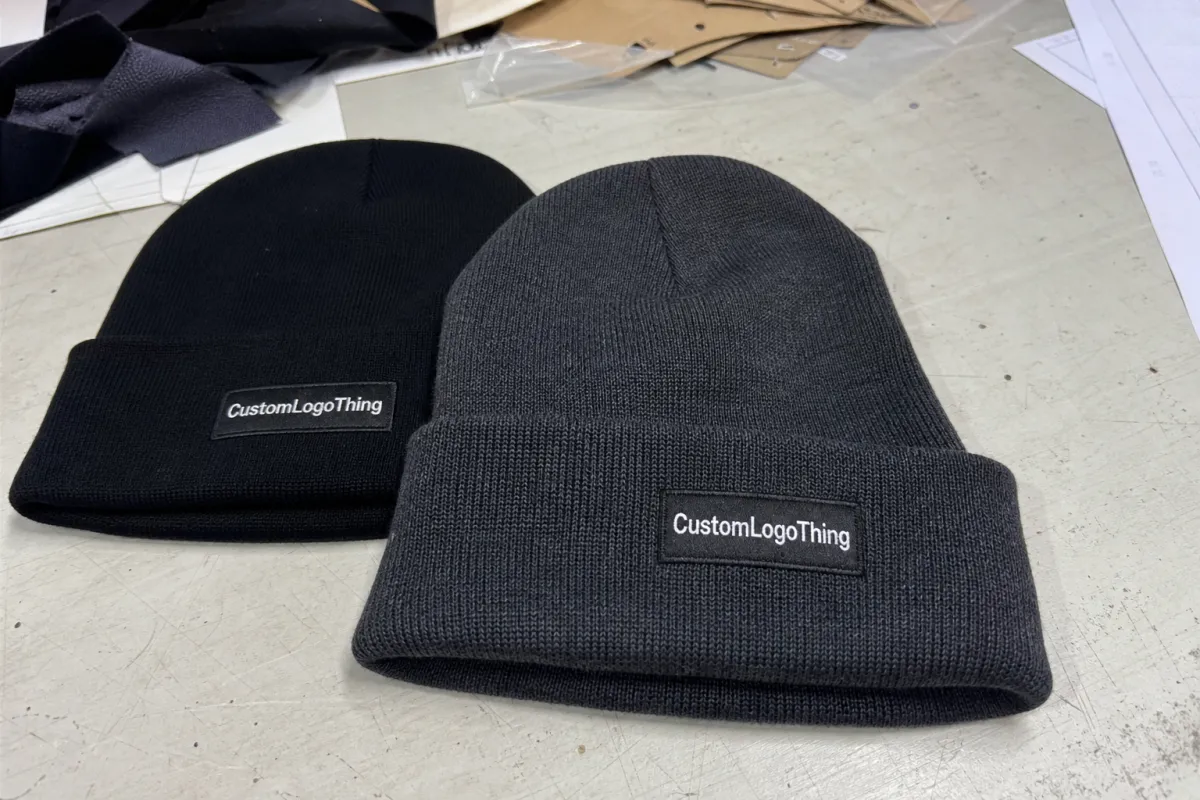
A shopper may feel the label before reading it. That is the first practical point behind Woven Labels Beanies retail branding: the label sits exactly where fingers grab the cuff, where the knit folds, and often close to the wearer’s forehead.
That small textile patch has an outsized job. It carries brand identity, perceived value, sometimes size or care information, and shelf recognition in a space that may be only 1.5 by 2.5 inches. On a folded beanie, that area can work hard, but only if the label is designed around the product rather than dropped onto it like a flat sticker.
A woven label is made from threads interlaced on a loom to form the background, logo, lettering, border, and color blocks. The design is built into the textile with yarn, not printed on top with ink. That construction is why woven labels often feel more permanent than surface prints, especially on knit accessories that are stretched, handled, worn under hoods, and stuffed into coat pockets.
Beanies are not T-shirts. The cuff stretches. The fold adds bulk. Ribbed knit expands unevenly. A label that looks crisp on a digital proof can curl, pucker, or look strangely oversized once it is sewn onto a 3-inch cuff. Good buying decisions answer three questions before bulk production starts: will the label look strong on the shelf, feel comfortable during wear, and survive normal use without fraying or cheapening the product?
Factory-floor rule: judge the label on the actual beanie, at actual size, under normal handling. A loose label on a table tells only half the story.
The strongest programs plan material, construction, cost, proofing, sampling, and attachment as one system. That prevents the usual late-stage surprises: a logo too detailed for thread, a label too stiff for the knit, or a sewing operation that costs more than the buyer expected.
How Woven Beanie Labels Are Made and Attached
The process starts with yarn selection. Polyester yarns are matched as closely as possible to the artwork colors, then loaded into the weaving setup so the loom can create the logo, letters, border, and background directly in the label. Polyester is common because it holds color well, resists abrasion, and tolerates repeated handling better than many softer but less stable fibers.
Buyers will usually hear three weave terms. Damask is the standard choice for fine detail because thinner yarns and tighter construction produce cleaner edges and more legible small letters. Satin has a smoother sheen and can make simple marks look polished, although tiny detail may not hold as sharply. Taffeta is more economical and slightly more textured, useful for block logos, basic care labels, or budget-sensitive runs.
Thread has thickness. That sounds obvious until a logo with hairline outlines, distressed texture, gradients, and a tiny tagline has to fit into a 1-inch badge. The woven version may need heavier strokes, fewer colors, or a simplified lockup. This is one of the most common points where buyers lose time: the screen artwork looks perfect at 400%, then the physical sample proves the design was never suited to weaving at retail-label scale.
Finishing changes how the label behaves on the beanie. A straight-cut label lies flat and is often sewn around the perimeter. A center-fold label wraps over an edge. End-fold labels tuck the short ends underneath for a cleaner face. Manhattan folds create a raised, framed effect. Miter folds angle the corners for a sharper patch-like finish. Loop folds work well for small side tabs that wrap around a seam or cuff edge.
Attachment deserves the same scrutiny as the label itself. Permanent retail labels are usually stitched as sewn-on patches, fold-over hem labels, side seam tabs, or labels captured into a seam. Adhesive backing can help with photography, temporary placement, or sales samples, but it is not a dependable permanent solution for beanies that flex, rub, and stretch. Stitch density, backing choice, edge softness, and placement all affect comfort.
Key Specs That Change the Look, Feel, and Durability
Label size is functional, not just visual. A 0.75-inch side tab can look refined with a simple icon. The same size can ruin a six-letter wordmark with a border. A 2 by 1.5-inch front cuff label gives more room for brand recognition, but on a shallow fisherman cuff it may dominate the knit. Before committing, mock up the exact size on the actual cuff. Even a paper print taped in place can reveal scale problems early.
Color planning needs realism. Thread is not ink. A Pantone reference helps communication, but stocked yarn shades may land slightly warmer, cooler, darker, or flatter than the brand color on a screen. Custom-dyed yarn may be available for larger programs, but it can add cost, approval time, and minimum quantity requirements. For smaller orders, selecting the closest stocked yarn is often the more practical decision.
Density changes both clarity and hand feel. Higher-density damask labels can hold sharper borders, cleaner lettering, and tighter shapes, yet they may feel firmer than softer, lower-density labels. On a beanie, that tradeoff matters. A firm patch can signal retail quality on a front cuff; the same patch can feel wrong on a thin, soft knit.
Edges show quality quickly. Heat-cut edges can reduce fraying, woven borders make the label look finished, and folded edges protect cut yarns from abrasion. Exposed cut edges need careful handling because the product stretches during wear, packing, and merchandising. If the label edge feels scratchy or starts lifting, the customer notices before they study the brand mark.
Placement drives shelf appeal. Front cuff labels are easy to see when beanies are folded in bins or stacked on tables. Side seam tabs feel quieter and suit minimalist branding. Rear seam labels can work for lifestyle positioning, though they are less visible at point of sale. Fold-over tabs add dimension, but the fold has to land cleanly or the label twists.
For woven labels beanies retail branding, the best specification is not automatically the most expensive one. It is the one that looks intentional on the shelf, supports the brand system, and still feels right after a full day of wear.
Cost, Pricing, MOQ, and Unit Cost Factors for Beanie Labels
Woven label pricing usually depends on quantity, finished size, weave type, color count, fold style, finishing complexity, and whether labels are supplied loose or sewn onto finished beanies. MOQ is not just supplier preference; it is arithmetic. Artwork preparation, loom setup, cutting, folding, sorting, and packing labor all have to be spread across the order. Fewer pieces means a higher unit cost.
As a planning range, simple loose woven labels may fall around $0.12-$0.35 each at higher quantities. Smaller runs, dense damask, custom folds, metallic yarns, special backing, or multi-color designs can move above that. Sewing attachment can add roughly $0.20-$0.75 per beanie depending on placement, alignment tolerance, labor market, and whether finished goods must be received, sorted, opened, labeled, inspected, refolded, and repacked. These ranges are not quotes; final pricing depends on the finished spec.
One- or two-color labels are typically the most economical. Additional thread colors add complexity, although the jump is not always dramatic if the weaving setup can already support the design. Tight placement requirements can raise cost too. Centering every front label within 1/16 inch on a ribbed cuff is a different production request than “sew label to front cuff.” The tighter the tolerance, the more inspection and rework risk enters the job.
| Label Option | Typical Use | Cost Impact | Buyer Watchout |
|---|---|---|---|
| Simple damask label, 1-2 colors | Clean logo badge or side tab | Lower to moderate | Keep artwork bold enough for thread |
| High-density damask, 3-6 colors | Premium front cuff branding | Moderate to higher | Check firmness against soft knits |
| Fold-over tab label | Side seam or cuff edge branding | Moderate | Confirm fold position and stitch path |
| Patch-style woven label with backing | Structured retail logo panel | Higher | Avoid bulky feel near the forehead |
Attachment often changes the economics more than buyers expect. Loose labels are one product. Finished, labeled beanies are a handling project. If beanies arrive individually bagged, every unit may need to be opened, positioned, sewn, checked, refolded, and returned to packaging. That labor can exceed the cost of the label itself.
A useful quote request includes finished label dimensions, vector artwork, color references, fold type, quantity, attachment method, beanie material, target delivery date, and retail packaging requirements. If the program also includes hangtags, belly bands, barcode stickers, or boxes, the Custom Labels & Tags category is a sensible place to map the full identification system rather than treating each component as an isolated purchase.
Lowest unit cost is not the same as best value. A label that curls, scratches, or muddies the logo weakens the full retail presentation, especially on a product where the label may be the only visible brand mark.
Process, Timeline, and Production Steps from Artwork to Finished Beanies
A typical path runs through artwork review, label specification, digital proof, woven sample or pre-production sample, approval, bulk weaving, cutting and folding, quality check, attachment, packing, and shipment. For a first order, many buyers should plan roughly 2-4 weeks after clean artwork approval for label production and attachment, with extra time for sampling, internal review, and freight. Complex programs take longer.
Artwork review is technical. The supplier checks line thickness, minimum text size, border spacing, color count, yarn availability, and whether the logo needs adjustment for weaving. A thin outline may need to become a heavier stroke. A tiny registered trademark symbol may need to be enlarged or removed. A gradient may need to become two or three solid thread colors.
The proof should show more than a nice rendering. It should include actual dimensions, thread colors or yarn references, fold lines, cut lines, border width, and placement notes. If the label wraps over a cuff edge, the proof should make clear which side is front-facing after folding. If stitching crosses the label face, the stitch path should be shown or described.
Sampling is worth the time for high-visibility retail launches, new suppliers, unusual colors, small typography, or premium beanies. A physical woven sample lets a buyer check clarity, hand feel, thickness, edge behavior, and color under normal light. For programs with broader packaging requirements, teams may also reference testing and sourcing frameworks from groups such as ISTA for distribution testing or FSC for responsibly sourced paper components like hangtags and sleeves.
Lead time shifts with order quantity, label complexity, sample rounds, attachment needs, beanie availability, seasonal demand, and shipping method. Lock the label spec early. A small artwork change after sampling can restart color review, loom setup, or approval steps, and that delay can push photography, retail compliance checks, barcode coordination, and launch packing out of sequence.
Step-by-Step Buying Guide for Retail-Ready Beanie Labels
Start with the job the label must perform. Is it a premium logo badge, a quiet side tab, an interior care label, a size marker, or a combined branding and compliance component? That decision shapes every spec after it. With beanies, clarity usually beats decoration.
- Choose the beanie style first. Ribbed knits, fisherman beanies, slouch styles, and double-layer winter beanies all create different branding areas. A 3-inch cuff offers more room than a shallow roll, and a thick rib can distort small rectangular labels.
- Simplify the artwork. Remove tiny secondary text, reduce color count, thicken fine lines, and choose a logo version readable from normal retail distance, often 2-4 feet away.
- Select the construction. Decide on damask, satin, or taffeta; choose straight cut, end fold, center fold, or loop fold; then confirm whether the edge should be heat cut, woven, folded, or backed.
- Confirm placement. Use a mockup or physical sample to check visibility when the cuff is folded, when the beanie is hung, and when it is packed in a bin, sleeve, or gift box.
- Approve the sample carefully. Check logo clarity, hand feel, stitch alignment, stretch interaction, color match, edge finish, and consistency with the intended retail presentation.
- Document the final spec. Save measurements, yarn references, fold style, placement photos, stitch thread color, and approved artwork so reorders do not drift across seasonal colorways.
Good documentation sounds tedious until the reorder arrives. Then it saves money. A one-page spec sheet can protect brand consistency across future beanie colors, new warehouse teams, and repeat production runs.
Common Mistakes That Make Beanie Labels Look Cheap
The first mistake is shrinking a full-size logo onto a tiny label without simplifying it. Thread cannot reproduce every digital detail at miniature scale. Small counters in letters close up, thin lines disappear, and delicate borders can look jagged.
The second mistake is choosing label size before confirming cuff height. If the cuff is 2.25 inches deep and the label is 2 inches tall, the branding may sit too close to the fold edge or look cramped after stitching. Leave breathing room. Even 1/8 inch of visual space can make a small label feel more balanced.
Color assumptions cause trouble as well. A screen color is light passing through pixels; thread is dyed material reflecting light. Ask for yarn options, a physical sample, or an acceptable tolerance before production. If exact brand color is non-negotiable, say that early and expect extra review time.
Over-stiff labeling on soft knits is another quiet failure. A patch may look premium on a table, then feel bulky against the forehead. For acrylic, wool blends, recycled yarns, or cashmere-like knits, test the label on the finished product body, not just in hand.
Weak edges show fast. Cut edges can fray, curl, or lift as the beanie stretches. Stitching too close to a delicate woven border can distort the design. Crooked sewing, mismatched thread color, and tension puckers make even a well-made label look careless.
Skipping a physical sample is the operational mistake buyers underestimate most. It is not always necessary for a reorder with proven specs, but for a first retail run, new supplier, or new beanie style, sampling is cheap insurance. The goal is not a good-looking loose label. The goal is a label that looks right on the actual beanie under retail handling.
If you want to compare how other branded components affect presentation, reviewing practical custom branding case studies can help frame the label as one part of a larger customer perception system.
Next Steps: Build a Spec Sheet Before You Request Samples
Before requesting samples, gather the core files and product details: vector logo artwork, brand color references, beanie photos or samples, desired placement, quantity range, target delivery date, and retail packaging requirements. If hangtags, belly bands, barcode stickers, or gift boxes are part of the program, include those from the start so the label supports the full presentation.
Create a simple spec sheet with finished label dimensions, weave preference, fold type, edge finish, backing preference, sewing location, stitch thread color, and acceptable logo simplifications. Add a photo or drawing showing placement on the cuff. If the label wraps over an edge, mark front, back, fold line, and stitch zone clearly.
Ask for a proof that shows actual size, fold lines, cut lines, and stitch placement. Many label issues come from unclear assumptions before production, not poor manufacturing. A supplier can only build what has been specified.
Order or approve a physical sample when the label carries the main retail look, when the beanie has a higher price point, or when the logo includes small detail. Then document approved colors, yarn references, measurements, fold style, and placement photos. That record keeps future reorders consistent across new colorways and seasonal launches.
Woven labels beanies retail branding works best when design, material, cost, and timeline are planned together before bulk production begins. Get the label right early, and the finished beanie feels more intentional from first shelf impression to first wear.
FAQ
What size should woven labels for beanies be for retail branding?
Most beanie labels should be sized to the cuff depth and logo detail rather than pulled from a generic template. A small side tab may only need room for a simple mark, while a front cuff label usually needs more width for legible branding. Test the label at actual size on the folded beanie before approving production.
Are woven labels better than printed labels for beanie retail branding?
Woven labels usually feel more durable and premium because the logo is built from thread rather than printed on the surface. Printed labels can work for gradients, very fine detail, or photographic effects, but they may not deliver the same textile character on a knit beanie. For most retail beanies, woven labels are preferred when shelf appeal and wear resistance matter.
How much do custom woven beanie labels cost?
Cost depends on quantity, label size, weave type, color count, fold style, finishing, and whether the labels are sewn onto the beanies. As a planning range, simple loose labels may cost around $0.12-$0.35 each at higher quantities, while attachment can add roughly $0.20-$0.75 per beanie. A complete quote should include sampling, label production, sewing if needed, packing, and shipping.
How long does the woven label process take for beanies?
Timeline depends on artwork readiness, sample approval, order quantity, attachment requirements, and shipping method. A first-time order often needs about 2-4 weeks after clean artwork approval, plus time for sampling and freight. Reorders with documented specs can move faster because construction and placement have already been approved.
Can woven labels on beanies include small text or care details?
Small text is possible within limits, but thread thickness makes very tiny lettering harder to read than printed text. Care details may be better placed on an interior label if the front label needs to stay clean and brand-focused. Ask for an actual-size proof or physical sample before approving labels with small typography.


