Woven Labels Material Guide for Ceramic Studios: What Actually Matters
A customer lifts a mug, studies the glaze, then notices the textile around it. Maybe it is an apron in the studio, a linen wrap around a gift set, a tool roll, or a pouch that holds smaller work. That little label on the textile does more than identify a brand. It tells the buyer whether the studio pays attention to details beyond the clay itself.
This Woven Labels Material guide for ceramic studios focuses on the choices that actually change the result: thread type, weave density, fold, edge finish, backing, size, and how the label behaves on real fabric. A woven label is not decorative trivia. It has to survive washing, handling, dust, folding, sewing, and a close look in gallery lighting.
Woven labels are made by weaving colored threads into the design instead of printing ink on top of fabric. That gives them a different feel from paper tags or printed cotton labels. The surface has structure. The edges can be clean and compact. The brand mark reads like part of the textile rather than something added at the last minute.
Ceramic studios use woven labels in more places than many buyers expect: aprons, towels, linen wraps, canvas pouches, tool rolls, tote bags, product cases, and textile packaging. Some also use them for short care notes or edition markers on reusable wraps. Paper hang tags still matter for shelf display and shipping inserts, but a woven label stays with the item and keeps doing its job after the sale.
The right label is rarely the most elaborate one. It is the one that suits the fabric, the sewing method, the brand style, and the amount of handling the textile will take.
Most label mistakes start with the artwork, not the loom. A studio falls in love with a tiny logo mockup before checking the seam allowance on the apron or the thickness of the towel edge. The practical questions come first: what material, what weave, what fold, what backing, what size, and what the label will have to endure.
How Woven Label Materials Work on Aprons, Wraps, and Studio Textiles
Most custom woven labels for textiles are made with polyester threads. That is a practical choice. Polyester holds color well, tolerates laundering, resists fraying, and can render sharper detail than many natural fibers at small sizes. For studio use, those traits matter more than novelty.
Three weave types appear often: damask, satin, and taffeta. Damask is the standard premium option for fine detail. It has a tighter weave and smoother surface, which helps small studio names, narrow borders, and compact marks stay legible. Satin is softer and more lustrous, so it works well on wraps, apparel-adjacent textiles, and labels near the skin. Taffeta is the more economical route, slightly more textured, and usually best for straightforward identification rather than intricate artwork.
Thread density changes more than people expect. A dense weave can keep a 20 mm or 25 mm label readable. A looser weave may turn a thin serif, a line drawing, or a tiny tagline into a blur. If your studio mark uses a hand-stamped pottery symbol, do not assume every rough edge can be translated into thread. Some details need to be simplified for the label to stay clean.
Color also behaves differently in woven construction. There are no gradients, no transparency tricks, and no soft digital fades. Strong contrast and controlled palettes usually work best. Ceramic brands often choose earthy tones like charcoal, warm gray, rust, olive, cream, and black. Those can look excellent, but low contrast can disappear faster in thread than on a screen. Two colors may feel balanced in a brand deck and still read weak once woven at actual size.
The textile that carries the label matters just as much as the label itself. A soft label on an apron neckline is a different decision from a stiff label sewn onto a canvas pouch or a tool roll. A beautiful proof can still be a poor product if the finished item it is sewn onto bends, washes, or folds in a different way than expected.
If you are comparing woven labels with printed fabric labels, paper stickers, or hang tags, start with the broader Custom Labels & Tags options first. Ceramic studios often need a mix: woven labels for cloth goods, kraft paper tags for retail display, and sturdier shipping materials for cartons and inserts.
Key Material Choices: Weave, Fold, Edge, Backing, and Size
Start with the weave. Damask is usually the safest choice for detailed logos, short text, and a refined retail presentation. Satin suits softer, more tactile applications. Taffeta can be the right call for utility labels, especially when the studio name or care line is simple and the budget is tight.
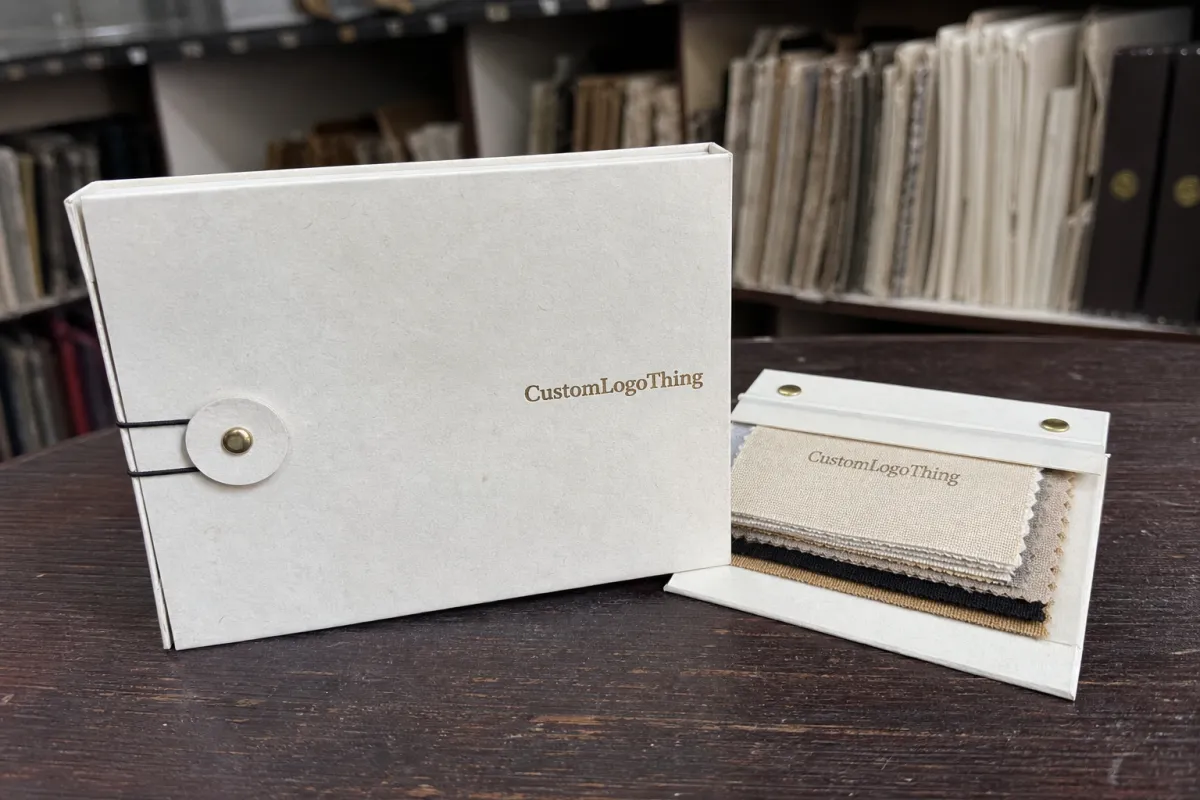
Then decide on the fold. A straight cut label is flat and best for patch-style placement. End fold labels tuck the left and right edges under, which makes them easier to sew onto edges. Center fold labels work well in seams and are common on aprons or care labels. Loop fold labels are useful on towel tabs, hanging items, and tool rolls. Miter fold labels give a neat corner treatment, but they usually cost more and need more careful positioning.
| Label Choice | Best Studio Use | Practical Note |
|---|---|---|
| Damask weave | Retail aprons, gift wraps, collector pouches | Best for fine detail and small lettering |
| Satin weave | Soft wraps, apparel-like goods, premium towels | Soft hand with a slightly glossy finish |
| Taffeta weave | Tool rolls, basic totes, simple utility labels | Lower cost and a bit more texture |
| Center fold | Apron seams and care labels | Confirm orientation before sewing |
| Loop fold | Towels, roll ties, hanging tabs | Good for visible edge placement |
Edge finish affects both durability and feel. Heat-cut edges reduce fraying on polyester labels. Folded edges create a neater sewn finish and softer contact points. On a towel corner the difference may be subtle. On an apron neckline it is obvious. Anyone who wears the label all day will notice whether the edge scratches, curls, or lies flat.
Backing should be chosen with the final use in mind. Sew-on labels are the most dependable option for washable studio textiles. Iron-on backing can help during placement and may be useful for lighter-use items, but it should not be treated as the only attachment method on heavily washed aprons, clay towels, or textured fabrics. Adhesive alone is rarely enough for serious studio use.
Size is where many orders go wrong. A 20 mm label can look elegant in a mockup and then lose the studio name once thread is woven. A 60 mm label gives room for detail but can overpower a minimal apron or small pouch. Think in finished dimensions, not just design canvas size: final width, folded size, seam allowance, and the height of the smallest readable text. In practice, many buyers are happier after increasing the artwork size by 10 to 20 percent before production.
Color contrast remains the quiet deciding factor. Charcoal on oatmeal linen usually works. Tan on cream may disappear under warm gallery lighting. Gray on sage can look calm on screen and underwhelming in the hand. The woven label needs to read cleanly at arm’s length, not only in the proof.
Pricing, MOQ, and Unit Cost Factors for Custom Woven Labels
Woven label pricing is driven by setup, artwork preparation, material, size, weave density, thread colors, fold style, backing, quantity, and packing requirements. MOQ, or minimum order quantity, matters because loom setup and proofing are spread across the full run. Small orders often cost more per label, even if the label itself is physically tiny.
For planning purposes, simple woven labels may fall around $0.18 to $0.45 per unit at several thousand pieces, depending on size, weave, color count, and finishing. Smaller studio runs can move into the $0.55 to $1.20 range once setup and folding are included. Those are working ranges, not quotes. They are still useful because they help a studio budget before requesting samples or final pricing.
The biggest cost adders are easy to predict once you know what to watch for: larger dimensions, high-density damask, more thread colors, metallic threads if they are available, iron-on or adhesive backing, custom folding, mitered corners, and individual packing. Shipping can also swing the final number if labels are needed before a market date or a wholesale delivery window.
It rarely makes sense to overspend on a purely functional label for a tool roll that lives in the studio. A simpler weave and two thread colors may be enough. Spend more where the customer sees and touches the label directly: retail aprons, gift wraps, collector pouches, and branded textile packaging.
Ask for pricing at two or three quantities. A run of 500 pieces may not look as good on paper as 1,000 or 2,500 if the same design can be used across aprons, towel bundles, pouches, and packaging. The full cost picture should include sewing labor, sample testing, storage, and whether the finished item supports a higher retail price. For a small studio, the label is part material, part presentation, part labor plan.
If the packaging system includes paper components and recycled claims, keep the claims separate unless the supplier has confirmed the material content. The Forest Stewardship Council is a solid reference for paper and fiber sourcing language, while the EPA recycling resources can help teams speak more accurately about recycling and waste reduction.
Process and Timeline: From Artwork to Finished Woven Labels
The normal process is simple enough: artwork review, material recommendation, quote, digital proof, sample or pre-production confirmation if needed, bulk weaving, cutting, folding, inspection, and shipping. The smoother the order, the less time is spent correcting assumptions after the proof arrives.
Before asking for a quote, gather the logo file, label size, thread colors, fold type, backing preference, quantity, and the item the label will be attached to. Vector artwork is best. A clear photo of a pottery stamp or hand mark can also help the production team understand what should stay recognizable and what can be simplified.
Artwork conversion is often the hardest part for ceramic brands. Thin serif text, small brush strokes, shaded clay shapes, and very compact taglines may need to be redrawn for thread. Woven labels are judged from a short viewing distance, but they are still small. A design that works on a website banner may fail at 25 mm wide.
The proof should confirm size, color placement, fold lines, orientation, seam allowance, and readability after folding. A center fold label with the logo facing the wrong way is not a minor inconvenience if the aprons are already cut and scheduled for sewing.
Timelines vary by order size, complexity, proof revisions, sampling needs, and shipping method. A reasonable planning window for many custom woven label orders is about 10 to 20 business days after proof approval. Sampling or specialized finishing can add time. Holiday periods, rush production, and freight delays can stretch the schedule further.
Ceramic studios should build in buffer time before markets, gallery drops, holiday launches, workshop openings, and wholesale deliveries. Labels should be ordered before the textile batch is sewn, not after. When labels arrive late, the usual result is a mismatch between the fabric, the fold, and the deadline. That is avoidable, and expensive to fix.
Step-by-Step Selection Guide for Ceramic Studio Label Orders
- Identify the application first. Decide where the label will live: apron neck seam, towel corner, canvas pouch, product wrap, tool roll, tote bag, or care label. Each surface asks for a different balance of size, softness, and visibility.
- Decide what the label must do. Branding, care information, maker identification, size marking, limited-edition marking, and premium finishing all need different amounts of space.
- Measure the sewing area. Check seam allowances, fold direction, fabric thickness, and how the label sits in use. A towel edge moves differently than a flat pouch front, and an apron neckline gets more wear than a packaging band.
- Simplify the artwork for weaving. Reduce tiny text, remove gradients, strengthen contrast, and decide which details genuinely matter. A clean studio mark beats a crowded miniature illustration.
- Select the material and weave. Choose damask for detail, satin for softness, or taffeta for utility. The right hand feel depends on whether the textile will be worn, washed, or simply handled occasionally.
- Choose fold and edge finish. Match the construction to the sewing method, then verify orientation so the label does not end up upside down on a loop, seam, or hanger tab.
- Review the proof at actual size. Print it or place a ruler on the screen. A label that fills a monitor can be tiny in the hand.
- Test placement on a sample textile. Check comfort, visibility, laundering needs, and whether the label feels balanced beside the ceramic piece or the package it supports.
From a production point of view, this is where money gets saved. A paper mockup taped to a towel or apron can prevent hundreds of labels from being sewn in the wrong place. Photograph the mockup from normal customer distance. Then look at it beside the mug, bowl, tile, or ornament. Scale changes the moment the ceramic piece enters the frame.
If the label belongs to a fuller packaging system, compare it with the other materials too: kraft paper wrap, corrugated cardboard shipper, note card, tissue, or biodegradable packaging elements. The woven label should belong to that system instead of competing with it.
Common Mistakes Ceramic Makers Make When Ordering Woven Labels
The first mistake is designing a woven label like a sticker. Thread is not ink. Too many thin lines, gradients, shaded textures, and tiny type can turn muddy. Simplifying the design is not a compromise on brand quality. It is translation into the correct production language.
The second mistake is choosing by appearance alone and forgetting the fabric beneath it. Rough canvas, soft linen, washed cotton, and apron necklines ask for different hand feel. A label that works on a pouch may irritate the skin if used the same way on workwear.
The third mistake is making the label too small because the brand prefers restraint. Minimal can be smart. Minimal can also become unreadable. If the studio name or care text cannot be read at a glance, the label is not doing its job. Ask for the smallest readable text height before approving production.
The fourth mistake is ignoring fold direction. Loop labels, towel tabs, and seam-inserted labels can face the wrong way if the proof is reviewed flat and never imagined in use. Mark the top edge. Draw an arrow. Solve the orientation before the order is cut.
The fifth mistake is trusting a soft color palette too much. Cream on tan, gray on sage, and rust on brown can all look sophisticated in a mockup and disappear once woven at small scale. What feels calm on a brand board can go quiet fast in thread.
The sixth mistake is choosing iron-on backing where sewing is the better option. Heat, washing, folding, and textured fabric can all challenge adhesive. For aprons, clay towels, and heavily handled wraps, sew-on construction usually lasts longer and looks more deliberate.
The seventh mistake is underestimating sewing labor. Applying 500 labels in-house between trimming, glazing, packing, and shipping is real work. Placement consistency matters too. A simple guide or jig can save time and keep the batch looking polished.
The eighth mistake is ordering too late. That leaves no room for proof changes, sampling, or a correction if the fold or size needs to shift. A Woven Labels Material guide for ceramic studios is only useful if it is used before the deadline starts pressing.
Expert Next Steps Before You Request a Label Quote
Gather physical samples first: apron fabric, towel edge, pouch material, wrap ribbon, canvas bag, or the textile band where the label will be attached. Texture, thickness, seam bulk, and wash behavior tell you things a PDF cannot.
Build a simple spec sheet. Include quantity, finished size, fold type, background color, logo color, attachment method, intended use, and whether the item will be washed. If budget is tight, pick one primary application first, such as retail aprons or reusable product wraps, rather than trying to label every textile in the studio.
Prepare the artwork in vector format if possible. Send a reference image of the pottery mark, stamp, or logo so the woven version can be compared with the original. Ask directly about the smallest readable text height, the most suitable weave, and which details should be removed before production starts.
Plan quantity around actual sales behavior: upcoming markets, online volume, wholesale packaging, workshop aprons, and staff apparel. For some studios, 1,000 labels shared across several uses makes more sense than 300 labels for one narrow purpose. For others, a small test run is the wiser move. The right answer depends on how fast the fabric is consumed and how stable the branding is.
Make a placement mockup by taping a paper rectangle to the textile and photographing it from normal viewing distance. Then place it beside the ceramic piece, the wrapping material, and any paper tag or insert. If you are also ordering paper or textile packaging, compare options through Custom Labels & Tags so the woven piece fits the full presentation rather than standing apart from it.
A good woven label does not need to announce itself loudly. It needs to fit the fabric, stay readable, survive handling, and make the handmade object around it feel finished. That is the standard worth aiming for.
FAQ
What is the best woven label material for ceramic studio aprons?
Damask woven labels are usually the best choice for studio aprons when the logo has fine detail or small text. For necklines or areas that touch skin, choose a softer hand feel and a folded edge. Sew-on attachment is typically more durable than relying only on adhesive or iron-on backing for washable aprons.
Can a woven labels material guide for pottery makers help with packaging labels too?
Yes. The same material decisions apply to reusable wraps, cloth pouches, tool rolls, tote bags, and textile packaging. For non-wearable packaging, a slightly firmer or more economical label may work because skin comfort is less critical. The important part is matching the fold, size, and sewing method to the material carrying the label.
Are woven labels washable enough for clay towels and studio textiles?
Polyester woven labels usually handle laundering well and resist fading better than many printed fabric labels. For clay towels or heavily used textiles, choose sew-on labels and avoid delicate placement points. It is worth testing a sample through the washing and drying routine your studio actually uses before labeling the full batch.
How small can text be on custom woven labels for ceramic brands?
Readable text depends on weave density, font style, contrast, and label size. Very thin lettering, tiny taglines, and detailed maker marks may need to be enlarged or simplified. Always review the proof at actual size and ask whether the smallest text will weave clearly before approving production.
How much do custom woven labels cost for a small ceramic studio?
Cost depends on quantity, size, weave type, thread colors, fold style, backing, and finishing requirements. Smaller runs usually have a higher unit cost because setup is spread across fewer labels. Ask for pricing at multiple quantities so you can see whether ordering more labels lowers the per-piece cost enough to justify the inventory.


