Ceramic Pom Pom Beanies Digital Proof Checklist Basics
Most beanie proof problems do not start at the knitting machine, the embroidery head, or the trim station. They start on a flat approval file. A logo looks centered on a PDF, then sits too close to the cuff seam once the hat is folded, stretched over a rounded head, topped with a pom, steamed, packed, and handled.
That is why a ceramic Pom Pom Beanies Digital Proof checklist matters. It gives the buyer a structured way to review every visible and technical detail before the order moves into sampling or bulk production. Ten minutes of careful proof review can prevent weeks of rework, especially on winter hats where soft knit fabric, raised decoration, and decorative trim all interact.
A digital proof is the pre-production approval file that turns a beanie idea into manufacturing instructions. It usually shows the beanie style, cuff height, pom pom color, logo placement, decoration method, patch or label details, artwork size, Pantone or thread references, and any ceramic-style logo element included in the design. For a custom hat, those details are not cosmetic footnotes. They tell production what to buy, cut, sew, stitch, attach, inspect, and pack.
The word ceramic needs clarification before approval. Buyers may use it to describe a true ceramic badge, a glossy molded charm, an enamel-style plate, a ceramic-look patch, a branded insert, or a decorative hang piece. Those options are not interchangeable. A rigid badge may require rounded edges, stronger attachment, added inspection, protective packing, and wash-care limitations. A ceramic-look patch is often lighter, less fragile, and easier to ship, but it may not deliver the same shine, weight, or perceived value.
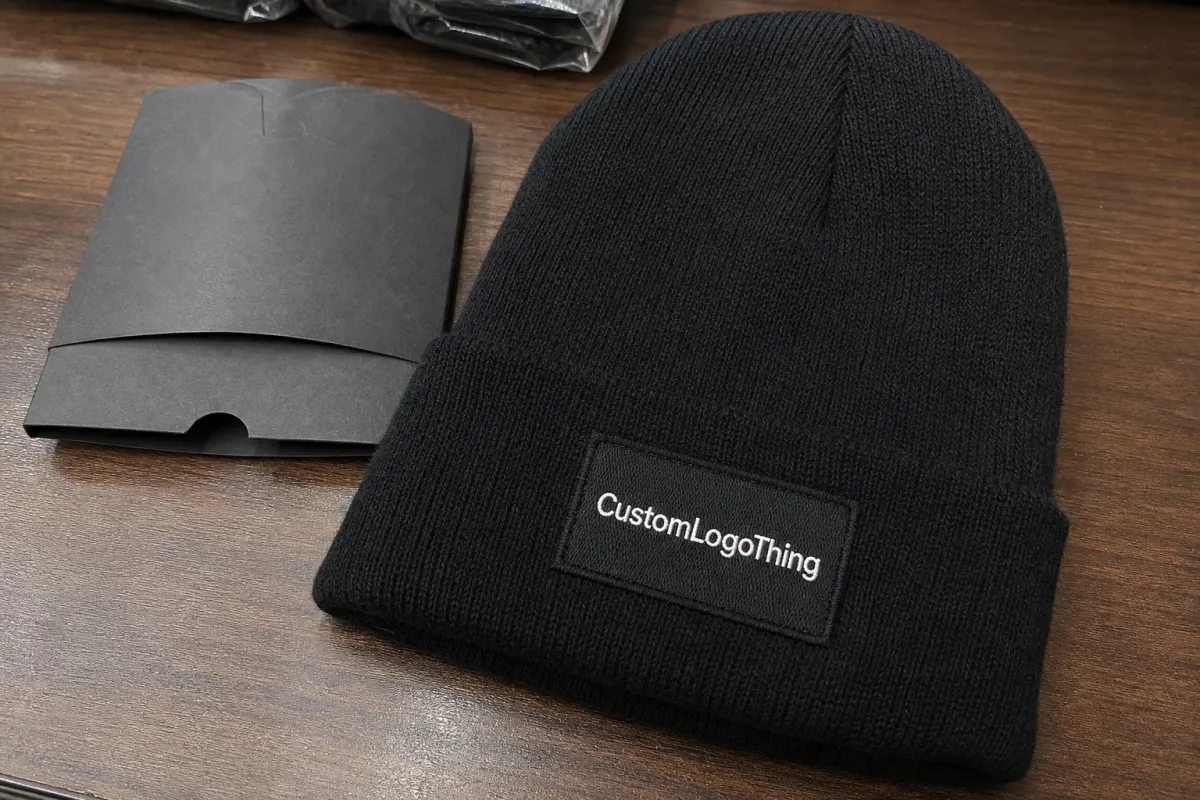
Pom Pom Beanies behave differently from flat promotional items. Knit stretches. Cuffs roll. Pom poms add height and visual weight. A 2.25-inch embroidered logo may look restrained in a mockup, then feel crowded on a narrow folded cuff. The proof is not just an artwork preview. It is a production control document.
How the Digital Proof Turns a Beanie Concept Into Production Instructions
A useful proof starts with the buyer’s artwork, preferred beanie style, color choices, decoration method, quantity, packing request, and delivery window. Then it translates those choices into a file both the supplier and the buyer can read without guessing. A beanie has more variables than people expect, and the proof is where those variables become fixed.
The main proof components usually include a front view, folded cuff view, logo placement dimensions, artwork scale, knit color, pom pom color, patch color, stitch color, backing notes, attachment notes, and production limits. Embroidery may call out stitch count, minimum line thickness, satin stitch limits, fill direction, underlay, and thread color codes. A woven label may specify a merrowed edge, hot-cut edge, center fold, end fold, or straight sew-down. A patch may require material thickness, deboss depth, print method, heat-press backing, or perimeter stitching.
Ceramic or ceramic-look details deserve a separate line item. Rigid pieces can be heavier than woven labels, less forgiving in laundering, and more sensitive to chips or pressure during transit. If the item is boxed for retail, packaging may need a shallow cavity, tissue wrap, molded insert, or card support so the badge is not pressed against the opposite side of the beanie. If the item is bulk packed 100 per carton, compression becomes a different risk: fewer presentation concerns, more pressure points.
Color is another place where the checklist earns its keep. A digital proof is rarely a true color guarantee. Monitor brightness, yarn dye lots, thread sheen, printed patch inks, faux fur pile, and ceramic glaze or coating can all shift the final appearance. Pantone references, thread cards, and material swatches reduce guesswork, but different surfaces reflect light differently. A navy yarn, navy embroidery thread, and navy glossy badge may all be “correct” while still looking slightly different beside each other.
The better buyer question is not “Will the color match my screen?” It is “Which colors are exact references, and which are closest available matches?” That phrasing forces a useful distinction between brand-critical color control and normal commercial tolerance.
Approval authorizes the supplier to proceed based on what is shown. If the proof says the logo is 2.5 inches wide, centered on a 3-inch cuff, using a fixed two-color pom, those specifications become the production instruction. If the proof omits the cuff height or ceramic badge thickness, the supplier may default to its standard. Sometimes the standard is fine. Sometimes it is the problem. For broader decoration and sourcing options, review the Manufacturing Capabilities page before approving a proof that may need a different production route.
Artwork, Logo Placement, and Material Details to Check Before Approval
Start with logo scale. Do not judge only by whether the artwork looks balanced on the PDF. Compare the proofed logo width and height against the actual cuff area. A common folded cuff may measure 2.5 to 3.5 inches high, but the usable decoration zone can be smaller after seam allowance, stretch, fold variation, and breathing room are considered.
Placement needs measurable language. Is the logo centered on the folded cuff? Offset left for a retail look? Aligned to a side seam? Positioned to remain visible if the wearer rolls the cuff higher or lower? A half-inch shift can change the entire read of the hat. For embroidered logos, at least 0.25 inch of clearance from the fold edge and seam area is a practical target when the design allows it.
Cuff height and fold depth deserve close review. A logo can disappear partly under the fold if the proof shows the hat flat but production folds it differently after steaming. Beanies are often shaped, steamed, trimmed, and packed before the buyer sees the finished goods. That handling changes how the cuff sits, especially on rib knits, fisherman styles, and thicker acrylic constructions.
Check the pom pom next. Confirm size, yarn or faux fur material, color mix, attachment method, and whether it is removable or fixed. A removable snap pom can help with washing and retail handling, but it adds hardware and another inspection point. A fixed pom is simpler, yet it may compress during shipping if the packing plan is too tight. If each beanie is individually bagged, ask whether the pom is fluffed before packing or left compressed.
If the design includes a ceramic element, verify component size, thickness, finish, logo color, attachment method, edge radius, weight, breakage risk, and wash guidance. Ask whether the trim is decorative only or intended to withstand regular wear. A 1.25-inch rigid badge with a glossy surface behaves very differently from a soft PVC patch, woven label, faux leather patch, or embroidered emblem.
- Artwork: Check spelling, trademark symbols, registered marks, small type, QR codes, fine outlines, and gradients.
- Color: Confirm Pantone numbers, thread references, yarn color names, and closest-match callouts.
- Construction: Review cuff fold, seam position, backing material, attachment stitch, and patch edge finish.
- Wearability: Judge how the logo reads when worn, not only how it looks laid flat.
- Care: Confirm whether the beanie can be machine washed, hand washed, spot cleaned, or should avoid heat drying.
Different materials use different color systems. Yarn, embroidery thread, woven labels, printed patches, and ceramic finishes rarely match with laboratory precision unless the job is specified and priced that way. The checklist should separate exact brand requirements from acceptable commercial tolerances, because that distinction affects cost, schedule, and inspection.
Process and Timeline From Proof Review to Finished Pom Pom Beanies
The usual order flow is quote confirmation, artwork cleanup, digital proof, proof revisions, optional pre-production sample, material ordering, knitting or blank sourcing, decoration, trimming, inspection, packing, and shipping. Each step has its own clock. Buyers often focus on production days, but proofing and approval time can make or break the schedule.
The proof stage moves quickly when the buyer sends clean vector artwork, Pantone references, exact placement instructions, confirmed quantities, and a clear in-hands date. It slows down when the logo is a low-resolution PNG, the brand color is described only as “dark red,” or the team is still choosing between three pom colors. One vague note can cost a day. Three vague notes can cost a week.
Timeline variables are real. Stock acrylic beanies with standard embroidery may be much faster than fully Custom Knit Hats with private labels and ceramic-look badges. Custom yarn colors, imported trims, physical sample approvals, peak season demand, inspection requirements, and air versus ocean freight can all change lead time.
For planning, separate the schedule into parts: 1 to 3 business days for the initial proof on a clean file, added time for revisions, 7 to 14 business days for a sample depending on construction, then a separate bulk production window after sample approval. These are planning ranges, not guarantees. Quantity, material availability, supplier capacity, and freight method still control the final calendar.
Revisions work best when feedback is consolidated into one clear response. “Move the logo up 0.25 inch,” “change thread to Pantone 186 C closest match,” or “revise pom to solid cream” gives production something measurable. Notes like “make it pop” or “move it a little” are risky. One person’s “little” is another person’s half inch.
Approval is usually the last low-cost correction point. After knitting, embroidery, patch production, or ceramic component attachment begins, changes may require remake charges, new materials, or schedule delays.
A physical sample is worth the extra time for new logo construction, high-value retail orders, rigid decorative pieces, unfamiliar materials, tight color requirements, or any design where weight and touch carry real importance. Ask for a timeline that separates proofing, sampling, bulk production, quality control, packing, and transit. That breakdown shows where the time is being spent and helps purchasing, marketing, and operations plan around the same facts.
Cost, Pricing, MOQ, and Quote Details Hidden Inside the Proof
A proof does not replace a quote, but it often reveals the choices that drive the final unit cost. Decoration size, stitch count, patch material, pom pom type, knit style, color changes, packaging, inspection requirements, and freight assumptions all matter. If the proof changes, the quote may need to change with it.
Common cost drivers include acrylic versus wool blends, stock colors versus custom-dyed yarn, simple embroidery versus multi-layer patches, fixed versus removable pom poms, and standard bulk packing versus retail-ready presentation. A stock acrylic pom pom beanie with simple embroidery may sit in a practical promotional range at moderate quantities. A custom knit beanie with a ceramic-look badge, inside woven label, individual polybag, hangtag, and carton labeling is a different cost structure entirely.
As a rough buyer observation, the lowest friction programs tend to use stock blanks, standard thread colors, simple embroidery, and bulk packing. Costs climb when the proof adds custom trim, specialty poms, private labels, molded components, retail packaging, or exact-match color work. For broader program planning, Custom Logo Things can help match decoration method to order requirements through its Manufacturing Capabilities.
| Option | Typical Cost Impact | Proof Details to Confirm |
|---|---|---|
| Stock acrylic beanie with embroidery | Often lower setup and lower MOQ; simple designs may fit standard promotional budgets depending on quantity | Thread colors, stitch count, logo size, cuff placement, backing, and trim color |
| Custom knit color with pom pom | Higher MOQ and longer material lead time, especially for custom-dyed yarn | Yarn reference, knit pattern, pom color mix, cuff height, and sample approval requirement |
| Woven or faux leather patch | Moderate setup; price changes with size, edge finish, backing, and sew-down labor | Patch dimensions, thread or print colors, edge finish, backing, and attachment stitch |
| Ceramic or ceramic-look component | May add mold, finishing, protective packing, breakage allowance, and added inspection time | Thickness, weight, finish, edge radius, attachment strength, wash guidance, and packing protection |
MOQ is tied to construction. Lower minimums are usually easier with stock beanie blanks and standard embroidery. Fully custom knit colors, private labels, ceramic-style trims, specialty poms, and retail packaging tend to require higher minimums because materials, machine setup, and trim sourcing need a larger run to make financial sense.
Setup costs should be plain. Embroidery digitizing turns artwork into a stitch file. Patch tooling prepares the shape, mold, or cutting path. Artwork preparation cleans files for production. Sampling proves construction. Component molds may be one-time or repeat-order costs depending on the supplier and design. Before approving the proof, compare the file against the latest quote line by line: size, quantity, colors, packing, shipping terms, setup fees, sample charges, and revision status.
Common Proof Approval Mistakes That Lead to Delays or Rework
The most common mistake is approving the overall look without reading the small production notes. Dimensions, color references, material callouts, backing details, and warning notes tell the factory what to make. The big mockup catches the eye. The small text controls the result.
Reviewing only on a phone creates avoidable risk. A small screen can hide tiny text issues, off-center placement, incorrect thread colors, thin outlines, or ceramic component details. Open the proof on a larger monitor if possible. Print it at 100% scale if the file includes actual-size artwork. A 0.1-inch line may look acceptable zoomed out, then fail as embroidery or fill in on a woven label.
Artwork file mistakes cause a lot of production pain. Raster logos, missing fonts, thin strokes, soft edges, gradients, and low-contrast color combinations may look acceptable digitally but produce weak stitching or muddy label detail. Embroidery is thread, not ink. Fine gradients and hairline outlines often need simplification, a larger logo area, or a different decoration method.
Do not assume the proof is a physical sample. Many digital mockups are scaled illustrations built from templates. Ask whether the image is a technical proof, a rendering, or a photo of an actual sample. That one question can prevent a misunderstanding about texture, proportion, and color.
Beanie-specific misses include stretch, cuff roll variation, seam location, pom pom compression, and how the logo reads when worn. A flat front view is helpful, but the buyer should picture the product on a head, with the cuff curved and the pom sitting above it. Small placement errors become more noticeable on a rounded shape.
Ceramic-related approval risks include weight, edges, wash limitations, attachment strength, and protective packaging. A polished badge can become a service issue if it chips in transit or pulls away after light wear. Industry packaging resources such as the International Safe Transit Association are useful for understanding transit testing principles, especially for products with rigid or fragile decorative components.
One final internal review helps. Marketing may care most about brand color. Purchasing may focus on price and MOQ. Operations may care about delivery date, carton count, and labeling. Let one person own the final sign-off so the supplier does not receive conflicting instructions from three departments after approval.
Final Check Before You Approve the Beanie Proof
Before approval, slow the process down for a few careful minutes. Print the proof if possible. View the logo at 100% scale. Compare the proof against the quote. Check placement measurements, cuff height, pom pom specs, thread or Pantone references, component notes, packing instructions, and revision number. Small checks now are cheaper than rushed corrections later.
A clean approval reply should list the approved file name, revision number, quantity, beanie color, pom pom color, logo method, patch or ceramic component details, packing method, shipping address, and required delivery window. That reply becomes part of the job record. It also gives both sides a clear reference if questions come up during production.
Ask three direct questions before signing off:
- What can still change without added cost?
- What change would trigger a revised quote or new proof?
- Is a physical sample recommended for this decoration method or trim?
Send the supporting files together: vector artwork, Pantone or thread references, brand guidelines, shipping address, contact person, in-hands date, and any compliance needs such as labeling or wash-care instructions. If the beanie is for a retail or employee program, confirm whether inside labels, hangtags, individual bags, carton marks, or fiber-content information are required.
Packaging and labeling expectations can also connect to broader sourcing choices such as paper tags, recycled content, or FSC-certified materials; the Forest Stewardship Council is a useful reference for understanding responsible paper-based material claims. Be specific here. “Eco tag” is not a specification. Recycled content percentage, FSC claim type, ink coverage, string material, and supplier documentation are specifications.
If the design includes rigid, ceramic, or ceramic-look details, confirm wash guidance, attachment strength, packing protection, and inspection standards before bulk production begins. AQL inspection level, carton drop expectations, and visible-defect criteria do not need to be complicated, but they should be understood before goods are packed and shipped.
The value of a ceramic pom pom beanies Digital Proof Checklist is not bureaucracy. It is alignment. The buyer’s brand, the decorator’s artwork file, the trim supplier’s component specs, and the production team’s packing plan all need to describe the same product. If those details line up on the proof, the finished beanie has a much better chance of matching the order everyone thought they approved.
FAQ
What should be included in a ceramic pom pom beanies proof checklist?
Include beanie style, cuff height, knit color, pom pom size and color, logo placement, artwork dimensions, decoration method, ceramic or ceramic-look component details, color references, quantity, packaging, and current quote version. Also check spelling, small text, seam alignment, backing material, attachment method, and production notes before approval.
Is a digital proof enough for custom pom pom beanies with ceramic details?
A digital proof is often enough for simple repeat orders, but a physical sample is recommended for a new ceramic-style badge, unusual trim, tight color matching, premium retail packaging, or a high-volume order. The sample helps confirm weight, texture, attachment strength, cuff fold, and how the beanie looks when worn.
How long does the proofing process take for custom pom pom beanies?
Proofing can move quickly when artwork is clean and specifications are complete. Revisions, missing color references, custom components, or sample requests add time. Ask your supplier to separate the schedule into artwork proofing, revision time, sampling, bulk production, inspection, packing, and shipping.
How does the approved proof affect the cost of pom pom beanies?
The approved proof locks in many cost drivers, including decoration size, stitch count, patch or ceramic component style, pom pom type, color count, label details, packing method, and inspection requirements. Before approval, compare the proof against the quote so unit cost, setup fees, MOQ, freight, and packaging assumptions match.
What is the biggest mistake buyers make when approving a beanie digital proof?
The biggest mistake is approving the visual mockup without checking the technical details, especially logo dimensions, cuff placement, thread or Pantone references, material notes, and packaging instructions. Review the proof at full size and confirm whether it is a technical production file, a rendering, or a sample photo.


