A beauty kit bag can look polished on a product page and still get rejected at receiving if the barcode sits across a gusset, zipper ridge, seal line, curved fill area, or glossy glare spot. That is the practical reason a beauty kit Plastic Bags Barcode placement guide belongs in the artwork stage, not after packed cartons are waiting for pickup.
Barcode placement is not decoration. It affects warehouse scanning, retail point-of-sale reads, marketplace fulfillment, SKU accuracy, chargebacks, relabeling labor, and launch timing. A scanner does not care how elegant the logo is. It wants contrast, clean edges, enough quiet zone, and a surface that stays reasonably flat after the bag is filled.
Beauty Kit Plastic Bags Barcode Placement Guide Basics
This guide covers four buyer-level questions: where the code should sit, how much open space it needs, how plastic film changes scan reliability, and what should be confirmed before production artwork is released. Small details decide whether a code scans on the first pass or needs three awkward rotations under a handheld reader.
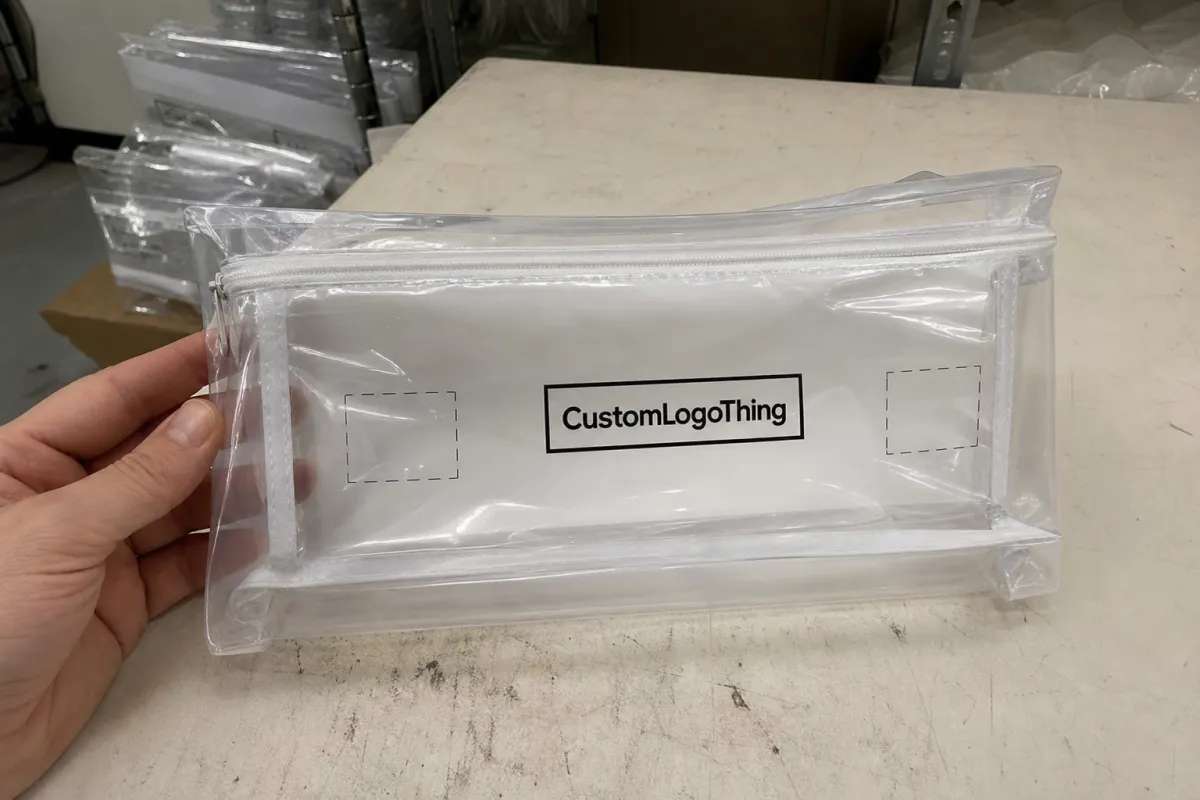
Beauty kit bags come in several common formats. Flat pouches suit sample sets, brush kits, and travel-size cosmetics. Zipper Poly Bags work for reusable kits and promotional bundles. Frosted cosmetic bags give a softer retail look, though the haze can reduce contrast if the code is printed directly on the film. Stand-up pouches add shelf presence. Hanging retail bags introduce more trouble spots: hang holes, reinforced headers, tear notches, and bottom gussets.
There are three usual barcode methods. A printed barcode is built into the bag artwork and printed directly on the film, usually best for stable SKUs and larger runs. A label-applied barcode uses a pressure-sensitive label, which helps with short runs, variable kits, late retailer changes, or several SKUs sharing one bag style. A barcode on an insert card sits inside a clear bag and can work well when the card stays flat, the plastic is not too glossy, and the code remains visible after packing.
From a buyer's point of view, the safest approach is to choose the scan side before the bag is designed. If the barcode is treated as leftover space after the logo, product name, ingredient copy, warning text, recycle mark, and decorative pattern are placed, it often lands near a fold or corner. A clean proof then becomes a slow scan on the packed bag.
Packaging floor rule: if the barcode crosses a part of the bag that bends, seals, crimps, expands, or catches glare, it needs another review before approval.
How Barcode Scanning Works on Flexible Beauty Packaging
A barcode scanner reads contrast, line spacing, edge definition, and quiet zones. It does not read brand intent. If the black bars are compressed, stretched, interrupted by a wrinkle, or crowded by artwork, the code may fail even when it looks acceptable in a PDF proof.
Flexible plastic behaves differently from paperboard. A carton gives the barcode a firm, flat panel. A plastic beauty kit bag can bend around makeup brushes, pucker around skincare tubes, stretch near a zipper, or reflect overhead lighting from a glossy PET laminated surface. Add mascara tubes, sample bottles, sachets, compact cases, or applicators inside the bag, and the surface may no longer be flat after filling.
Orientation matters. In picket fence orientation, the bars stand vertically like fence posts. In ladder orientation, the bars run horizontally like rungs. Picket fence orientation often works well on stable flat panels. Ladder orientation may tolerate some vertical web movement during printing, depending on the print process and bag layout. The better choice depends on bag shape, fill direction, scan angle, and where an operator naturally grabs the package.
The quiet zone is the blank margin around the code. Crowding that area with a floral pattern, logo edge, ingredient text, zipper texture, or seal embossing can block the scanner from finding the start and end of the symbol. For UPC-style retail codes, prepress teams usually protect a clear left and right margin based on the barcode specification, not just visual balance.
Contrast is just as practical. Black bars on a white or matte light panel usually scan better than metallic ink, pastel bars, transparent film, or a barcode placed over visible products inside the bag. If the bag is clear, the code may need a white ink flood, white label, or backing card. A beige brush handle or pink tube behind clear film can become part of the scanner's visual field. That rarely helps.
Verification closes the gap between screen and production. A code that looks crisp at 400% zoom can fail after printing, heat sealing, folding, carton packing, or viewing through glossy film. Buyers dealing with retail and parcel handling requirements can also review packaging distribution expectations through organizations such as ISTA.
Key Placement Factors: Material, Shape, Seals, and Fill
Material choice changes barcode behavior. Clear LDPE is flexible and economical, often used around 2 to 4 mil for cosmetic poly bags, but it wrinkles and shows product contents behind the code. Frosted PE softens the look and hides contents slightly, although the haze may reduce edge contrast. CPP can be glossy and clear, with decent stiffness for display bags. PET laminated film holds print sharply and feels more premium, but gloss can bounce light into a scanner. Compostable and biodegradable films vary widely; some are cloudy, softer, or more prone to scuffing, so sample testing matters.
The barcode should sit on the flattest practical panel. Keep it away from bottom gussets, side seals, zipper tracks, hang holes, tear notches, rounded corners, and crimped edges. On a stand-up pouch, the bottom gusset may look flat in artwork, then curve outward once filled. On a hanging bag, the header may seem stable, but the hang hole and reinforcement zone can interrupt the quiet zone if the code is squeezed too close.
Filled-bag behavior is easy to underestimate. Brushes create long ridges. Compacts create hard pressure points. Tubes and bottles create shadows and rounded bulges. Sachets slide. If the barcode is printed directly on flexible film and the product presses behind it, the bars may bend just enough to slow scanning.
A predictable side helps the whole operation. Receiving teams, retail clerks, and fulfillment staff should not need to rotate each beauty kit repeatedly to find the scan area. For many beauty kits, the back lower central panel works well, as long as it stays above the bottom fold and away from zipper hardware. Small bags may need a vertical side panel, but that choice should be scan-tested at actual size.
Clear bags deserve extra caution. They are attractive because shoppers can see the kit, yet the same visibility can fight the barcode. A white ink flood panel, white label, or printed backing card creates a stable background. It also gives prepress a cleaner target for barcode sizing, especially for UPC-A, EAN-13, FNSKU, and QR codes.
Size matters too. Beauty kits are often compact, and brands naturally want to protect the front-panel design. Still, shrinking the barcode too far can reduce scan reliability. A typical retail UPC should not be squeezed into a decorative corner because the mockup looks tidy. Brand hierarchy matters, but the barcode is a functional component, not a leftover graphic.
Production Steps and Timeline for Approved Barcode Artwork
A clean production path starts with a packaging brief, then moves through bag style selection, size confirmation, dieline or layout approval, barcode number generation, artwork placement, prepress review, proofing, sampling when needed, and production approval. Each step protects the next one. Skip the barcode decision early, and the project often circles back right when everyone wants speed.
Provide the barcode information early. Include UPC, EAN, SKU, FNSKU, QR code data, human-readable numbers, preferred scan side, retailer routing requirements, marketplace label rules, and distributor instructions. If the bag will sell through both retail and online fulfillment, say so before artwork begins. Retail UPCs, marketplace labels, internal warehouse SKUs, and shipping labels may each have different rules.
The prepress check is straightforward. The team confirms resolution, quiet zone, color contrast, orientation, placement relative to seals, and whether the print method can hold the line definition. Flexographic printing, rotogravure, digital printing, and thermal-transfer labels behave differently. A small barcode printed in one color on matte white film is usually less risky than a tiny reversed barcode dropped into a glossy pattern.
A digital PDF proof confirms layout, text, general position, and numbering. It does not prove how the barcode behaves on the real bag. A physical sample or pre-production sample is more useful when the bag is clear, highly glossy, heavily filled, unusually small, or intended for a strict retailer. Not every order needs a full sample round, but buyers should understand what the proof can and cannot confirm.
Custom printed plastic bags move faster when the barcode file is clean, the dieline is approved, and no late SKU changes arrive. A straightforward printed run might need roughly 7 to 12 business days for proofing and plate or setup work, then another 12 to 20 business days for production after approval. Quantity, material, print method, color count, and factory load can shift that range. Freight and domestic finishing add more time.
Common bottlenecks are predictable: barcode files supplied as screenshots, low-resolution JPEGs, missing human-readable numbers, last-minute retailer changes, multiple kit sizes sharing nearly identical artwork, and barcode relocation after proof approval. Build barcode approval into the packaging calendar before photography, retail submission, fulfillment setup, or launch inventory planning.
Cost, Pricing, and MOQ Effects of Barcode Placement Choices
Barcode placement looks like a small layout decision, but it can affect print setup, label labor, material choice, scrap risk, and proofing time. The cheapest-looking option is not always the lowest-cost option after rescans, relabeling, rejected receipts, and delayed shipments are counted.
| Barcode Method | Best Fit | Typical Cost Impact | Buyer Watchout |
|---|---|---|---|
| Printed directly on bag | Stable SKUs, medium to larger runs, polished retail presentation | Often lowest labor cost at scale; setup may be tied to plates, cylinders, or digital print minimums | Placement must be right before production because changes can require reprint or relabeling |
| White label applied to stock or custom bag | Short runs, seasonal kits, variable SKUs, late marketplace data | May add roughly $0.03-$0.12 per unit for label and application, depending on volume and handling | Label edges can lift on textured or oily surfaces; hand application can drift |
| Printed insert card inside clear bag | Clear display kits, sample sets, premium backer-card layouts | Card cost may range around $0.08-$0.25 per unit for small to mid-size cards, based on board, print, and quantity | Card must stay flat and visible after the products are packed |
| White ink flood panel under printed code | Clear or translucent printed bags needing stable contrast | Can add ink coverage, setup review, or another print station depending on method | Panel size must protect quiet zone without looking like a design mistake |
Custom printed plastic bags often have minimum order quantities tied to film type, thickness, bag construction, print method, and color count. A simple LDPE zipper bag may have a lower starting point than a laminated stand-up pouch with multiple colors and a shaped hang hole. Labeled stock bags can be practical at 500 to 2,000 units, while fully custom printed bags may begin around 3,000 to 10,000 units depending on the specification.
Unit pricing varies widely, but planning ranges are useful. A basic custom printed zipper poly bag might land around $0.18-$0.38 per unit at several thousand pieces, depending on size, thickness, print coverage, and closure. A laminated stand-up pouch for a beauty kit can run higher, often $0.35-$0.90 or more, especially with matte finish, hang features, or heavier film. Labels add cost, but they may prevent a larger problem if SKU data is still changing.
Ask for quote details together: bag dimensions, film thickness, closure type, print colors, barcode method, SKU count, quantity breaks, packing requirements, and whether barcode verification is requested. If sustainability claims are involved, confirm material documentation and avoid vague wording. For paper insert cards or FSC-certified components, buyers can review sourcing language through FSC.
The point is not making the code bigger than the brand. It is protecting total landed packaging performance. A lower per-bag price does not help if receiving teams must rescan every case, fulfillment staff apply emergency labels, or a retailer deducts fees for unreadable UPCs.
Step-by-Step Barcode Placement Checklist for Beauty Kit Bags
- Choose the scan side first. Pick the broadest, flattest panel that remains visible after the kit is packed, sealed, and handled. For many pouches, that means the back panel above the bottom fold.
- Stay away from moving features. Keep the barcode clear of zipper tracks, seal bands, bottom folds, gusset expansion zones, hang holes, tear notches, rounded corners, and any area that wrinkles when filled.
- Choose the barcode method. Decide whether the code will be printed on the bag, placed on a white label, printed on a card insert, or supported by a white ink panel.
- Confirm the number source. Check that the UPC, EAN, SKU, FNSKU, or QR code matches the sales channel, inventory system, retailer portal, or marketplace account.
- Protect size and quiet zone. Place the code at practical scale with strong contrast and enough open space away from patterns, compliance copy, texture, and decorative artwork.
- Review at actual size. A barcode that looks generous on a large monitor may be tiny on a 5 inch by 7 inch cosmetic pouch.
- Test a packed sample if possible. Scan it with the kit filled, sealed, and oriented the way warehouse staff, store associates, or shoppers will handle it.
That checklist is plain because barcode failures are plain: glare, wrinkles, low contrast, bad files, and late changes. A buyer who marks the barcode zone early usually saves time in proofing because the designer, prepress operator, and bag maker are solving the same problem from the start.
QR codes need breathing room as well. Beauty brands often use them for tutorials, shade charts, ingredients, authenticity checks, or batch-level information. A QR code on a curved pouch corner can be just as troublesome as a poor UPC. If the code supports compliance or consumer instructions, test it with an ordinary phone camera under store-like lighting, not only in a design file.
Common Mistakes That Make Beauty Bag Barcodes Fail
The first mistake is placing the barcode too close to the bottom gusset. On a flat proof, the lower panel may look open. After filling, the plastic curves outward, the bottom fold becomes rounded, and the scanner can no longer see a stable symbol.
Printing directly on clear film without a white background is another frequent problem. Mascara tubes, brush handles, foil sachets, colorful product labels, and shadows inside the kit can reduce contrast behind the bars. A white flood panel or label is not glamorous, but it often saves the scan.
Then there is the tiny barcode. The front panel is valuable, the brand mark needs space, and beauty packaging carries a lot of required copy. Still, shrinking a code beyond practical limits can create more cost than it saves visually.
Premium finishes can cause trouble too. Metallic ink, heavy gloss varnish, pastel bars, reverse printing through clear film, and patterned backgrounds may look refined but scan poorly. If a premium look is the goal, keep the barcode in a controlled service zone and let the rest of the design carry the luxury cue.
File quality matters more than many teams expect. A barcode supplied as a screenshot, compressed JPEG, or copied web image can blur edges or alter proportions. Send vector artwork such as AI, EPS, or PDF when possible, or a high-resolution barcode generated from the correct data. The human-readable numbers should match exactly.
Late structural changes deserve a fresh barcode review. Changing the bag size, fill contents, zipper style, hang-hole location, or seal width after approval can move the barcode into a risky zone. If the bag changes, the scan area changes too.
Multiple codes can also confuse operations. A retail UPC, marketplace FNSKU, internal SKU label, QR code, and shipping barcode should not be stacked so closely that staff scan the wrong one. Give each code a purpose, a location, and enough separation to reduce mistakes.
Next Steps Before You Request a Beauty Kit Bag Quote
Start with a short spec sheet before contacting a packaging supplier. Include bag size, material preference, closure type, thickness, order quantity, print colors, number of SKUs, sales channel, and whether the bag needs to hang, stand, reseal, or ship inside an outer carton. A 3 mil frosted zipper bag for a brush kit and a laminated stand-up pouch for skincare samples are different quoting projects.
Mark the desired barcode zone on a flat layout or on a photo of a similar bag. Note areas that must stay clear for side seals, zipper tracks, hang holes, tear notches, product visibility, and compliance copy. If you know the kit contents, list them by size and shape; a 15 ml tube behaves differently from a flat sachet.
Gather clean barcode files and confirm the numbers against your inventory system, retailer portal, marketplace account, or distributor instructions before artwork is built. Decide whether printed barcodes, applied labels, or insert-card barcodes make more sense based on run size, SKU variability, launch timing, and how permanent the data is.
Ask the packaging manufacturer to review the barcode at actual size on the proposed material. Request feedback on gloss, transparency, folds, fill distortion, white ink needs, and label adhesion if labels are planned. If the bag is bound for a retailer with strict receiving rules, ask whether barcode verification can be included or whether you should run verification through your own compliance process.
A good barcode decision is made while changes are still cheap. Put the code on a flat, readable, predictable surface. Protect the quiet zone. Use clean artwork. Test the packed bag whenever the material or fill creates doubt. Those steps do not make the package less beautiful; they keep it from failing for a reason nobody sees in the hero image.
FAQ
Where should a barcode go on beauty kit plastic bags?
Place it on the flattest consistent panel, away from zipper tracks, seals, gussets, hang holes, tear notches, and areas that wrinkle after filling. For clear or frosted bags, use a white label, white ink panel, or backing card when the products inside could reduce contrast.
Can a barcode be printed directly on clear cosmetic plastic bags?
Yes, but direct printing on clear film usually needs a strong dark code over a white background or white flood panel to prevent the contents from showing through. Without backing contrast, brushes, tubes, labels, and shadows inside the kit can make the code difficult to scan.
What file type should I send for barcode artwork on plastic bags?
Send a vector barcode file when possible, such as AI, EPS, or PDF, or a high-resolution file generated from the correct UPC, EAN, SKU, FNSKU, or QR data. Avoid screenshots, compressed JPEGs, or copied web images because they can blur bars, change proportions, or create unreadable edges.
Does barcode placement affect the cost of custom beauty kit bags?
It can affect cost if the placement requires extra white ink, a separate label, additional proofing, variable SKU handling, or a different print method. Good placement can also reduce hidden costs by preventing rescanning, relabeling, fulfillment delays, and retailer chargebacks.
Should I use a label or printed barcode for small-run beauty kits?
Labels are often practical for short runs, multiple SKUs, seasonal kits, or products still waiting on final retail or marketplace data. Printed barcodes are usually cleaner and more efficient for stable artwork, higher quantities, and beauty kits where a polished finished look matters.

