Skincare Refill Plastic Bags Print Proof Guide for Buyers
Why Proofing Catches Expensive Problems Early
A serum refill pouch can look immaculate on screen and still arrive with the ingredient panel too small, the logo drifting into a gusset fold, and the color reading more “sad beige” than premium skincare. Flexible packaging is not a flat label. It has seals, folds, spouts, windows, hang holes, fill volume, surface tension, and material stiffness all conspiring to change what the shopper actually sees.
A skincare Refill Plastic Bags print proof guide matters because the proof is not decoration. It is the approval record your supplier uses to print, laminate, cut, seal, and convert the pouch. If you approve a typo, the press will reproduce it with impressive loyalty. Machines are not sentimental.
Refill bags are less forgiving than jars, cartons, or rigid bottles. The surface curves. Panels flex. Bottom gussets hide artwork. Heat seals reduce usable print space. A pouch that sits cleanly in Adobe Illustrator does not behave like a framed poster once it holds 500 ml of cleanser, body lotion, or shampoo.
For buyers, the goal is not to become a prepress technician overnight. The goal is to catch the expensive errors early: wrong dieline, unreadable barcode, weak white ink, copy too close to the seal, untested spout placement, incorrect film spec, or a finish that looks elegant until it scuffs in transit.
Practical rule: if the proof does not clearly show seal zones, safe areas, material structure, barcode placement, color references, and final copy, it is not ready for production approval. It is still a draft wearing better shoes.
How the Print Proof Process Works for Skincare Refill Bags
The basic workflow is simple: the buyer confirms pouch specs, submits artwork, receives a dieline or checks against one, reviews a proof, requests revisions, signs final approval, and then production begins. The mess usually appears during review. Legal changes a claim. Regulatory copy grows by six lines. The designer notices a tear notch cutting into the brand mark. Operations asks whether the pouch will stand after filling.
Good. That is what proofing is supposed to reveal.
Buyers usually encounter four proof types:
- Digital proof: a PDF or electronic file used to review layout, copy, dieline fit, bleed, safe zones, and basic color intent.
- Hard copy proof: a printed paper or film-based sample that helps confirm scale, type size, barcode placement, and overall crowding.
- Press proof: a sample produced on actual or similar production equipment; useful for color-critical work but usually slower and more expensive.
- Production sample: a physical pouch or short sample run used to check construction, finish, opacity, spout position, zipper height, and hand feel.
A digital proof may be enough for a repeat order using the same film, same print process, and minor artwork changes. It is not enough for every project. New refill pouches with clear windows, matte finishes, pale brand colors, metallic film, shaped profiles, or spouts usually deserve a physical sample or at least material swatches. A PDF cannot show whether frosted film feels premium, whether white ink is opaque enough behind a cream logo, or whether the filled pouch collapses like a tired sandwich.
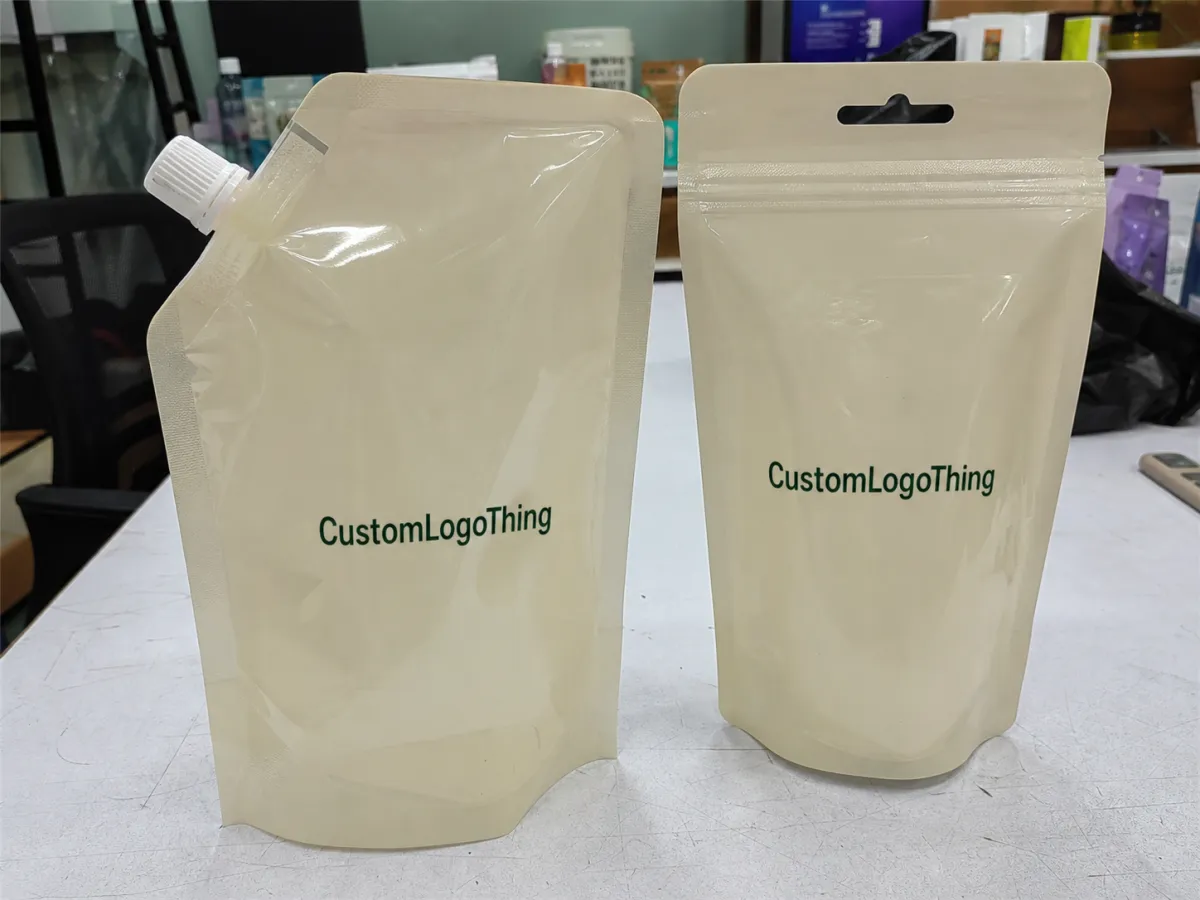
Pouch format changes the proofing risk. Flat pouches have fewer structural surprises. Stand-up pouches require bottom gusset review. Shaped pouches need tighter dieline control. Spouted refill bags require cap, fitment, and graphics alignment checks. Zipper refill bags need zipper height and tear notch position confirmed. Rollstock for automated filling adds another layer: registration marks, repeat length, eye marks, unwind direction, and machine direction must match the filling line.
Material changes the outcome too. PE, PP, PET laminates, PCR blends, mono-material recyclable films, foil barrier structures, matte coatings, gloss finishes, and soft-touch laminations all affect ink behavior. Ink on clear PET does not look like ink on white film. Matte lamination does not reflect light like gloss. Foil can enrich color while reducing type clarity. None of that is theoretical once 20,000 units have been printed.
A proof still has limits. It cannot guarantee identical color under every light source, perfect position to the fraction of a millimeter, or the exact shelf behavior of every filled pouch. Reasonable tolerances are normal. Undefined tolerances are the problem.
Artwork, Dielines, and Print Areas Buyers Must Check
The dieline is the pouch map. Trim line, bleed, safe zone, seal area, fold lines, gusset panels, spout area, zipper placement, tear notch, hang hole, and bottom fold are not decorative marks. They are the physical rules of the bag.
Safe zones deserve discipline. Logos, product claims, ingredient lists, usage directions, batch fields, and barcodes should sit away from seals and folds. Flexible packaging can shift during printing, lamination, slitting, pouch making, and filling. A movement tolerance of 1-3 mm is common depending on format, film stiffness, and machine setup. That may sound small. It is not small when a seal bar clips the word “dermatologist.”
Artwork files should be production-ready before proofing starts. Suppliers typically need vector logos, outlined fonts, embedded or linked high-resolution images, CMYK or spot color values, correct barcode files, and layered editable artwork. If the requested file is Adobe Illustrator and the submitted asset is a flattened 900-pixel PNG, the issue is not supplier fussiness. The file cannot carry the job.
Check bleed separately from safe area. Bleed extends artwork beyond the cut line so tiny cutting shifts do not leave white edges. Safe area pulls critical content away from risky zones. Buyers sometimes confuse the two, then wonder why beautiful edge-to-edge art survives while the directions panel gets pinched into a fold.
Barcode proofing is boring, which is exactly why it gets neglected. Review the barcode size, quiet zone, contrast, orientation, and placement on a flat, scannable panel. A barcode that wraps around a side gusset is not an edgy design choice. It is a scanner complaint waiting to happen. For retail packaging, check GS1 requirements before approving final artwork.
Skincare refill packaging has extra copy pressure because small pouches often carry legal, product, and sustainability language in one tight space. Confirm the ingredient list, INCI names, net contents, usage instructions, warnings, recycling marks, batch or lot area, shelf-life symbol, country of origin, and certification marks. If the package references FSC-certified paper wraps, cartons, or related components, confirm chain-of-custody rules through FSC before adding marks casually.
Do not pack every square millimeter with copy. Refill bags already have folds, glare, hand distortion, and shelf shadows. Some front panels become more premium after deleting 20% of the claims. The pouch is a container first, a billboard second.
Use the proof as a construction document before treating it as a design presentation. If the pouch is structurally wrong, perfect typography is just riding on a bad bag.
Color, Finish, and Material Factors That Change the Final Look
Screen color is not print color. Monitors use light. Packaging uses ink on film, usually viewed under inconsistent retail, bathroom, warehouse, or studio lighting. That single fact prevents many dramatic emails.
Most refill pouches use CMYK, spot colors, or an extended gamut setup. CMYK is efficient for many designs. Spot colors help protect signature shades, especially clinical whites, botanical greens, soft creams, or deep blues. Extended gamut can support complex gradients, illustrations, and photography, but it still needs defined targets and proof approval.
Print method matters. Digital printing often suits smaller runs, launch testing, seasonal variants, or multiple SKUs because setup costs are lower and plates are not usually required. Flexographic printing suits larger flexible packaging runs and repeat orders, especially when unit cost matters at scale. Offset printing is common for cartons and some paper components, but refill pouches more often depend on digital or flexo depending on structure, volume, and supplier equipment.
| Proof or Print Choice | Best For | Typical Tradeoff | Buyer Watchout |
|---|---|---|---|
| Digital proof | Layout, copy, dieline review | Fast and low cost | Does not show true film texture, opacity, or stiffness |
| Physical sample | Scale, finish, hand feel | Slower and more expensive | May still vary slightly from mass production |
| Digital printing | Lower MOQs and test runs | Higher unit cost at larger volumes | Color repeatability needs clear targets |
| Flexographic printing | Larger repeat runs | Higher setup costs | Plate costs and revision fees can add up |
Background film changes everything. Clear films often need a white ink layer behind important artwork; otherwise colors weaken once product sits inside the pouch. White film gives cleaner color but removes transparency. Metallic films can make color feel richer, though fine type may lose crispness. Kraft-effect designs can look warm and natural, but printed fake kraft on plastic can look cheap if the texture is heavy or repetitive. It happens more often than anyone admits in the first meeting.
Matte and gloss create different risks. Matte looks soft, modern, and premium, especially for minimalist skincare lines, but scuffs and rub marks can show more clearly. Gloss makes color pop, wipes clean more easily, and can suit shower or refill use, though it may feel less elevated for certain formulas. Soft-touch finishes add tactile appeal but may raise cost and handling concerns.
Barrier layers are not only about formula protection. Foil or high-barrier structures can help protect oxygen-sensitive, fragrance-sensitive, or light-sensitive products, but they may affect recyclability and the final visual finish. Mono-material films can support recycling goals, yet they may differ from conventional laminates in stiffness, clarity, sealing range, puncture resistance, and color appearance. Environmental claims should be checked against current guidance from resources such as the EPA greener products resources. Vague green language is not a substitute for a verified packaging claim.
Request material swatches before final approval if transparency, tactile feel, sustainability messaging, or color accuracy matters. Expect small color variation between proof, first production run, and reorder. Strong buyers define acceptable color ranges and reference standards; weak approvals chase one mythical perfect shade across different films, finishes, and lighting conditions.
Cost, MOQ, and Quote Details Behind Printed Refill Bags
Printed refill bag pricing depends on pouch size, film structure, barrier requirement, print method, color count, finish, zipper or spout hardware, order quantity, proof type, setup charges, packing method, and freight. “How much for a pouch?” is not enough information. That question is basically “How long is a rope?” with a purchase deadline attached.
For planning purposes, digital proofing is often included or inexpensive. Physical samples may range from modest sample-and-courier fees to a few hundred dollars, depending on material, construction, and whether tooling is needed. Press proofs cost more because they use production equipment, real film, ink, operator time, and press capacity that could be used for paid production.
MOQ is a cash-flow decision as much as a packaging decision. Lower MOQs help brands test a formula, retailer, scent, or refill concept, but unit cost is higher. Larger quantities reduce per-bag cost, yet increase inventory risk if ingredients, claims, barcodes, legal copy, or artwork change. For a new skincare refill line, quote at two or three levels, such as 2,500, 5,000, and 10,000 units. Then compare storage space, expiry risk, cash tied in inventory, and per-unit savings.
Typical setup costs may include plates, cylinders, custom dies, spout molds, color matching, sample making, and special finish trials. Some are one-time charges. Others repeat when artwork changes, colors are revised, a supplier changes process, or a new structure is introduced. Ask directly which charges are reusable and which are tied to a specific SKU.
A useful quote should list bag dimensions, fill volume target, film structure, thickness, print method, number of colors, finish, proof type, MOQ, unit cost by quantity, setup fees, lead time, revision policy, packing details, and shipping terms. If the quote says “custom pouch, full color, best quality,” that is not a purchasing document. It is a polite fog machine.
The cheapest quote often hides a compromise: thinner film, weaker barrier, no hard proof, vague color control, limited QC, unclear material structure, or freight surprises. Cheap packaging becomes expensive when filled product must be relabeled, repacked, discounted, or recalled. Proofing is partly about artwork accuracy, but it also exposes quote gaps before they become production gaps.
Production Timeline and Approval Steps Before Printing
A realistic timeline usually moves through spec confirmation, artwork review, proof preparation, buyer review, revisions, final approval, material sourcing, printing, lamination or curing, pouch making, quality control, packing, and freight. Depending on supplier workload, pouch structure, and season, a straightforward custom run may still need several weeks from final proof approval to shipment. Spouts, specialty films, physical samples, color matching, and imported components add time.
Proof approval is often the bottleneck. Not the factory. Slow internal feedback, missing barcode files, late formula changes, unresolved legal copy, and multiple people commenting in separate email threads can stall an order faster than a busy press schedule. Public launch dates do not make dielines more accurate.
Timeline variables include material availability, spouted components, specialty finishes, sample shipping, color matching, holiday production peaks, and whether the job is new or repeat. A repeat order with no artwork or material changes should move faster because the approved proof, color target, and production spec already exist.
Keep the approval chain painfully clear. Assign one decision owner, one backup, and one final signer. Five people sending design notes from five inboxes is not collaboration. It is sediment. Use one marked-up proof, one revision list, and one final approval record.
Set a proof review deadline before the project starts. Also set a practical revision limit. Endless tiny edits can push the job into a new production slot, and production slots do not care that someone suddenly dislikes the comma after “Aqua.”
“Approved for production” means the buyer accepts the artwork, spelling, dimensions, layout, color target, material structure, finish, pouch construction, and tolerances shown in the proof or specification. After approval, changes usually cost money and time. After printing starts, they may not be possible at all.
Keep the approved proof, quote, dieline, material spec, color references, barcode files, and final copy together for reorders. The best reorder file is boring. Boring files save weeks.
Common Proofing Mistakes That Ruin Skincare Refill Packaging
The most common mistakes are predictable: approving without printing the proof at actual size, ignoring seal zones, placing critical copy on gussets, using low-resolution images, forgetting white ink, and assuming the pouch will look flat after filling. Print the proof at 100% scale. Hold it. Fold it. Imagine a customer squinting at it in a bathroom with mediocre lighting. Because someone will be.
Copy and compliance errors can be brutal. Wrong net contents, outdated ingredients, missing warnings, unsupported claims, unreadable recycling marks, and incorrectly used certification logos create relabeling costs or worse. Attractive packaging does not outrank legal reality.
Color mistakes are just as common. Buyers approve from a phone screen, compare samples under yellow office lighting, skip Pantone or LAB references for core brand colors, then expect matte film to match glossy label stock perfectly. That is not color management. That is wishful thinking with a purchase order.
Construction mismatches deserve equal attention. Spout placement may sit too close to graphics. A zipper can interfere with the front-panel design. Fill volume may be untested. The bag can be too soft to stand or too stiff to pour comfortably. Refill packaging has to work in the hand, not only in a mockup.
Translation and localization can wreck a clean layout. French, German, Spanish, Arabic, and other market copy may expand, contract, or change reading direction. Refill bags have limited real estate, and text expansion can push warnings, ingredients, or symbols into unsafe areas.
Approval behavior causes plenty of failures. Designers should not approve technical specs alone. Procurement should not approve aesthetics alone. Packaging needs both views in the room: someone who sees brand damage and someone who sees production risk. Use a checklist, sign off by category, and keep written revision notes. Memory is not a quality control system.
Approval Checklist Before Your Custom Refill Bag Goes to Press
Start with the practical basics. Confirm pouch size, target fill volume, closure type, material structure, barrier needs, and filling method. Gather final legal copy. Prepare vector artwork. Request the correct dieline. Define color targets. Decide whether a digital proof is enough or whether a physical proof is worth the added time.
Build one approval packet. Include the proof PDF, dieline, material spec, quote, barcode file, color references, final legal copy, and any sustainability claim support. One packet beats twelve attachments scattered across inbox archaeology.
Review the proof in the right order: construction first, copy second, barcode third, color fourth, finish fifth. If the bag is structurally wrong, debating the shade of sage green is a hobby, not progress.
Ask the manufacturer direct questions before approval:
- Where are the seal zones, fold lines, gussets, and safe areas?
- What is the live print tolerance in millimeters?
- Is white ink included behind pale, clear, or transparent artwork?
- Will the pouch stand, pour, or dispense properly at the target fill volume?
- What proof type is included in the quote?
- Which changes after approval trigger fees or schedule delays?
For Custom Logo Things projects, the cleanest starting brief includes pouch dimensions, fill volume, material preference, closure type, artwork files, quantity range, shipping destination, and target launch date. That gives the supplier enough context to flag print, material, tooling, and timeline risks before anyone signs off.
Use this skincare Refill Plastic Bags print proof guide as the last gate before production, not as a post-disaster checklist after a full run is already printed. The press will make what the approved file tells it to make. Give it a file worth obeying.
FAQs
What should a skincare refill bag print proof include?
It should show the final dieline, artwork placement, bleed, safe zones, seal areas, gussets, spout or zipper position, barcode, copy, color references, material structure, and finish. For skincare, also check ingredient text, net contents, warnings, batch area, recycling marks, and certification logos before approval.
Do I need a physical proof for custom printed skincare refill pouches?
Use a physical proof when color, transparency, material feel, spout placement, stiffness, or shelf presentation matters. A digital proof may be enough for simple repeat orders or low-risk artwork, but it will not show true texture, opacity, scuff behavior, or filled-pouch performance.
How long does the print proof process take for refill plastic bags?
A digital proof is usually faster than a physical sample, but timing depends on complete artwork, final specs, supplier workload, and revision speed. Physical samples, color matching, custom films, and spouted components add time, so build proofing into the launch calendar instead of treating it as a formality.
What affects the cost of printed skincare refill plastic bags?
Cost is driven by pouch size, order quantity, film structure, barrier level, print method, color count, finish, zipper or spout hardware, proof type, setup fees, packing method, and freight. Ask for quantity breaks and a clear list of setup charges so you can compare unit cost against inventory risk.
Can I change artwork after approving the skincare refill plastic bags proof?
Usually yes before production starts, but changes may require a revised proof and can delay the schedule. After plates, cylinders, materials, or production slots are committed, changes can trigger extra costs. After printing starts, congratulations, you now own the mistake.

