Buyer Fit Snapshot
| Best fit | Branded Tray and Sleeve Boxes projects where brand print, material claims, artwork control, MOQ, and repeat-order consistency need to be specified before quoting. |
|---|---|
| Quote inputs | Share finished size, material target, print colors, finish, packing count, annual reorder estimate, ship-to region, and any compliance wording. |
| Proofing check | Approve dieline scale, logo placement, barcode or warning zones, color tolerance, closure strength, and carton packing before bulk production. |
| Main risk | Vague material claims, crowded artwork, missing packing details, or unclear freight terms can make a low unit price expensive after revisions. |
Fast answer: Branded Tray and Sleeve Boxes: Design, Cost, and Fit should be specified like a repeatable production item. The safest quote records material, print method, finish, artwork proof, packing count, and reorder notes in one written spec.
Production checks before approval
Compare the actual filled-product size with the drawing, then confirm tolerance on folds, seals, hang holes, label areas, and retail display edges. Reserve space for logos, QR codes, warning copy, and material claims before decorative graphics fill the panel.
Quote comparison points
Review material grade, print process, finish, sampling route, tooling charges, carton quantity, and freight assumptions side by side. A quote is only useful when the supplier can repeat the same color, closure quality, and packing count on the next order.
Branded Tray and Sleeve Boxes: Design, Cost, and Fit
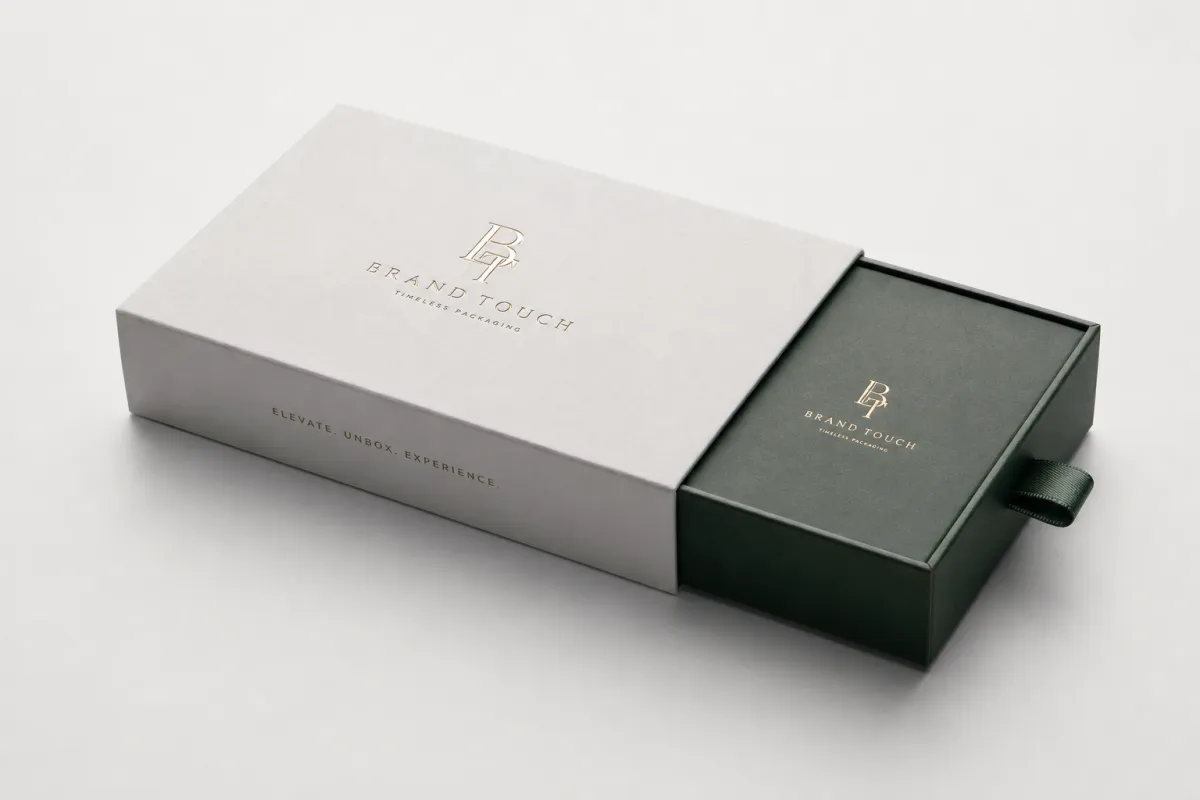
Open a sleeve the right way, and the product feels more valuable before anyone even lifts it out. That small slide is why Branded Tray and Sleeve boxes matter so much: the structure changes how a customer reads the package in seconds, not minutes.
The mechanics stay simple, and that simplicity is part of the appeal. A tray holds the product, a sleeve wraps the outside, and the package creates a controlled reveal that feels deliberate, tidy, and more premium than a plain carton with the same artwork printed across the face.
From a packaging buyer's point of view, branded Tray and Sleeve boxes do several jobs at once. They frame the product, create a presentation moment, and give the brand a larger surface for messaging without forcing the structure into a complicated closure system. That balance works well for cosmetics, gift sets, apparel accessories, stationery, premium food items, and promotional kits, especially when the product already has a strong shape and does not need a bulky shipper.
Fit, board choice, and print planning decide whether the idea actually works. I have seen branded tray and sleeve boxes succeed because the sleeve glides with just the right amount of resistance, and I have seen them miss the mark because the tray rattled, the color looked muddy, or the insert did not stop the contents from shifting during transport. That second scenario happens more often than people expect, and it usually starts with someone treating the box as a graphics exercise instead of a structure.
The visual idea is easy to understand, but the real work happens in tolerances, materials, and production details. If the tray, sleeve, and insert all support the same handling experience, branded tray and sleeve boxes can make a modest product feel considered and well-made. If one piece is off, the whole package reads as accidental, and customers feel that immediately.
A sleeve carries the brand message, but the tray carries the product. If the fit is loose, the presentation feels cheap; if it is too tight, the opening experience becomes frustrating.
What Branded Tray and Sleeve Boxes Are and Why They Stand Out
At the simplest level, branded tray and sleeve boxes are a two-part package. The tray is the inner base that supports the product, while the sleeve is the outer wrap that slides over it and adds branding, structure, and a reveal moment. In some builds, the tray is a folding carton. In higher-end versions, it can be rigid board wrapped with printed paper or specialty stock.
What makes branded tray and sleeve boxes stand out is not complexity, because mechanically they are straightforward. It is the experience. A customer pulls the sleeve away and the product appears in stages, which feels more deliberate than opening a tuck-end carton. That staged reveal works well for products where presentation influences the buying decision as much as the item itself.
The format also gives the brand a clean visual field. The sleeve has broad uninterrupted panels, so logos, copy, line art, ingredient calls, or campaign messaging can breathe instead of fighting a crowded front flap. In practice, that makes branded tray and sleeve boxes feel more disciplined, especially for minimalist brands that want the package to look premium without piling on decoration.
Products that do well in this format usually share a few traits. They are compact, easy to nest into an insert, and expected to have some kind of gifting or retail presentation value. Think of a candle set, a lipstick duo, a premium tea assortment, a pen kit, a scarf, a watch accessory, or a corporate giveaway set. If the item benefits from a reveal and can be protected by the tray, branded tray and sleeve boxes are often a smart fit.
Our Custom Packaging Products page shows how this format compares with other carton and insert options, and our Case Studies page gives a useful sense of how real product categories change the structural requirements. That comparison matters, because a tray and sleeve can be cost-effective in one category and underbuilt in another.
- Presentation value: the sliding reveal creates a moment customers remember.
- Brand surface area: the sleeve gives more uninterrupted print space than many carton styles.
- Structural control: the tray and any insert keep the product centered and stable.
- Flexibility: branded tray and sleeve boxes can feel gift-ready, retail-ready, or ecommerce-friendly with small changes.
How Branded Tray and Sleeve Boxes Work in Real Packaging
It helps to break branded tray and sleeve boxes into their moving parts. The tray does the physical support work. The sleeve handles the visual and tactile work. If the package includes an insert, that insert does the precise location work, keeping the item from riding too high, tilting, or scraping against the board.
The opening motion looks simple, but friction and caliper matter more than most people expect. A sleeve that is too loose slides open without any control, which can feel flimsy. A sleeve that is too tight catches, wrinkles, or scuffs the print. The sweet spot is the middle, where the package feels confident and calm in the hand. Board thickness, coating type, and even humidity in storage can shift the fit slightly, so a sample run is worth more than a theoretical drawing.
In real packaging use, the sleeve also gives the buyer a better place for branding hierarchy. The outside can carry the hero message, while the tray can hold secondary information, instructions, or a subtle interior print. That means the package can tell a small story as it opens, which is one reason branded tray and sleeve boxes often outperform plain cartons in perceived value.
The format can be adapted for different channels without changing the core idea. For shelf display, you might use a slightly taller sleeve so the top edge frames the product line neatly. For ecommerce, a tighter tray and an insert that survives vibration and drop stress become more important. For gifting, the priority shifts toward presentation quality and a smooth first pull. The same general structure can serve all three, but branded tray and sleeve boxes need to be engineered to the job, not just to the artwork.
Compared with a tuck-end carton, the tray and sleeve format usually feels more premium because the opening motion is more intentional. Compared with a rigid magnetic closure box, it can be lighter, easier to produce, and often more efficient for certain quantities. Compared with a plain paperboard carton, branded tray and sleeve boxes offer a more memorable reveal while still keeping the structure understandable on the production floor.
If the package must survive parcel shipping, it is smart to think about drop and vibration performance early. A format that looks perfect on a table can still fail in transit if the contents move too much. For shipment testing methods, the general framework used by the packaging industry is described by ISTA, which is useful when a project needs to line up presentation with transit protection.
That is why branded tray and sleeve boxes are never just a print decision. They are a structure, a motion, and a protection plan wrapped into one package.
Design and Structural Factors That Shape Branded Tray and Sleeve Boxes
Design choices start with substrate, because the board sets the tone before a single color is printed. SBS works well when you want sharp graphics and a clean retail look. Kraft board gives a more natural, earthy character and can be a strong fit for wellness or food-adjacent brands. CCNB can be economical for certain folding builds, especially when the package will be printed heavily and recycled-content messaging matters. Rigid chipboard raises the perceived value immediately, which is why it shows up so often in premium branded tray and sleeve boxes.
The most common size mistake is making the package feel generous on a drawing and loose in the hand. A tray that allows too much play makes the contents shift, and the sleeve then loses the snug, controlled feel that branded tray and sleeve boxes are supposed to create. Over-tuning the size can cause the opposite problem, making the package hard to open, especially if a coating adds drag or the board swells slightly in a humid environment. A tolerance band of even 0.5 mm to 1.5 mm can affect the way the sleeve slides and how the edge line looks once assembled.
Print and finish matter, but they need to support the structure rather than overpower it. Embossing adds depth where the hand naturally rests. Foil can create a strong logo or accent mark, though too much foil can make the sleeve feel busy. Soft-touch coating can make branded tray and sleeve boxes feel more tactile and refined, while matte or gloss lamination changes both the look and the scuff resistance. Spot UV is useful when the brand wants contrast without adding another ink color, and a window cutout can be smart when the product itself should be visible before the sleeve is removed.
Internal support deserves more attention than it usually gets. If a box contains a bottle, a set of jars, a folded garment, or multiple small parts, the insert is often the part that determines whether the package feels premium or merely decorated. Die-cut paperboard, molded pulp, EVA foam, or simple folded partitions all have a place, depending on product fragility and price point. In branded tray and sleeve boxes, the insert often matters more than one extra print effect.
Brand consistency also lives in the details. A logo centered on the sleeve but offset on the tray can make the whole package feel unresolved. So can mismatched typography between exterior and interior panels, or a color that changes too much under store lighting. Good branded tray and sleeve boxes keep the brand language steady from the outside panel to the interior reveal.
For projects where fiber sourcing matters, FSC-certified paperboard can support responsible sourcing claims, but it should still be matched to the actual print and structural needs of the job. Certification helps, yet it does not replace good engineering. A certified board that is too light for the product is still the wrong board.
Here is a practical way to think about the build:
- Choose the board first: decide whether the package needs folding-carton efficiency or rigid-box presence.
- Set the fit target: determine how much friction the sleeve should have when opening and closing.
- Define the finish: pick one or two effects that support the brand rather than competing with it.
- Plan the insert: stabilize the product before adding decorative extras.
- Test the hand feel: confirm that the final branded tray and sleeve boxes open cleanly and close evenly.
Cost and Pricing Factors for Branded Tray and Sleeve Boxes
Pricing for branded tray and sleeve boxes is driven by the same few variables every time: board grade, size, print coverage, finishing, insert complexity, and order quantity. A smaller simple build might be surprisingly economical, while a heavier rigid presentation package can move quickly into premium pricing. The key is understanding what is pushing the number up, because branded tray and sleeve boxes can be tuned in several directions.
Short runs usually cost more per unit because setup work does not shrink in the same way the quantity does. A print press still needs prep, a die still needs to be made or adjusted, and the line still needs changeover time. That means 1,000 units may carry a noticeably higher unit price than 5,000 units, even if the artwork stays the same. It is common to see a 20% to 40% jump at lower volumes, depending on print method and finishing.
At the other end, larger runs often make sense when the box is tied to a stable product line. If the SKU will stay active for several months, or if the package supports seasonal reorders, the setup cost is easier to absorb. That is one reason branded tray and sleeve boxes are often planned around production windows rather than just one launch date.
Freight, warehousing, and assembly labor also deserve a line in the budget. A beautifully designed package can still be expensive to move if the sleeve and tray ship flat in separate stacks, or if the insert requires hand assembly. Coated stocks may need more care in transit, and oversized boxes can trigger higher cartonization or pallet density costs. In practice, packaging buyers should ask for separate quotes on structure, printing, finishing, and assembly so the true cost of branded tray and sleeve boxes is easier to read.
The table below gives broad pricing examples. These are not hard rules, because size, coverage, and regional labor rates shift the number, but they are useful for early budgeting.
| Format | Best For | Typical Build | Approx. Unit Cost at 5,000 | Notes |
|---|---|---|---|---|
| Printed folding tray + sleeve | Accessories, stationery, small retail kits | 12-16 pt SBS tray with printed sleeve | $0.45-$1.10 | Good value if the artwork is simple and the insert is minimal |
| Rigid tray + printed sleeve | Gifts, cosmetics, premium sets | 800-1200 gsm chipboard with wrapped sleeve | $1.40-$3.25 | Stronger presence, more assembly, better shelf impact |
| Tray, sleeve, and custom insert | Fragile or multi-piece kits | Board tray with die-cut paperboard or foam insert | $0.95-$2.40 | Insert design can matter more than exterior decoration |
| Heavy finish presentation build | Launches, luxury gifts, corporate giveaways | Thicker board, foil, embossing, soft-touch lamination | $2.25-$4.50 | Higher setup and finishing costs, but a stronger premium signal |
One mistake is comparing only the unit number and ignoring the broader packaging line. If branded tray and sleeve boxes save retail labor because they are easier to merchandise, that can offset a slightly higher box price. If they require manual assembly at pack-out, that labor needs to be included before the project is approved. The cheapest quote on paper is not always the cheapest package in practice.
A better budgeting habit is to ask for three separate views: a plain functional version, a mid-level branded version, and a premium finished version. That gives the buyer a real picture of what each step costs and what each step adds to branded tray and sleeve boxes. Sometimes the mid-level option is the one that makes the most sense, because it gives the right look without spending on a finish the customer will not notice.
From a purchasing standpoint, the price conversation gets much easier when everyone agrees on what the box must do. If the goal is shipping protection, the budget should lean toward board strength and insert design. If the goal is shelf appeal, the money may be better spent on print crispness and a more polished sleeve. If the goal is gifting, then alignment, tactile finish, and opening feel become more valuable than raw material thickness.
Step-by-Step Process and Timeline for Branded Tray and Sleeve Boxes
Good projects start with a clear brief. Before any artwork begins, define the product dimensions, the actual packaging footprint, the customer type, the shipping method, and the shelf or display environment. A package built for a boutique counter is not the same as a package built for direct-to-consumer fulfillment, even if both end up as branded tray and sleeve boxes.
From there, the dieline and engineering review should happen early. This is where the tray depth, sleeve length, thumb notch placement, and insert clearance are checked against the real product. If the item has rounded corners, delicate surfaces, or multiple components, those details should be measured before the graphic layout is finalized. It is much easier to adjust a dieline than to redesign artwork after print-safe areas have already been approved.
Artwork development and proofing are the next gate. This stage is where color, logo placement, barcode placement, legal copy, and any interior print panels get confirmed. I like to see packaging teams check the design under both neutral daylight and store lighting, because branded tray and sleeve boxes can shift in feel once a matte black or rich neutral is printed on coated stock. A sample card or digital proof can be useful, but a physical sample is better whenever the budget allows.
The production sequence usually follows a predictable order: print, cut, crease, fold, glue, finish, and inspect. Each step adds time in a different way. A plain printed sleeve on a standard tray can move faster than a package with foil, embossing, and a nested insert. If the project involves hand assembly, that can become the longest part of the schedule, particularly for large quantities or mixed-SKU kits.
A realistic timeline depends on complexity, but a practical range is often 12 to 15 business days from approved proof for a straightforward build, and 18 to 25 business days or more for branded tray and sleeve boxes with custom inserts, specialty finishes, or larger production runs. If freight, carton loading, or pallet staging adds another layer, build in extra buffer so the schedule is not tight on the final week. The best projects are the ones that allow time for sample approval before full production begins.
For shipments that must perform in distribution, it is worth checking the package against an appropriate test method rather than assuming the shelf sample is enough. The general approach used by the packaging industry is outlined by ISTA, and that kind of testing helps reveal whether the tray and sleeve survive the same handling that a carton sees in transit.
A simple workflow keeps the process manageable:
- Discovery: define dimensions, quantity, product sensitivity, and shipping conditions.
- Engineering: build the dieline and check the tray, sleeve, and insert fit.
- Design: place graphics, copy, and compliance content with the print method in mind.
- Proofing: review a sample or proof for color, alignment, and sliding feel.
- Production: print, convert, finish, inspect, and pack out the order.
That process may sound ordinary, but it is usually what separates branded tray and sleeve boxes that feel polished from those that merely look attractive on a screen.
Common Mistakes to Avoid with Tray and Sleeve Packaging
The first mistake is chasing style before structure. A beautiful sleeve cannot rescue a tray that lets the product rattle around inside. Once the package is in the customer's hand, loose parts and crooked alignment are noticed immediately, and branded tray and sleeve boxes lose credibility fast if the contents do not sit correctly.
The second mistake is overbranding. Too many logos, too much copy, or too many competing colors can make the sleeve feel crowded. The format usually works best when one message leads and the rest of the information supports it. Clean hierarchy matters more than squeezing every marketing point onto the outside of branded tray and sleeve boxes.
Another issue is ignoring board thickness and coating buildup. A sleeve that feels perfect in a digital proof can become too tight once the actual stock, lamination, and adhesive all come together. This is especially true when the design uses dense coverage or a specialty finish. A small tolerance issue can become a big annoyance during pack-out, and it can also damage the opening feel.
Skipping a physical sample is another costly habit. On screen, a tray can look centered and the sleeve can look smooth. In hand, the fit might bind, the insert might need a deeper pocket, or the top edge might look too short next to the product. One sample often reveals the problems that would otherwise show up after a full run of branded tray and sleeve boxes has already been produced.
Freight and assembly labor are easy to overlook because they sit outside the artwork conversation. Yet they can change the economics of the entire project. A package that ships flat but requires hand insertion of dividers or foam might still be a good fit, but the budget should reflect the labor. Likewise, an oversized sleeve can increase pallet space, which adds costs nobody planned for in the first estimate.
There is also a softer mistake: trying to make the box do too much. A package should not compete with the product. It should support the product story, protect the contents, and create a smooth opening sequence. When branded tray and sleeve boxes are treated as a billboard, they can start to feel loud and dated instead of premium.
Common warning signs include:
- Loose movement: the product shifts when the package is tilted.
- Tight drag: the sleeve catches or scuffs during opening.
- Crowded graphics: the messaging feels forced rather than clear.
- Skipped testing: fit problems only show up after full production.
- Hidden labor: pack-out time and freight were not included in the budget.
Expert Tips and Next Steps for Branded Tray and Sleeve Boxes
If I were advising a buyer on branded tray and sleeve boxes, I would start with a physical sample before approving a large order. That is especially true if the product has a glossy surface, unusual dimensions, or multiple pieces that need to sit in a specific order. The sample does not just prove the size; it proves the feel, and feel is a major part of what makes branded tray and sleeve boxes effective.
I would also design the sleeve message before the structural flourishes. The sleeve usually gives the strongest first impression, so the front, spine, and opening edge should be planned around the most important brand signal. After that, the tray and insert can be engineered to support the handling needs of the product. That order keeps the project focused on what the customer actually sees first.
Finish testing deserves more attention than it gets. A soft-touch coating can feel wonderful in a sample room and look dull under a bright store fixture. Foil can be elegant, but if the artwork is too dense, it can start to feel more decorative than premium. The same artwork can behave differently under daylight, warm retail lights, and warehouse fluorescents, so branded tray and sleeve boxes should be viewed in more than one environment before approval.
My preferred workflow is simple and practical:
- Define the goal: presentation, shipping protection, gifting, retail display, or a mix of all four.
- Choose the structure: folding tray, rigid tray, or tray with insert.
- Confirm the fit: check product dimensions against sleeve clearance and tray depth.
- Review samples: confirm opening feel, print quality, and color accuracy.
- Compare pricing: separate structure, print, finish, and labor so the budget is readable.
- Move to production: only after the sample and proof both feel right in hand.
That sequence keeps the project grounded and makes the decision easier for everyone involved. It also gives the buyer a cleaner way to compare suppliers, because the numbers and the samples can be judged on the same terms. If you want to see how these choices play out in real work, the examples on our Case Studies page and our Custom Packaging Products page can help frame the conversation.
For packaging teams trying to improve presentation Without Wasting Money, branded tray and sleeve boxes are one of the most useful formats available. They are simple enough to produce at scale, flexible enough to support many product types, and polished enough to make a small item feel considered. Get the fit right, choose the materials carefully, and keep the finish focused, and branded tray and sleeve boxes can do exactly what they are supposed to do: protect the product, strengthen the brand, and make the opening moment feel worth the wait.
What products fit best in branded tray and sleeve boxes?
They work especially well for products that benefit from a presentation moment, such as cosmetics, premium food items, apparel accessories, candles, stationery, and gift sets. They are strongest when the item has a defined shape and does not need a deep, bulky shipping carton. If the item is fragile or multi-piece, add an insert so the tray carries the load instead of letting the contents move around.
Are branded tray and sleeve boxes expensive to make?
They can be economical in simple formats and more premium in rigid or heavily finished versions, so cost depends on size, quantity, and decoration choices. Short runs usually cost more per unit because setup and press time are spread across fewer boxes. Special finishes, custom inserts, and thicker board all raise the price, so compare structure and decoration separately when budgeting.
How long does it take to produce tray and sleeve packaging?
The timeline depends on whether the design is standard or fully custom, but sampling, proofing, printing, finishing, and assembly all need time. Complex artwork or specialty finishes usually add more lead time than a straightforward printed sleeve on a standard tray. Build in extra time for sample approval so fit issues are caught before full production starts.
What materials are used for tray and sleeve boxes?
Common choices include folding carton board, kraft board, CCNB, and rigid chipboard, each with a different balance of strength, print quality, and cost. The sleeve often uses the same or a lighter board than the tray, depending on how much structure the package needs. If the box is meant to feel premium, heavier board and higher-end coatings usually make the biggest difference.
How do I make branded tray and sleeve boxes feel more premium?
Focus on clean alignment, accurate sizing, and a smooth sliding motion, because those details shape the first impression immediately. Use one or two finishes well rather than stacking too many effects that compete with the product. A good insert, a strong brand color system, and crisp print quality often create more value than added decoration alone.
Takeaway: before you approve branded tray and sleeve boxes, lock the fit, test the sleeve motion with a physical sample, and budget structure, finish, and labor separately; that one check keeps the package premium in hand instead of just on screen.


