Custom Printed Rigid boxes get judged quickly. Buyers lift the lid, feel the weight, check the wrap at the edges, and notice whether the box holds its shape before they ever read the logo. That first tactile impression does a lot of work, which is why custom printed rigid boxes can influence perceived value more than many other packaging choices.
For brands selling beauty products, electronics, gifts, subscription kits, or premium accessories, the box usually has to protect the contents, support the brand story, and make the opening feel intentional. Done well, the format strengthens branded packaging, improves package branding, and gives the product a more credible retail or e-commerce presence.
Why custom printed rigid boxes stand out on shelf and in transit
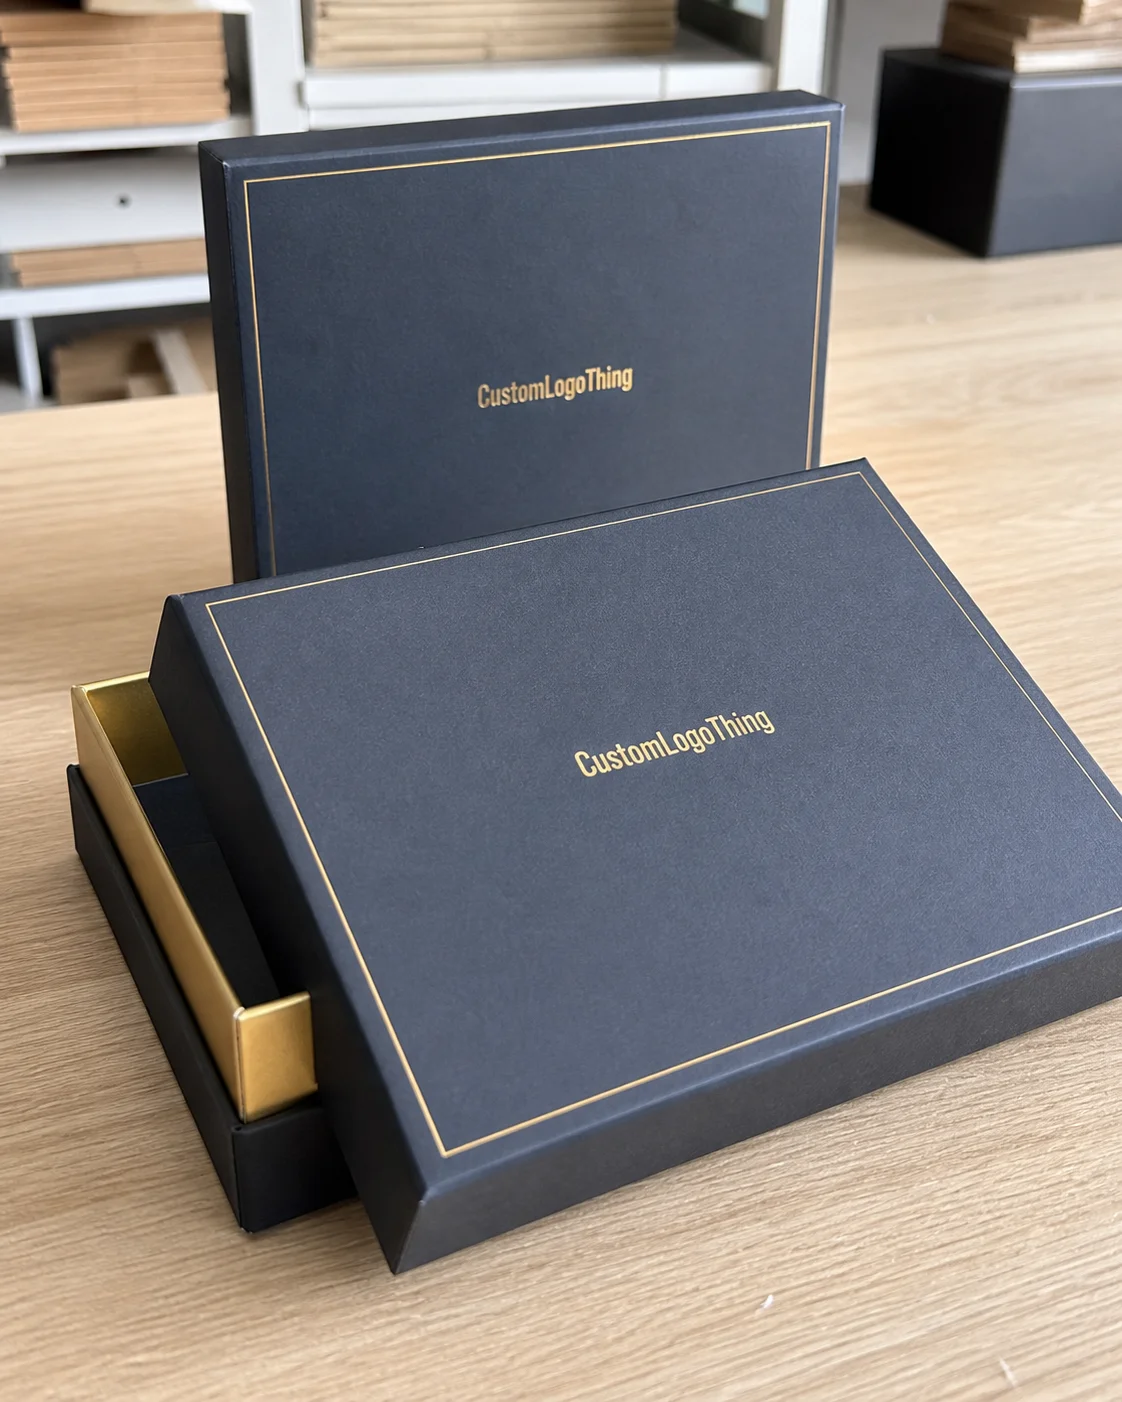
A rigid box is not a folded carton. It is built from thicker paperboard or chipboard, then wrapped with printed or decorative paper. That extra structure is the point. It creates clean edges, a set-up feel, and a more substantial closure than a standard folding carton usually delivers.
From a packaging buyer’s point of view, the practical benefit is straightforward: the box feels premium before the customer reads anything. That matters in categories where product packaging helps justify price. A lip serum, wireless accessory, candle set, or watch band may be small in size, but the packaging can make the purchase feel more considered.
These boxes tend to perform best where unboxing is part of the sale. Beauty brands use them for kits and gift sets. Electronics teams use them for accessories and premium devices. Gifting companies rely on them because they photograph well and keep their shape. Subscription programs use them because repeated handling exposes weak packaging quickly, and rigid structures stay presentable longer than lighter cartons.
“Buyers don’t always say they want premium packaging. They say they want the product to feel worth the price.” That usually means the box has to communicate value in under five seconds.
There is also a distribution advantage. Rigid boxes can better resist crush and edge deformation during pack-out and transit, especially when paired with the right insert. That does not make them indestructible. It means they can be engineered for better protection while still supporting upscale retail packaging and a stronger shelf presence.
For brands comparing Custom Printed Boxes across formats, the tradeoff is usually cost versus experience. Folding cartons are efficient. Rigid boxes are more premium. The extra spend makes sense when margin, presentation, or repeatability justify it.
How the rigid box construction and print process works
The construction is simple once you separate it into layers. Most rigid boxes include a chipboard or paperboard base, a printed wrap, adhesive, and sometimes an insert or liner. The base provides structure. The wrap creates the visible surface. The insert controls product placement and cushioning.
Production usually begins with the dieline and artwork setup. That is where dimensions, panel layout, bleed, glue tabs, and print coverage are finalized. After that, components are die-cut, printed, wrapped, assembled, and inspected. If the box includes foil, embossing, or specialty coating, those steps are added before final wrapping or after print, depending on the build.
Print method matters. Litho wrap printing is common for higher-volume runs because it delivers crisp images and good color consistency. Digital print is often a better fit for shorter runs or product tests because setup is lighter. Foil stamping adds visual contrast. Embossing and debossing create depth. Spot UV gives selective shine, which can work well on logos or product names if the base finish is matte.
What many teams underestimate is alignment. Print coverage, edge wrap, and glue tolerance all affect the final look. If the wrap is off by even a small amount, the box can read as busy rather than premium. A clean rigid box often depends less on flashy graphics and more on tight execution. On a hard-edged structure, small registration errors are easy to see.
Insert choice changes both the experience and the protection level. Foam can hold delicate items firmly, though some buyers now prefer paper-based alternatives for recycling or branding reasons. Cardboard inserts are common, cost-effective, and easier to align with paper-based packaging goals. Molded pulp is increasingly used by brands that want a stronger sustainability signal. Ribbon lifts and finger-notched trays improve the reveal, especially for gift sets.
For brands balancing visual appeal and practicality, the best custom printed rigid boxes usually begin with the product’s actual geometry rather than a mood board.
- Base: chipboard or paperboard, often in the 1000–2000 gsm range depending on size and weight
- Wrap: printed paper, specialty paper, or coated stock
- Decoration: foil, emboss, deboss, spot UV, or textured coating
- Insert: foam, paperboard, molded pulp, or ribbon-assisted tray
For standards and packaging terminology, the Packaging School / packaging.org resource hub is useful for orientation, while transit performance questions often point back to ISTA test methods and basic package engineering.
Material, finish, and insert choices that change performance
Board thickness affects more than people expect. It changes crush resistance, lid feel, wall stiffness, and how the box holds its shape after repeated handling. A thin build may still photograph well, but in hand it can feel hollow or flex too easily. For heavier products, that becomes a problem. For prestige items, it can feel cheap in a way that graphics rarely fix.
Finish decisions should match the use case. Matte reduces glare. Soft-touch gives a velvet-like feel, though it can show scuffs if the box is handled heavily. Gloss can make color pop and improve contrast, but it also highlights fingerprints and lighting reflections. Textured wraps create a richer tactile cue, especially for gifting and luxury categories.
The insert is where many buyers save a little and lose a lot. A secure insert reduces movement, limits abrasion, and lowers the chance of return claims on fragile items. It also improves presentation because the product sits where it should instead of drifting inside the box. If the item is small, heavy, or oddly shaped, the insert becomes part of the product experience rather than a packing accessory.
Distribution path matters too. A retail box for shelf display has different priorities than a mailer used for direct-to-consumer shipping. Fingerprint resistance matters more in retail. Drop resistance matters more in e-commerce. Photography matters in both, but lighting conditions can make matte black look elegant in one setting and dull in another. That is why sample approval under real lighting is worth the effort.
If a spec only looks good in a mockup, it is not finished. Match the finish and insert to weight, fragility, and freight path. Otherwise, you end up with packaging that looks premium in prepress and underperforms in use.
| Option | Typical effect | Best for | Tradeoff |
|---|---|---|---|
| Matte wrap | Low glare, cleaner photography | Beauty, apparel, premium sets | Can show scuffing on rough handling |
| Soft-touch finish | Tactile luxury, refined hand-feel | Prestige gifting, cosmetics | Usually higher cost, sometimes less scratch resistant |
| Gloss finish | High color pop, strong shine | Retail display, vibrant graphics | Fingerprints and reflections are more visible |
| Molded pulp insert | Paper-based retention, eco signal | Tech accessories, gift kits | Less customizable than foam or board |
If sustainability is part of the buying brief, it helps to check how the chosen spec lines up with current material and recovery guidance. The FSC site is a practical reference point for responsibly sourced paper options.
Pricing, MOQ, and quote variables that drive unit cost
Pricing for custom printed rigid boxes depends on more than size. The main variables are box dimensions, board grade, print coverage, finish complexity, insert type, and the number of decoration steps. A plain rigid box with simple print costs less than one with soft-touch lamination, foil, embossing, a custom insert, and a printed inner tray. That is not arbitrary markup; it is added material and labor.
MOQ matters because setup cost has to be spread across the run. If you are ordering 500 units, the per-box price is usually much higher than at 5,000 units because the same proofing, machine setup, waste, and inspection steps are divided across fewer pieces. Small runs can be useful for launches or testing, but they are rarely the cheapest path.
Typical pricing varies widely, but buyers often see something like $1.20-$2.50 per unit for smaller runs with moderate decoration, and roughly $0.70-$1.50 per unit at larger quantities depending on size and finish. Once complex inserts, specialty paper, or premium decoration are added, the range can climb quickly. That is why comparing quote scenarios is more useful than chasing a single “best” number.
Ask for landed cost, not just factory cost. Freight, duties, sampling, and packaging can change the real total enough to alter the margin picture. A quote that looks attractive on paper can become expensive once shipping and rush handling are added.
Hidden charges also appear often: plate or die fees, custom insert tooling, reproof costs, and rush production. None of these are unusual. They just need to be visible early. A quote that is slightly higher but complete is usually easier to manage than one that looks lean and grows after the third revision.
For teams buying custom printed rigid boxes for the first time, it helps to ask for two options: a cost-efficient spec and a premium spec. That makes the tradeoff obvious. You can see what the finish, insert, and print upgrades are actually worth.
| Run size | Typical unit cost behavior | Why it changes |
|---|---|---|
| 500–1,000 pcs | Higher | Setup, labor, and waste spread across fewer units |
| 2,000–5,000 pcs | Moderate | Better efficiency, more favorable material buying |
| 10,000+ pcs | Lower | Setup cost diluted, production runs become more efficient |
Production steps and lead time from dieline to delivery
The order flow usually follows a clear sequence: project brief, structural spec, artwork proof, prototype or sample, production, quality check, and shipping. Each step can move quickly if the details are stable. Each step can also stall if decisions keep shifting.
The most common delays are ordinary. Artwork changes arrive after proof approval. Internal dimensions are still being negotiated. The insert shape changes after the product has already been approved. Finish placement for foil or spot UV is adjusted too late. None of these are catastrophic, but they add days.
Standard rigid builds with straightforward print and common finishes may move through in roughly 12-18 business days after proof approval, though that depends on the supplier and the season. More complex builds can take longer, especially if they include multiple decoration layers, specialized inserts, or extra sampling rounds. Sampling, manufacturing, and freight should be treated as separate blocks of time.
Planning buffer is not optional if the boxes support a retail reset, a holiday launch, or a limited promotion. Packaging has a way of becoming the bottleneck right when marketing is ready to move. More launch pressure comes from late sign-off than from production itself.
Shipping mode changes the schedule as well. Air freight can save a launch, but it raises cost quickly. Ocean freight makes sense for larger replenishment orders, but it requires more lead time and better inventory planning. If you are launching a new SKU, carry enough safety stock to absorb the freight window plus a small buffer for reprints or damage.
For buyers working through broader packaging programs, it can help to review related Custom Packaging Products while planning the box spec, because the outer shipper, insert, and display box often need to work as one system.
Common mistakes buyers make when ordering rigid packaging
One of the biggest mistakes is approving artwork before confirming internal dimensions. The outside size might look right in a mockup, but if the product sits too tightly or rattles around, the box fails in practice. Clearance space matters. Closure direction matters. Product orientation matters. These are structural details, not minor finishing notes.
Another frequent issue is assuming the insert will fix a sizing problem. It will not. Inserts can stabilize and present the product, but they should not be used to absorb bad dimensional planning. If the item is taller, heavier, or more fragile than expected, the base spec has to reflect that from the beginning.
Brand teams also get tripped up by finish choices. Some coatings make barcode scanning harder. Some deep colors read differently under retail lighting. Some glossy surfaces photograph beautifully but show every fingerprint during handling. Packaging design has to be judged in context, not just in a file preview.
Shipping and pack-out are the other blind spots. A strong box design can still underperform if the master carton count is wrong, the inner protection is weak, or drop-test expectations are never discussed. ASTM and ISTA testing exist for a reason. For e-commerce and transit-heavy programs, a basic drop and compression check can prevent a lot of trouble later.
The final mistake is administrative, but it causes real damage: not archiving the approved spec sheet. Teams reorder months later, and suddenly no one remembers the exact board thickness, insert fit, or foil placement. Then the next run looks “almost right,” which is another way of saying inconsistent. Good branded packaging is repeatable.
If you want a cleaner system, keep a record that includes the final dieline, color notes, insert drawings, finish callouts, and approval version. That document becomes the source of truth for later orders, substitutions, and reprints.
Expert tips and next steps for a cleaner first order
Start with a sample or structural proof. Not because samples are glamorous, but because they expose real-world issues early: closure tension, product fit, board feel, and shelf presence. A prototype costs less than a failed production run.
Then create a one-page spec sheet. Keep it simple, but complete. Include dimensions, board grade, finish, insert type, print coverage, target quantity, and any special notes about the logo, barcode, or inner print. The clearer the brief, the fewer corrections you need later.
Ask for two quote paths. One should be cost-efficient. The other should show the premium build. That comparison makes tradeoffs visible. You may find that a modest upgrade in finish or insert quality yields a much stronger customer perception for only a small increase in cost.
Also ask for tolerance ranges and sign-off rules. If the launch date is fixed, you want to know when changes stop being editable. You want proof checkpoints. You want a clear answer on what happens if a file is late or a sample is revised. That sounds procedural, and it is. Procedure keeps packaging schedules from drifting.
For teams buying custom printed rigid boxes for the first time, the smartest move is usually to gather the dieline, print-ready files, product dimensions, freight destination, and target date before requesting quotes. That lets the supplier price the actual build, not a guess. It also gives you a better chance of getting the right mix of durability, branding, and cost from the first order.
And if you are still choosing between formats, compare the box against your product’s real journey: shelf, shipping, unboxing, and reorder cycle. That is where the right spec becomes obvious.
Frequently asked questions
What details do I need to quote custom printed rigid boxes accurately?
Provide finished dimensions, product weight, insert needs, print coverage, and target quantity so the quote reflects the real build. Add the delivery location and launch date because shipping method and rush timing can change the final price materially.
How long do custom rigid box orders usually take?
Simple builds with standard finishes move faster; foil, embossing, and custom inserts add approval and production time. Sampling, proof approval, manufacturing, and freight should be treated as separate timeline blocks instead of one estimate.
Which finishes work best for premium rigid packaging?
Soft-touch and matte finishes reduce glare and fingerprints, which helps both shelf presentation and photography. Gloss, foil, embossing, and spot UV are best used when the goal is contrast, visual drama, or a stronger luxury signal.
Can I order a small run of custom rigid boxes without a huge MOQ?
Yes, but unit cost usually rises because setup, labor, and waste are divided across fewer boxes. Small runs make sense for product tests, limited editions, and seasonal launches when speed matters more than the lowest cost.
How do I avoid sizing mistakes before production starts?
Send the exact product dimensions, closure direction, and clearance requirements, not just a rough outside measurement. Request a sample or structural proof and check the insert fit, lid closure, and carton pack-out before approval.


