The stationery unstructured dad hats Digital Proof Checklist is about preventing expensive mistakes before production starts. A soft, unstructured crown changes how artwork sits, so a logo that looks fine on screen can land too low, too large, or too crowded once it is stitched on the actual cap. Small shifts in placement, thread choice, or logo scale are easy to miss in a mockup and costly to fix after approval.
That is why the proof should be treated as a production document, not a courtesy preview. Buyers who review hat style, decoration method, size callouts, and thread codes before signing off usually catch the errors that lead to reprints, rush fees, and schedule slips. The goal is simple: confirm that what is being approved matches what will be sewn, patched, or printed.
A good proof answers one question: if production starts now, will the finished hat match the buyer's expectation and the quoted spec?
Why the Stationery Unstructured Dad Hats Digital Proof Checklist Catches Costly Errors
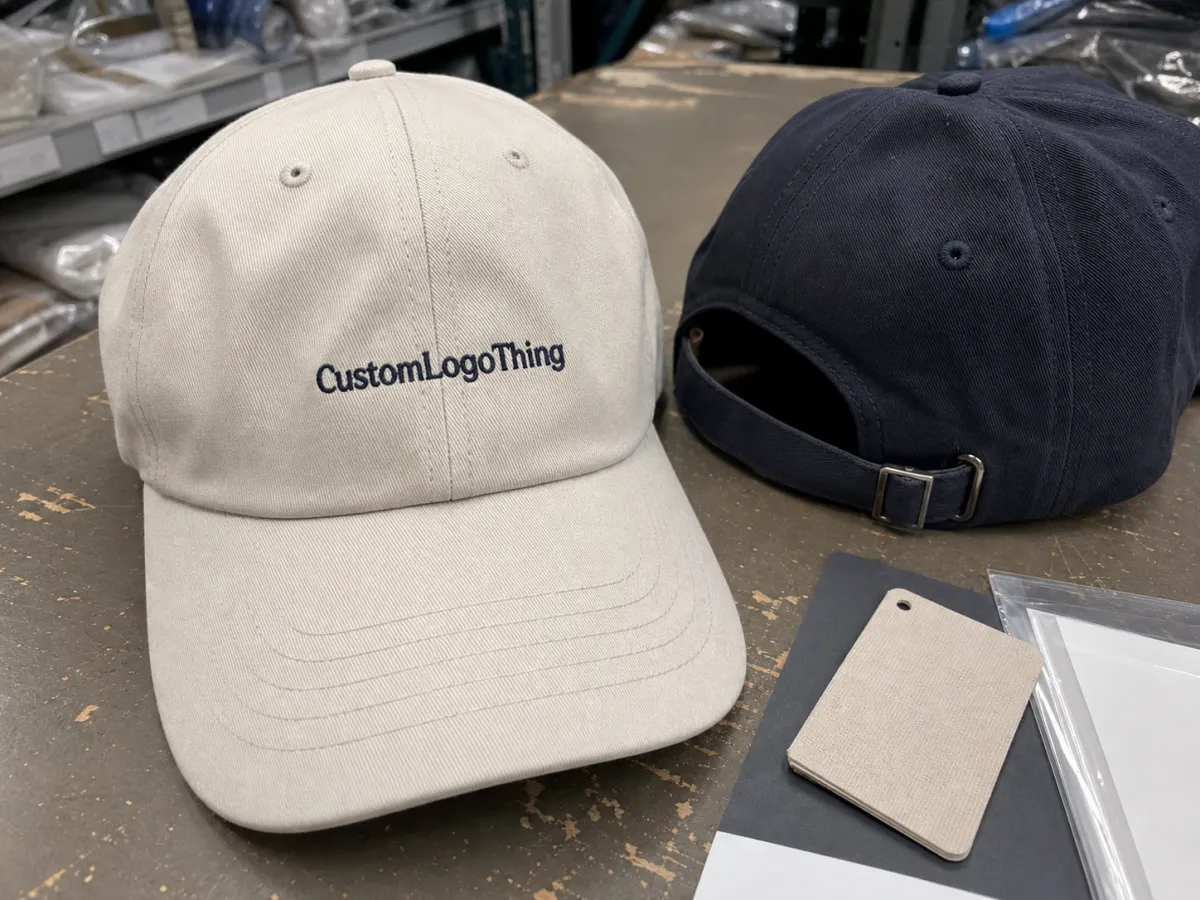
On a flat screen, artwork looks rigid and precise. On an unstructured dad hat, the front panel flexes, the seam line changes the visual center, and the brim can make a centered logo appear low or cramped. That is the first reason a checklist matters: it forces the review to happen against the actual cap style, not a generic mockup.
Digital proofs compress several production decisions into one image. A useful proof should show the hat blank, closure type, decoration method, artwork version, thread colors, placement, and any digitizing notes. If embroidery is involved, the file is not just being copied; it is being translated into stitches. That translation is where most surprises start. A logo that seems clean in a PDF can become crowded once stitch direction, density, and pull are applied.
Skipping those details has a real cost. One missed placement note can trigger a revision. One overlooked art change can force a new digitizing pass. One quick approval can move a mistake into production, where correction costs more than the margin on a small order. For low-MOQ runs, even a minor fix can erase the economics of the job.
There is also a coordination risk. Marketing may assume purchasing checked the file, purchasing may assume design signed off, and production may assume the buyer noticed the change. That handoff gap is where proof errors survive. A checklist makes ownership visible and reduces the chance that everyone thinks someone else reviewed the details.
How Digital Proofs Move From Artwork Upload to Approval
The process usually starts with file intake. The supplier checks whether the artwork is vector or raster, whether the logo is readable at the intended size, and whether the uploaded version is the one the buyer actually wants. Vector files such as AI, EPS, and editable PDF usually give the digitizer more control. A low-resolution PNG or screenshot often needs cleanup before a proof can be built.
Next comes the mockup. The supplier places the artwork on the chosen decoration area: front panel, side panel, back closure, or patch location. On unstructured caps, front decoration deserves extra attention because the soft crown shifts the visual center. A logo can be mathematically centered and still look off if it sits too close to the seam or too near the brim. Buyers should check both measurement and appearance.
A strong proof packet usually includes:
- Hat style: unstructured, low-profile, dad cap, and closure type
- Decoration method: embroidery, patch, woven label, print, or a mixed approach
- Artwork version: the exact approved file or lockup
- Thread colors: specific codes or named equivalents, not vague descriptors
- Placement and size: width, height, and distance from reference points
- Notes: digitizing guidance, cleanup items, or construction limits
Color needs careful handling. Screen color is only a reference, not a match standard. Thread has texture and sheen, so the finished stitch can read darker or flatter than the on-screen swatch. That is normal. What matters is whether the chosen thread code is correct and whether the buyer understands the visual range of embroidery.
Approval should leave a paper trail. If a revision is discussed by phone or in chat and never captured on the final proof, the order can drift. The safer practice is to mark comments, request a revised file, and approve only the final version after every change is visible in writing.
Pricing, MOQ, and Quote Drivers for Custom Dad Hats
Custom dad hat pricing usually comes down to four variables: decoration complexity, quantity, turnaround speed, and artwork prep. For a straightforward one-location embroidered hat, buyers often see prices in the rough range of $4.25-$7.50 per unit at 144 pieces, depending on the blank, stitch count, and finish level. At lower quantities, unit price rises because setup costs are spread across fewer hats. A 48-piece run can land closer to $7.50-$12.00 per unit once digitizing, proofing, and production setup are included.
The quote drivers are predictable, but they are not interchangeable. Stitch count affects machine time. Multiple thread colors add changes and slow the run. Artwork cleanup can add digitizing hours. Custom labels and private-label packaging add labor. Rush timing compresses the schedule and often raises the cost more than buyers expect.
- Stitch count: more stitches require more machine time and more thread
- Thread colors: multi-color artwork adds changes and can slow the run
- Digitizing or cleanup: clean vector art costs less than rebuilt artwork
- Custom labeling: woven labels, interior tags, and branded packaging add steps
- Rush order: faster timing often means overtime or schedule reshuffling
MOQ changes the quote because it changes how setup is amortized. A buyer ordering 24 units is carrying a larger share of art prep, digitizing, proofing, and quality control than a buyer ordering 144. That is not a penalty. It is the practical cost of small production.
Revisions can also change pricing. If the buyer enlarges the logo, adds another thread color, or moves the decoration to a harder-to-sew area, the supplier may need to re-price the job. A small proof tweak can become a bigger production change if it increases stitch count or adds a second decorating step.
A useful quote should make the cost structure visible. Ask what the price includes, how many revision rounds are covered, and which changes trigger a re-quote. If the supplier cannot explain those points clearly, the proof stage becomes guesswork. For packaging or insert components in the same order, FSC is a useful reference for paper sourcing, while ISTA provides a standard lens for transit testing and ship-ready packaging expectations.
| Order Type | Typical MOQ | Typical Price Range | Common Adders |
|---|---|---|---|
| Simple one-color embroidery | 48-144 | $4.25-$8.50 | Digitizing, standard proofing |
| Multi-color front logo | 72-144 | $5.50-$10.00 | Higher stitch count, extra thread changes |
| Custom label or patch upgrade | 100-250 | $6.50-$12.50 | Label application, patch sourcing, extended proofing |
| Rush order | Varies | Quote-specific | Expedite fee, compressed schedule |
The table above mirrors how production teams actually price the job. If the supplier cannot identify whether art, quantity, or timing is driving the number, the quote is probably too loose for safe approval.
Process and Turnaround: From Proof Request to Production Start
A normal workflow runs from intake to proof, proof to revision, revision to approval, and approval to production scheduling. On a clean one-location design, a proof can often be turned around in 1-2 business days. If the file needs cleanup, if multiple decoration areas are involved, or if labeling is custom, the proof stage can stretch to 3-5 business days before the order is ready to move.
Most delays come from a few predictable places. File quality is one. A blurry JPEG or a logo pulled from an email signature forces extra artwork cleanup before the mockup can begin. Another is decision drift. If marketing wants one placement, purchasing wants another, and operations has not signed off, the proof bounces around while the schedule slips.
Production timing also depends on order complexity. A single front logo is straightforward. A front logo plus a woven label or a closure note adds more checkpoints. Each checkpoint is another chance for a clarification request or a re-quote. That is not a flaw in the supplier; it is the reality of custom assembly.
Approval timing matters more than most buyers think. A proof accepted late in the day may miss a same-day cut-off if the batch has already been staged. The plant cares when the final approved file, PO, and notes land in the queue, not when someone opened the email. That difference is where many timing expectations break apart.
The fastest path is usually the cleanest one: one approver, clear files, written notes, and a quick response to revision questions. Buyers can often save days without paying a rush fee just by making the proof process less ambiguous.
Step-by-Step Proof Review for Unstructured Dad Hats
The best proof review is mechanical. It should reduce guesswork and force the buyer to verify the details that affect production.
- Confirm the artwork file: verify the version number, spelling, and correct logo lockup.
- Inspect placement: compare logo position against the seam, front panel shape, and brim distance.
- Verify the hat color: make sure the blank matches the order and brand standard.
- Check thread colors: confirm codes or names, not just general descriptors.
- Review the size callout: check logo width, height, and scale against the cap profile.
- Read the notes: look for digitizing instructions, stitch changes, or construction limits.
Measurement matters. Ask for the logo width and height in inches or millimeters. Ask for the distance from the brim if the design sits low on the front panel. Ask whether the artwork is centered to the seam or shifted slightly for visual balance. On a soft cap, a design that is technically centered may still look off if it hugs the seam too tightly or floats too high on the crown.
Compare the proof to the original order line by line. A lot of mistakes begin as small changes: one fewer thread color, a different logo version, a revised closure, or a shifted embroidery area. Those are not cosmetic details. They can affect cost, timing, and the finished look.
If more than one department is involved, appoint one final approver. Shared approval chains create version confusion. Better to collect internal comments, settle the disagreement once, and send one clean response to the supplier. The goal is not consensus theater; it is a usable proof.
Save the final proof, the revision history, and the signed approval. Reorders move faster when the exact approved version is easy to find. Without that record, the team ends up reconstructing the order from memory and email history, which is a weak substitute for documentation.
Common Proof Mistakes That Lead to Reprints
The most common mistake is assuming the digital mockup defines color precisely. It does not. Thread rarely matches a screen swatch literally. Under shop lighting, a color may look darker, flatter, or slightly shinier than expected. The fix is to confirm the thread code and accept that embroidery lives in a physical medium, not a pixel grid.
Small text creates another predictable issue. Words below about 0.18 inches in cap embroidery can become hard to read, especially when the lettering sits on a curved or soft area. Thin strokes, punctuation, and tiny trademark marks often need simplification during digitizing. If the logo contains legal marks or fine copy, those should be checked before approval, not after delivery.
Placement errors show up often on unstructured caps because the front panel is not rigid. A logo can look centered in the proof and still sit awkwardly once stitched and worn. That is why good proofs show not just artwork position but also the relationship to the seam, brim, and adjacent stitching.
Process mistakes can be just as damaging as art mistakes. Approving the wrong version is a classic. So is forgetting to re-check the quantity after a revision. Another common miss is leaving special instructions in an email chain rather than on the approved proof. Production teams build from the documented file, not from the buyer's memory.
For orders that include shipping cartons, inserts, or retail-ready packout, packaging standards matter too. Packaging.org is a useful reference for materials and print considerations, and ISTA guidance helps set a baseline for what should survive transit without damage. Those sources do not replace supplier specs, but they help buyers ask better questions.
If the proof is ambiguous, production will interpret it somehow. That interpretation is usually where the extra cost starts.
Expert Tips for a Clean Handoff and Final Approval
For simple artwork, a standard proof is usually enough. For logos with fine type, gradients, badges, or tight line work, ask for a close-up crop as well. Embroidery can simplify detail during digitizing, and a zoomed view exposes problems the full mockup hides. If the supplier provides stitch counts, read them. A jump from 6,000 stitches to 11,000 is not minor; it can change machine time and how the design sits on the cap.
One approver is better than five. A single reviewer can gather input from marketing, purchasing, and operations, then send one authoritative response. The proof stays cleaner, and the revision chain stays shorter.
Before release, ask the supplier to confirm three items in writing:
- Proof version number: the exact file you approved
- Hat style: blank type, profile, and closure
- Thread codes: the exact colors to be sewn
If the order includes patches, woven labels, or alternative closures, confirm whether those are part of the same run or separate line items. That detail affects unit Price, Lead Time, and quality control. It also matters later when the buyer reorders and expects the same result without rebuilding the spec from scratch.
The cleanest handoff is boring: final proof, written approval, PO, shipping details, and any packout instructions all in the same record. Production teams do better with complete documentation than with a stream of last-minute clarifications.
What should a stationery unstructured dad hats digital proof checklist include?
It should confirm the artwork version, hat color, thread colors, logo size, placement, and any digitizing or construction notes. It should also verify the quantity, revision limits, and whether the proof matches the exact production-ready order.
How long does a dad hat digital proof usually take?
Simple proofs are often ready in 1-2 business days. If the artwork needs cleanup, multiple decoration areas are involved, or the design requires extra labeling, the proof stage can take 3-5 business days or longer.
What changes most often affect pricing on custom unstructured dad hats?
Stitch count, thread count, custom labeling, rush timing, and low quantities are the main drivers. Artwork cleanup or a resize can also raise the quote before production begins.
How do I check logo placement on an unstructured dad hat proof?
Check the logo width and height, then compare the placement against the front panel shape, brim distance, and center seam. Ask for a close-up if the art sits near a seam or includes fine text.
What should I do after I approve the digital proof?
Send written approval, lock the proof version, and confirm the PO, shipping address, and delivery contact. Keep the final proof on file so reorders and future color matching stay consistent.


