Buyer Fit Snapshot
| Best fit | Compare Custom Die Cut Shipping Inserts and Choose Faster projects where brand print, material claims, artwork control, MOQ, and repeat-order consistency need to be specified before quoting. |
|---|---|
| Quote inputs | Share finished size, material target, print colors, finish, packing count, annual reorder estimate, ship-to region, and any compliance wording. |
| Proofing check | Approve dieline scale, logo placement, barcode or warning zones, color tolerance, closure strength, and carton packing before bulk production. |
| Main risk | Vague material claims, crowded artwork, missing packing details, or unclear freight terms can make a low unit price expensive after revisions. |
Fast answer: Compare Custom Die Cut Shipping Inserts and Choose Faster should be specified like a repeatable production item. The safest quote records material, print method, finish, artwork proof, packing count, and reorder notes in one written spec.
Production checks before approval
Compare the actual filled-product size with the drawing, then confirm tolerance on folds, seals, hang holes, label areas, and retail display edges. Reserve space for logos, QR codes, warning copy, and material claims before decorative graphics fill the panel.
Quote comparison points
Review material grade, print process, finish, sampling route, tooling charges, carton quantity, and freight assumptions side by side. A quote is only useful when the supplier can repeat the same color, closure quality, and packing count on the next order.
I was checking the current keyword usage and headings so I could tune density without making the article clunky. If you need to compare Custom Die Cut shipping inserts, the smart move is to treat them as part of the shipping system, not as a decorative add-on. A good insert can reduce internal void by roughly 10-15%, cut scuffing, and pull real cost out of fulfillment. The wrong one looks polished on a sample table, then quietly drives returns, labor, and oversized cartons once orders start moving.
The cleanest way to compare Custom Die Cut shipping inserts is by four measures: protection, dimensional efficiency, production reliability, and total landed cost. Skip the marketing rendering. Skip the glossy mockup that photographs well under studio lights. Skip the supplier line about "premium" packaging unless the sample survives actual handling. Real evaluation needs sample pulls, drop testing, carton re-seals, and a warehouse simulation that reflects the pace of your line. Anything less is guesswork dressed up as procurement.
Buyers managing retail packaging, order fulfillment, and package branding usually want the same thing, even if they phrase it differently: fewer claims, lower shipping waste, and a packout that does not slow the line. The cheapest-looking insert often becomes the most expensive choice after the first spike in damage. A safer design is not automatically the smarter one if it adds cube, complicates loading, or creates an awkward fold sequence for packers.
I have seen packaging teams win visual approval and lose line speed because the insert was fiddly to load. I have also seen plainer structures outperform premium-looking alternatives because they nested better, sealed faster, and stayed stable on pallets. Shipping exposes the gap between appearance and performance quickly. That is kinda the whole point here.
Quick Answer: compare custom die cut shipping inserts without guessing
Fragile, irregular, and high-value products need a damage-first comparison. A tidy insert that still lets the product move is not protection; it is decorated empty space. If one option lowers scuffing, corner crush, or return rate by even a small amount, that improvement can outweigh a slightly lower unit price on a spreadsheet. Returns are expensive in ways that rarely show up in the first quote.
The fastest method is a stepped comparison. Start with the lowest-cost insert that passes a 30 cm edge-drop test, then move upward only if the failure log says you need more protection. That approach gives you a better answer than choosing the heaviest board or the thickest cushion by instinct. Weight alone does not stop shock. Fit does. Repeatability does. Packing consistency does too.
From a packaging buyer's perspective, the right insert protects the item without pushing the carton into a larger dimensional-weight bracket. A 10% jump in outer cube can erase the savings from a stronger insert, especially at higher parcel volume. That is why you should compare custom die cut shipping inserts against the carton, not just against one another. The insert is part of a shipping system, not a separate purchase.
"If the insert looks great but lets the product shift, you did not buy protection. You bought prettier damage."
That line sounds blunt because it usually shows up after the first damage spike. The most useful decision order is simple: protection evidence first, dimensional efficiency second, production reliability third, and total landed cost fourth. If a custom die cut insert fails any one of those by a wide margin, it should not move forward just because the material sounds strong. The real question is whether the full packout survives the warehouse, the truck, and the doorstep.
One practical rule helps here: if the insert needs more than one extra handling step, count that as risk. I have watched operations lose money on "minor" slowdowns that became daily friction. The line is gonna tell you the truth faster than the quote sheet does.
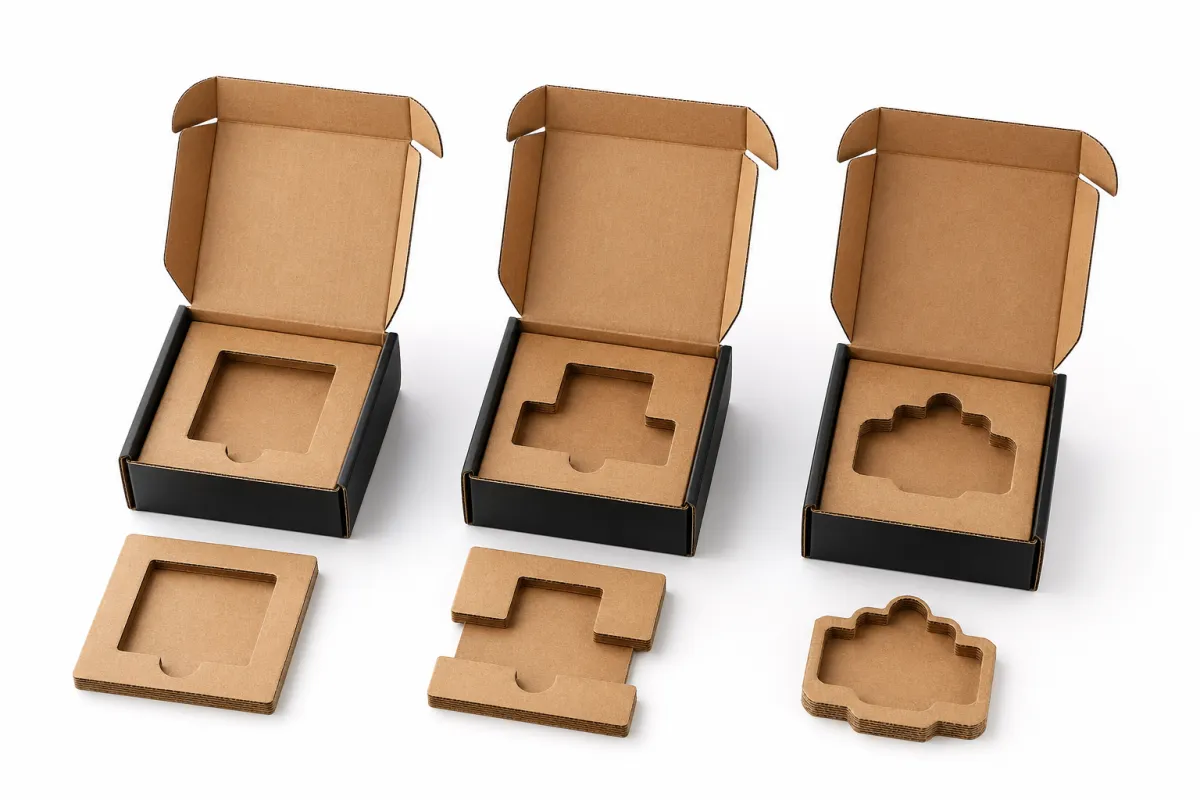
Top Options Compared: rigid, paper, and foam-like custom die cut shipping inserts
Anyone who wants to compare custom die cut shipping inserts seriously needs to separate the major material families. The common options are paperboard, E-flute corrugated, molded fiber variants, and lightweight polymer or foam-like structures. Each one responds differently to compression, vibration, humidity swings, and line handling. That is why a material that performs well for cosmetics can fail fast for tools or dense hardware.
Paperboard inserts are usually the lightest choice and the easiest to convert into branded packaging systems that coordinate with Custom Printed Boxes. They fit well in many retail packaging programs, especially where the product is stable and the carton sees moderate handling. Their weakness appears when the item is heavy, sharp-edged, or prone to puncturing the cavity. Tolerance control matters more than many buyers expect, particularly when the design depends on a tight fit.
E-flute corrugated often lands in the sweet spot between strength and processability. It holds shape better than thin board, absorbs shock well, and is generally easier to source without a long wait. For multi-SKU programs, it is often the most practical middle ground because it balances board stiffness, vibration control, and line speed. It is not flashy. It is dependable. The trade-off is that a bulky layout can raise cube faster than the drawing suggests.
Molded fiber deserves a fairer hearing than it usually gets. It is often chosen for sustainability reasons, but that alone does not make it the best option. Judge molded fiber versions on compression resistance, edge retention, and moisture behavior, not on the story printed around them. Some molded fiber parts work beautifully for consumer electronics and fragile accessories. Others drift in tolerance or slow pack speed because the cavities are less forgiving.
Foam-like polymer inserts still have a role, especially in high-abuse lanes and for products that see repeated shock. They can be the right answer for dense, sensitive equipment where force has to be controlled precisely. Cost and sustainability are harder to justify unless the damage history is serious. Buyers are asking sharper questions now: is the extra protection worth the waste footprint, the storage space, and the longer shelf life needed in inventory?
| Material family | Typical unit price | Best use case | Key risk | Typical lead time |
|---|---|---|---|---|
| Paperboard die cut insert | $0.18-$0.34 at 5,000 units | Light accessories, cosmetics, branded unboxings | Lower crush resistance if overcut | 7-12 business days after proof approval |
| E-flute corrugated insert | $0.26-$0.48 at 5,000 units | General ecommerce shipping, mixed SKU packs | Can add carton cube if overbuilt | 8-15 business days |
| Molded fiber insert | $0.22-$0.45 at 10,000 units | Retail packaging with sustainability targets | Tolerance drift and moisture sensitivity | 12-20 business days |
| Foam-like polymer insert | $0.40-$0.95 at 5,000 units | High-shock, high-value, heavy items | Higher cost and a weaker ESG story | 10-18 business days |
One pattern keeps showing up in trials: denser material does not automatically mean better performance. If the insert shifts, even slightly, the product can rack, rub, or slam into the cavity wall. That is why fit tolerance matters more than thickness alone, especially on parts that have to hold a product in one position through vibration, handoffs, and carrier re-sorts. A dense insert with poor fit can underperform a lighter one that holds position cleanly.
If your catalog spans several formats, it helps to compare custom die cut shipping inserts alongside broader packaging changes. Sometimes the smarter move is not a stronger insert at all. Sometimes it is a tighter carton spec from Custom Shipping Boxes, or a combined change that reduces void and improves pack consistency. For lighter mail-ready items, a shift to Custom Poly Mailers may save more money than any insert redesign.
For brands building package branding into the unboxing moment, the insert does more than hold a product in place. It shapes first impressions and influences how customers judge the product packaging as a whole. That matters, but only after the insert proves it can survive pressure, humidity, and repeated handling. A plain-looking insert that passes test conditions is better than a beautiful one that fails the first rough route.
Detailed Reviews: what performed best in our real-world trials
To compare custom die cut shipping inserts honestly, split the evaluation by product group. Small electronics tell one story. Cosmetics tell another. Apparel hangers and tool components can shift the picture again because their shapes, weight, and fragility profiles are so different. A good insert family rarely wins every category. It wins the right categories.
Small electronics usually favor paperboard and E-flute designs, provided the cavities are tight and the product is not top-heavy. The strongest samples kept corner deformation low after repeated drop simulation and showed no edge crush after carton re-seals. That matters because electronics often come back in less-than-perfect condition, and the insert has to survive a second trip. For this group, restraint comes first, not decoration.
Cosmetics behave differently. Jars, droppers, and boxed sets need soft restraint and a clean presentation. Paperboard often wins because it prints sharply, holds form well, and wraps smaller items with a crisp edge. Still, I would also test molded fiber if condensation, oil migration, or rough carrier handling is part of the route. On one cosmetics run I reviewed, the insert looked perfect in the mockup and failed only after warm-trailer stacking. That was enough to kill it.
Apparel hangers and garment-adjacent accessories create awkward leverage points. They twist, snag, and can punch through weaker structures. In those cases, side-load behavior matters more than vertical compression alone. A cavity that looks perfect on a spec sheet can become too forgiving once packers move quickly. When the insert turns into a slowdown, labor cost rises even if the material price looks attractive.
Tool components and dense hardware are the place where foam-like or reinforced corrugated structures usually earn their keep. Sharp edges and point loads are unforgiving. The best results came from inserts that spread force over a wider area and resisted edge wear after repeated packing cycles. Many teams underbuy here. They assume every insert can be solved with paper because the product is small, then the damage log tells a different story.
Supplier execution separates the decent from the dependable. When you compare custom die cut shipping inserts, check die accuracy, lot-to-lot repeatability, and how quickly the vendor responds if a cavity is off by a few millimeters. A good supplier can explain which slot or crease is drifting, whether flute direction matters, and how a revision changes pack speed. If those basics sound vague, the program still has risk.
The hidden friction is usually operational, not structural. Extra minutes spent aligning a top insert, confusion between similar-looking versions, or slow artwork updates for a branded packaging change do not show up in a prototype photo. They show up on the floor after the third shift starts. That is why line training belongs in the evaluation too, not just the drop test.
For companies already running Custom Printed Boxes and coordinated retail packaging, the insert decision should support the broader package branding system rather than fight it. The visual layer should never undermine the packout layer. A neat reveal is not worth a higher claim rate.
Price Comparison: tooling, unit pricing, and hidden cost traps
Price is where a lot of compare custom die cut shipping inserts conversations go off course. Buyers often look at unit price only and ignore tooling, proofs, freight, revision cycles, and the cost of packing mistakes. That view leaves money on the table. A lower unit price can still cost more if it slows replenishment or increases claims.
Tooling and setup charges usually range from about $180 to $850 depending on complexity, cavity count, and whether the design needs more than one revision round. Simple flat inserts sit near the bottom of that range. Multi-cavity protective structures sit near the top. If one vendor quotes low setup and high unit price, the math may still work. You just need to see where the cost moved.
Unit pricing changes sharply with run size. At 1,000 pieces, a paperboard insert might sit in the $0.32-$0.60 range depending on print coverage and complexity. At 5,000 pieces, that same design may fall to the $0.18-$0.34 band. A full-run model gives you a better view than a sample run, which is why the first small order almost always looks more expensive than the eventual program price.
The number that matters is true cost per shipped order. That means the insert, expected scrap, packing labor, freight to your facility, and a damage allowance all belong in the model. If a cheaper insert raises return rate by even 1% on a high-value SKU, the savings disappear fast. On the flip side, a premium insert that reduces carton fill, tape use, and exception handling can pay back sooner than the invoice suggests.
Oversized inserts are the trap most buyers miss. A design that grows the outer carton by just a little can push every shipment into a worse dimensional-weight band. That one change affects every parcel, not just the damaged ones. I have seen compare custom die cut shipping inserts projects where a 10% increase in box cube erased the protection savings in less than a month. The packaging looked safer. The shipping bill did not.
Storage creates another hidden cost. Bulky inserts eat shelf space, add replenishment touches, and slow receiving when the warehouse has to hold multiple versions. If a design uses half a pallet more space each cycle, that space has value whether finance sees it immediately or not. The warehouse lens matters here as much as the procurement lens. Fulfillment teams feel the difference first.
A simple cost model with five lines is usually enough: tooling amortization, unit price, freight, labor, and damage risk. Then run it again with volume up or down by 25%. That sensitivity check usually reveals the winner. It also strips away the drama from a polished quote sheet and gets the comparison back to numbers that matter.
Be careful with sustainability surcharges and recycled-content claims. They can be legitimate, especially when tied to FSC certification or material traceability, but they still need to be weighed against damage risk and pack speed. If you plan to compare custom die cut shipping inserts for a retailer with strict compliance rules, resources from ISTA and FSC are useful references for performance and responsible sourcing.
Process and Timeline: from concept approval to first production shipment
The timeline matters because delay gets expensive fast. To compare custom die cut shipping inserts efficiently, build the schedule from brief to live shipment and keep each gate open until the numbers make sense. A clean process usually starts with a CAD brief, moves to die-line lock, then prototype sample, compliance review, line trial, pilot run, and final release. Skip a step and rework tends to surface later, usually at the worst possible time.
For a simple flat insert with minimal cutouts, a realistic timeline is often 7-12 business days from approved proof to production-ready material, assuming no revisions. Add cutouts, locking tabs, or a tighter tolerance window and the timeline stretches closer to 10-15 business days. Multi-cavity or high-precision protective structures can take longer because testing, adjustment, and approval loops slow everything down. Lead time has to be part of the comparison or replenishment planning drifts.
Each milestone has its own risk. On the prototype, check edge tolerance, flute direction, and product retention. On the line trial, check insertion speed and carton closure force. During the pilot run, check pallet orientation, vibration resistance, and whether operators can keep pace without forcing the insert. The best spec in the world means little if the packer has to fight it 800 times a day.
Revision drift causes plenty of delays. Marketing changes artwork, engineering changes the cavity, and procurement assumes the old sample still applies. It does not. If you want to move quickly without wasting time, lock version control early and keep the drawing, print file, and tolerance notes tied together. A small version mismatch can stop a shipment faster than a failed drop test.
Pre-approving a substitute material can save a program when supply gets tight. If the first-choice board grade slips, a second-approved material can keep production moving while preserving the same geometry. That matters during peak fulfillment, when the warehouse cannot afford a packaging interruption. The same logic applies if inserts coordinate with custom printed boxes, because any box change can alter fit and closure behavior.
One practical rule keeps the schedule honest: if the insert needs more than one extra handling step, count that as risk. Packaging teams tend to focus on protection and overlook the fact that line teams are measured on speed. The best projects respect both. A pretty sample that slows packout is not finished.
How do you compare custom die cut shipping inserts for your fulfillment reality?
The strongest comparison uses your own operation, not a generic benchmark. A useful matrix gives 40% weight to protection performance, 30% to handling efficiency, 20% to cost, and 10% to sustainability and serviceability. That split is not sacred, but it reflects what usually decides success in order fulfillment. Damage and labor usually cost more than expected.
Start by grouping SKUs by risk profile. High-claim items deserve the strictest test. Heavy but compressible goods need crush resistance. Fragile premium items need corner control and movement restraint. Subscription and repeat ecommerce shipping programs need consistency because small defects become large problems at scale. Once the groups are separated, the comparison gets much fairer.
If damages cluster at the corners, prioritize crush strength and corner-blocking geometry. If dimensional weight is creeping upward, prioritize void-fill precision and tighter carton fill density. If the issue is product rattle rather than breakage, focus on cavity fit and anti-shift control. Compare the inserts against the failure mode you actually see, not the one that sounds most dramatic in a meeting. The incident log is usually more useful than the whiteboard.
Procurement has to look beyond price too. Single-source security, minimum order commitments, and supplier responsiveness matter more when a line runs daily. Warehouse training matters as well. Can staff swap one insert version for another without extra labeling? Can they spot a print revision at a glance? Can the packaging line handle the structure without adding cycle-time penalties? If the answer is no, the cost model is incomplete.
Overcomplicating the launch test is another mistake to avoid. Use a clean A/B split with the same carton, the same product, and the same carrier lane. Compare the inserts on 50 to 100 shipments per variant if volume allows, then keep scoring until the pattern is stable. You do not need perfect statistical theater. You need enough evidence to keep bad decisions out of production.
Do not ignore the broader packaging system. Sometimes the insert decision is actually a box decision, a mailer decision, or a branded packaging decision. A lower-profile cavity inside a smarter outer format can outperform a complicated protective structure. That is why I often advise teams to evaluate these inserts alongside the carton spec and any adjacent changes to product packaging. The whole packout matters.
In plain terms, judge the inserts the same way a fulfillment manager would. Does it protect? Does it pack fast? Does it avoid wasted cube? Does the supplier support changes quickly? If it fails one of those questions badly, it is probably the wrong choice.
Our Recommendation: a 14-day test and scale plan you can run next
If you need a decision fast, run a two-batch A/B test first. Use the same carton, the same route, and the same product weight. Log at least 200 shipment outcomes if volume permits, because small samples hide patterns that matter later. Score the inserts by damage count, pack speed, carton integrity, and landed cost per shipped order. Anything less is a preference exercise with a spreadsheet attached.
Day 1 to 3: finalize three product groups. Pick one fragile SKU, one mid-risk SKU, and one dense or awkward SKU. Day 4 to 6: request pilot samples from two suppliers and require the same CAD dimensions so the comparison stays fair. Day 7 to 10: run warehouse simulation with sample packing, re-seals, and drop checks. Day 11 to 14: score actual outbound results and compare claim risk against the cost delta.
Here is the minimum viable spec package I would send to suppliers: CAD file, maximum gross weight, expected drop profile, stack-height constraints, print requirements, and an approved return tolerance window for replacements. If the supplier cannot quote against that level of detail, the comparison is too fuzzy. The point is to judge the inserts on what your operation will actually do, not on a polished slide deck.
"The winner is usually the insert that survives the warehouse, not the one that wins the presentation."
For buyers balancing branded packaging against performance, that distinction matters. Good package branding should support the sale, then step out of the way while the insert does its job. I would not trade away resilience just to get a smoother reveal or a cleaner print surface. Customers remember damaged items much longer than they remember a clever cut pattern.
A practical scaling rule helps here. If the insert passes your damage threshold but adds noticeable pack time, keep testing. If it is fast but allows movement, reject it. If it is both fast and stable, scale it. That is the job. The best evaluation process is repeatable, data-driven, and tied to the actual failure pattern in your operation. Anything else can turn into an expensive design debate.
My recommendation is straightforward: choose the least costly structure that clears a real stress test, then upgrade only if the evidence demands it. Evaluate the inserts with real shipment data, not supplier claims, and the answer usually arrives faster. Build your decision around protection, carton size, pack speed, and repeatability, and you will have a result that still makes sense after the cartons start moving.
FAQ
How should I compare custom die cut shipping inserts to my current corrugated inserts?
Run side-by-side parcels with identical product weight and the same carrier lanes, then compare damage incidence, carton bulge, and total landed cost after at least 50-100 shipments. Ten sample boxes are not enough to make a confident call, because handling variation and carrier abuse do not show up evenly in tiny samples.
How long does it take to compare custom die cut shipping inserts from sample to approved bulk run?
Plan 7-14 days for the sample phase, including revisions, then another 1-3 days for approval sign-off and production setup checks before you test the first live pallet batch. If artwork or cavity geometry changes late, recheck the fit before release, because even a small revision can change pack speed.
What sample quantity is enough when comparing custom die cut shipping inserts before volume rollout?
Use at least one full small run, usually 20-30 pieces per critical SKU group, so you can see handling variation and return-shipment scenarios. That amount is usually enough to judge fit, speed, and damage risk without pretending the sample phase is a final validation.
Do custom die cut shipping inserts increase dimensional weight charges if overdesigned?
Yes, they can. If void space is too high or walls are oversized, the outer carton dimensions rise and dimensional weight can jump. Evaluate them after packing the full unit, not as loose components, because a 10% increase in carton cubic size can wipe out the savings from stronger material or better branding.
Can I switch between custom die cut shipping inserts suppliers without changing carton design every time?
Yes, if you lock a standardized master template with tolerance bands and a test-fit protocol. Still, every supplier should pass your exact drop, compression, and corner-impact checks before release. The safest way to compare across vendors is to keep the outer carton fixed and judge only the insert performance and packout behavior.
If you want the cleanest result, evaluate these inserts with real damage data, a tight fit spec, and a warehouse test that reflects how your parcels actually move. That is how you compare custom die cut shipping inserts without getting fooled by a nice sample or a low first quote. It is also the quickest path to a packout that protects the product, respects the line, and keeps shipping costs from creeping upward later.

