A premium serum, a tech accessory, or a gift set can still feel ordinary if the package opens loosely or shifts in hand. Custom Boxes With Magnetic closure add structure, repeat opening, and a cleaner presentation, which is why they are common in packaging where the box is part of the product experience.
For buyers sourcing Custom Packaging Products for retail packaging, PR kits, subscription onboarding, or gift packaging, the structure matters as much as the artwork. A rigid magnetic box can improve perceived value, but only if the board, wrap, insert, and closure are specified well.
These boxes are not the right choice for every project. If the goal is only low-cost transport protection, a simpler carton is usually more efficient. But if the customer will open the box, close it again, and keep it, the closure becomes part of the product story and has to justify its cost.
What Custom Boxes with Magnetic Closure Are and When They Make Sense
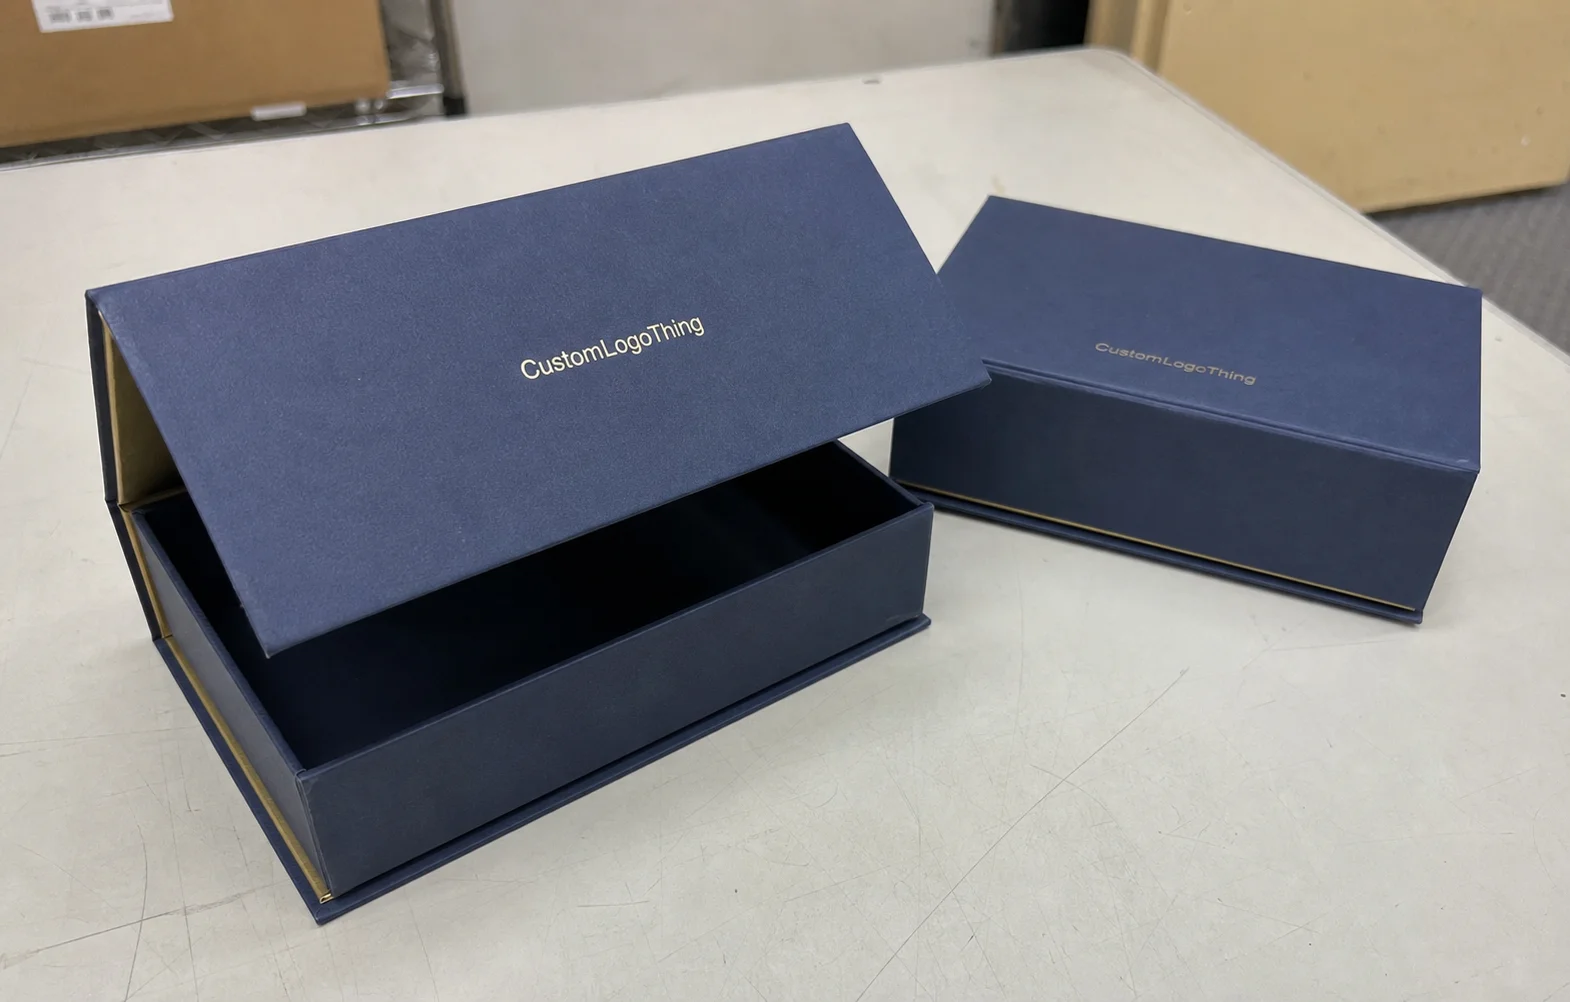
A magnetic closure box is a rigid setup box with hidden magnets in the flap and front wall. The lid closes with a clean snap, which gives the box a more finished feel than a tuck flap or basic folding carton. Most versions use greyboard or chipboard wrapped in printed paper, specialty stock, or laminated cover material.
The construction is simple on paper: a rigid board shell creates the shape, the wrap carries the graphics, and the magnets handle the closure. In production, small deviations matter. A sample can look perfect and still feel wrong if the hinge score, magnet placement, or board thickness is off.
These boxes work well for luxury gifts, cosmetics, electronics accessories, apparel, subscription kits, and other product packaging where unboxing is part of the sale. If the box will be handled by retail staff, shipped to customers, or photographed for launch content, it should look finished from every angle, including the inside.
If the lid only closes cleanly after you press it twice, the spec is wrong. That is a tolerance problem, not a premium feature.
Many buyers focus on print finish first and structure second. That usually leads to the wrong tradeoff. The board grade, wrap material, insert design, and magnet layout affect the feel more than an extra decoration pass. In rigid packaging, the structure is the expensive part and the artwork is only one line item.
How the Magnetic Closure Mechanism Works
The box relies on a rigid frame, wrapped exterior panels, and embedded magnets hidden inside the closure points. The magnets need to align closely so the lid closes without drifting, twisting, or missing the landing point. A supplier should be able to show where the magnet pockets sit on the dieline, not just say the box will “close nicely.”
- Rigid board panels create the structure and keep the box square.
- Wrapped exterior stock carries the graphics and finish.
- Embedded magnets provide the snap closure.
- Inserts hold the product so it does not rattle or shift.
- Hinge scoring controls how the lid opens and returns.
Board thickness changes the feel more than many briefs account for. Standard rigid boxes often use greyboard in the 1.5 mm to 3 mm range, depending on size and price target. Heavier board improves durability, but it also increases bulk and can require a stronger magnet. A thick lid with a weak closure feels unfinished. A light lid with an overly strong magnet feels awkward.
The magnets are usually small neodymium disks or strips hidden between layers. Placement matters more than raw pull strength. The magnet should guide the lid into place, not yank it shut. Too much pull can wrinkle the wrap at the front edge over time; too little and the box opens too easily in transit or during handling.
Good samples should be opened and closed repeatedly. If the box squeaks, binds, or drifts after several cycles, the production build is not ready. A rigid box is supposed to feel precise. If it feels improvised, the engineering step was rushed.
Specs That Affect Cost, Quote Accuracy, and MOQ
Price starts with size, then increases with every decision that adds material, setup, or handwork. For custom boxes with magnetic closure, the main cost drivers are dimensions, board caliper, wrap stock, print coverage, foil, embossing, soft-touch lamination, insert complexity, and magnet count. Specialty paper and tight tolerances move the number quickly.
MOQ is mostly a cost question. A smaller run spreads dieline setup, magnet placement, and assembly labor across fewer units, so the unit price rises. Many rigid box suppliers are comfortable starting around 500 to 1,000 units, but the quote usually improves once the run reaches the low thousands.
Accurate quotes depend on accurate inputs. A request for “premium box with insert” is too vague to compare meaningfully. Send exact dimensions, product weight, insert requirements, finish preference, target quantity, and delivery destination. Without that, the number is not a quote you can buy against.
| Build Option | Typical Unit Cost at 1,000 | Typical Unit Cost at 5,000 | Best Fit |
|---|---|---|---|
| Rigid wrap, simple print, paper insert | $1.40-$2.20 | $0.80-$1.35 | Promos, apparel, lighter gift sets |
| Soft-touch laminate, full-color print, custom paperboard insert | $1.90-$3.10 | $1.10-$1.90 | Cosmetics, onboarding kits, retail packaging |
| Foil, emboss, specialty paper, EVA or molded insert | $2.80-$5.00 | $1.70-$3.20 | Luxury sets, collector items, high-touch launches |
Those figures are not freight-inclusive and assume a straightforward structure. Shipping, duties, sampling, and rework risk can matter as much as unit price. A quote that ignores landed cost is not useful for procurement.
If sustainability matters, ask for FSC-certified paperboard or paper wrap and confirm the documentation. The cleanest procurement story is a documented certification, not a vague “eco” claim. See the current framework at FSC.
Finishes also affect how the box performs after production. Soft-touch lamination feels premium but can scuff under tight packing. Foil adds impact, but too much coverage can crowd the design. The best spec is usually the one that survives production, shipping, and shelf handling without rework.
Production Process and Lead Time: From Dieline to Delivery
The timeline usually starts with brief intake, then sizing, dieline creation, sample approval, production, assembly, quality check, and shipping. Every change to artwork, finish, magnet position, or insert shape can add days, and in some cases it resets the schedule.
For a straightforward rigid magnetic box, a sample often takes 5 to 10 business days. Mass production usually runs 15 to 25 business days after approval, depending on quantity and finish complexity. If shipping crosses oceans, transit can add another 25 to 45 days. Lead time should include freight, not only factory work.
The approval sequence should be fixed early: size first, then structure, then artwork, then finish, then magnet strength, then outer carton plan. Changing the order is a common cause of delays and rework. If the insert changes after wrap approval, the box can shift out of tolerance.
- Confirm product dimensions, weight, and closure feel.
- Approve the dieline and insert layout.
- Review a physical sample, not only a PDF.
- Lock artwork, finish, and magnet placement.
- Start production after written approval.
- Check packed samples and carton packing before release.
If the boxes will move through parcel networks or retail distribution, ask whether the supplier can reference ISTA-style testing or an equivalent method. The goal is not jargon. The goal is to know whether the pack survives vibration, compression, and drops before the product does. Current ISTA resources are here: ISTA test methods.
A dated production calendar is better than a vague promise. Ask for sample approval, production start, completion, and ship dates. If a supplier cannot break the schedule into milestones, the lead time is probably soft. For fixed launches, batch production may help reduce deadline risk, but it usually limits flexibility on revisions.
Common Mistakes That Cause Weak Closures or Wasteful Builds
The most common error is choosing magnet strength by guesswork. Too weak and the flap opens in transit or in the hand. Too strong and the box becomes annoying to open, especially for gift packaging meant to feel polished. Closure force should match the product and the user.
Size mistakes are just as common. Measuring the product alone is not enough. You need clearance for the insert, wrap thickness, and the movement of the lid as it closes. A box that fits the object on paper can still pinch, bulge, or miss alignment once assembled.
- Guessing magnet size instead of testing closure force.
- Ignoring insert thickness in the final outer dimensions.
- Overbuilding the finish with foil, emboss, and soft-touch just because they are available.
- Skipping packed testing after the sample looks fine on a desk.
- Forgetting shipping stress and compression inside master cartons.
Overdesign is another easy trap. A buyer can stack every premium treatment onto a box and still not improve the customer experience. If the boxes will sit in a warehouse or move through fulfillment, scuff resistance may matter more than another decorative pass.
Do not approve from renderings alone. Open the sample repeatedly, pack the product, shake it, close it with one hand, and put it in a shipping carton. That is how you catch the real problems before they become a full run of custom boxes with magnetic closure that look expensive but behave awkwardly.
Another avoidable mistake is ignoring the outer carton. A beautiful rigid box packed into a weak master carton can still arrive dented, scuffed, or out of square. The outer pack should protect both the product and the packaging the customer sees.
Expert Tips for Better Fit, Finish, and Unboxing
Start by defining the closure feel. Do you want a soft snap, a firm click, or an easy-open lid for frequent use? “Premium” means different things to different buyers, and the magnet spec should reflect that choice.
Match the finish to the use case. Soft-touch lamination looks refined and feels expensive, but it can scuff in high-touch fulfillment or retail handling. Matte, satin, and coated wraps all behave differently under abrasion, so the supplier should tell you which finish survives your actual environment.
The insert should be designed around the product first. Too many Custom Printed Boxes look good outside and then waste the interior with a loose cavity or a filler insert that does not stabilize anything. A better insert controls the reveal, protects the item, and keeps the closure from being stressed by movement.
If the box will be photographed, gifted, or stored, the interior should still look intentional. A plain inside can be acceptable. A careless inside usually is not. The inside remains part of the brand experience.
There is also a quality-control benefit to keeping the design disciplined. Fewer unnecessary finishes mean fewer failure points. A matte wrap with a clean insert can look sharper than a crowded spec that tries to prove value by stacking every premium option in the catalog.
Next Steps to Get a Sample, Quote, and Order Plan
Before asking for pricing, gather the basics: exact dimensions, product weight, target quantity, artwork files, finish preferences, insert requirements, target delivery date, and ship-to destination. That is the minimum needed for a quote with real value.
- Final outer dimensions and product dimensions
- Estimated unit weight
- Target order quantity and backup quantity
- Print coverage and artwork format
- Finish choice, such as matte, gloss, or soft-touch
- Insert type, material, and cavity layout
- Destination and desired delivery window
Ask for a written quote and a physical sample at the same time. Screen approvals do not show closure force, board rigidity, or how the insert behaves under pressure. If the project has a fixed launch date, compare landed cost rather than unit price alone. Freight, duties, sampling, and replacement risk belong in the same calculation.
Lock approvals in the right order: size, structure, artwork, finish, magnet strength, and carton plan. If you need help scoping the build, start with Custom Packaging Products and send the spec set together instead of piecemeal. That usually improves quote accuracy and shortens revision cycles.
For this category, custom boxes with magnetic closure should be ordered only after the sample passes fit, closure, and transit checks. That is the point where the box stops being a concept and becomes a usable part of the product.
Before you choose a supplier, ask what they reject before production starts. A strong answer usually includes magnet alignment, board warping, wrap adhesion, and insert fit. That tells you more than a polished sales deck ever will.
FAQ
How much do custom magnetic closure boxes usually cost?
Pricing depends on size, board thickness, finish, inserts, and order quantity, so there is no honest one-line answer. Smaller runs cost more per unit because setup and assembly labor are spread across fewer boxes, while larger runs usually reduce the unit price. The real question is whether the structure matches the value of the product.
What is the MOQ for custom boxes with magnetic closure?
MOQ varies by factory and construction, but rigid magnetic boxes usually start higher than simple folding cartons. Many suppliers are more comfortable once you reach 500 to 1,000 units, especially if the job includes custom inserts or specialty finishes. Lower MOQ usually means higher unit cost and more inventory risk.
How long does production take for magnetic closure boxes?
Lead time depends on sampling, approvals, quantity, and finish complexity, so the calendar should be confirmed before order placement. A sample might take 5 to 10 business days, while production often runs 15 to 25 business days after approval. Artwork changes and sample revisions are the main reasons schedules slip.
What products work best in custom magnetic closure packaging?
They work best for products that benefit from presentation and repeated opening, such as gifts, cosmetics, tech accessories, and onboarding kits. They are less useful when the box is only for low-cost shipping protection. If the pack is supposed to sell the experience, a magnetic closure is doing real work.
What should I send to get an accurate quote for magnetic closure boxes?
Send exact dimensions, product weight, target quantity, insert requirements, artwork files, and finish preferences. Include the delivery destination and target ship date so the quote reflects real logistics, not placeholder pricing. With those details in place, custom boxes with magnetic closure are much easier to price, sample, and approve without wasted budget.


