Buyer Fit Snapshot
| Best fit | Custom Branded Box Filler projects where brand print, material claims, artwork control, MOQ, and repeat-order consistency need to be specified before quoting. |
|---|---|
| Quote inputs | Share finished size, material target, print colors, finish, packing count, annual reorder estimate, ship-to region, and any compliance wording. |
| Proofing check | Approve dieline scale, logo placement, barcode or warning zones, color tolerance, closure strength, and carton packing before bulk production. |
| Main risk | Vague material claims, crowded artwork, missing packing details, or unclear freight terms can make a low unit price expensive after revisions. |
Fast answer: Custom Branded Box Filler: What It Is and How It Works should be specified like a repeatable production item. The safest quote records material, print method, finish, artwork proof, packing count, and reorder notes in one written spec.
Production checks before approval
Compare the actual filled-product size with the drawing, then confirm tolerance on folds, seals, hang holes, label areas, and retail display edges. Reserve space for logos, QR codes, warning copy, and material claims before decorative graphics fill the panel.
Quote comparison points
Review material grade, print process, finish, sampling route, tooling charges, carton quantity, and freight assumptions side by side. A quote is only useful when the supplier can repeat the same color, closure quality, and packing count on the next order.
A premium box that opens to a product rattling around like loose change is not premium. It is expensive disappointment with a logo on it. That is why custom branded box filler matters so much: it protects the product, frames the reveal, and makes the inside feel deliberate instead of accidental. For brands investing in Custom Packaging Products, the filler is not filler in the careless sense. It is part of the experience, part of the damage control, and part of the brand story.
In practice, custom branded box filler can be soft printed tissue, a rigid insert that locks the product in place, or a textured paper element that adds color without much weight. The job is not to cram the box full. The job is to keep the product intact and make the inside look like someone actually thought about it. That sounds basic because it is. Basic is fine when the box has to survive shipping and still look good on camera.
Custom branded box filler: why it matters more than the box itself
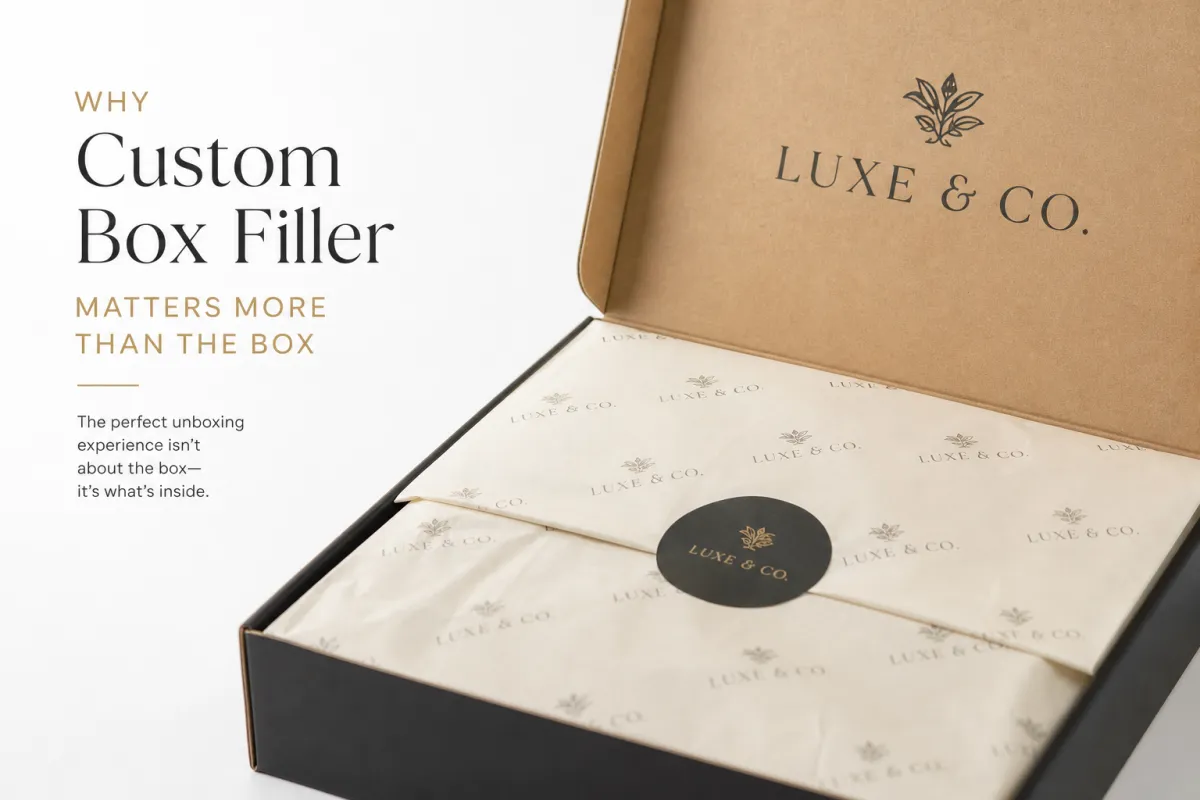
The outside of the carton gets the first glance. The inside gets the memory. That is the blunt reality behind custom branded box filler. A mailer can have great print, nice board, and a sharp closure, but if the product slides around inside, the whole thing feels cheap. Customers may never study the materials, but they can tell the difference between a snug reveal and a box that sounds hollow.
From a packaging buyer's point of view, custom branded box filler has three jobs. First, it protects the product from impact, abrasion, and shifting. Second, it holds the item in a clean presentation so the customer sees the brand the way the brand intended. Third, it adds visual cues that reinforce the rest of the branded packaging system. That could be a color match, a texture, a printed pattern, or a simple tissue seal with a logo mark.
The perception shift happens fast. A candle nested in scored paper feels curated. A ceramic mug sitting in a loose void of kraft shreds feels less expensive than it is. A serum bottle held in a die-cut insert looks like it belongs in a serious retail packaging program. The product did not change. The package did. I have seen brands spend real money on the outside and then undercut the whole thing with a flimsy interior. That part never gets old.
If the item moves, the customer notices. If the item is supported, the customer feels the brand knew what it was doing.
Custom branded box filler also affects operations. A filler that slows pack-out by 15 seconds sounds small until you multiply it across 2,000 orders. That is nearly nine extra hours of labor. A pretty inside that creates a bottleneck is not premium. It is a process problem with better graphics.
The best uses show up across several channels:
- DTC shipping where the box needs to look polished on arrival and survive parcel handling.
- Retail packaging where the reveal supports shelf value or giftability.
- Gift sets where presentation carries almost as much weight as the product itself.
- Subscription packaging where repeated unboxing has to stay interesting without becoming wasteful.
That is why custom branded box filler is less about decoration than most people assume. It is packaging design, protection engineering, and package branding all occupying the same square inch of cardboard. Not glamorous. Effective, though. Which, frankly, is better.
Brands that skip the inside usually pay for it later in returns, broken products, crushed edges, or customer complaints that say "beautiful box, cheap feel." That sentence is a small disaster. The right custom branded box filler can stop it before it starts.
How custom branded box filler works in the unboxing flow
Think of the packaging stack as layers. The outer mailer or shipper handles transit abuse. The product wrap handles surface protection. The void fill or insert stabilizes the load. The reveal layer handles the first impression. custom branded box filler can sit in any of those layers, and the best solution is usually the one that does the most with the least material.
The simplest forms are paper-based. Printed tissue is the easiest entry point because it is light, flat, and relatively affordable. Crinkle paper and paper shreds add volume and can look festive, though they are more about positioning than true shock protection. Honeycomb paper gives a cleaner, more structured look and is widely used for mailers and gift packaging. A well-placed wrap or seal can turn custom branded box filler into a reveal moment without turning the whole pack-out into a craft project.
Then there are engineered formats. Molded Pulp Inserts, folded paperboard trays, and die-cut supports are doing real work. They hold the product, keep surfaces from touching each other, and reduce movement during shipping. If the item is fragile, heavy, or awkwardly shaped, the conversation shifts from "nice presentation" to "does it survive ISTA testing?" For parcel shipments, that question matters more than a polished render. See the testing framework at ISTA if you need a reminder that transit is not a gentle hobby.
Branding can be subtle or loud. A single-color tissue sheet with a repeat logo is restrained and flexible. A fully printed insert can turn the inside of the box into a branded stage. A contrast of matte paper and metallic print creates texture without shouting. The right version of custom branded box filler depends on whether the brand wants calm, playful, premium, or eccentric. Not every brand needs the inside of the box to look like a trade show booth exploded.
There is also a very real tradeoff between visual impact and protection. Loose crinkle paper may photograph well, but it does almost nothing for a glass dropper bottle unless the rest of the pack is already secure. A molded insert may not feel as festive, but it keeps a product centered and reduces movement better than decorative fill. That is the part people learn after the first damage report, usually after they have already ordered the nicer-looking option.
Custom branded box filler works best when it matches the rest of the packaging strategy:
- For gifting, visual presentation can take priority, as long as the product is still protected.
- For subscription kits, speed matters because pack-out labor compounds quickly.
- For premium skincare and fragrance, texture and restraint often matter more than loud print.
- For fragile items, functional support usually beats decorative volume.
Here is a useful rule of thumb: if the filler helps the reveal and holds the product where it belongs, it is earning its keep. If it only looks good for three seconds and then causes damage, it is overpriced confetti.
Key factors that shape custom branded box filler cost
Cost is where custom branded box filler stops being a mood board exercise and becomes procurement. The main drivers are material, print method, order volume, sizing, and whether the design needs custom tooling. If anyone tells you all filler is priced the same way, they are either guessing or selling something.
Simple branded tissue sits at the low end because the base material is cheap, print coverage is manageable, and the format is easy to ship flat. Depending on quantity and print complexity, rough budget ranges for printed tissue can land around $0.04-$0.12 per sheet at larger runs. Crinkle paper or shredded paper may fall around $0.06-$0.18 per pack, depending on color and fill weight. These are broad ranges, not promises. Still, they show how quickly custom branded box filler can stay practical if you keep the format simple.
Engineered solutions cost more because they do more. A folded paperboard insert, a die-cut support, or a molded pulp tray may run from $0.25-$1.20 per unit depending on dimensions, board thickness, cavity count, and finish. Add printing, foil, embossing, or a custom shape and the number climbs. That is not a flaw. It is just what happens when the filler has to hold a product in place instead of merely surrounding it.
Minimum order quantities matter more than many brands expect. A small brand might want a beautiful, custom-printed insert, only to discover that the unit price looks fine at 10,000 pieces and annoying at 1,000. Setup fees, plate charges, and sampling can make a cheap-looking solution expensive fast. Custom branded box filler usually has a lower barrier to entry in paper formats and a higher barrier in custom inserts, especially if the design needs a new die or mold.
There are hidden costs too:
- Setup and tooling: die-making, plates, cutters, or mold creation.
- Sampling: physical mockups, color proofs, and fit tests.
- Freight: bulky filler can ship inefficiently, especially in low-density formats.
- Storage: large sheets and inserts eat warehouse space quickly.
- Labor: a nice filler that adds 10-20 seconds per pack can raise fulfillment cost more than the material itself.
Here is a simple comparison to keep the decision grounded:
| Filler format | Typical use | Approx. unit cost | Pros | Tradeoffs |
|---|---|---|---|---|
| Printed tissue | Fashion, beauty, gifts | $0.04-$0.12 | Light, brandable, easy to store | Limited protection on its own |
| Crinkle paper / shred | Gift sets, subscription boxes | $0.06-$0.18 | Good visual volume, fast pack-out | Can feel messy, weak for fragile items |
| Die-cut paperboard insert | Cosmetics, electronics, premium kits | $0.25-$0.85 | Strong fit, cleaner presentation | Needs accurate specs and tooling |
| Molded pulp insert | Glass, electronics, heavier products | $0.35-$1.20 | Protection, structure, lower-plastic perception | Higher setup and less visual flexibility |
For brands looking at custom branded box filler as a cost control tool, the smartest move is often choosing the simplest format that solves the actual problem. If the issue is product shifting, do not buy decorative volume. If the issue is brand perception, do not hide a premium product in plain kraft void fill and call it strategic.
There is also the sustainability angle, which affects cost in both directions. FSC-certified paper options can carry a premium, but they also support sourcing claims more cleanly. If the paper is part of a broader branded packaging program, it may be worth the extra spend. You can review certification basics at FSC. Just do not slap an eco label on a material choice and assume the math disappears. Packaging buyers see through that trick pretty fast.
If you want a useful benchmark, think in tiers. Economy custom branded box filler for lightweight products may stay under $0.15 per unit at volume. Mid-range presentation-focused formats often fall around $0.15-$0.45. Premium engineered inserts can climb from there depending on structure and print. The right range depends on product value, shipping risk, and how much of the budget belongs inside the box rather than on it.
Custom branded box filler process and timeline
The process sounds simple until the first dimension is wrong. Then everything slows down. A good custom branded box filler program starts with a short, practical brief: product size, weight, surface fragility, ship method, target budget, and the brand tone you want the inside of the box to communicate. If the brief is vague, the samples will be vague, and vague does not protect anything.
The typical workflow looks like this:
- Define the product specs - exact dimensions, weight, finish, and any fragile points.
- Set the brand goal - is the filler meant to hide, hold, frame, or impress?
- Choose the material - tissue, paper shred, insert board, molded pulp, or a hybrid.
- Prepare artwork - repeat print, logo placement, color matching, and any special finishes.
- Review mockups - flat proofs and dielines are useful, but physical samples are better.
- Test fit with real products - not a placeholder block that "should be close."
- Approve production - lock spec, quantity, and delivery window.
- Launch and monitor - watch damage rates, labor time, and customer response.
Timeline depends heavily on complexity. Simple printed tissue can move in roughly 7-12 business days after proof approval if the artwork is ready and the supplier is not buried. A folded insert or paperboard format may take 10-18 business days. Custom molded or heavily engineered solutions often need 15-25 business days or more because tooling, sampling, and fit checks add steps. Custom branded box filler is quick only when the design is already sane. The machine does not care about your launch date.
Where do delays happen? Usually in the same predictable places:
- Artwork approval drags because brand colors, logo placement, or repeat scale were not settled early.
- Custom tooling adds time if the insert needs a new die or mold.
- Special finishes such as foil or embossing require extra review.
- Dimensional changes happen after sampling, which means the sample becomes a very expensive lesson.
- Supplier backlog stretches lead times during seasonal peaks.
One of the easiest ways to avoid delay is to test the filler with actual inventory, not a guessed substitute. A bottle with a rounded shoulder sits differently than a rectangular carton of the same height. A luxury candle in a matte glass jar needs a different hold than a candle in a straight-sided tin. Custom branded box filler that looks perfect in a rendering can fail when the real product shows up and refuses to behave. That is not the supplier being dramatic. That is just product geometry doing what product geometry does.
Before you request quotes, prepare this short launch checklist:
- Product dimensions and weight
- Photos or samples of the actual item
- Ship method: parcel, mailer, retail bag, or pallet
- Target unit budget and acceptable range
- Brand colors, print files, and logo rules
- Sustainability requirements, including recycled content or FSC preference
- Expected annual volume and reorder cadence
That checklist helps suppliers quote more accurately and keeps the project from drifting into expensive custom work that solves the wrong problem. It also makes it easier to compare custom branded box filler options against your broader packaging design plan instead of treating the inside of the box like an afterthought.
How to choose the right custom branded box filler for your product
The right custom branded box filler starts with the product, not the mood board. Weight, fragility, shape, finish, and shipping distance all matter. A 3-ounce lipstick does not need the same support as a ceramic diffuser. A shirt sent across the state does not need the same interior build as a glass jar going through parcel distribution. The product tells you what the filler has to do.
Brand tone matters too. Playful brands can get away with bold graphics, bright color, and loose paper textures. Luxury brands usually need restraint, cleaner edges, and a more tactile finish. The filler should match the promise. If the outer box says premium and the inside looks like a craft bin, the mismatch is obvious. Custom branded box filler should make the package feel coherent.
There are three questions worth asking before you pick a format:
- Does the product move during transit? If yes, the filler needs structural support.
- Does the customer see the filler first? If yes, presentation matters more.
- Does the team pack this at scale? If yes, the format has to be fast and forgiving.
Sustainability deserves a direct answer, not vague marketing fog. Paper-based custom branded box filler is often the safest route because it is versatile, printable, and easier to align with recycled-content goals. FSC-certified paper or paperboard helps with sourcing credibility. Recycled fiber and compostable options can work, but only if the whole system supports disposal in the buyer's actual market. A fancy eco claim that depends on perfect municipal recycling behavior is not a strategy. It is wishful thinking dressed as packaging design.
For fragile products, engineered inserts often win. Molded pulp can provide a strong hold with good perceived sustainability. Paperboard inserts can offer cleaner branding and easier print control. Foam alternatives exist, but they should be chosen carefully because not every foam substitute behaves the same in compression or recovery. Custom branded box filler is not a place to pretend all materials are interchangeable.
Storage and fulfillment reality also matter. Bulky crinkle fill can look great, but it consumes space and may shed during pack-out. Oversized die-cut inserts can slow the line if they require careful alignment. A compact paper wrap may be visually simple yet much faster for a small team to use consistently. The best choice is the one that your warehouse can repeat without grumbling by day three.
For brands still building their packaging system, it helps to review existing formats and compare them against Case Studies. Seeing how other product categories balance appearance, protection, and labor can prevent expensive trial-and-error. Custom branded box filler works best as part of a full packaging plan, not as a random accessory bolted onto the order after the fact.
A practical decision matrix looks like this:
- Choose printed tissue if the product is light, the brand wants a clean reveal, and budget is tight.
- Choose paper shred or crinkle if you need volume fast and the product is already protected elsewhere.
- Choose folded inserts if the item needs centering, separation, or a premium shelf-like presentation.
- Choose molded pulp if protection and sustainability both matter and the product has weight or fragility.
That sounds basic because it is basic. Good custom branded box filler is usually the obvious answer once the right questions get asked. The trap is skipping the questions and ordering the prettiest option in the catalog.
Common mistakes with custom branded box filler
The biggest mistake is choosing filler for looks only. Pretty paper does not stop a glass jar from cracking. Decorative shreds do not prevent a tall bottle from tipping sideways in transit. A lot of brands learn this the hard way, then act surprised that packaging has to obey physics. custom branded box filler should improve both presentation and performance, or it is only half a solution.
Overbranding is another common misstep. If every surface inside the box is competing for attention, the product loses the spotlight. The inside should support the reveal, not shout over it. A restrained logo repeat, a signature color, or one printed message is often enough. More is not automatically better. Sometimes it is just louder.
Wrong sizing causes a mess. Too loose, and the product shifts. Too tight, and the edges crush or the pack-out team starts forcing pieces into place. Either way, you are creating waste. A good custom branded box filler fit should allow consistent insertion with no wrestling match. If the team needs to "make it work" every time, the design is already failing.
Sustainability claims can also go wrong. A brand may choose a material that is technically recyclable but practically difficult for customers to recycle in their region. Or it may use mixed materials that complicate disposal, then label the package eco-friendly because the paper content sounds nice. That is not transparency. That is packaging theater.
Then there is pack-out inefficiency. A beautiful filler that adds 20 seconds per box may seem acceptable until volumes rise. At 500 orders, that is manageable. At 5,000, it is a labor line item with a personality. Custom branded box filler should fit the speed of your operation, not just the aesthetics of your brand deck.
Other mistakes show up in testing:
- Skipping ship testing and assuming the box will survive because it looks solid.
- Ignoring product finish so soft coatings rub against rough paper.
- Using one filler format for everything even though SKUs behave differently.
- Ordering too much too early before the real pack-out process has been validated.
That last one hurts because it locks in waste. A pilot run is cheaper than a warehouse full of the wrong insert. If you want a better starting point, review your broader Custom Packaging Products lineup and match the filler to the rest of the system. Custom branded box filler should reinforce the package, not fight it.
There is also a subtle mistake many teams make: they treat the inside as a second-class surface. It is not. Customers photograph unboxing moments. Influencers open boxes on camera. Retail staff notice interior presentation. If the filler looks rushed, the whole package feels rushed. That is a strange place to save money.
Expert tips and next steps for custom branded box filler
Start small. A pilot run tells you more than a deck full of renderings ever will. Compare damage rates, pack time, and customer feedback before you scale. If custom branded box filler lowers breakage by even a few percentage points, the savings can justify a slightly higher unit cost. If it adds labor and does not improve the customer experience, cut it. No sentimentality required.
Physical samples matter because paper weight, texture, and color shift under real lighting. A cream tissue may read warmer than expected. A kraft insert may feel more premium or more dull depending on finish. A printed sheet may look crisp on screen and muddy in daylight. Until you hold the actual sample, you do not really know what the customer will see.
Build a short spec sheet before you ask for quotes. Keep it practical:
- Product dimensions, weight, and fragility points
- Target budget per unit and acceptable range
- Brand rules for color, logo use, and tone
- Shipping method and transit distance
- Expected monthly or annual quantity
- Sustainability requirements and sourcing preferences
That simple document saves a lot of back-and-forth. It also keeps custom branded box filler decisions tied to actual business goals instead of personal taste. Packaging has enough subjective arguments already. There is no need to add more.
Use the unboxing moment to reinforce one message. Not five. One. Maybe the message is "clean, calm, premium." Maybe it is "fun, bright, and gift-ready." Maybe it is "engineered for protection." Whatever it is, let the filler support that idea and stay out of the way once the product appears. Strong custom branded box filler is often quieter than people expect.
From an authority standpoint, keep standards in view. If the shipment is going through parcel networks, look at ISTA test methods. If the paper sourcing matters, look for FSC certification. If recycled content or disposal claims are being made, make sure the claim matches the actual material structure and local recycling behavior. Those details do not sound flashy, but they separate real packaging work from marketing fluff.
One more thing: do not choose the most complex option because it feels more custom. Custom does not mean complicated. Sometimes the smartest move is a printed tissue sheet, a precise fold, and a neat seal. That can be enough to make custom branded box filler feel premium without turning the line into a bottleneck. I know that sounds boring, but boring is often what scales.
If you want a clean next step, audit your current packaging in three columns: protection, presentation, and labor. Mark where the product shifts, where the reveal feels flat, and where pack-out slows down. Then shortlist two or three custom branded box filler formats and test them against real orders. That is the practical way to buy packaging Without Wasting Money on guesswork.
What is custom branded box filler used for?
It keeps products from shifting during transit while making the unboxing feel more intentional. It can also add brand color, texture, or print inside the box without changing the outer packaging. Custom branded box filler works well in retail, gifting, subscription, and e-commerce packaging where presentation matters.
How much does custom branded box filler cost?
Pricing depends on material, print method, order size, and whether custom tooling is required. Simple printed tissue is usually cheaper than molded inserts or specialty die-cut solutions. Smaller orders pay more per unit, so MOQ and setup fees matter a lot. In many programs, custom branded box filler can range from a few cents to well over a dollar per unit depending on the structure.
Which material is best for custom branded box filler?
Paper-based options work well for most brands because they are versatile and easy to brand. Fragile products may need stronger engineered inserts instead of loose decorative filler. The best choice depends on product weight, shipping risk, and the brand experience you want to create. In other words, the best custom branded box filler is the one that solves the actual problem.
How long does custom branded box filler take to produce?
Simple branded filler can move quickly if artwork and dimensions are already locked. Custom inserts or printed specialty formats take longer because sampling and approvals add time. The fastest way to avoid delays is to approve specs early and test with real products before production. For many projects, custom branded box filler can take roughly one to four weeks depending on complexity.
Is custom branded box filler worth it for small brands?
Yes, if the filler improves protection or makes the product feel worth the price. Small brands should start with low-risk formats like printed tissue or paper fill before jumping into expensive custom tooling. The best test is whether the filler lowers damage, speeds packing, or improves repeat purchase behavior. If it does none of those things, custom branded box filler is probably decoration pretending to be strategy.


