Custom Can Labels: Buy Smarter, Print Better, Ship Clean
Custom can labels have to do more than look good in a mockup. They sell the product, carry required information, and survive the abuse that starts as soon as a can leaves the line: cold storage, condensation, stacking, carton friction, and repeated handling. If the label fails in any one of those places, the packaging does not feel finished. It feels underbuilt.
That is why buyers who source custom can labels should think beyond artwork. The right label format depends on the can size, storage conditions, application method, and how often the design changes. A seasonal beer, an energy drink, a sparkling water, and a limited-run coffee beverage all create different production problems. Treating them as the same order is how brands end up with labels that print fine but perform badly.
For short runs, frequent flavor changes, or multi-SKU lines, labels are often the practical choice over direct print. They give a brand room to adjust copy, test a new design, or shift quantities without committing to a large inventory of preprinted cans. The tradeoff is that the label has to be specified carefully. Stock, adhesive, finish, and die size all matter more than most first-time buyers expect.
What Custom Can Labels Actually Do for Your Product
A good can label has a short window to earn trust. It has to be readable from a distance, attractive under store lighting, and durable enough to survive cooling and distribution. That is not just a design brief. It is a packaging requirement.
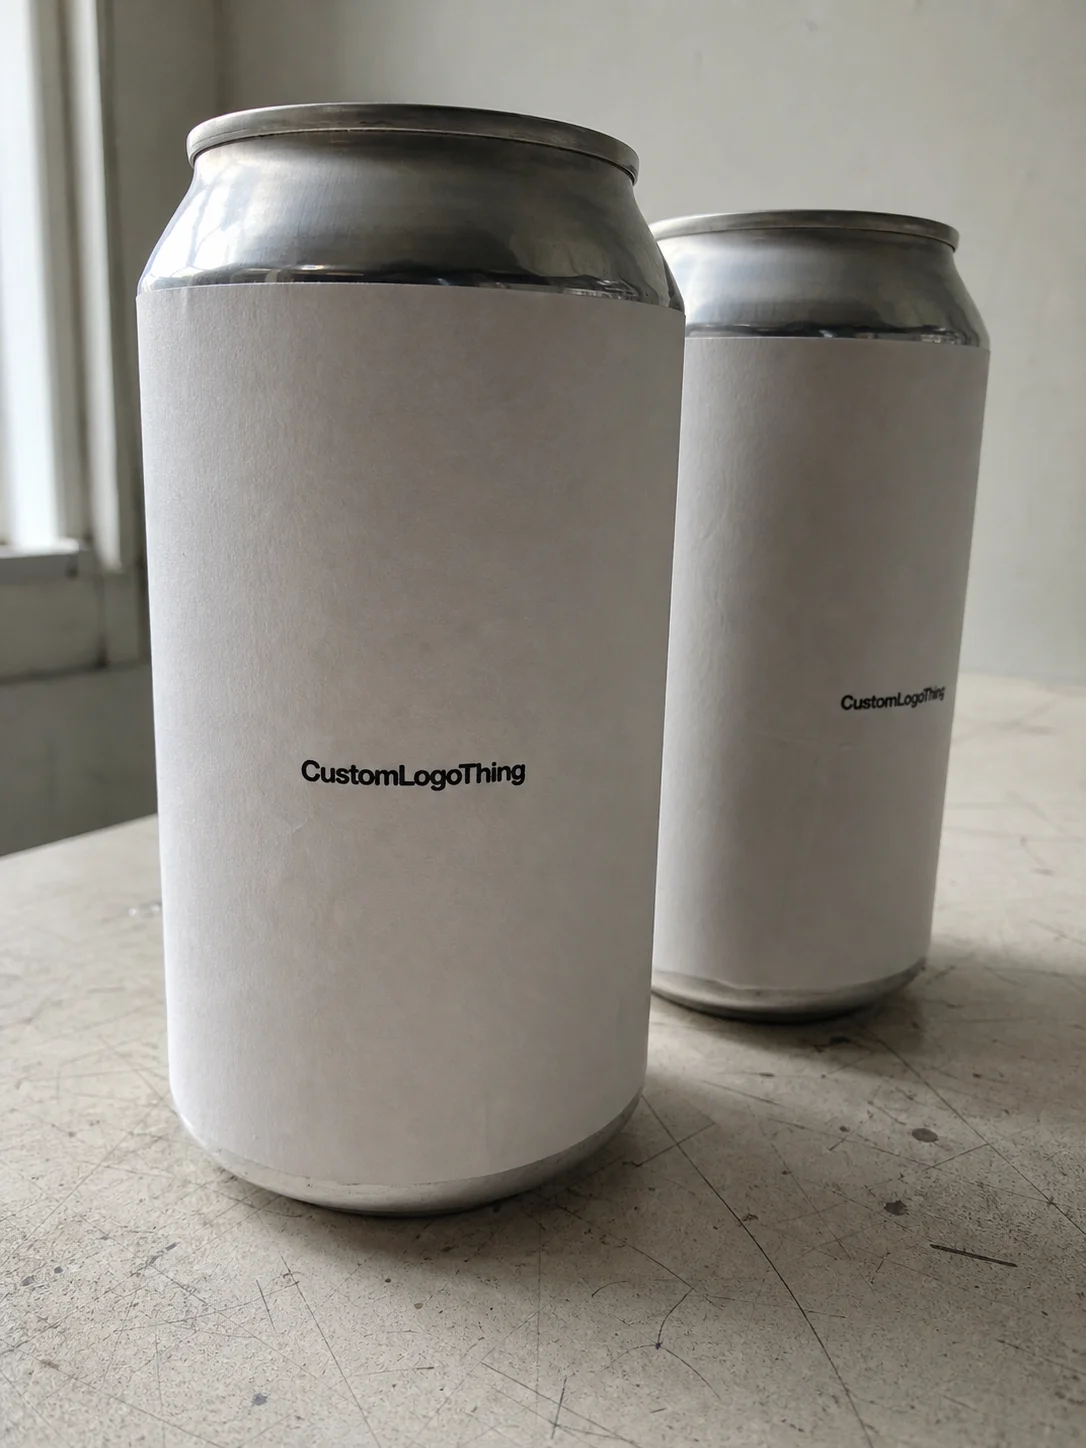
Most custom can labels are pressure-sensitive labels, wrap labels, or shrink sleeves applied to aluminum cans for beverages and related products. Each format serves a slightly different purpose. Pressure-sensitive labels are common because they are flexible and relatively easy to apply. Shrink sleeves offer full coverage and more room for graphics. Wrap labels sit somewhere in the middle, giving a clean look without the setup burden of a full sleeve system.
Brands use labels because they need control. Control over flavor launches. Control over seasonal editions. Control over the wording on the back panel when regulations change. That matters in retail packaging, where a product can move from test run to shelf placement faster than a full manufacturing cycle would allow. A label system also helps maintain consistency across can sizes and format changes, which becomes important as a line expands.
There is a practical upside that gets overlooked: labels can protect margin. A brand does not have to print thousands of cans in a single design just to test demand. If sales data says a flavor should stay in rotation, the label can be reprinted. If it misses, the inventory risk is smaller. That is useful for products with uncertain demand, promo windows, or frequent regulatory updates.
A label that survives shipping and condensation is part of the product. A label that peels early becomes a cost problem.
Material choice changes the outcome more than many buyers realize. Paper can be fine for dry, low-abuse applications, but moisture-resistant films are usually a safer choice for refrigerated cans. If the label is only judged on a screen, the wrong stock can seem acceptable. Once it hits a cooler, the flaw shows up fast.
For brands building a broader packaging design system, the can label should match cartons, carriers, and any custom printed boxes used in shipping or retail display. Consistency does not mean everything looks identical. It means the system looks intentional. That helps the product feel like one line instead of a collection of unrelated print jobs.
How the Labeling Process and Timeline Actually Works
The production path is simple on paper and less simple in practice. It usually starts with the can measurements, then a dieline, then artwork setup and proofing. After approval, the labels are printed, finished, inspected, and shipped. If a co-packer or contract filler is applying them, the label also has to match the equipment. That means roll direction, core size, unwind orientation, and adhesion behavior all matter.
Timelines depend on how ready the order is. If artwork is clean, materials are standard, and no unusual finishing is required, turnaround often lands in the 10 to 15 business day range after proof approval. Specialty films, uncommon adhesives, metallic effects, or custom constructions can push the job closer to 15 to 20 business days. Rush orders are possible, but they cost more and leave less room for correcting mistakes.
What usually slows production
- Artwork files that are not print-ready, including low-resolution graphics or missing fonts.
- Late proof changes after the job has already moved into production.
- Materials that need to be sourced instead of pulled from inventory.
- Fit issues caused by the wrong can diameter, taper, or seam allowance.
- Application problems when the label is being machine-applied rather than wrapped by hand.
That last item creates more trouble than people expect. A label that looks fine on a sample can behave differently on a line that applies pressure at speed. If the product will be filled by a co-packer or contract packager, test it on the actual can and the actual equipment. A PDF proof does not tell you how the seam will sit after the label has passed through a machine and sat in cold storage for a day.
For buyers comparing packaging formats, it helps to look at adjacent products too, such as Custom Labels & Tags and broader Custom Packaging Products. The right choice is the one that fits the product, the order size, and the real handling conditions. Not the one that sounds the most polished in a sales deck.
Material, Adhesive, and Finish Choices That Change Performance
This is the part that separates a durable label from a short-lived one. Paper, BOPP, vinyl, and shrink film all behave differently under moisture, abrasion, and temperature change. The right stock depends on where the can will live. A dry shelf product has different needs from a beverage that spends its life in ice, refrigeration, or a humid distribution channel.
BOPP is one of the most common choices for can labels because it resists water and scuffing well, and it prints cleanly. It is a sensible default for refrigerated beverages and products that will see routine handling. Vinyl can offer strong durability and conform well in some cases, though it may cost more than a standard film. Shrink film is better when the package needs full-wrap coverage or a more complex graphic field, but it introduces more setup and more chances for waste if the dimensions are off.
Adhesive choices
- Permanent adhesive: best for general retail use and cold-chain products where the label needs to stay in place.
- Removable adhesive: useful for promotional packaging or short-life applications where clean removal matters.
- Freezer-grade adhesive: built for low temperatures and repeated condensation exposure.
Finish changes more than appearance. Gloss gives strong color and a polished look. Matte reduces glare and can improve legibility under bright lighting. Soft-touch adds a premium feel, though it can show handling marks depending on the coating. Foil and metallic effects can work well on the right brand, but they should earn their place. Too many effects make the label harder to read and more expensive to produce.
If the can will be chilled, packed tightly, or handled in wet conditions, durability matters more than decoration. The most expensive finish is still the wrong choice if it lifts at the edge. For packaging durability and transport testing references, the ISTA packaging testing standards are a useful starting point. For responsible fiber sourcing, the FSC framework is the relevant reference.
Labels should also sit comfortably inside the larger packaging system. If the can line uses a certain typography style, color palette, or surface finish, the same language should carry through to the shipper and any display carton. The package should feel like one product family. When it does not, buyers notice, even if they do not say why.
Cost, Pricing, MOQ, and Unit Cost Factors
Pricing for custom can labels depends on the parts of the order that actually consume time and material: size, shape, quantity, print method, material, adhesive, and finishing. A simple rectangle on a standard film will cost less than a custom die-cut piece with metallic effects and freezer adhesive. The design that looks easiest on a screen is not always the cheapest to produce.
Small orders carry a higher unit cost because the setup cost is spread across fewer pieces. That is why MOQ matters. A run of 1,000 labels may land around $0.25 to $0.55 per label, depending on size and construction. At 5,000 pieces, the unit price can drop closer to $0.10 to $0.22 if the build is straightforward. Higher quantities can reduce the price further, especially when the artwork stays stable and the material is standard. Special finishes, tight registration, and custom dies push the cost up quickly.
| Order Type | Typical Use | Relative Cost | Best For |
|---|---|---|---|
| Paper label | Dry, low-abuse applications | Lowest | Short runs, indoor display, limited moisture exposure |
| BOPP film | Cold storage and general retail | Moderate | Most beverage labels, refrigerated products |
| Vinyl label | Higher abrasion resistance | Moderate to high | Durability-focused branding |
| Shrink sleeve | Full-wrap coverage | Higher | Complex graphics, unusual shapes, more coverage |
Digital printing and flexographic printing behave differently on the cost curve. Digital is usually the cleaner choice for shorter runs, versioned artwork, and products that change often, because the setup is lighter. Flexographic printing tends to make more sense at higher volumes and with stable artwork, where the upfront setup can be spread over a larger order. If you are comparing quotes, make sure every supplier is quoting the same material, finish, and adhesive. Otherwise the numbers are not really comparable.
There are sensible ways to lower cost without weakening the label. Use a standard shape when possible. Limit decorative effects to the SKUs that need them. Keep artwork print-ready so prepress does not become a hidden expense. Avoid specifying premium finishes just because they sound attractive in a meeting. The best packaging decision is usually the one that solves the real problem at the lowest acceptable cost.
Sizing, Artwork, and Compliance Checks Before You Order
Start with the can, not the file. Measure the diameter, check the label panel height, and account for seam overlap and any taper in the body. A label can look correct in a layout file and still miss the actual container by a few millimeters. That is enough to create alignment problems, exposed edges, or an awkward seam placement. A dieline is not decoration. It is the control document.
Artwork preparation should cover bleed, safe area, barcode placement, and text size. Barcodes placed too close to a curve or seam can scan poorly. Small type can print legibly and still be hard to read in a retail cooler. If the product is beverage-related or otherwise regulated, leave room for ingredient statements, net contents, warnings, and any required claim language. A crowded label often means something important was added too late.
File quality matters as much as layout. Common errors include low-resolution imagery, RGB files sent where print color management is expected, missing linked images, and fonts that are not embedded or outlined. These issues are easy to miss on a monitor and annoying to fix after proofing starts. A proper proof should make it easy to verify the size, panel placement, and copy against the can in hand.
Ask for a physical fit check whenever the can profile, label size, or label construction changes. A screen proof is helpful. It is not the container.
Packaging education resources can also help buyers ask better questions. The Institute of Packaging Professionals is useful for understanding terminology, testing expectations, and industry norms. That does not replace supplier validation, but it helps separate useful advice from generic sales language.
Compliance reaches beyond food and alcohol. Even a simple branded can can run into problems if recycling marks, contents statements, or product claims are sloppy. If a label needs to serve more than one market, check the copy for jurisdiction-specific requirements before approval. Fixing a claim on press is expensive. Fixing it on a pallet is worse.
Common Ordering Mistakes That Waste Time and Money
The most common mistake is choosing the wrong can size. A 12-ounce can is not one universal shape. Slim cans, standard cans, and specialty profiles all have different diameters and wrap behavior. That changes the final label dimensions, the seam position, and sometimes the required adhesive performance. If the wrong profile is used, the label can be off before the first box ships.
Condensation is another frequent miss. A label can look acceptable in an office and fail quickly in a cooler or cold packing area. That usually happens because the wrong adhesive was chosen or because paper stock was selected for visual reasons instead of environmental ones. A label that looks elegant in a sample book can still be the wrong material for the job.
Other expensive errors
- Approving artwork before confirming seam location and wrap behavior.
- Using too many effects, which weakens readability and raises cost.
- Making copy changes after proof approval.
- Ordering too few pieces, which keeps unit cost unnecessarily high.
- Skipping a real-world test on the actual can and storage condition.
Late changes create the kind of delay that compounds everything else. Once approval happens, any adjustment can trigger a new proof, new setup work, or wasted material. If the deadline matters, treat proof approval as a real control point. It is not a casual sign-off. It is the point where the order stops being abstract and starts becoming physical.
One final point gets ignored too often: if the label cannot survive the actual route from print to shelf, the design does not matter. That applies to the label and to the rest of the package system. If the can looks right but the shipper fails, the broader custom packaging products strategy is still letting the brand down.
Expert Tips for Better Results on Custom Can Labels
Begin with the environment, then choose the stock. That order saves time. If the cans will sit in ice, live in refrigerated cases, or move through humid distribution channels, build around those conditions first. Style comes after durability. A label is not a poster, and it should not be designed like one.
For a first launch, a seasonal series, or a product line that is still changing, a pilot run is usually the best use of budget. It gives you a chance to check adhesion, legibility, fit, and handling before committing to a larger order. A small test is cheaper than a full run that peels in cold storage or scans badly at retail.
Keep the hierarchy simple
- Product name first.
- Variant or flavor second.
- Legal or regulatory copy third.
- Brand story and decorative elements last.
That hierarchy helps shoppers understand the product in seconds and prevents the label from becoming crowded. Small curved surfaces punish over-design. A can is not the place to hide five ideas at once. The strongest labels usually make one clear claim, one clear flavor cue, and one clean path for the eye.
Ask for samples of the actual label stock, not just a flat proof. Compare them under store lighting and, if possible, in cold conditions. The same art can look richer on one surface and flatter on another. The sample tells you how the material behaves. The mockup only tells you what the design department hoped would happen.
If the product line is growing, keep the visual rules consistent across cans, cartons, and shipping packs. The same type treatment, color logic, and label hierarchy should carry through the system. That makes the product easier to manage and easier for a buyer to recognize. It also avoids the common problem where the can looks premium and the rest of the packaging looks like it came from a different order.
For the next purchase, the checklist is simple: measure the can, gather final artwork, confirm quantity, define storage conditions, and Request a Quote that spells out material, adhesive, finish, and proof requirements. That is the practical way to buy custom can labels without paying for mistakes that should have been caught earlier.
What are custom can labels used for on beverage cans?
They identify the product, carry required information, and help the can stand out on shelf or in a cooler. They also let brands run short editions, test new flavors, and update copy without changing the can itself.
How do I know what size custom can labels to order?
Measure the can diameter and the full label wrap area, then confirm seam allowance and any taper in the body. A dieline or fit template should be tested against the actual can before production starts.
What affects the price of custom can labels the most?
Quantity, size, material, finish, adhesive, and print method usually have the biggest effect on cost. Special finishes, custom shapes, and small orders can raise the unit price quickly.
How long does the turnaround usually take for custom can labels?
Standard orders often move faster when artwork is clean and materials are in stock. More complex constructions, special finishes, and approval delays can extend the timeline.
Do custom can labels hold up in cold or wet conditions?
Yes, if the material and adhesive are selected for refrigeration, condensation, or freezer exposure. Paper labels with the wrong adhesive can fail quickly, so the storage environment should drive the specification.