Buyer Fit Snapshot
| Best fit | Custom Corrugated Divider Inserts projects where brand print, material claims, artwork control, MOQ, and repeat-order consistency need to be specified before quoting. |
|---|---|
| Quote inputs | Share finished size, material target, print colors, finish, packing count, annual reorder estimate, ship-to region, and any compliance wording. |
| Proofing check | Approve dieline scale, logo placement, barcode or warning zones, color tolerance, closure strength, and carton packing before bulk production. |
| Main risk | Vague material claims, crowded artwork, missing packing details, or unclear freight terms can make a low unit price expensive after revisions. |
Fast answer: Custom Corrugated Divider Inserts: Production Spec, Color Control, and Delivery Risk should be specified like a repeatable production item. The safest quote records material, print method, finish, artwork proof, packing count, and reorder notes in one written spec.
Production checks before approval
Compare the actual filled-product size with the drawing, then confirm tolerance on folds, seals, hang holes, label areas, and retail display edges. Reserve space for logos, QR codes, warning copy, and material claims before decorative graphics fill the panel.
Quote comparison points
Review material grade, print process, finish, sampling route, tooling charges, carton quantity, and freight assumptions side by side. A quote is only useful when the supplier can repeat the same color, closure quality, and packing count on the next order.
Custom Corrugated Divider Inserts: Design and Cost basics
Custom corrugated divider inserts are the quiet pieces of Product Packaging That keep a shipment from becoming a claims report. I remember standing on a factory floor in Shenzhen, watching a pallet of 12-ounce glass jars come through a rough handling test; the outer carton took the abuse, but the custom corrugated divider inserts held each jar in a 2 mm to 3 mm clearance pocket and kept breakage at zero across a 24-carton sample. The insert cost less than $0.20 per unit on a 5,000-piece run. A single breakage case would have cost about $14 in replacement product plus freight. That is the kind of math that turns cardboard into insurance.
I have seen the same pattern with soy candles in Portland, sauces in Los Angeles, cosmetics in New Jersey, and cable accessories shipped out of Dallas. Teams will spend $0.80 on a printed carton and then hesitate over a $0.15 divider that protects the actual product. That is backward, especially when the product margin is only 18% to 24% and one broken case can wipe out the profit on four good ones. Custom corrugated divider inserts usually cost a small fraction of the total shipper, yet they can prevent damage that burns labor hours, replacement stock, and retailer confidence. If a package has to survive UPS sortation in Louisville or warehouse handling in Atlanta, specificity beats optimism every time. The same logic applies to carton dividers, packaging inserts, and other protective packaging components that look minor until the first claim arrives.
What Are Custom Corrugated Divider Inserts?
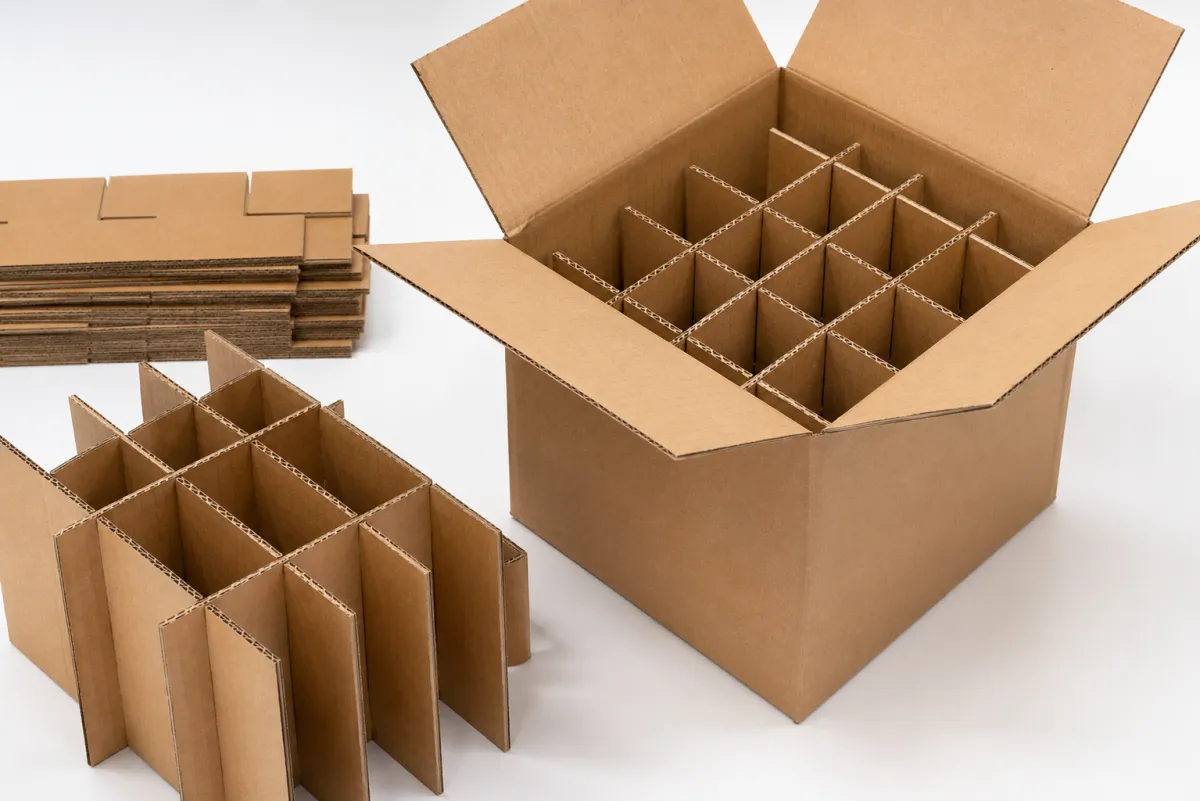
Custom corrugated divider inserts are slotted corrugated sheets that fit inside a carton and create separate cells for individual items. Each bottle, jar, vial, or component gets its own lane, usually with 1.5 mm to 4 mm of clearance depending on fragility and finish. No knocking into the neighbor. No side-to-side slide. No corner rub showing up after transit and somehow becoming your problem. I have seen packaging teams in Guangzhou discover too late that a box can look perfect on paper and still fail when a 320 g glass bottle gets 18 mm of lateral motion in a 400 mm carton.
Generic partitions are usually cut to a standard footprint and pushed into a box because they are easy to source from stock in places like Dongguan or Ohio. True custom corrugated divider inserts are built around product dimensions, carton interior, and pack-out speed. That difference matters. A standard 4-cell divider might work for one candle line at 60 mm diameter, but it becomes a liability when the jar shoulder grows to 64 mm and the lid adds another 3 mm. A custom layout can cut assembly time by 6 to 9 seconds per carton, which sounds small until you ship 18,000 units and the labor line jumps by several thousand dollars.
The strange part is that the insert is often the cheapest component in the shipper system, yet it protects the most expensive thing in the chain: the product, the margin, and the replacement policy. I once watched a buyer in Chicago push for a heavier outer box while ignoring the divider geometry; we fixed the divider first, and the breakage rate dropped from 3.8% to 0.6% before we touched the carton board. That is how often people chase the wrong issue in packaging design. I say that with affection, but also with the memory of too many spreadsheet arguments that lasted longer than the sample review.
If you are comparing custom corrugated divider inserts with other packaging structures, start with the actual job. Are you stopping glass-to-glass contact, keeping bottles upright in a 12-pack shipper, or preserving shelf presentation for a retail set in a 24-count master carton? The answer changes the spec and the budget. It also changes whether you need divider-only protection or a broader system that includes Custom Packaging Products or a different outer shipper like Custom Shipping Boxes. A divider that fits a 9 x 6 x 4 inch carton is useless if the real inside cavity is 8.75 x 5.75 x 3.5 inches.
I usually tell clients to make three decisions first: how many cells they need, what board grade they need, and how fast the packer has to assemble the insert. Once those are clear, custom corrugated divider inserts stop being a vague line item and start acting like a tool. Which is a relief, frankly, because vague line items are where packaging budgets hide until procurement asks a very direct question. In practice, that usually means deciding between corrugated partitions, divider sheets, or a fully custom insert build before anyone starts asking about print.
How Do Custom Corrugated Divider Inserts Work in Packaging?
The mechanism is simple. Slotted cross-members slide into each other and form a grid, usually with intersecting panels spaced to match the product pitch within 1 mm to 2 mm. Each item sits in its own cell, so contact, rubbing, and impact get reduced. That is the whole trick. No magic. Just geometry, board strength, and controlled friction. Good custom corrugated divider inserts turn a loose carton into a managed pack-out, and the difference is obvious the first time a pallet gets dropped from 30 inches during transit simulation.
Corrugation gives you cushioning and compressive strength, but the divider does the real containment work. It stops lateral movement, which is the thing that usually turns a shipment into a claim. If the carton gets dropped, the items still move a little, but the divider keeps that motion from becoming a glass-on-glass collision or a dented closure. That is why I treat custom corrugated divider inserts as a structural part of the package, not an accessory. The accessory mindset is how teams end up paying for 2% to 5% avoidable breakage on high-volume SKUs.
I saw this on a candle line in Guangzhou. The brand had premium printed cartons, a matte finish, and a soft-touch coating that cost about $0.32 more per box than the plain version. The candles still cracked because the inserts were loose by 4 mm and the flute direction ran against the load path. Four millimeters was enough. Once we tightened the cell size and changed the flute orientation, the breakage rate fell from 4.1% to 0.7% across a 10,000-unit test run. The buyer stopped blaming the carrier and started asking for a second sample, which is usually how you know the packaging finally got honest.
Different products need different divider logic. Bottles usually need vertical separation and snug neck clearance, often around 2 mm to 3 mm at the top. Jars need more sidewall protection, especially if the glass wall is under 1.8 mm thick. Cosmetics and retail packaging often need cleaner presentation and faster assembly because the box may be opened by a customer in under 10 seconds. Electronics accessories, hardware kits, and spare parts can use denser cell layouts because the items are smaller and less fragile. Custom corrugated divider inserts are not one template; they are a fit issue, a strength issue, and a pack-out issue rolled into one.
Board choice matters too. Light retail sets might use E-flute or B-flute board because the insert needs to stay thin and neat in a 3 mm to 5 mm profile. Heavier shippers may need 44 ECT or even double-wall depending on weight and stack pressure, especially on pallets stacked five high in a warehouse in Phoenix or Toronto. I have had suppliers in Suzhou try to sell overbuilt board because it made their quote feel safer. Safe for them, maybe. Not for the customer’s freight budget. An extra $0.04 per insert sounds tiny until it multiplies across 60,000 units.
Assembly is another practical point. Some custom corrugated divider inserts ship flat and are slotted together on-site, which can save 40% to 60% in storage volume. Others come pre-formed for faster line packing when the labor rate is $18 to $26 per hour and every second counts. Flat shipper inserts usually save freight and warehouse space. Pre-slotted systems save labor. You pick the trade-off based on pack-out volume, not on what looks tidy in a sample photo. A pretty sample that slows the line is just a very polite problem.
For testing, I compare the insert against transit reality, not showroom conditions. The best quick check is to pack real product, shake the carton side to side for 20 seconds, and see if the contents move more than 1 mm. Then run drop tests or distribution simulation that match your shipping route, whether that route is regional freight out of Memphis or parcel shipping through Dallas. If you need a baseline, the material at ISTA is useful for understanding transit testing, and FSC is worth reviewing if your board sourcing needs chain-of-custody discipline. That is not glamorous work, but neither is processing claims.
Custom Corrugated Divider Inserts Cost: What Drives Price
The price of custom corrugated divider inserts is usually driven by six things: board grade, flute type, slot count, sheet size, die-cut complexity, and quantity. Print can matter too, but if you are paying for branding on a divider, I would ask why unless the insert is visible in a retail opening or part of a premium unboxing experience. Most buyers get more value from better fit than from a logo no one sees. I say that as someone who has had to explain an unnecessary print line item to a very annoyed procurement team in New Jersey.
Here is the part people miss. Low volume can make the unit price look rude. A 500-piece run may cost almost twice as much per insert as a 5,000-piece run because setup gets spread across fewer units. That does not mean the supplier is gouging you. It means the math is stubborn. I have negotiated with converters in Dongguan, Columbus, and Ho Chi Minh City, and the story is the same: setup is setup. The calculator does not care about your feelings, which is rude in its own way.
| Divider build | Typical use | Example price per unit | Why it costs that much |
|---|---|---|---|
| 32 ECT, B-flute, 4-cell slotted | Candles, jars, light cosmetics | $0.15 per unit at 5,000 pieces | Lower board weight, simple layout, faster converting in 12 to 15 business days from proof approval |
| 44 ECT, B-flute, 8-cell slotted | Glass bottles, sauce bottles, fragile retail kits | $0.19-$0.28 per unit at 5,000 pieces | More board strength and more slotting, but still efficient for plants in Shenzhen or Monterrey |
| 200# test, C-flute, or reinforced double-wall | Heavier parts, industrial kits, dense shipments | $0.27-$0.45 per unit at 5,000 pieces | Extra material, higher crush resistance, and more setup time for wide-format die cutting |
Those numbers are realistic, not universal. I have also seen a simple 8-cell divider land at $0.39 at 500 units and drop to $0.15 once the order hit 5,000 pieces. That is why I always ask for pricing at 500, 1,000, and 5,000 units. A quote that only shows one quantity hides the breakpoint where your cost starts behaving like a grown-up number. A one-point quote is a nice way to get surprised later, usually when the purchase order is already signed.
Supplier choice can change the answer too. A quote from WestRock, Pratt Industries, or a regional converter in Ohio, Georgia, or northern Mexico may come back with different assumptions on board availability, press scheduling, and freight. I do not care which name is on the email if the spec is sloppy. Apples-to-apples specs matter more than brand names in the quote thread. If one supplier thinks your cell count is 6 and another thinks it is 8, your comparison is garbage. I have seen people compare garbage with a straight face, which is an impressive but unhelpful skill.
"The insert was not our biggest line item, but it was the one causing the refunds." That was a buyer in a client meeting after we found that the carton looked fine while the divider was letting glass shift by 6 mm during transit on a route from Shenzhen to Seattle.
There are hidden costs too. Oversized cartons waste corrugated board and cube space, especially when palletized on a 48 x 40 inch footprint with 5 layers per pallet. Extra cell count increases assembly labor by 3 to 7 seconds per carton. A fancy layout can slow pack-out enough to eat the savings from cheaper material. Freight from overbuilt packaging is a sneaky one; a heavier system may cost more to ship every month, which means your packaging design is quietly taxing your margin. It is the sort of tax nobody votes for and everybody pays.
If your product is part of a premium retail packaging program, you may be tempted to make everything look more complex. I get it. I have worked on branded packaging where the buyer wanted the insert to "feel engineered" and suggested a 350gsm C1S artboard mock-up for a divider that never needed to be seen. Fine, but that material belongs in a presentation sleeve or a fold-over display, not in a shipping grid for glass. The best package branding is the one that protects the product first and gives the customer a clean opening experience second. Nobody pays a premium to open broken goods. They just complain faster.
One more honest point: custom corrugated divider inserts are almost always cheaper than foam when you need recyclable, general-purpose separation. Foam still has a place for delicate luxury items or very high-value objects, but corrugated usually wins on cost, weight, and sustainability. If the insert can do the job in corrugated, I usually push clients that way before they spend extra on material they do not need. The foam sample may look impressive, but impressive is not the same as efficient. In many packaging inserts programs, corrugated gives you enough protection without adding weight or a recycling headache.
Custom Corrugated Divider Inserts Process and Timeline
The workflow for custom corrugated divider inserts starts with dimensions, not guesswork. First come the product size, carton interior, weight, and pack count. Then come the dieline, sample cut, approval, and production. If a supplier says they can quote everything from a blurry phone photo, be cautious. I have seen too many "fast" quotes turn into expensive rework because someone measured the outside of the box instead of the inside cavity. That mistake is common enough to be annoying and expensive enough to be memorable.
For a simple sample, I usually expect 3 to 7 business days after the supplier has clear specs. Full production often runs 12 to 15 business days from proof approval for straightforward slotted layouts, and 15 to 20 business days when the insert needs multiple die lines or double-wall board. Shipping time is separate. That distinction sounds obvious until someone asks why the cartons are not already in the warehouse two days after approval, as if corrugated could teleport itself from Dongguan to Denver. I would love that technology, but we are not there yet.
Delays usually come from the same four places. The first is unclear measurements. The second is revision churn, which happens when five people have opinions but no one owns the final spec. The third is waiting on product samples from the factory in Suzhou, Shenzhen, or Anaheim. The fourth is changing the slot count after the quote. If you change the geometry late, you are no longer making a small edit. You are reworking the design of the custom corrugated divider inserts. At that point, the calendar starts pushing back for good reasons.
In one supplier negotiation, I got a quote that looked excellent until I asked whether the sample included glue-free locking tabs or a pasted seam. That changed the lead time by four days and the unit cost by $0.02. Not a lot on paper. Enough to matter across 30,000 units, especially when the run is booked for a retail launch in Chicago on a fixed Wednesday ship date. That is the level of detail that separates a useful quote from a fairy tale. Packaging has a lot of fairy tales, and most of them arrive in spreadsheets.
Clean approvals save money. One decision-maker. One spec sheet. One final carton size. That is the discipline. If you want the insert to match a broader packaging system, it also helps to confirm the outer box early, especially if you are pairing it with Custom Printed Boxes or a new retail tray. Changing the outer carton after the divider is approved is how teams end up paying twice for one design problem. I have watched that movie more times than I care to admit, usually with a red pen and a very tired operations manager.
Here is the best way I have seen teams avoid chaos:
- Send exact product dimensions, weight, and photos.
- Confirm the inside carton dimensions, not the outer size.
- Approve the cell count and board grade.
- Review the physical sample with real product, not placeholders.
- Lock the spec before production starts.
That process sounds boring because it is. Boring is good. Boring means your custom corrugated divider inserts fit the carton, the line can pack them fast, and the shipment has a fighting chance. If you are also buying other packaging components, it helps to keep the spec stack simple and consistent across your Custom Packaging Products program so the whole order behaves predictably. Predictable is underrated right up until a claim shows up in an email at 7:12 a.m.
Step-by-Step Guide to Spec Custom Corrugated Divider Inserts
I always start with the product itself. Measure the footprint of each item, the height, the weight, and anything that sticks out. That means caps, pumps, handles, pour spouts, tamper bands, shrink sleeves, labels that create drag, and odd shoulders on the bottle or jar. A 1.5 mm label ridge is enough to ruin a tight cell if nobody accounted for it. That is not theory. That is the kind of mistake I have seen on a packing floor at 6:40 a.m. in Nashville when everyone is already grumpy and the coffee has not done its job yet.
Next, measure the carton interior. Not the shipping carton on the drawing. Not the "should be" carton. The actual inside dimensions, ideally measured twice with a caliper or a steel rule. The insert must fit the space you really have. I once sat in a meeting where a team insisted their carton was 12 by 9 by 6 inches, then the live sample came in at 11.75 by 8.75 by 5.5. That small miss forced a full redesign of the custom corrugated divider inserts and cost them two weeks. Two weeks is a long time to stare at a nearly-right box.
Then decide how many items should sit in each layer. Four, six, eight, twelve. It depends on the product size and your assembly pace. A smaller cell count may speed packing, but it can also waste cube space. A denser grid can improve shipping efficiency, but if the item is fragile, you may need more clearance. There is no universal answer. There is only the answer that fits your product and your labor budget. That is a little annoying, but it is also what makes packaging interesting.
After that, pick the material and construction. Light SKUs may use simple slotted B-flute. Midweight items often do well in 44 ECT. Heavier or break-prone goods may need stronger board or a different divider structure. If you are shipping through rough lanes from Los Angeles to Miami, I would rather move up one board grade than gamble on a cheaper sheet that collapses under stack pressure. The extra pennies are easier to explain than a broken shipment. Claims meetings are not where savings look heroic.
Then ask for a prototype. A decent supplier should give you a dieline or sample and let you test the real product in the real carton. Do not approve from a screen if the product is fragile. I have watched teams approve custom corrugated divider inserts from PDFs and then act shocked when the first production run jammed on the packing line because the hand-folds were tighter than expected. A PDF can lie by omission in ways that make everyone irritated.
My field checklist is simple:
- Product size: exact dimensions, not rounded estimates.
- Carton interior: inside length, width, and height.
- Weight: per item and per completed carton.
- Fragility: glass, ceramic, coated metal, or durable plastic.
- Assembly speed: manual pack-out or semi-automated line.
- Visual goals: plain transport, retail packaging, or premium open-box presentation.
If sustainability matters, ask about board sourcing and recycling claims up front. I like FSC-certified board when the program needs it, and I like keeping the package structure recyclable when the customer base cares. That does not mean every project needs the greenest possible spec. It means the design should fit the claim. Honest branding beats fancy wording every time. If you are using branded packaging or package branding in a premium line, keep the claim aligned with the structure, not the mood board. Customers notice mismatch faster than you think, especially in markets like Seattle, Vancouver, or Amsterdam where recyclability is part of the purchasing conversation.
One practical note: custom corrugated divider inserts should be tested with the actual closure you use. A jar lid, spray top, pump, or bottle shoulder can change how the pack sits in the carton. I have seen a project fail because the product was tested without tamper bands installed. The sample fit beautifully. The real shipment? Tight, ugly, and late. There is nothing like a production line discovering a missing detail ten minutes before lunch.
Common Mistakes With Custom Corrugated Divider Inserts
The biggest mistake is guessing. A few millimeters off can turn a clean pack-out into a jammed mess. Too loose, and the product shifts. Too tight, and workers start forcing items into cells, which damages finish and slows the line. I have watched packers "solve" a bad fit by bending board in a plant outside Indianapolis. That is not a solution. That is a future claim with a time stamp.
Another common error is overengineering. Some teams add extra slots, extra board, and extra cell walls because they think more structure equals more safety. Not always. Sometimes that just adds cost and makes the insert harder to fold. A heroic-looking custom corrugated divider inserts design can be less useful than a simple one that fits cleanly and packs fast. Heroic is a strange goal for packaging anyway, especially when the line rate is 22 cartons per minute.
Underestimating assembly labor is a classic money leak. I once audited a client’s pack line and found that a cheaper insert cost them 11 extra seconds per carton. That sounds trivial until you multiply it by 24,000 units. Suddenly the "savings" vanished. Labor is part of the packaging cost whether procurement wants to stare at it or not. Ignoring it does not make it disappear; it just makes it ambush you later, usually in the form of overtime.
Skipping drop tests is another expensive habit. If you do not simulate transit, your customer will do the testing for you with their own floor and their own temper. I prefer a controlled drop from 24 to 30 inches, a compression check, and a real pack-out review before production. That is not paranoia. That is just cheaper than replacing damaged stock after it leaves your dock. Also, nobody enjoys a returns pile. Nobody, especially not the warehouse team that has to sort it at 4:30 p.m.
The final mismatch is carton choice. A good divider cannot rescue a bad outer box. If the carton is too large, the product still moves. If the carton is too weak, the walls crush before the insert does its job. I have seen teams blame the custom corrugated divider inserts when the real issue was that the shipping box had the wrong burst strength from the start. That is packaging whack-a-mole, and it gets old fast.
Here is the blunt version: if your packaging system is off by even one step, the insert gets blamed for everything. The better habit is to check the whole stack—product, divider, carton, closure, and shipping route—before anyone orders tens of thousands of pieces. That is how product packaging stays sane. Or at least saner than it was five minutes ago.
Expert Tips for Better Custom Corrugated Divider Inserts
Build from the product outward. That is my first rule. Define the item, then the pack-out, then the carton, then the divider. If you start with the artwork or a box size someone guessed from a previous job, you end up forcing the product to fit the packaging instead of the other way around. That is how bad specs get born, and bad specs are stubborn little things. I have seen them survive three rounds of revisions in a row.
Ask suppliers for two versions: one lowest-cost functional option and one safer premium option. That comparison makes trade-offs visible. A client can look at a 32 ECT B-flute divider at $0.16 and a stronger 44 ECT version at $0.23 and decide whether the extra $0.07 is worth the added protection. That is a real business conversation. "Looks nice" is not a business conversation, though I have heard it offered like one at 8:00 a.m. on a Monday.
There are also little design moves that save money without hurting function. Fewer slot intersections. Smarter nesting on standard sheet sizes. Simpler layouts when the product size allows it. A good converter in Shenzhen or Charlotte can often trim waste with a cleaner dieline. In one case, a layout change cut board usage by 9% and reduced pack-out time by 5 seconds per carton, which mattered on a line running 9,000 units a week. Small numbers. Big annual impact. That kind of math is why I keep a pencil nearby, even in meetings where people still prefer whiteboards.
I also like to think about branding and sustainability together. Corrugated can do both jobs if the design is disciplined. That is useful for retail packaging and for warehouse shippers that still need a polished feel. If you are building Custom Printed Boxes for a launch, do not waste the divider on decoration no one sees. Put the money where the customer actually notices it: fit, protection, and clean opening. The customer cannot admire a divider they never have to think about.
There is a negotiation lesson I learned the hard way. The best custom corrugated divider inserts are not the ones that impress a sample table in Chicago or Shenzhen. They are the ones that protect the product and speed up fulfillment. That is the whole game. I have lost arguments to prettier designs before, and I have watched those same designs get blamed later when labor ran hot and the product started arriving with corner rub. Pretty does not pay freight. I wish it did; it would make meetings much shorter.
Use the testing standards as a sanity check, not a badge. If you need transit simulation, ISTA gives you a credible framework. If you need a sustainability conversation, FSC is useful for sourcing language and chain-of-custody basics. Standards are not there to decorate a quote. They are there to keep everyone honest. The paperwork may be dull, but dull paperwork beats broken inventory by a wide margin.
If your project touches broader packaging design, keep the whole stack coordinated. Divider, carton, artwork, and closure should feel like one system. That is why I often review custom corrugated divider inserts alongside Custom Packaging Products and Custom Shipping Boxes in the same planning session. Separate decisions look neat on paper. Integrated decisions save money in the real world, especially when freight and labor are both rising by 6% to 8% a year.
And yes, I still recommend a physical sample every time. A photo cannot tell you if the board creaks, if the fit is loose by 2 mm, or if the packer hates the fold sequence. A sample can. That is why the best teams still put hands on the product before they sign off on custom corrugated divider inserts. If somebody rolls their eyes at that, I usually know I am about to hear a complaint later, often about the line stopping for 20 minutes on launch day.
If you want the shortest version of my advice: keep the layout simple, match the carton to the product, and make sure the divider does not slow the line. That is how you get custom corrugated divider inserts that earn their keep instead of becoming another line item nobody wants to explain. Packaging should remove friction, not invent it, and it should do that whether the run is 1,000 pieces in Ohio or 50,000 pieces in Guangdong.
How do I measure for custom corrugated divider inserts?
Measure the inside dimensions of the carton and the exact footprint of the product, not the outside box size. Include clearance for caps, labels, handles, pumps, and any surface texture that makes the fit tighter. If possible, send a sample product or a dimensioned sketch so the supplier can confirm the layout before cutting samples for custom corrugated divider inserts. I would rather spend five extra minutes measuring than five extra weeks fixing a bad die-line.
What affects custom corrugated divider inserts pricing the most?
The biggest drivers are board grade, flute type, slot count, die-cut complexity, print, and quantity. Short runs cost more per unit because setup gets spread across fewer pieces. A 500-piece order might land near $0.39 per unit, while 5,000 pieces could drop closer to $0.15 to $0.19 depending on the build. I always ask for pricing at 500, 1,000, and 5,000 units so the breakpoints show up clearly for custom corrugated divider inserts. That is where the real cost story usually hides.
How long do custom corrugated divider inserts take to produce?
Simple samples may take 3 to 7 business days once dimensions are approved. Full production often runs 12 to 15 business days from proof approval for straightforward slotted layouts, and 15 to 20 business days when the insert needs multiple die lines or heavier board. Freight time is separate, so plan for delivery if you need custom corrugated divider inserts on a specific packing date. Rush requests are possible sometimes, but they are never as magical as people hope.
Are custom corrugated divider inserts better than foam inserts?
Corrugated is usually lighter, easier to recycle, and often cheaper for general shipping protection. Foam can be better for very delicate or luxury items that need extra cushioning or a more premium feel. The right choice depends on fragility, sustainability goals, and how much abuse the package will take in transit. For many product packaging programs, custom corrugated divider inserts are the cleaner answer, especially when the product ships from a plant in Shenzhen, Chicago, or Monterrey.
What should I send a supplier before ordering custom corrugated divider inserts?
Send product dimensions, carton specs, quantity, fragility notes, and photos of the items packed together. Tell them whether the insert needs to ship flat, assemble fast, or support branding and color printing. Ask for a dieline and a physical sample before you approve production, because guessing is how budgets get wrecked on custom corrugated divider inserts. If the supplier asks good questions, that is usually a very good sign.
If you remember nothing else, remember this: custom corrugated divider inserts are not an accessory. They are part of the packaging system, part of the cost structure, and part of the customer experience. I have seen a $0.18 insert save a $14 product and a relationship with a retailer that could have vanished after one bad shipment. That is why I take custom corrugated divider inserts seriously. They are the quiet workhorse of product packaging, and when they are spec’d right, they make the whole stack behave. When they are spec’d wrong, they behave like a tiny disaster with slots.
The practical takeaway is straightforward: measure the real product, measure the real carton interior, test the real closure, and lock the divider spec before you buy volume. Do those four things and custom corrugated divider inserts stop being a cost line you worry about and start being the reason the shipment arrives intact, the pack line keeps moving, and the claims inbox stays quieter than usual.

