Buyer Fit Snapshot
| Best fit | custom e-commerce packaging inserts for packaging buyers comparing material specs, print proof, MOQ, unit cost, freight, and repeat-order risk where brand print, material, artwork control, and repeat-order consistency matter. |
|---|---|
| Quote inputs | Share finished size, material target, print colors, finish, packing count, annual reorder estimate, and delivery region. |
| Proofing check | Approve dieline scale, logo placement, barcode or warning zones, color tolerance, and any recyclable or compostable wording before bulk production. |
| Main risk | Vague material claims, crowded artwork, or missing packing details can create delays even when the unit price looks attractive. |
Fast answer: Custom E-Commerce Packaging Inserts: Design, Cost, and Fit should be specified like a repeatable production item. The safest quote includes material, print method, finish, artwork proof, carton packing, and reorder notes in one written spec.
What to confirm before approving the packaging proof
Check the product dimensions against the actual filled item, not only the sales mockup. Ask for tolerance on folds, seals, hang holes, label areas, and retail display edges. If the package carries a logo, QR code, warning copy, or legal claim, reserve that space before decorative graphics fill the panel.
How to compare quotes without losing quality
Compare board or film grade, print process, finish, sampling route, tooling charges, carton quantity, and freight assumptions side by side. A lower quote is only useful if the supplier can repeat the same color, closure quality, and packing count on the next order.
Custom e-commerce packaging inserts can look almost disarmingly plain when they are sitting on a bench in a warehouse, stacked beside a 30 cm steel ruler, a hot knife, and a half-used roll of 48 mm tape that nobody claims by noon. The real test comes later, after the carton has traveled through a sortation hub in Louisville, crossed a regional linehaul in Indiana, and taken a corner drop that nobody in the design review simulated because the box looked fine on the table. I have watched a shipper that felt perfect during a fit check crack a glass bottle because the insert left a 3 mm pocket on one side, and that tiny gap turned into a hard impact by the time the parcel reached zone 7 delivery. That is exactly why custom e-commerce packaging inserts deserve attention: they do far more than occupy space. They center the product, control movement, and keep the package looking composed after real shipping abuse.
For brands that care about product packaging and package branding, the insert is not a hidden utility piece. It is the component that stops a candle jar from rattling, keeps an accessory kit from spilling into the carton, and protects a premium cosmetic item from arriving with rubbed edges after 900 miles in a trailer. I remember a meeting in Columbus, Ohio, where the marketing team was focused on a glossy tray with a dramatic reveal, while the warehouse manager quietly held up a stack of 48 returns and said the current shipper was draining margin on every order. Honestly, I think that was one of the clearest packaging conversations I have ever seen, because the argument stopped being about style and became about money, handling, and whether the product would still look like itself when the customer opened the box.
At Custom Logo Things, I treat these internal supports as part of the whole pack system, right beside the outer carton, tape pattern, void fill, and pallet build. If you are also comparing Custom Packaging Products, the insert is the piece that gives the rest of the pack a better chance to do its job. A well-built insert supports branded packaging, cuts damage claims, and reduces the number of repacks when a load-out feels too loose or too fussy for the line. And yes, I have seen a beautiful box design get completely humbled by a sloppy cavity layout, which is always a little painful because the print team did their job and the mechanics quietly sabotaged it.
What Are Custom E-Commerce Packaging Inserts?
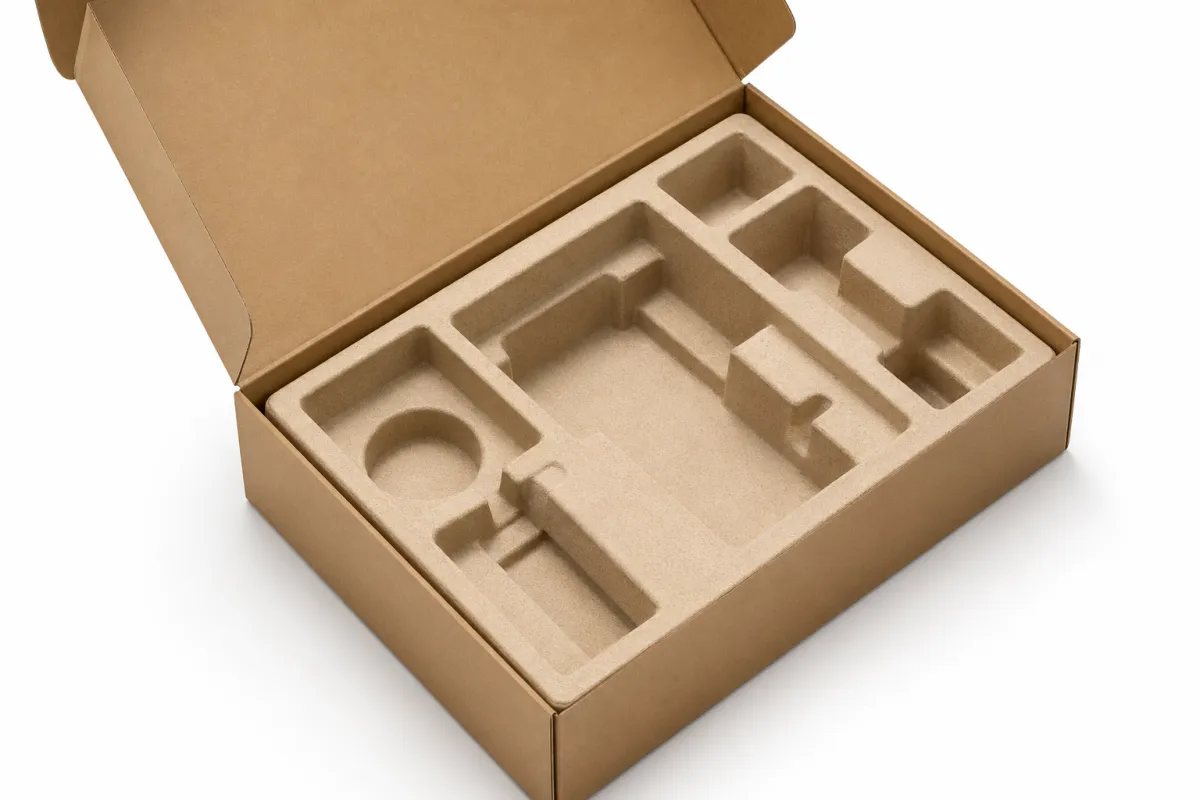
Custom e-commerce packaging inserts are shaped internal structures that hold a product in a controlled position inside the shipper. They may be cut from corrugated board, molded pulp, paperboard, foam, or a hybrid stack built to balance protection and presentation. They are not simply spacers. They are engineered to keep the product centered, immobilized, and ready for opening so it arrives looking like it left the line minutes earlier, not after days of truck vibration and carrier handling. In practical terms, an insert is the difference between a product that rattles around in a box and one that feels nested into the packaging from the start.
I learned that lesson on a folding-carton line in Dongguan while testing a two-piece paperboard cradle for a small audio accessory. The bench fit looked clean, the pull test felt stable, and the part seemed ready for production. After a corner drop and a rough transfer through parcel simulation, the product had shifted just enough to scuff the printed finish. The outer carton still looked untouched, which is exactly why these structures can mislead teams during development; a package can appear polished and still fail if the cavity lets the item move 2 or 3 mm under vibration. That kind of failure is maddening because everybody in the room swears the design was "basically right" until the first customer email arrives with a photo and a very unimpressed tone.
There is a meaningful gap between packaging that fills space and packaging that controls movement, absorbs shock, and supports a premium unboxing moment. A void-fill pillow may reduce empty volume, yet it rarely anchors a product the way a die-cut insert with locking tabs can. Well-designed support pieces behave more like a seat belt for the product, holding the load steady while also making the opening experience feel intentional. That matters for Retail Packaging That has to stand beside the polished look people expect from Custom Printed Boxes, especially when the item is fragile, high-value, or just annoyingly easy to scuff if it so much as breathes the wrong way.
These structures affect more than one department. Operations sees fewer damage claims, finance sees lower return costs, and marketing gets cleaner package branding because the product opens in a deliberate sequence instead of tumbling out with loose components. The best inserts support the line, the carrier, and the customer at the same time, which is not easy to pull off in packaging design and worth protecting while the spec is still flexible. If you have ever watched a warehouse team rebuild the same carton because the cavity was off by a few millimeters, you know exactly how quickly a small geometry mistake turns into a very expensive joke.
Think of the insert as a small piece of product engineering inside the carton. It may use a single cavity, a fold-over flap, a wraparound collar, or a layered nested build, but the goal stays the same: stop the item from rotating, protect the edges that fail first, and present the product in a way that feels finished rather than improvised. That quiet utility is the strength of custom packaging design, and it is also why the best versions often look boring to everyone who has never had to explain a broken shipment to a retail buyer.
"The best insert is the one nobody notices after shipment because nothing moved, nothing rubbed, and nothing broke." I said something close to that during a supplier review in Shenzhen, and the plant manager nodded because he had seen the same thing on 12,000-run production orders for specialty cosmetics. I still think that is the cleanest definition of good packaging I have ever heard, even if it sounds a little less glamorous than the marketing deck.
How Do Custom E-Commerce Packaging Inserts Work in Fulfillment?
Custom e-commerce packaging inserts have to perform from the first packing motion to the last-mile doorstep handoff. The product is loaded, the support piece aligns it, the outer carton closes, and then the package has to survive scan belts, lane merges, truck vibration, stack pressure, and the occasional porch drop. A good insert keeps the item stable by limiting free space and spreading force into the material instead of into the product. That sounds simple, but the math behind it can get surprisingly picky once you start dealing with finish-sensitive surfaces or items with a center of gravity that refuses to behave.
In a warehouse, the insert also has to speed up pack-out. If your team is spending 18 seconds trying to figure out the front side of an insert or turning the product twice before the cavity makes sense, the design is costing real money. I once walked a fulfillment center in northern New Jersey where 6 packers were each losing about 10 seconds per order because the layout had a left-right symmetry problem; after the converter added a single lead-in tab and a printed orientation cue, the line recovered nearly a full labor minute per dozen units. That is the kind of practical improvement these internal supports can create when the geometry is right, and it is one of the reasons I trust the pack station more than a glossy concept rendering every single time.
The insert should work with the outer carton instead of fighting it. If the shipper is a 32 ECT single-wall box and the insert is built too aggressively, the package can feel stiff on the bench but crush at the bottom edge because the load paths are wrong. The same warning applies to void fill, tape pattern, and dunnage. A strong insert does not excuse a weak carton or a sloppy seal. Good pack-out components function as one part of a larger protective system, not as a standalone fix, and if someone tries to sell you otherwise, they are probably trying to protect their own quote more than your product.
Depending on the product geometry, you may need locking tabs, wraps, nested layers, or a cavity that supports the item at 2 or 3 points of contact instead of only one. That matters for vibration, especially with round or tall objects that bounce when they are supported only at the base. A rectangular accessory box may be fine with a simple tray, while a fragile glass jar or molded device often needs a tighter cradle, a shoulder stop, or a secondary sleeve to prevent compression on the lid. This is where the right insert repays the extra design time, because a better structure can absorb a lot of bad behavior from carriers that do not exactly baby the parcel.
For teams building pack station components into a fulfillment flow, repeatability is the clue that matters most. If ten different packers can load the same item in the same 4-step sequence, the design is friendly to labor and less likely to trigger rework. If the result depends on one person knowing a hidden trick, the design still needs work. I have seen operations thrive when the insert matched the natural motion of the line, and I have seen them grind to a halt because one fold needed a hand position that only two people in the building could remember before their second coffee.
That is also why I like to watch live packs on an actual line rather than only reading CAD screenshots. The bench shows fit, but the line shows friction, speed, hand placement, and whether the product needs a 15-degree tilt to drop in cleanly. The best package support pieces only earn their place when they make packing easier under pressure, not just prettier in a meeting. In one plant near Grand Rapids, Michigan, a redesign that reduced a three-motion load to a single drop-in saved roughly 7 seconds per order across a 22,000-unit monthly run, which is the sort of detail that makes operations people sit up straighter.
Key Factors That Shape Insert Design and Performance
The first design variable for any insert is the product itself: weight, fragility, finish, and center of gravity. A 120 g accessory with a matte surface behaves very differently from a 1.8 kg glass jar with a lacquered lid and a high center of mass. Irregular shapes create the most trouble because the product may need support in 3 or 4 zones instead of one neat cavity, which means the insert has to be tuned with real measurements instead of a generic template. I have learned the hard way that "close enough" is a phrase that gets people into trouble faster than almost anything else in packaging.
Material selection changes everything. Corrugated board is often the workhorse because it is easy to die-cut, printable, and available in several flute profiles, including E-flute for a clean presentation and B-flute for a bit more stiffness. Molded pulp brings a strong sustainability story and can be excellent for corner protection, while paperboard works well for lighter products and retail-style presentation. Foam can still be the right answer for extremely sensitive goods, but I rarely recommend it before checking whether a fiber-based option can meet the same drop and compression requirements. That is where the right spec needs honest material comparisons instead of assumptions, because the cheapest-looking material is not always the smartest one once the shipping labels start piling up.
On one negotiation with a packaging supplier in Suzhou, the sales rep wanted to sell a foam tray at $0.31 per unit because it already sat in their catalog, but the customer needed only 1.5 mm of edge separation and a clean white look for subscription retail packaging. We switched to a 350gsm C1S artboard insert with a spot-glued lock, and the landed cost dropped to $0.18 per unit at 5,000 pieces. The better answer was not the more expensive one; it was the one that matched the product and the pack flow. That happens constantly with packing components, and I honestly think this is the part of the job that separates a packaging quote from a packaging solution.
Fit tolerances deserve real attention because a 1 mm change can affect both protection and pack speed. If the cavity is too loose, the item shifts; if it is too tight, the packer forces the product and may scuff the finish or bend a tab. Caliper, crush resistance, and fold memory all matter, especially for inserts that need to hold shape after 500 or 1,000 cycles in storage. In practice, the specification should account for how the material behaves after scoring, folding, or humidity exposure, not only the drawing dimensions on paper. Packaging never seems to care about your idealized dimensions, which is rude, but there it is.
Sustainability belongs in the discussion, but it should not be treated like a label added after the fact. If a lighter paperboard structure can protect the product and reduce dimensional weight charges, that is a real win. If the design saves 12 g of material but creates a 4% damage rate, the trade is bad. Fiber-based support pieces often perform well because they can be recycled more easily in many curbside systems, and the EPA recycling guidance is useful context for recovery and material choice. I always like having that conversation early, because nobody enjoys discovering that their "eco" insert is costing more in replacements than it ever saved in board weight.
The table below shows how I usually compare options in a production meeting when a client wants both protection and a clean branded presentation. These are not universal prices, because geometry and tooling move the numbers around, but they are close to what I see on real quotes for internal packaging components from converters in Guangdong, Illinois, and Pennsylvania:
| Material | Best Use | Typical Strength | Visual/Branding Fit | Approx. Unit Cost at 5,000 |
|---|---|---|---|---|
| Corrugated E-flute | Light to medium products, premium shipper look | Good stiffness, easy die-cutting | Strong for branded packaging and custom printed boxes | $0.16-$0.28 |
| Molded pulp | Corner protection, sustainable presentations | Good shock absorption, moderate compression | Natural, matte, understated | $0.22-$0.40 |
| Paperboard | Lighter goods, cosmetic kits, retail packaging | Clean structure, limited load capacity | Excellent print surface for package branding | $0.12-$0.24 |
| Foam | High-value fragile items, precision fit | Strong cushioning, excellent hold | Functional, less fiber-friendly | $0.24-$0.60 |
| Hybrid fiber build | Mixed protection and presentation needs | Balanced stiffness and cushioning | Good for premium pack presentations | $0.20-$0.38 |
Warehouse reality matters just as much as structure. If a design needs 8 tabs folded by hand or 3 separate parts aligned before the product can even be loaded, the labor penalty shows up quickly on the invoice. The best solutions usually balance protection, material usage, and line speed without asking the packers to become puzzle solvers. I have a special dislike for designs that look elegant in a PDF and then require the pack team to perform a small engineering ritual just to get one item into the box.
Custom E-Commerce Packaging Inserts: Cost, Pricing, and Timeline
Custom e-commerce packaging inserts are priced by more than material weight, and that is where many buyers get surprised. The quote usually reflects the substrate, part complexity, tooling, print, glue or assembly steps, and the order quantity. A simple die-cut tray in 24 pt paperboard can be quite reasonable at volume, while a deeper molded design with custom cavities and a two-color print run will cost more because the setup work is heavier and the scrap rate is different. A lot of people want packaging costs to behave like a vending machine, but that is not how the tooling and conversion side works.
For a rough planning number, I have seen prototype samples run anywhere from $150 to $500 depending on whether the supplier is hand-building the part or using a quick-turn cutter. Tooling may add another $350 to $2,500, especially if the design needs a steel rule die, a mold, or a dedicated fixture. At production scale, the per-unit cost drops fast; I have seen these parts come in at $0.15 each on a 5,000-piece run when the geometry was simple, the substrate was a 350gsm C1S artboard, and the artwork stayed single color. The trick, as always, is that a simple-looking insert often took an annoying amount of thinking before it became simple.
Timeline matters just as much as price. A clean project can move from brief to prototype in 5 to 8 business days, then reach approved production in 12 to 15 business days from proof approval. If testing reveals a weakness, add 3 to 7 business days for revision and re-sampling. I once had a cosmetics client in Southern California who thought they needed a 2-week launch window, but one small cavity adjustment plus a logo placement change pushed final approval out by 9 days. That is normal for packaging inserts; it is better to lose a week in development than a quarter on returns, and it is much easier to explain to leadership than a stack of broken product photos from the field.
Below is the kind of cost logic I share with buyers who need more than a vague estimate. The cheapest insert is not always the cheapest total package once damage, labor, and shipping waste are counted. For these programs, the total landed cost should include the outer shipper, assembly time, and the hidden price of each damaged order.
| Cost Driver | What Changes the Price | Typical Impact | How to Control It |
|---|---|---|---|
| Material choice | Corrugated, pulp, paperboard, foam, hybrid | Can shift unit cost by $0.08-$0.35 | Match strength to product risk |
| Geometry complexity | Tabs, folds, pockets, multi-part builds | Raises tooling and labor time | Simplify the structure where possible |
| Print and branding | One-color, four-color, coating, varnish | Adds setup and finishing cost | Limit print to high-visibility areas |
| Order quantity | 1,000 vs 5,000 vs 25,000 units | High volume lowers unit cost | Forecast accurately before release |
| Validation testing | Drop, vibration, compression, line trials | Adds up-front project time | Budget for testing before launch |
I usually tell clients to think in 3 layers: prototype cost, pilot-run cost, and unit cost at scale. A prototype at $280 might look expensive next to a mass-produced insert at $0.19, but that early sample can save a 2,000-order recall. In the same way, support pieces that reduce dimensional weight by 0.5 lb can pay back their design effort much faster than the spreadsheet suggests. I have seen a team argue for three days over a few pennies of board cost while quietly losing far more in shipping fees, which is one of those situations that makes me stare at the wall for a second and then ask everyone to recalculate the freight.
Another place money leaks out is over-sizing. If the insert forces the shipper to grow by even 1 inch in each direction, the parcel may move into a higher dimensional-weight tier with UPS or FedEx, and that alone can raise annual shipping spend by thousands of dollars. I have seen teams celebrate a sturdier build while unknowingly adding $0.72 in freight per package, which is why cost conversations around pack components need to include the carton size, not only the unit price. Freight is very good at punishing optimism, which is a hard lesson but a useful one.
For brands building the spec into a new launch, the best timeline is usually straightforward: brief, sample, test, revise, approve, then release. Skip one step and you usually pay for it later. I have watched that sequence unfold in supplier meetings from Guangdong to Indiana, and the pattern is the same every time: projects that respect the process launch cleaner and stay calmer once volume starts. There is a reason the old guys in the plant always want one more sample before signoff; it is not caution for its own sake, it is memory.
Step-by-Step Guide to Specifying the Right Insert
The first step is a product audit, and I mean a real one with calipers, a scale, and a few sample units from the actual production lot. Measure the item in at least 3 positions, note the fragile zones, and record any accessories that ship in the same carton, like cables, chargers, or refill packs. I once watched a team design around a CAD file and miss a 1.7 mm protrusion on a molded cap, which caused every fifth unit to bind on insertion. That was a very long afternoon in a plant outside Raleigh, and nobody was especially cheerful by the end of it.
Next, translate that audit into a packaging brief a converter can build from. Include product dimensions, target shipper size, protection goals, branding goals, expected annual volume, and the warehouse handling pattern. If the product must stay upright, say so. If the unboxing should reveal the item in a certain sequence, write that down. Good packaging specs start with specifics, not vague notes like "make it secure" or "make it premium." Those phrases are where packaging projects go to become vague, expensive, and slightly irritating to everybody involved.
Then ask for 2 or 3 structural concepts and sample them in the real carton, not on a desk with no tape and no void fill. Use the same packer motion your team will use on the line, the same tape length, and the same outer box thickness. Compare how each design behaves with the actual product weight, because a 90 g sample can feel perfect while a 1.4 kg production item tells a different story. That is one reason the right insert needs production-like testing instead of classroom testing, and it is also why I trust a physical sample more than a clever presentation deck that promises the laws of physics will behave politely.
After that, validate the design with practical checks. The standards I lean on most often are the common parcel test methods used across the industry, including the guidance from the ISTA testing organization. A small drop test, a vibration pass, and a compression check can reveal more than 20 email threads ever will. The point is not to prove the design is perfect; the point is to find the weak spot before the first 1,000 orders ship. If the insert fails in a lab, you have a chance to fix it. If it fails in the wild, you get customer complaints, return labels, and a brand team pretending not to panic.
Finally, revise the spec and lock it down before launch. That final document should name the substrate, caliper, board grade, print side, fold direction, glue points, tolerance, and pack sequence. When a production team can follow the same 6-step process every time, the structure becomes repeatable rather than fragile. That repeatability is the real prize, because it keeps launch planning from turning into a guessing contest every time a new SKU shows up.
Here is a simple working sequence I recommend to clients who need a clean approval flow:
- Measure the product and its accessories with 3 sample units.
- Write a one-page brief with shipper size and protection goals.
- Review 2 or 3 concepts from the converter or packaging engineer.
- Build a live sample using the actual carton and tape pattern.
- Run drop, vibration, and compression checks with the intended carrier profile.
- Approve the final spec only after the packers sign off on line speed and fit.
I also advise teams to treat branding as part of structure, not as a last-minute print file. If the insert is visible at opening, a clean logo panel or a matte finish can strengthen branded packaging without adding much cost. That is why the overall build often works best alongside matching custom printed boxes and a deliberate unboxing sequence that makes the customer feel the package was designed, not assembled by accident. The customer may not be able to name the individual parts, but they absolutely notice whether the whole thing feels considered.
For companies that need to keep multiple SKUs under control, standardizing a spec template helps. I have seen a brand in Illinois reduce launch confusion by 40% after they created a single brief form with 18 fields: product weight, target shipper, finish sensitivity, edge protection, accessory count, and photo references. Those details sound small, but they are the difference between a clean development cycle and three rounds of "almost right" samples. That is the real value of a disciplined insert program, because the time you spend collecting clear data pays you back when the line starts moving and everyone knows exactly what the structure is supposed to do.
Common Mistakes That Lead to Damage and Waste
One of the biggest mistakes is overbuilding the structure because the team wants to feel safe. Extra material can raise cost, slow the pack line, and create a harder opening experience without adding meaningful protection. I once reviewed a tray that used 42% more board than necessary simply because the buyer assumed thicker meant better; the real problem was that the product needed stronger edge support, not more bulk. More material can make a project feel serious, but seriousness is not the same thing as performance.
Poor fit is the next trap. If the insert allows the product to shift, rub, or settle differently after 30 minutes in a truck, the damage may not show until the customer opens the box. That is especially true for glossy surfaces, painted finishes, and sensitive lids that can mark under even light movement. Strong packaging inserts eliminate that guesswork by holding the product in the same orientation from pack-out to delivery. I prefer packaging that looks slightly understated and performs beautifully over packaging that looks clever and behaves like a loose drawer full of bad ideas.
Another common error is designing the insert in isolation and forgetting the outer carton. A clean-looking cavity can fail inside a weak shipper, just as a heavy-duty carton can still let a product bounce if the insert leaves a 10 mm void on one side. I have seen return rates jump after a team changed tape and carton grade without rechecking the insert. That is why the full pack system should always be tested together, because the product does not care which component failed first; it only cares that it got broken.
Skipping validation testing is an expensive shortcut. If you do not run a sample through the same parcel environment your customers will use, you are guessing. The worst version of that mistake is when the first test data comes from angry customer photos and a 3 a.m. rush to salvage a launch. Testing is cheaper, and much calmer. Good support structures deserve the same attention as the product inside them, and frankly the product deserves that too.
There is also a labor mistake that shows up fast: designs that look elegant but require too many manual steps. If a packer has to fold, rotate, tuck, and align the item in a 9-second sequence, throughput falls and error rates rise. That problem showed up in a meeting with a subscription-box client in Nashville who wanted a dramatic reveal, but the reveal cost them 2 extra labor minutes per order. Once we simplified the assembly, the pack station got faster and the customer still received a polished opening moment. That is a better trade for these projects, and it is usually easier to defend once the labor numbers are on the table.
Finally, do not ignore supplier communication. A converter can only build what you specify, and a vague brief leads to a vague part. If the material, print finish, tolerance, and pack orientation are not written down, the sample can drift away from the real need by the second revision. In my experience, the clearest programs are the ones where operations, design, and the supplier all see the same numbers on the page. That sounds almost too obvious to say, but plenty of projects fall apart because somebody assumed the other side "just knew what we meant."
Expert Tips for Better Insert Specs and Next Steps
My first tip is simple: build around actual damage data and customer feedback, not around assumptions. If 70% of your returns involve corner crush, the structure should defend corners first. If the complaints are about scuffs on a coated surface, then surface separation matters more than vertical stiffness. I have seen teams fix the wrong problem for months because the loudest complaint was not the most common failure mode, and that is one of the more expensive forms of confusion in packaging.
My second tip is to bring packaging engineers, converters, and fulfillment managers into the conversation early. A packaging designer may care most about the opening reveal, while a warehouse lead cares about whether the insert can be loaded in 1 motion instead of 3. Those are both valid concerns, and the best design usually balances them instead of picking a side. A quick 30-minute review with the right people can save weeks of redesign, and it also saves everyone from the very polite but very tired email thread that starts with "one small question" and somehow turns into a whole new project.
My third tip is to keep the approval workflow boring and consistent. Brief, sample, test, revise, sign off. That sequence is not glamorous, but it prevents half-finished decisions that create warehouse headaches later. I like simple scorecards that rate fit, protection, speed, print quality, and recyclability on a 1-to-5 scale, because they force the team to compare options with the same yardstick. With packaging insert projects, boring process often leads to exciting results, which is one of those rare business truths that I am happy to repeat.
If you want a sustainability lens, look beyond a material label and ask how the whole package behaves. A fiber-based insert that reduces product breakage by 3% can save more material over time than a thinner option that generates more replacements and more freight. Organizations like FSC can help brands think through responsible sourcing, while the EPA’s recycling guidance helps clarify recovery pathways. That kind of context matters when the insert supports both brand story and operational reality, because the customer does not experience the board grade in isolation; they experience the whole decision.
For brands scaling up, I recommend measuring the product, gathering at least 25 to 50 pieces of shipping failure data, and requesting 2 or 3 structural options before you commit to tooling. Then run a pilot pack-out with 100 to 300 units and inspect the cartons after the same handling your customer will face. That process is not expensive compared with the cost of a bad launch, and it gives your team a real picture of how the support structure will behave outside the lab. It also tends to settle arguments quickly, which I consider a hidden benefit.
If you are building a premium offering, the insert can also work with the rest of the presentation stack: the outer carton, a printed sleeve, a thank-you card, and the product itself. That is where custom packaging inserts support package branding in a way customers can feel. The box opens cleanly, the product sits where it should, and the whole experience feels planned instead of patched together. That feeling matters more than people admit, because customers may forget the exact structure, but they remember whether the package felt thoughtful.
So the next move is straightforward: measure the item, define the shipping risk, choose the material that matches the load, test the sample in the real shipper, and finalize the spec before you scale. That is the path I would use for a launch whether I was shipping 1,000 units or 100,000, because the basics do not change just because the order gets bigger. The only thing that changes is how expensive the mistakes become.
Custom e-commerce packaging inserts are at their best when they protect the product, speed the line, and reinforce the brand at the same time, and that is exactly why I would never treat custom e-commerce packaging inserts as a minor detail in a launch plan. Lock the product measurements, match the substrate to the damage risk, run the insert through the real carton, and do not approve production until the packers can load it cleanly without wrestling it. That is the practical line between a package that only looks prepared and one that actually is.
FAQs
What are the best custom e-commerce packaging inserts for fragile products?
For fragile goods, the best custom e-commerce packaging inserts are the ones that match the product’s shape, weight, and failure points rather than just the material name on the quote. A glass candle jar, for example, usually needs corner and rim protection, while a ceramic item may need base support and side restraint. I always test the design in the same shipper and carrier flow used in production, because a design that survives a 12-inch bench drop may still fail after 48 hours of vibration in a parcel network. That extra testing step is the difference between a calm launch and a very frustrating round of returns.
How much do custom e-commerce packaging inserts usually cost?
Pricing depends on material, part complexity, tooling, quantity, and any printing or assembly requirements. In real quotes, I have seen simple paperboard prototypes run a few hundred dollars, while unit cost at volume can fall into the $0.12 to $0.40 range depending on the build. The lowest-cost part is not always the cheapest choice once damage, labor, and shipping waste are counted, and that is why I like to compare landed cost rather than just supplier price. A quote that looks great until the freight and return numbers show up is not actually a great quote.
How long does it take to develop custom e-commerce packaging inserts?
A straightforward set of these internal supports can move quickly, but sample revisions and testing often add time before production starts. A clean project might reach prototype in 5 to 8 business days and production approval in 12 to 15 business days from proof approval, while more complex geometry or print requirements can push that longer. The timeline is usually a mix of measurement, design, prototyping, validation, and final approval, so a 1-week delay in testing often prevents a much bigger delay after launch. I would always rather hear a team complain about a slow sample round than about thousands of damaged shipments later.
Which material is most sustainable for e-commerce packaging inserts?
The most sustainable choice depends on the product, shipping environment, and local recovery system. Fiber-based options like paperboard, corrugated, and molded pulp are often strong candidates when they meet protection needs and do not force oversized cartons or higher damage rates. A good sustainability decision balances recyclability, material use, and breakage prevention, because a recycled-friendly insert that fails in transit is not a good environmental outcome either. I tend to trust the option that lowers waste across the full system, not the one that only sounds good in a sustainability slide.
How do I know if my e-commerce packaging inserts fit correctly?
Your inserts fit correctly when the product sits securely without rattling, pinching, or needing force that could damage the item. The best check is simple: measure real product samples, not just drawings, confirm the fit inside the final shipper, and run a small pilot with vibration, drops, and repeated handling. If the product stays centered, the packer can load it in the same way every time, and the insert still looks clean after transit, you are very close to the right spec. I like to say the insert passes when nobody has to wrestle with it and nothing arrives embarrassed.

