Custom Event Hats Logo Placement Guide: What Buyers Miss
Most event hats are judged from six feet away. Not under a designer’s microscope. This Custom Event Hats logo placement guide is for buyers who want hats people actually wear, not caps that look fine in a mockup and sad in daylight.
Logo placement is not decoration trivia. It affects visibility, embroidery quality, unit cost, sponsor value, wearer comfort, and the odds that the hat survives past the event weekend. A good cap keeps showing up in photos, golf carts, school pickup lines, and airport security bins. A bad one gets donated with the other “free stuff.”
The main placement zones are simple: center front, left front panel, side panel, back arch, closure strap, underbrim, woven patch, leather patch, and all-over pattern. Simple does not mean forgiving. Seams interrupt stitches. Vent holes cut into usable space. Low-profile crowns compress tall artwork. Bucket hats curve in ways flat proofs politely ignore.
Practical rule: choose the location where the logo earns attention without fighting the construction of the hat.
That usually means the primary sponsor or event mark belongs on the front. A date, department name, team icon, or secondary sponsor can sit on the side. Back embroidery works for short text. Not a mission statement. Underbrim printing can be clever, but if that is your only branding location, nobody sees it unless the wearer is staring at the ceiling.
Good placement also protects the budget. Fixing a logo on a proof is cheap. Fixing it after 500 hats are stitched is not. By then, the options are usually “live with it,” “discount the whole order,” or “start over and miss the event.” None of those are delightful.
The goal here is practical: understand the safe zones, match artwork to decoration method, confirm dimensions, and avoid the tiny-logo-on-curved-crown problem that somehow remains alive and well.
How Logo Placement Works on Event Caps and Hats
Hat construction decides what your logo can do. Six-panel caps have a center seam, so direct embroidery across the middle needs artwork that can tolerate that break. Five-panel caps give you a cleaner front panel, which is why they are friendly for patches, screen print, heat transfer, and centered marks.
Trucker caps usually have a structured front and mesh sides. Front branding is strong. Side decoration may be limited, depending on panel material and seam placement. Foam truckers can take bold front print or patches, but tiny embroidered detail often looks clunky.
Dad hats are softer and lower profile. They look relaxed, which is the point, but they do not love tall logos. A 3-inch-wide horizontal mark may work. A tall crest with tiny type may collapse into thread fuzz. Beanies stretch, so simple embroidery, woven labels, and patches usually behave better than fine-line artwork.
Bucket hats need layouts that respect the curve around the crown. A front patch can look sharp if it is not too tall. Wraparound decoration gets risky fast unless the artwork is built for distortion. Visors have limited vertical space, often making a 1.75 to 2.5 inch wide mark more realistic than a large front logo.
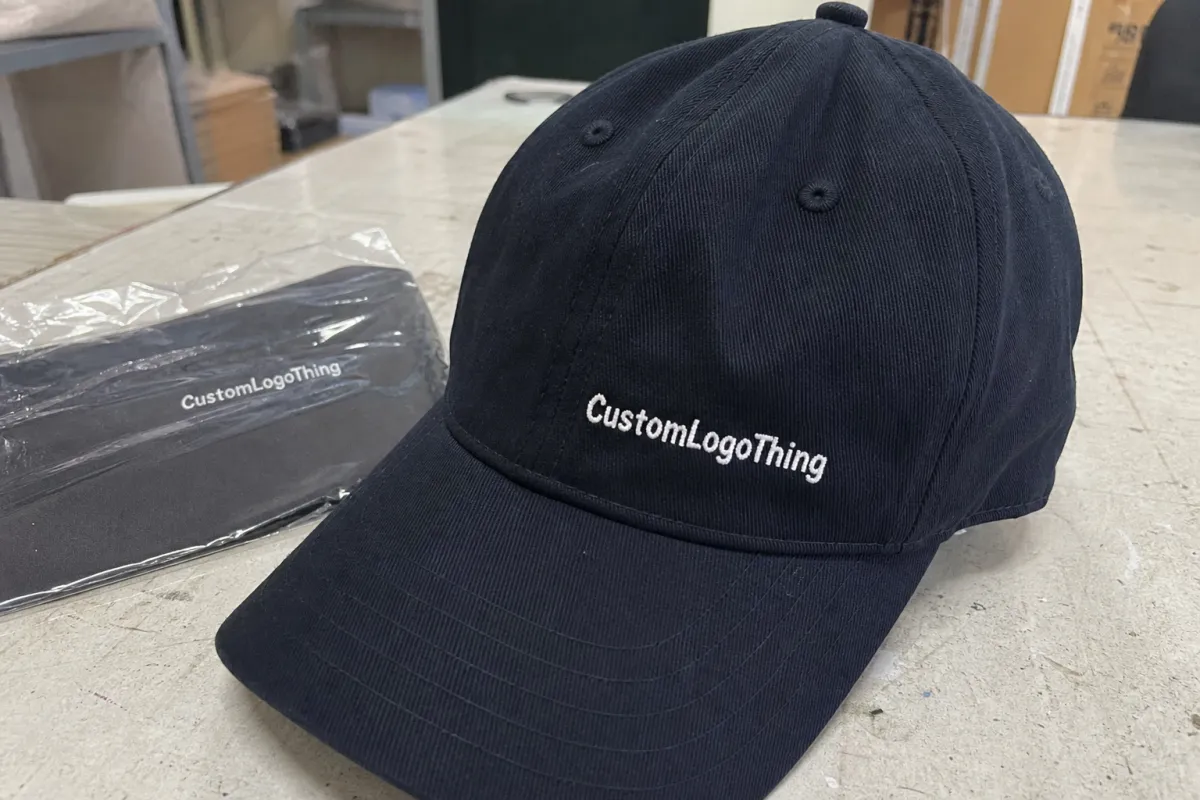
Center front remains popular because it works. It gives the highest visibility in event photos, registration lines, sponsor areas, charity runs, outdoor crowds, and staff uniforms. If people need to recognize the brand quickly, front placement does the job.
Side placements are better as support. Think event dates, short sponsor names, department labels, team icons, or location tags. A side logo can look polished, especially on golf hats and staff caps, but it is weak as the only brand location unless the whole design is intentionally understated.
Back placement has limits worth respecting. Embroidery above the opening can handle short text around 2.5 to 4 inches wide, depending on the closure and crown shape. Woven labels near the strap can look retail-ready. Small text on the closure strap can work, but keep expectations realistic. It is a detail, not the billboard.
Decoration method changes the ideal placement. Embroidery needs stable fabric and simplified artwork. Patches need clean attachment zones. Screen print prefers smoother, flatter surfaces. Heat transfer can handle color, but it dislikes seams, heavy texture, and deep curves. Front embroidery often works best around 2.25 to 3.5 inches wide. Side logos usually sit around 1 to 2 inches. Those are not laws. They are guardrails that prevent expensive nonsense.
Key Factors Before You Choose Front, Side, or Back Placement
Start with the job of the hat. A crowd giveaway needs bold front branding. A VIP gift can handle a quieter mark. Retail-style merch needs restraint, because nobody wants to wear a sponsor wall to brunch. Staff hats need fast recognition from 10 to 20 feet away, especially at festivals, golf outings, charity runs, school events, and trade shows.
Audience behavior matters. Outdoor events benefit from stronger contrast and front placement because hats appear in photos, lines, and moving crowds. Conferences can use cleaner branding because the setting is closer and calmer. Golf outings may justify side sponsor marks, but keep them neat. Golf people notice details. They also complain with impressive efficiency.
Logo shape is the next filter. Horizontal logos usually fit front panels well. Tall crests may need a woven patch or a five-panel cap. Circular marks can work nicely on structured crowns, but they need enough diameter to stay readable. Detailed marks should be simplified before embroidery.
Thin outlines, tiny taglines, gradients, shadows, and little registration symbols are where clean artwork goes to die. Embroidery is not print. Thread has thickness. It spreads, pulls, and stacks. A mark that looks crisp on a business card may turn into a small angry nest at 2.25 inches wide.
Color contrast deserves more respect. Navy thread on a black hat is not “subtle” if nobody can read it. It is invisible. Tone-on-tone can look premium for VIP merch, but only if quiet branding is the goal. For sponsor visibility, choose contrast levels that work in daylight, shade, and indoor photos.
Crown height also controls placement. Low-profile dad hats squeeze vertical logos. Structured trucker caps support bolder front decoration. Bucket hats need curved-friendly layouts. Beanies stretch, so small block text and simple icons behave better than complex badges.
Sponsor hierarchy should be decided before artwork starts. Primary sponsor gets the front or the main patch. Secondary sponsors belong on side panels, back embroidery, woven labels, hangtags, or inside labeling if the budget allows. If five sponsors demand equal front placement, the real issue is not production. It is approval management.
Wearer comfort matters too. Overbranding makes hats feel like walking billboards. That can be acceptable for volunteers working a one-day event. For attendee gifts, it is risky. If you want people to keep the hat, treat it more like branded packaging and custom promotional products: the outside needs to sell the brand without making the person carrying it look like unpaid ad space.
Pricing, MOQ, and Unit Cost by Logo Location
Placement affects cost because every added location adds setup, machine time, handling, proofing, and quality checks. One front embroidery location is usually the most economical branded option. Front plus side plus back decoration can look polished, but the cost climbs because the hat has to be decorated, repositioned, checked, and sometimes re-hooped for each location.
Minimum order quantities vary by supplier, blank availability, decoration method, and season. Simple embroidered caps may start around 48 to 100 units. Custom patches, specialty trims, imported blanks, private-label details, or multiple placements often push practical minimums toward 144, 250, or 500 units. Not always. Often enough that buyers should ask before building a budget around 72 pieces with three decoration locations.
Setup costs can be billed separately or built into the unit price. Embroidery digitizing may run about $35 to $95 per logo. Woven patch setup might land around $75 to $200 depending on size, edge style, and complexity. Leather patch dies, screen setups, and heat-transfer artwork prep can add more. If a quote looks strangely low, check whether setup, freight, proofing, and rush charges are included before celebrating.
| Logo Location or Method | Typical Use | Common Cost Impact | Buyer Notes |
|---|---|---|---|
| Center front embroidery | Main event or sponsor logo | Usually the most efficient branded option | Best around 2.25 to 3.5 inches wide for many caps |
| Side embroidery | Date, department, small sponsor | Adds setup and handling | Keep most side marks around 1 to 2 inches wide |
| Back arch embroidery | Website, location, short phrase | Moderate added cost | Works best with short text above the opening |
| Woven patch | Detailed logos or retail look | Higher setup, better detail | Good for crests, small type, and multi-color marks |
| Leather patch | Premium gifts or VIP merch | Higher perceived value and unit cost | Best for simple debossed or engraved artwork |
| Multiple placements | Sponsor-heavy events | Can increase cost quickly | Ask whether each location has separate setup |
Flat embroidery is efficient for simple logos. 3D puff costs more and needs bold shapes, wider lettering, and fewer small gaps. Woven patches suit detailed marks and small type. Leather patches add perceived value, especially for VIP swag, but they are not magic; a complicated logo still needs simplification. Screen print and heat transfer can work on certain hat styles, but fabric texture, seams, and panel shape matter.
Request pricing in tiers: 100, 250, 500, and 1,000 units. Unit cost often drops once setup is spread across more hats. A basic front embroidered cap might be around $7.50 to $14.00 at lower quantities, depending on blank quality and stitch count. Upgraded patch styles, premium blanks, or multi-location designs may move into the $11.00 to $22.00 range. Freight, rush production, specialty blanks, and individual polybagging can change that quickly.
Do not choose the cheapest placement blindly. A bargain logo nobody can read is not marketing. It is fabric with regrets.
Process and Timeline From Artwork to Finished Event Hats
The production path is straightforward if nobody keeps changing their mind. Choose the hat style. Select logo placement. Confirm the decoration method. Submit production-ready artwork. Review the proof. Approve a sample or detailed mockup. Then production starts.
Artwork should be vector whenever possible: AI, EPS, or a clean PDF. A low-resolution PNG may be fine for a rough mockup, but it is not final production art. Embroidery needs digitizing, which converts the logo into stitch instructions. Patch production needs edge style, thread or material colors, backing, and attachment details. Screen print needs clean separations. Heat transfer needs color and size control.
A proper proof should show logo width, height, placement, thread colors or patch colors, hat color, and any secondary locations. Ask for actual dimensions, not just a pretty floating logo on a hat image. Mockups can lie politely. Measurements do not.
Sampling is smart for large events, sponsor-heavy orders, retail merch, or complicated multi-location decoration. A pre-production sample may add 5 to 10 business days, sometimes more for custom patches, overseas production, or imported blanks. For a 1,000-piece order, that extra time is usually cheaper than discovering the logo sits too low on every crown.
Simple domestic blank orders can sometimes move in 7 to 12 business days after proof approval. More typical decorated hat orders often need 12 to 20 business days. Custom patches, specialty colors, large quantities, or overseas production may need 25 to 45 days or more. Shipping time is separate. So is the time your committee spends debating whether the logo should be “just a little bigger.” Naturally, that request arrives after everyone approved the proof.
Build in buffer time for artwork cleanup, proof revisions, sample review, shipping, receiving, and event setup. If the order includes hangtags, belly bands, cartons, or retail packaging, confirm those items on the same schedule. Paper-based hangtags and packaging may involve sourcing claims, board specs, carton strength, and transit testing. Organizations such as the Forest Stewardship Council publish guidance around responsible paper sourcing, and ISTA provides testing standards for packaging performance.
Lock placement early. Changing from front embroidery to a woven patch can reset pricing and timing. Adding side logos midstream can trigger new proofs, new setup, and more handling. The smart move is boring: decide the visual hierarchy before the supplier starts building the order.
Step-by-Step Placement Decision Guide for Buyers
Use this Custom Event Hats logo placement guide as a decision path, not a decoration buffet. More locations do not automatically mean a better hat. Often they just mean more invoices.
- Identify the hat’s job. Is it an attendee giveaway, staff uniform, sponsor gift, retail merch item, team gear, or VIP swag? A staff hat needs visibility. A retail-style cap needs taste. Those are not the same assignment.
- Choose the main visibility zone. For most event hats, center front is the safest answer. If the design is fashion-driven or premium, a left front patch or small woven label can work.
- Simplify the logo. Remove tiny taglines, thin outlines, gradients, shadows, and small secondary text. Embroidery often struggles with lettering under roughly 0.18 inch high, depending on font, stitch density, and fabric.
- Match logo width to hat shape. Keep front artwork readable without pushing it so wide that it bends awkwardly around the crown. A 3-inch wide logo often feels balanced on structured caps; a low-profile dad hat may need less height.
- Add secondary placements only with a purpose. Sponsor recognition, date and location details, staff identification, or team grouping are valid reasons. “Because there is empty space” is not.
- Select the decoration method based on artwork. Embroidery suits simple marks. Woven patches handle detail. Leather patches signal premium. Screen print works on specific flat styles. Heat transfer can help with color-heavy designs if the surface cooperates.
- Request a proof with actual dimensions. The proof should state logo width, height, placement distance from seams or brim, thread colors, patch size, and hat style.
For buyers who also manage custom printed boxes and product packaging, the logic should feel familiar. Package branding works when hierarchy is clear. Hat branding works the same way. One main message. Supporting details. Clean contrast. No clutter pretending to be strategy.
One more buyer note: ask how placement will be centered. Centered on the front panel and visually centered on the crown are not always identical, especially with seams, curved panels, and off-center marks. A good proof should clarify the intent before production starts.
Common Logo Placement Mistakes That Make Hats Look Cheap
The first mistake is placing a detailed logo across a seam and expecting it to stitch like a business card. Hats are curved. Thread has limits. Physics remains undefeated.
The second mistake is making the logo too small for the event setting. If hats are meant to show up in crowd photos, booth traffic, charity runs, outdoor activities, or sponsor recaps, a 1-inch front mark may look precious on the proof and invisible in real life. For visibility, stay closer to the 2.5 to 3.25 inch front range unless the hat is deliberately understated.
Third, buyers use too many placements at once. Front logo, left sponsor, right sponsor, back website, underbrim slogan, woven label, and custom taping can make a cap feel less like merch and more like a NASCAR hood. Yes, sponsors want exposure. No, that does not mean every square inch needs embroidery.
Fourth, hat structure gets ignored. Unstructured dad hats, foam truckers, flat brims, bucket hats, beanies, and visors do not share the same safe decoration zones. A design that looks great on a five-panel camper cap may fail on a six-panel cap with a center seam. A patch that sits cleanly on a structured crown may pucker on soft fabric.
Fifth, contrast gets treated like an afterthought. Tone-on-tone can look elegant, especially for VIP gifts or understated retail packaging tie-ins, but it needs controlled expectations. If sponsor visibility matters, choose thread, patch, or leather colors that stand apart from the hat body.
Sixth, buyers approve mockups without checking real measurements. Ask whether the logo is centered on the panel or visually centered on the crown. Check placement distance from the brim. Confirm thread colors using available thread charts, not monitor guesses. Screens lie. Thread is real.
Seventh, back and side placement gets assigned important information without considering hair, sunglasses, ponytails, hoods, collars, headphones, or closures. A website stitched above the back opening may disappear if the wearer has long hair. A side sponsor may hide under sunglasses or a headset. Placement lives on a human head, not a flat template.
Eighth, buyers forget the order will be inspected by humans at speed. Dense stitching, awkward seams, high-contrast thread, and tiny type make defects easier to spot and harder to control. Quality checks should confirm logo position, thread color, loose threads, puckering, patch alignment, and consistency across sizes or hat colors. If an order uses mixed hat colors, proof each colorway. Do not assume one thread color works on all of them.
A useful placement plan prevents these errors before they cost money. The best fix is not glamorous: simplify the art, check the dimensions, respect the hat shape, and approve the proof slowly.
Next Steps Before You Request a Hat Quote
Before asking for pricing, gather the basics. You need hat style, quantity, event date, logo file, preferred placement, backup placement, decoration method, and shipping location. If any of those are missing, the quote will either be vague or padded with assumptions.
- Hat style: six-panel cap, five-panel cap, trucker, dad hat, bucket hat, beanie, or visor.
- Quantity: ask for 100, 250, 500, and 1,000 unit tiers if you are not locked in yet.
- Artwork: provide vector files and a simplified version for embroidery or patches.
- Placement: name the primary location first, then any secondary locations.
- Decoration: embroidery, woven patch, leather patch, screen print, or heat transfer.
- Deadline: include the event date and the date hats need to be in hand, not shipped.
Prepare one primary logo and one simplified version. The full brand mark may work beautifully on signage, product packaging, or custom printed boxes, then fail at 2.5 inches wide in thread. That is normal. Small-format branding needs editing.
Ask for two quote versions: one clean single-location option and one upgraded option with a patch or secondary placement. This makes the tradeoff visible. Guessing is how budgets get weird.
Before approval, confirm logo width, height, thread colors, patch size, location, hat color, quantity, unit cost, setup charges, shipping method, and production timeline. If the order includes hangtags, belly bands, cartons, or retail packaging, keep the visual system consistent with your broader Custom Packaging Products. Good package branding and good hat branding both need hierarchy, contrast, and restraint.
Use this Custom Event Hats logo placement guide as a checklist before approving artwork. Placement is easy to fix on paper, mildly annoying to fix during proofing, and expensive to fix after production. That is the whole argument, really.
FAQ
What is the best logo placement for custom event hats?
Center front is usually the best placement for event hats because it gives the strongest visibility in crowds, photos, registration areas, and sponsor spaces. Side or back placements work better as secondary branding for dates, small sponsor logos, team names, or event details. If the logo is highly detailed, a woven patch on the front may look cleaner than direct embroidery.
How large should a logo be on custom event caps?
Most front cap logos work well around 2.25 to 3.5 inches wide, depending on the hat style and logo shape. Side logos are usually smaller, often around 1 to 2 inches wide, because the panel area is limited. Always approve the actual measurement on the proof, not just the mockup image.
Does logo placement affect the cost of custom event hats?
Yes. Each added logo location usually adds setup, production time, handling, and inspection. A single front embroidery is typically more budget-friendly than front plus side plus back decoration. Patch styles, 3D puff embroidery, specialty trims, and multi-location branding usually increase unit cost.
What logo placement works best for sponsor event hats?
Put the primary sponsor or event logo on the front for maximum visibility. Use side panels or back embroidery for secondary sponsors, dates, locations, or short text. Avoid crowding five sponsor logos on the front unless the goal is to make nobody happy.
When should I finalize logo placement before hat production?
Finalize placement before the proof is approved, because changes after approval can delay production and change pricing. For large orders or sponsor-heavy events, approve a sample or detailed production proof before full manufacturing. Build in extra lead time for artwork cleanup, patch production, revisions, and shipping.


