A five-panel cap gives the front panel enough uninterrupted space for a patch to read cleanly. That is why custom five-panel Caps with Logo Patches usually outperform busier headwear styles: the mark has room, the crown stays flatter, and the first impression is faster. A strong front panel does a lot of work in a very small space.
From a packaging buyer's point of view, this is really about control: control of the surface, the texture, the first impression, and the budget. A cap can do the same kind of branding work that a carton or insert does on a shelf. It should communicate quickly, feel intentional, and avoid small production mistakes that make the whole order look rushed.
If the cap is part of a larger kit, the same logic applies to the box, insert, and hang tag. Keep the finish and color logic aligned instead of treating the headwear as a separate afterthought. The Custom Packaging Products page is useful if you are comparing packaging formats for a bundled launch.
Custom five-panel caps with logo patches: what they solve
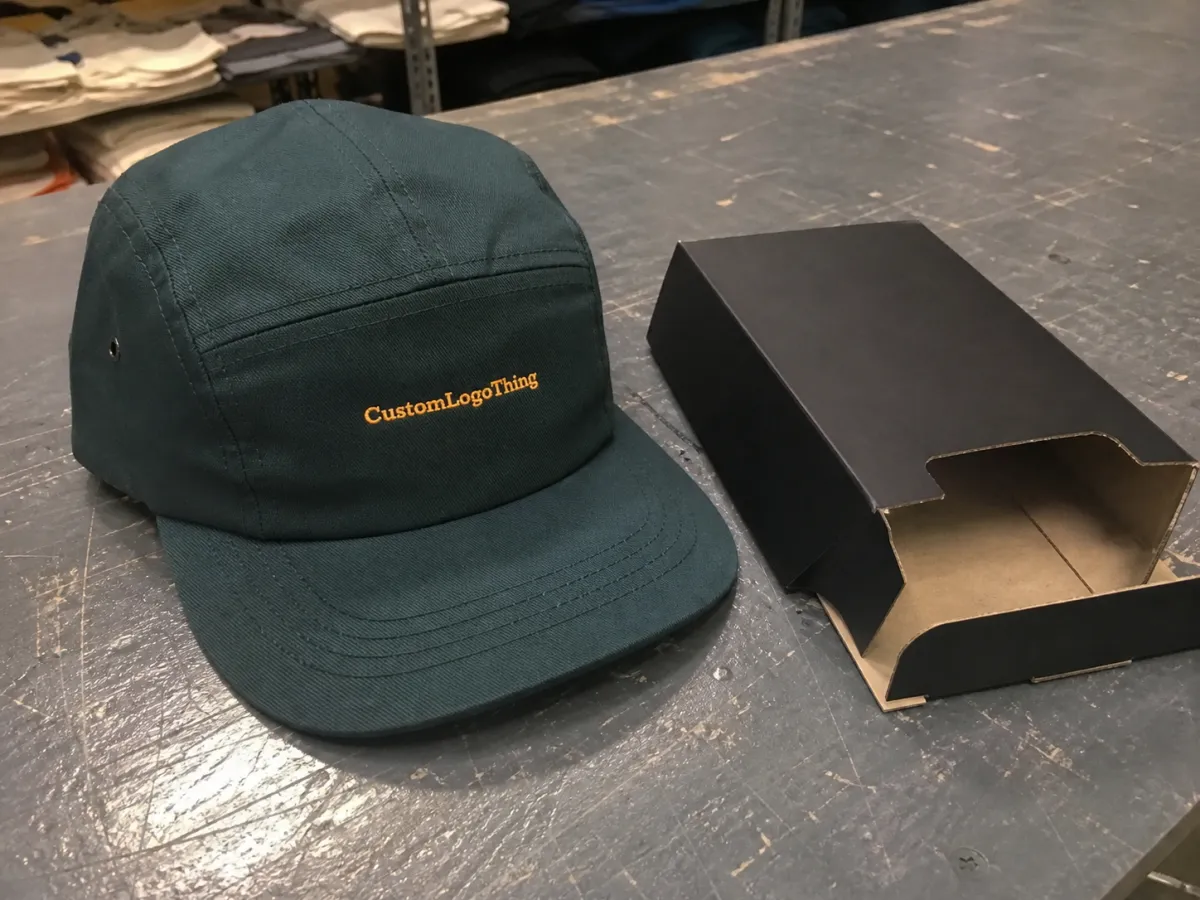
Five-panel construction gives you a flatter front than many six-panel styles, so the patch usually looks cleaner and more retail-ready. That is not a tiny detail. On a shelf, at a merch table, or in a photo, clean front geometry makes the logo easier to read from a distance of six to ten feet. That is often the difference between a cap that looks like a giveaway item and one that feels like merchandise with a point of view.
Custom five-panel caps with logo patches fit merch drops, event uniforms, startup kits, outdoor brands, and retail tie-ins where one strong mark has to carry the design. They also work well in press kits and welcome boxes because the flat front makes the patch feel deliberate instead of crowded. The cap has to justify its place in the package before anyone even puts it on.
The cap is doing two jobs at once. It needs to wear comfortably, and it needs to look good hanging on a peg, sitting in a shipper, or stacked in a display. That means patch size, backing, crown depth, and front-panel structure all matter. A soft patch on a thin crown can flop. A stiff patch on a shallow crown can buckle the front. Neither result helps the brand.
A smart cap order starts with the mood, not the artwork file. Premium, rugged, sporty, and workwear all push you toward different patch materials and attachment methods.
In practice, buyers who start with the intended feel get better samples faster. If the goal is premium, leather or woven patches usually make sense. If the goal is a harder-wearing utility look, PVC or dense embroidery may be the better fit. If the cap sits inside a broader packaging system, the patch should echo the same visual language as the box and insert instead of fighting them.
How patch construction works on a five-panel cap
Logo patches can be woven, embroidered, PVC, leather, felt, or printed. Each one changes the texture, the amount of detail you can show, and how the cap ages after repeated wear. Woven patches are better when the logo has small type or fine edges. Embroidery gives texture and a familiar retail feel. Leather leans premium. PVC feels bold and tough. Felt can read soft and heritage-driven, but it is not always the best choice for daily wear.
Attachment matters just as much as patch material. Sewn-on patches are usually the safest for long-term wear. Heat-applied options are faster and sometimes cheaper, but they are more sensitive to fabric choice and crown construction. Hybrid methods, where a patch is tacked and then stitched or heat-set after placement, are common on more premium runs because they help the patch sit flatter and resist edge lift.
| Patch type | Best use | Detail level | Typical add-on cost per cap |
|---|---|---|---|
| Woven | Small text, crisp logos, clean retail look | High | $0.35-$0.80 |
| Embroidered | Classic texture, stronger visual depth | Medium | $0.30-$0.90 |
| Leather | Premium, heritage, outdoors, lifestyle brands | Medium | $0.45-$1.20 |
| PVC | Bold branding, durability, workwear | Medium | $0.60-$1.40 |
| Printed | Color-heavy art, fast visual approval | Medium to high | $0.25-$0.70 |
Patch thickness has to match the front-panel structure. Too stiff, and the crown starts to fight the patch. Too soft, and the logo loses shape quickly. The best art files are also simpler than many buyers expect. Tiny copy, hairline rules, and crowded icons usually look worse once the patch is reduced to cap size. A patch is not a poster. It is a small object viewed in motion.
For fine text, woven patches usually handle detail better than embroidery because the threads can hold tighter edges. As a practical rule, lettering smaller than about 4.5-5 pt often starts to fill in on a woven patch, and embroidered letters need even more breathing room. On ship-in-kit programs, transit standards matter too: ISTA is relevant if cartons are expected to protect crown shape, while FSC matters if the order includes paper hang tags, inserts, or mailers.
What drives cost, MOQ, and unit price
Cost is driven by patch material, stitch count, patch size, backing, cap fabric, and whether the logo needs extra placement or multiple colors. A simple one-color woven patch on a standard cotton twill cap is not the same job as a full-color leather-backed patch on a brushed twill crown with color-matched thread. The quote should reflect that difference, or the buyer gets surprised later. That kind of surprise is usually expensive.
MOQ matters because setup costs get spread across the run. Small orders often carry a higher unit price even when the cap itself looks identical. Many suppliers will quote low minimums for stock blanks with standard patches, but once you ask for custom fabric, specialty backing, or a patched crown that needs extra labor, the minimum can rise quickly. In practice, 100-250 units is common for simpler runs, while 300-500 units is a more realistic floor for fully custom decoration.
A realistic landed unit price for custom five-panel caps with logo patches often lands around $3.20-$6.80 at higher quantities, while smaller orders can sit closer to $5.50-$10.00 once setup, sampling, and packing are included. That spread is normal. It is also why a quote that only lists the cap price is only half a quote. Ask for a landed number, not just a unit number.
Typical cost drivers buyers miss
- Patch edge finish: embroidered borders and laser-cut edges usually cost more than a simple cut edge.
- Backing method: sew-on is dependable; heat-seal or adhesive backings can add process steps or risk.
- Color count: more colors can mean longer setup and higher patch production cost.
- Cap fabric: brushed cotton, ripstop, canvas, and recycled blends do not price the same way.
- Packing spec: individual polybags, size stickers, and retail folding all add labor.
Cheapest usually means thinner panels, simpler closures, fewer patch options, or lower-grade backings that do not wear as well. That is fine if the cap is a one-time giveaway. It is a mistake if the cap is meant to sell a brand or hold up on repeat wear. Saving forty cents does not help if the first complaint arrives after a week of use.
Production process and turnaround timeline
The production process usually moves in stages: spec the cap, approve art, confirm the patch sample, lock color references, then move into bulk production. On a clean run, a straightforward order can move from approved proof to bulk completion in roughly 12-18 business days after sample signoff. If the patch is custom-shaped, color-critical, or unusually detailed, 3-5 extra business days is a normal buffer.
Simple patch shapes and standard materials move faster. Custom dies, specialty finishes, and mixed decoration add time because each step needs a separate check. If a supplier is also handling branded packaging components at the same time, ask how the work will be queued. One late proof can delay the whole batch, and the clock usually does not care why it happened.
If color accuracy matters, build in sample time. Screens are convenient, but a physical sample tells you whether the patch actually works on the cap. It also shows whether the front panel sits flat once stitched, whether the crown depth feels right, and whether the patch edge looks too sharp or too soft. A digital mockup cannot tell you that.
Turnaround should be discussed by stage, not only as one total number. Ask for timing on proofing, sampling, bulk production, and freight separately. That makes delays easier to spot early. It also helps you decide whether a faster patch style is worth the tradeoff. A woven patch can be easier to approve than a complex embossed leather option, even if the final visual difference is subtle on paper.
Design specs that change fit, texture, and durability
Front-panel size and seam placement define how large the patch can be before it starts fighting the crown. On a five-panel cap, you usually get more usable front space than on a seam-heavy six-panel style, but there is still a limit. A patch that is too wide will crowd the visor line or start curling at the edges. A patch that is too tall can make the cap feel top-heavy. Good placement is not about filling space. It is about keeping the front calm.
Material choice affects fit more than buyers expect. A 100% cotton twill cap around 280-340 gsm usually holds a patch well without feeling stiff, while brushed cotton can feel softer but still keep the front panel structured. Ripstop and lighter recycled polyester blends are useful for performance programs, though they may need more careful backing choices so the patch does not ripple. Fabric weight, crown depth, and sweatband material all shape the final wear experience.
Closure style changes the wear and the buyer profile. Snapback, strapback, and fitted styles all affect comfort, price, and resale appeal. Snapbacks are common for merch and event programs because they are easy to size. Strapbacks can feel a little more refined. Fitted caps have more precise sizing and less flexibility, which can be good for retail sets but awkward for broad giveaway programs. The closure should match the audience instead of following habit.
Patch finish changes the message fast: matte leather feels premium, woven feels crisp, embroidery feels classic, and PVC feels bold and durable. Texture is part of the branding. A glossy patch on rough canvas tells a different story than a flat woven patch on brushed twill. The right combination can support a broader brand system, especially if the cap sits beside a box, tag, or mailer with the same visual language.
Specs worth confirming before you approve
- Crown depth: deep enough for comfort, not so tall it slouches.
- Visor curve: flatter for modern retail looks, more curved for classic wear.
- Sweatband material: cotton feels familiar; performance blends dry faster.
- Panel fabric weight: lighter fabrics feel softer, heavier ones hold shape better.
- Patch backing: sew-on, heat-applied, or hybrid, depending on durability needs.
The visor curve, sweatband, and crown depth matter if the cap is meant to be worn all day instead of just photographed. That is where many buyers get tripped up. A cap can look perfect in a render and still sit awkwardly on a real head. Real wear is less forgiving than marketing art, which is why sample approval is worth the extra step.
Step-by-step ordering checklist for clean approvals
Define the use case first. Merch, retail, uniforms, and giveaways all want different budgets, materials, and patch styles. If the cap is going into a retail program, detail, hand-feel, and packaging presentation matter more. If it is for field staff, durability and comfort move higher on the list. If it is a giveaway, the order may tolerate a simpler patch and a lower-cost closure.
Choose the patch material after you compare samples, not before. The right texture can rescue weak art; the wrong one can flatten a good logo. Ask to see at least two options side by side if the budget allows it. One of the clearest comparisons is woven versus embroidery, or leather versus PVC, because the difference is obvious once they are in your hand.
Lock size, placement, and color limits before requesting mockups. That cuts down on revision loops and avoids approval drift. A lot of delays happen because the buyer keeps changing the same three things in different words. Be concrete instead: patch width in millimeters, patch location in millimeters from center seam, and exact thread or print colors. If the logo has small type, define the minimum readable size in advance. Precision saves time. Vague language burns it.
If a supplier cannot quote the cap, patch, and packing separately, the order is probably too loosely defined.
Approve a sample only after checking legibility, seam interference, edge finish, and whether the cap still wears comfortably. Hold it at arm's length. Look at it in daylight. Put it on a head. Fold it into a carton if it will ship retail-ready. Those checks catch problems that mockups hide. They also help if the cap is part of a larger branded-kit rollout and needs to look coherent next to other items.
Common mistakes that make patch caps look cheap
Overcomplicated logos collapse on small patches. Thin lines, tiny type, and crowded icons turn into visual noise. The artwork may look impressive on a screen, then turn into a messy blur once it is shrunk to cap size. If the logo needs a microscope, it is too detailed for a front patch.
Choosing a patch style that fights the fabric creates puckering, crooked edges, and a crown that never sits flat. A thick patch on a soft, low-structure cap is asking for trouble. So is a heat-applied patch on fabric that does not hold adhesive well. The materials have to cooperate, or the cap spends the rest of its life looking slightly off.
Ignoring MOQ and setup math can wreck the budget fast. A low quote is not a good quote if every change gets expensive later. Ask whether the patch die, digitizing, color matching, and packing are all included. Ask what happens if you change placement after sample approval. Ask what the freight estimate is based on. These questions are not annoying. They are the difference between an informed buy and a guess.
Skipping a physical sample because the mockup looked fine is how buyers end up with a cap that feels louder, rougher, or smaller than expected. Mockups help with composition. They do not tell you how the patch edge sits against the panel or whether the crown collapses after a few wears. That is why experienced buyers sample first when the order matters.
- Centering: a drift of a few millimeters is visible on a flat front panel.
- Thread tension: too tight puckers the fabric, too loose makes the patch look tired.
- Edge clean-up: loose fibers or rough die cuts are obvious under daylight.
- Wear test: the cap should hold shape after being put on, removed, and packed again.
What to lock before pricing
Shortlist two or three patch materials and decide whether the look should feel premium, sporty, or utility-driven before sending artwork. That one decision makes the rest of the spec easier. It also stops the quote process from turning into six rounds of "one more version," which slows everything down.
Measure the usable front-panel space and write down a maximum patch width so suppliers quote the same spec instead of guessing. If the cap has a shallow crown, say so. If the patch must stay below a seam line, note it. If the logo includes small type, specify the minimum finished size. The more concrete the brief, the less room there is for expensive interpretation.
Ask for sample photos, turnaround by stage, and a line-item quote that separates setup from unit cost. If the order also includes packaging, ask how the cap fits into the larger rollout. That matters for timing, especially if you are bundling with mailers, inserts, or other branded components. The cap should not become the item that drags the schedule.
Use the same Checklist Before You buy custom five-panel caps with logo patches: legibility, placement, backing, fit, and delivery window. If those five things are clear, the order usually goes much smoother. If they are fuzzy, the quote will be fuzzy too. And fuzzy quotes have a habit of getting more expensive once production starts.
FAQ
How do custom five-panel caps with logo patches compare to six-panel caps?
Five-panel caps usually give you a flatter, cleaner front, which helps patches read faster from a distance. Six-panel caps can work too, but the seam layout often interrupts larger front patches more noticeably. If the logo needs to feel bold and simple, five-panel usually has the advantage.
What patch type is best for custom five-panel caps with logo patches?
Woven patches are best when you need fine detail and crisp text. Embroidery works well for texture and a classic look, while leather or PVC pushes the cap toward premium or rugged styling. The best choice depends on logo complexity, wear conditions, and how polished the final cap needs to feel.
What MOQ should I expect for five-panel caps with logo patches?
MOQ depends on the supplier, patch method, and cap style, but small orders usually cost more per unit. Stock blanks with standard patches can sometimes start at 100-250 units, while more customized runs often land closer to 300-500. If you need a test run, ask for the smallest viable production batch and compare the real landed price.
How long does production take for custom five-panel caps with logo patches?
Timeline usually depends on sample approval, patch complexity, and whether your artwork needs revisions. A straightforward run can often move from approved proof to bulk completion in 12-18 business days, with sample work adding a few days before that. Specialty finishes, custom shapes, or extra approval rounds extend the lead time.
Can I order custom five-panel caps with logo patches without a sample?
Yes, but it is risky if color match, texture, or patch thickness matters to the final product. At minimum, request a digital proof with exact placement and sizing. For premium orders, a physical sample is the safer move because it reveals fit and finish problems that a screen cannot show.

