Buyer Fit Snapshot
| Best fit | Custom Paperboard Box Inserts projects where brand print, material claims, artwork control, MOQ, and repeat-order consistency need to be specified before quoting. |
|---|---|
| Quote inputs | Share finished size, material target, print colors, finish, packing count, annual reorder estimate, ship-to region, and any compliance wording. |
| Proofing check | Approve dieline scale, logo placement, barcode or warning zones, color tolerance, closure strength, and carton packing before bulk production. |
| Main risk | Vague material claims, crowded artwork, missing packing details, or unclear freight terms can make a low unit price expensive after revisions. |
Fast answer: Custom Paperboard Box Inserts: Design, Cost, and Fit should be specified like a repeatable production item. The safest quote records material, print method, finish, artwork proof, packing count, and reorder notes in one written spec.
Production checks before approval
Compare the actual filled-product size with the drawing, then confirm tolerance on folds, seals, hang holes, label areas, and retail display edges. Reserve space for logos, QR codes, warning copy, and material claims before decorative graphics fill the panel.
Quote comparison points
Review material grade, print process, finish, sampling route, tooling charges, carton quantity, and freight assumptions side by side. A quote is only useful when the supplier can repeat the same color, closure quality, and packing count on the next order.
Custom Paperboard Box Inserts: Design, Cost, and Fit
Most product damage starts with movement, not with the outer carton. A box can look solid on a shelf and still let the contents rattle, rub, or tip during transit. That is why custom paperboard box inserts matter so much: they hold the product in place, separate components, and make the opening experience feel controlled instead of chaotic. The shipping box usually gets the blame because it is the part everyone sees first. The insert is often the piece that decides whether the product arrives clean or damaged.
From a packaging buyer’s perspective, custom paperboard box inserts are not filler. They are part of the protection plan, part of the product presentation, and part of the brand story. Cosmetics, candles, drink kits, electronics, and subscription packs all rely on an interior structure that does more than occupy space. The insert has to hold, protect, and present in one move. If it only does one of those jobs, the design is incomplete.
If you already work with Custom Packaging Products, you already know the difference between a carton that merely contains something and a package that actually manages the customer experience. A well-built insert speeds up packing, reduces freight damage, and makes the unboxing feel deliberate. A poor one creates scuffed finishes, uneven spacing, loose parts, and a steady stream of rework that no production team wants to babysit.
What Custom Paperboard Box Inserts Actually Do
Custom paperboard box inserts solve a simple problem in a very specific way: they stop motion. If a bottle can drift half an inch in transit, it probably will. If a compact can bump a lid, it will. If a multi-piece kit has room to bounce around in a mailer, that is exactly what it will do. The insert creates a shaped pocket for each item so the product stays controlled from packing through delivery.
That sounds basic because packaging often is basic at its core. Good structural work does not need to be dramatic; it needs to be accurate. The insert keeps one item or several components fixed in position, which prevents the product from grinding against the carton wall or colliding with another piece in the set. It also changes how the package feels when the customer opens it. Clean spacing, aligned parts, and no loose crumpled filler give the package a finished, intentional feel.
In practical use, custom paperboard box inserts handle four jobs at once:
- Protection: They reduce impact and abrasion by limiting movement.
- Separation: They keep accessories, refills, or multiple SKUs from touching.
- Presentation: They frame the product so the first reveal feels orderly.
- Operational control: They help packers place every item in the same position.
That last point matters more than people usually admit. If a structure is awkward to use, the pack line will find a shortcut, and then the precision you paid for disappears in production. I have seen this happen with Custom Printed Boxes and branded packaging programs that looked polished in a mockup but got messy once real people had to assemble them. A good insert should make packing simpler, not theatrical.
The most common applications include cosmetics, fragrances, candles, drink assortments, electronics accessories, subscription kits, and premium retail packaging. In those categories, custom paperboard box inserts often replace loose kraft paper, air pillows, or generic dividers because the buyer wants the package to feel cleaner and the product to arrive in one piece. They are especially useful when the box holds odd shapes, fragile finishes, or multiple parts that need to stay separated.
Think of the insert as quiet insurance. It does not need applause. It needs to work every time.
How Custom Paperboard Box Inserts Work Inside the Box
Custom paperboard box inserts work through geometry, not magic. Tabs, folds, slots, die-cuts, and retention points create pressure in the right places so the product cannot wander around. The structure braces the item without turning packing into a wrestling match. That balance is the entire point of the design.
Paperboard performs well because it is light, printable, easy to die-cut, and flexible enough to fold into useful shapes without becoming expensive too quickly. For many retail packaging and mailer applications, it delivers enough compression resistance to keep light to medium-weight products steady. It also pairs well with branded packaging, since the interior can carry color, pattern, logo placement, or a simple premium finish depending on the look you want.
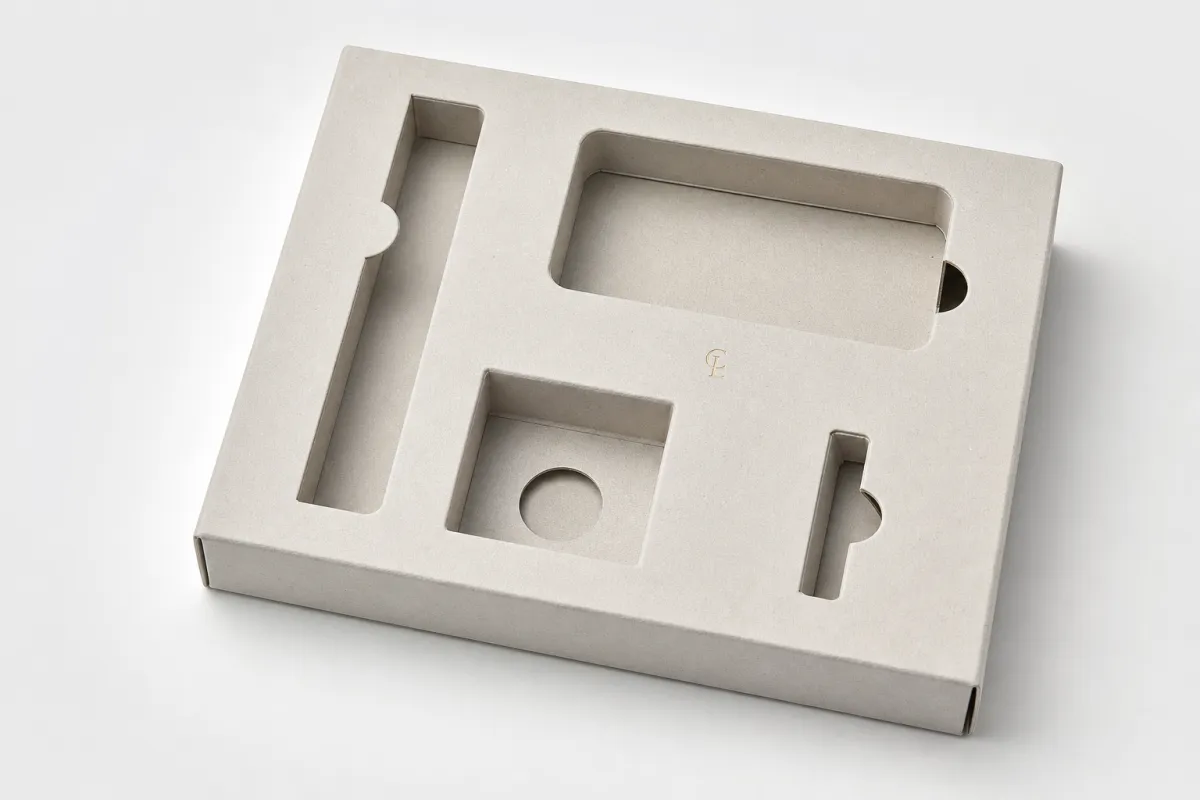
Common structures you will see
There are a few standard approaches. A single-cavity holder centers one item. A multi-compartment divider separates multiple products or components. A shoulder-style insert lifts the product to a visible reveal height, which is common in premium gift packaging. Wrap-around supports hug irregular items such as bottles or accessory kits. Custom paperboard box inserts can also include nested trays, corner supports, or fold-in locking walls when the geometry needs more control.
Some brands want the insert to disappear into the background. That works when the product itself should stay front and center. Other brands want the insert to become part of the reveal, especially in custom paperboard box inserts used for cosmetics or tech accessories. The goal is not to make every interior look alike. The goal is to match the insert to the product, the carton, and the packing method.
The tradeoff is straightforward. Tighter retention improves protection, but too much pressure slows assembly and can scuff delicate finishes. Loose retention speeds things up, but then the structure is little more than decoration. The right design creates enough friction to hold the item in place while still letting a packer seat it without fighting the carton every time.
For that reason, custom paperboard box inserts should be designed with assembly behavior in mind. Ask how the product enters the cavity. Does it drop in from the top, slide in from the side, or require a twist to seat correctly? Does the insert allow room for labels, cables, clips, or protective wrap? Can the packer repeat the motion hundreds of times without fatigue? A technically sound insert that is miserable to use is still a weak insert.
For brands balancing product packaging performance with a clean look, the simplest structure that still controls movement is often the right answer. That usually means fewer parts, clearer folds, and realistic tolerances. Fancy structures can work well, but they have to earn their keep on the line and in transit.
One practical detail gets overlooked all the time: paperboard inserts are not ideal for every product. Very heavy glass, sharp metal hardware, or unusually fragile parts may need corrugated support, molded pulp, or a hybrid structure. Paperboard can do a lot, but it cannot ignore physics. That is the kind of honest constraint that saves a project from later headaches.
Key Factors That Affect Fit, Strength, and Branding
If custom paperboard box inserts fail, the cause usually traces back to one of three issues: poor dimensions, the wrong material choice, or a finish that does not match the product’s actual weight and handling. Buyers often focus on the carton size and treat the insert as an afterthought. That is backwards. The insert is the part doing the controlling.
Start with the product dimensions. Measure the item, the closure, any cap or nozzle, the accessory set, and any protective wrap that will stay on during shipping. A bottle with a pump is not the same as a bottle without one. A candle in a glass jar is not the same as the same jar inside a sleeve. A difference of 1 to 2 mm can be enough to make the fit too tight or too loose, especially in compact retail packaging formats.
Weight and fragility come next. Light cosmetics may work with a thinner paperboard insert, while glass, metal components, or denser electronics may need deeper support or a different structure. The walls, folds, and contact points have to match the load. If the item is tall and top-heavy, the insert needs to support the upper mass as well as the base. Otherwise the product tips, and the carton gets blamed again.
Material choices that actually change performance
Paperboard thickness, caliper, flute choice if corrugated is involved, fold quality, and finish all affect how custom paperboard box inserts behave. Common insert materials include 14pt to 24pt SBS or C1S board, and heavier paperboard in the 300-500 gsm range for stronger holding power. Higher caliper is not automatically better. Flimsy board usually creates the same tired result: rounded folds, weak tabs, and a structure that looks fine in a file and sloppy in a carton.
Finish also affects branding. White board inside a luxury set can look crisp and clean. Natural kraft can feel more earthy and restrained. A printed interior can extend the outer carton story and strengthen package branding. Not every brand needs a dramatic reveal, though. Sometimes the smartest choice is a clean, well-cut insert with a few printed touchpoints and the rest left plain.
Manufacturing limits matter as much as finish. The sharper the cut and the tighter the cavity, the more likely tolerance issues become. A cavity that looks perfect on screen may fail in production once coating, print gain, or fold variance show up. Good packaging design includes realistic allowances instead of wishful thinking. That is why prototype testing matters before you approve a full run of custom paperboard box inserts.
For brands comparing Custom Packaging Products, the right insert choice often comes down to how much premium feel you want versus how much production risk you can tolerate. Pretty is helpful. Fit is non-negotiable.
Production Process and Lead Time for Custom Paperboard Box Inserts
The production path for custom paperboard box inserts is usually straightforward, but only if the brief is complete. The best process begins with a clear product dimension sheet, a few photos of the item and its accessories, the intended shipping method, and a decision about whether the insert is meant for retail display, e-commerce, or both. That information saves time later, which is rare enough in packaging to be appreciated.
From there, the supplier or packaging team develops a structural concept and then a prototype or sample. The sample stage is where hidden problems show up. The cavity is too loose. The pull-out tab is awkward. The closure rubs the product. The assembly sequence takes longer than expected. Catching those issues on a sample costs far less than discovering them after a full run of custom paperboard box inserts has already been cut and shipped.
Lead times vary by complexity. A simple insert can move through sampling and production faster than a multi-part branded structure with special folds or print on both sides. As a rough planning range, a plain structural sample may take a few business days, while full production often falls somewhere around 10 to 20 business days after approval, depending on quantity and the workload already in front of it. Add more time for complex artwork, revisions, hand assembly, or a long queue of approvals sitting in someone’s inbox.
Projects also slow down when the spec changes midstream. If the product dimensions change, the print file changes, or the carton style changes after the insert has been engineered, the sample often has to be redone. That is normal, but it should be planned for. The phrase “just one small revision” has burned more budgets than most line items ever will.
If the insert will be hand-folded or hand-packed, labor belongs in the schedule. A structure that seems fast in theory may be slow once a real team has to fold it thousands of times. Experienced teams test the pack flow, not only the fit. A well-designed insert should protect the item and keep the line moving at a sensible pace.
The best insert is the one the packer does not have to fight. If the structure slows the line, the packaging is not finished, even if the drawing looks beautiful.
For shipping validation, many teams reference ISTA test methods or similar package testing standards. The right test depends on the distribution channel, the product weight, and the level of risk you want to prove out. That is where custom paperboard box inserts move from design decision to performance component.
Custom Paperboard Box Inserts Cost and Pricing Drivers
Custom paperboard box inserts are usually priced by material, complexity, quantity, and finishing. That sounds obvious, yet buyers still get surprised because the first quote reflects the design they asked for, not the one they accidentally created. A simple one-piece insert and a nested multi-cavity structure are not the same thing, even if both happen to fit in the same outer box.
The biggest price drivers are board thickness, die-cut complexity, print coverage, quantity, and whether the insert is standard structural work or a fully custom build. MOQ matters because setup costs get spread across fewer pieces on short runs. That is why low-volume projects often look expensive per unit. The math is not mysterious; it is just stubborn. If you order 500 units, the unit price can be 30% to 60% higher than at 5,000 units, depending on the structure and production method.
Printed inserts cost more than plain ones, but they can support the brand story and raise perceived value. For some product packaging programs, that extra spend makes sense because the insert is visible as soon as the box opens. For others, plain structural board is enough, especially if the outer carton already carries the branding load. There is no prize for paying for print coverage nobody notices.
Typical pricing comparisons
| Insert Type | Best Use | Typical Unit Cost at 5,000 | Notes |
|---|---|---|---|
| Plain die-cut paperboard insert | Light products, simple retail packaging, mailer kits | $0.12-$0.22 | Lowest visual impact; strongest value when the structure is simple. |
| Printed branded insert | Premium gift sets, cosmetics, custom printed boxes | $0.18-$0.35 | Adds brand visibility; print coverage and color count change the price quickly. |
| Multi-compartment divider set | Accessory kits, beverage assortments, sample packs | $0.22-$0.45 | More cuts and folds; better for keeping several items separated. |
| Shoulder or wrap-style insert | Premium reveals, structured retail packaging, fragile items | $0.28-$0.60 | More material and tighter tolerances; often used for a higher-end unboxing. |
Those ranges are not a quote. They are a buying compass. Final pricing depends on board grade, print setup, tooling, packing method, shipping, and whether you need samples or revisions along the way. Ask for tiered pricing at 1,000, 3,000, 5,000, and 10,000 pieces if you want to see where the unit cost actually drops. One tier can reveal more than ten polished sales sentences.
Hidden costs matter too. Proofs, tooling changes, assembly labor, extra packaging tests, and freight can all move the final number. If the insert is hand-packed, that labor should be counted alongside material cost because a slower pack line is a real cost. The smartest buyers do not stop at “What is the price?” They ask, “What is the total cost to get this safely out the door?”
If sustainability is part of the brief, ask about FSC-certified board and right-sized material use. You can read more about sourcing through FSC. Not every job needs premium recycled content, but many brands do need a cleaner sustainability story, and paperboard makes that easier than foam or mixed-material packaging.
Common Mistakes That Make Inserts Fail
The first mistake is measuring only the main product and ignoring everything else. Caps, closures, cables, inserts, sleeves, pouches, and protective wraps all affect fit. Custom paperboard box inserts should be designed around the full packed product, not around the bare item sitting on a clean desk. If the insert only fits the product before the accessories are added, it does not fit.
The second mistake is making the cavity too tight. People like to do this because tight feels secure. Then production starts, and every packer has to force the product in, rotate it twice, and hope the finish survives. If you are selling cosmetics, coated metal, or anything with a polished surface, over-tight inserts can create scuffs, pressure marks, and a pack line that feels like punishment. The fix is not to push harder. The fix is to redesign the fit.
Weak structure is the third problem. Thin board, poor fold design, and too few support points will collapse faster than a polite excuse in a quality review. A tray that sags or a divider that bends during insertion damages both protection and presentation. The insert should feel stable in hand. If it flexes like a cereal flap, it probably will not survive a real distribution lane with vibration and compression.
Brand mismatch is the fourth issue. A technically correct insert can still look cheap if the color is wrong, the cut edges are rough, or the print does not line up cleanly. That matters in branded packaging, because customers notice whether the interior feels intentional. If the outside is polished and the inside looks like scrap board with a logo dropped on it, the premium story gets awkward fast.
Then there is the revision trap. Teams skip a prototype because the concept “looks fine,” then pay for rework after a shipment fails fit testing or the pack line reveals the structure is awkward. That is usually more expensive than making a sample in the first place. A sample is not a delay. It is a cheap argument with reality.
For product packaging that carries any real risk, a prototype should be treated as a normal step rather than an optional luxury. That is true whether you are building custom paperboard box inserts for a one-off launch or rolling them into a larger custom packaging program.
Expert Tips and Next Steps for Your Insert Program
Start with the product journey, not with the box drawing. Move one sample from packing to customer opening and watch where the item shifts, rubs, or catches. If you can spot the problem in a single walkthrough, you just saved yourself a batch of expensive surprises. Custom paperboard box inserts should be built around how the product actually behaves, not around how the render looks in a presentation file.
Use a fit checklist before quoting. Include product dimensions, weight, breakability, accessory count, packing method, and the expected shipping stress. Ask whether the insert is for retail shelving, e-commerce, subscription kits, or seasonal gift packaging. Each use case changes the structure. A retail insert can be built for display. A mailer insert has to survive transit abuse. Same material, different job.
Here is a practical quote conversation that saves time: send the artwork, the measurements, the order quantity, the target timeline, and a photo of the product in its current packaging. That gives the supplier enough context to estimate structure, material, and likely production issues. If you want a useful quote for custom paperboard box inserts, do not make the vendor guess whether the item is a 3-ounce glass jar or a 2-pound metal component.
It also helps to shortlist two or three structural options before you commit. Compare them on five points: fit, assembly speed, shipping protection, branding impact, and unit cost. That is usually more useful than comparing three nearly identical drawings while ignoring the actual performance difference. A slightly cheaper insert that increases damage claims is not cheaper. That is just postponed pain.
- Option 1: simple structural insert for speed and low cost.
- Option 2: printed insert for stronger shelf and unboxing presentation.
- Option 3: multi-compartment structure for sets, kits, or mixed products.
If you need a broader packaging lineup, browse the full Custom Packaging Products range and compare the insert program against the outer carton, not just against itself. The outer box and the insert should work as one system. That is where package branding starts to feel coherent instead of stitched together.
Custom paperboard box inserts are worth the effort because they reduce damage, improve presentation, and make the pack process less chaotic. If you want the insert to do its job, keep the fit realistic, the material honest, and the design tied to the actual shipping path. Before you approve production, test the packed product, not just the insert drawing. That one habit catches most failures while they are still cheap to fix.
Frequently Asked Questions
What are custom paperboard box inserts used for?
They hold products in place, reduce shifting, and help prevent breakage during shipping. They also improve presentation by keeping items aligned and easy to remove. You will see custom paperboard box inserts in cosmetics, beverage kits, electronics, and gift packaging because they solve protection and branding problems at the same time.
How do I know if custom paperboard box inserts will fit my product?
Measure the product, accessories, and any protective wrap, not just the main item. Check how much compression the product can handle without damage or cosmetic scuffing. Prototype the insert before full volume so you can catch fit issues early. That is especially useful for custom paperboard box inserts built for irregular shapes or fragile finishes.
What affects the cost of custom paperboard box inserts the most?
Material thickness, structural complexity, print coverage, and quantity are the biggest drivers. Low quantities usually raise unit cost because setup gets spread across fewer inserts. Extra revisions, custom finishing, and manual assembly can also push pricing up. If you are comparing quotes for custom paperboard box inserts, ask for multiple quantity tiers so the price curve is visible.
How long does production usually take for custom paperboard box inserts?
Simple designs move faster, while complex structures with print or multiple folds take longer. Prototype approval is often the biggest timing checkpoint. Clear specs and fast feedback help reduce delays. For a typical run of custom paperboard box inserts, a straightforward structure can move much faster than a multi-part premium insert.
Can custom paperboard box inserts replace foam or plastic packaging?
In many retail and mailer applications, yes, if the structure is strong enough for the product. Paperboard is usually easier to print, lighter to ship, and better for a clean unboxing experience. Very heavy or highly fragile items may still need a different protection strategy. For many brands, though, custom paperboard box inserts are a cleaner, easier-to-brand alternative to foam or plastic.

