Custom Planner Stickers: Design and Order Smarter Sets
A planner sticker sheet can contain less physical material than a postcard, yet it may sit inside someone’s calendar for 30, 60, or 90 days. It can influence reminders, budgets, meals, classes, product launches, and the small rituals that keep a week from unraveling. That is the quiet commercial value of custom planner stickers: they live close to decisions.
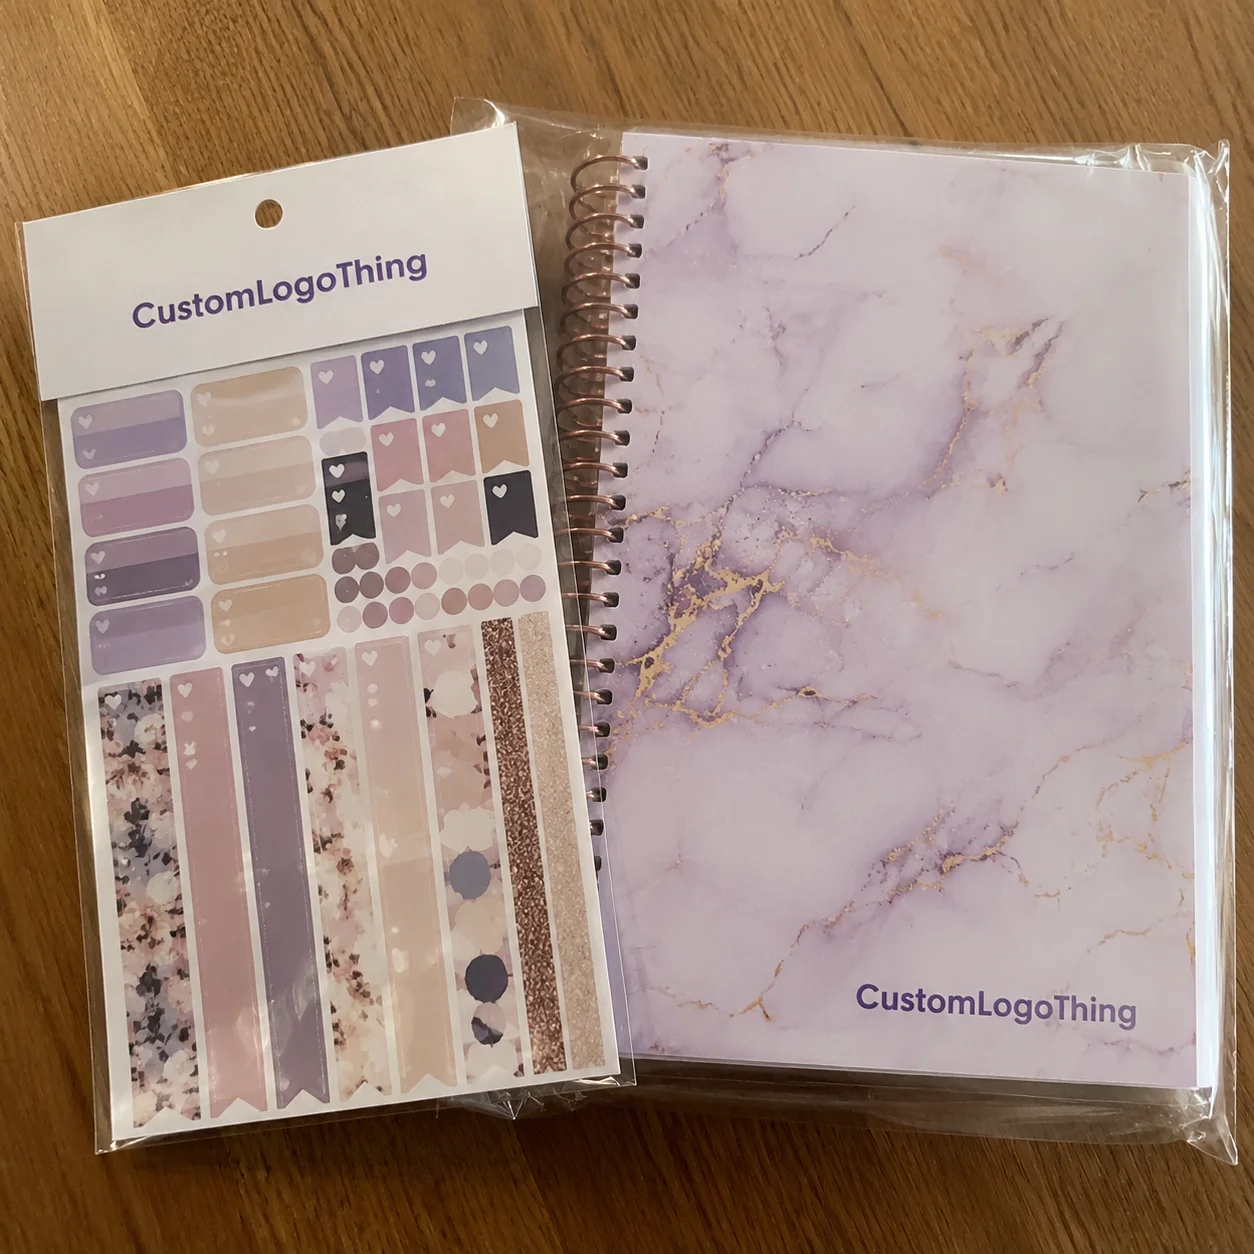
Planner stickers are branded or personalized adhesive labels made for calendars, journals, notebooks, productivity planners, habit trackers, classroom planners, event schedules, and packaging inserts. Some are decorative. Others do work. A date dot tells the user where to look. A reminder tab flags a deadline. An icon compresses a task into a symbol. A branded sheet inside a mailer turns a routine shipment into a small, tactile brand moment.
Buyers order them for stationery lines, subscription boxes, coaching programs, teacher kits, wedding planning sets, product launches, corporate gifts, and retail add-ons. The mistake is treating them like “just stickers.” A planner sheet has to print cleanly, peel easily, fit a real page, accept the right pen, and survive handling without making the planner bulky. Specs, cost drivers, timeline risks, and proofing discipline decide whether the final sheet feels useful or disposable.
What Custom Planner Stickers Are Really Used For
The first question is not “What shape should we print?” It is “What job should the sticker do?” That shift saves waste. A decorative floral corner needs strong color and a smooth finish. A weekly meal planning label needs blank writing space, low glare, and enough width for normal handwriting. A tiny workout icon needs a simple silhouette; if it relies on four thin lines at 6 mm wide, it may print as a smudge.
Most planner sticker sheets fall into a few working categories:
- Decorative stickers: borders, illustrations, seasonal art, motivational phrases, and brand mascots.
- Functional labels: appointment boxes, habit trackers, checklists, budget labels, and weekly headers.
- Reminder tabs: flags, arrows, page markers, deadline tags, and priority stickers.
- Date and icon stickers: date dots, event icons, class markers, shipping reminders, and small symbols.
- Promotional sticker sheets: branded inserts for product packaging, subscription boxes, and retail bundles.
From a packaging buyer’s point of view, the best sheet is rarely the most crowded one. A 4 x 6 inch sheet with 42 readable, easy-peel stickers can outperform a sheet with 90 tiny shapes that customers cannot lift without bending the liner. More pieces look impressive in a product photo. Fewer, better-sized pieces often win in actual use.
That matters for stationery brands, but it also matters for product teams using sticker sheets as inserts with candles, cosmetics, craft kits, educational materials, or custom printed boxes. A flyer may be recycled in minutes. A useful planner sheet can stay in rotation for weeks. The brand exposure is not loud; it is repeated, which is more valuable for some categories than another discount card.
Planner stickers also create a different kind of expectation than ordinary labels. Users touch them, write on them, reposition them, and compare them against the page structure in front of them. If the art direction matches the rest of the brand system, the sheet feels intentional. If it looks like a generic giveaway, it becomes clutter.
How Planner Sticker Sheets Work From Artwork to Peel-Off Use
A planner sticker sheet has more engineering than people expect. The basic anatomy includes the face stock, adhesive, backing liner, kiss-cut lines, optional outer die-cut shape, print layer, finish, and sheet layout. If one piece is wrong, the user notices quickly.
Kiss-cutting means the blade cuts through the sticker face stock and adhesive but not through the backing liner. The user peels individual stickers from the sheet. Die-cutting cuts through the full sticker and liner, creating a standalone shape. For planner sheets, kiss-cutting is usually the right choice because the backing sheet holds dozens of small stickers together during packing, shipping, retail display, and repeated use.
Material choice controls feel and function. Matte paper is the common pick for writable labels, habit trackers, and appointment boxes. Gloss paper gives color more punch, which suits decorative art and promotional sheets. Vinyl adds durability, but it can bulk up thin planner pages. Clear film can look subtle on calendar layouts, though ink opacity and contrast need careful checking. Removable adhesive helps users reposition stickers without tearing paper, but performance depends on paper coating, adhesive coat weight, and how long the sticker has been left in place.
Size changes the user experience. Tiny icons around 6-8 mm need clean shapes and generous spacing. Weekly headers may need 35-50 mm of writable width. Decorative blocks often work best when they match common planner grid systems, such as 1.5 inch vertical boxes, monthly calendar squares, or bullet journal dot spacing. A sticker can be attractive and still wrong if it does not fit the page.
Production callout: If users will write on the sticker, test with the actual pen type. Gel pens, ballpoints, fineliners, and markers behave differently on matte paper, coated paper, vinyl, and laminated surfaces.
One common failure is over-finishing. A glossy laminate may protect the sheet, but it can make an appointment label nearly useless if ink beads on the surface. Heavy vinyl may feel premium in the hand and annoying in a planner by week three. Weak color contrast may look calm on screen and unreadable under desk light. The finished sheet has to serve the page, not just the product photo.
Key Specs That Decide Quality, Usability, and Brand Fit
Before requesting a quote for custom planner stickers, gather the decisions that move production: sheet size, individual sticker sizes, quantity per sheet, material, adhesive type, finish, color requirements, cut style, and packaging format. Missing details do not make the job impossible, but they do make the first price less reliable.
Common sheet formats include 4 x 6 inches for inserts, 5 x 7 inches for retail-friendly sets, A5 for planner brands, half-letter for larger functional kits, and custom dimensions for subscription boxes or shelf displays. A 4 x 6 inch sheet usually works well as a low-friction add-on in branded packaging. A 5 x 7 inch sheet gives more room for headers, boxes, and decorative elements without feeling oversized. A5 feels more substantial, but freight, packing, and storage costs may increase once the sheet needs a larger mailer or backing card.
| Spec choice | Best use | Tradeoff to check |
|---|---|---|
| Matte paper | Writable labels, habit trackers, appointment boxes | Less color pop than gloss |
| Gloss paper | Decorative art and colorful promotional sheets | May resist some pens |
| Removable adhesive | Calendars, journals, repositionable planner layouts | Can cost more than standard adhesive |
| Clear film | Subtle overlays and minimalist planner spreads | Needs strong ink contrast |
| Header card or belly band | Retail packaging and bundled sticker kits | Adds packing labor and proofing steps |
Finish deserves more attention than it gets. Matte is usually better for writing. Gloss increases vibrancy. Soft-touch can suit stationery brands that sell by texture as much as design. Laminate improves scuff resistance, but it may reduce writeability. Not always. Often enough that testing matters.
Color accuracy is another practical issue. Most sticker sheets are prepared in CMYK. Pantone matching may be available depending on the print process, but buyers should not assume a neon RGB screen color or metallic gradient will print exactly as shown. A digital proof helps with layout and spelling. A physical sample gives better evidence for color, opacity, finish, and peel behavior.
For brands with strict packaging standards, align the sticker palette with product packaging, tissue paper, mailers, and any Custom Labels & Tags already in use. A warm off-white sticker sheet sitting beside a cool white mailer can look accidental. So can black text that shifts toward charcoal on one component and blue-black on another.
Readability is not decoration. As a working rule, avoid text below 5 pt unless the font is very clean and the message is not critical. Leave 1.5-2 mm between small kiss-cut shapes where possible. Keep cut lines away from lettering. Maintain enough contrast for quick scanning, especially for classroom, coaching, or productivity systems where the sticker is supposed to reduce mental load.
Packaging format also changes the order. A loose sheet for a subscription box is simple. A retail set may need a header card, barcode label, belly band, poly bag, or bundled kit format. If sustainability claims matter, ask about FSC-certified paper options and chain-of-custody documentation through FSC. For larger distribution programs, transit testing guidance from ISTA can help packaging teams think beyond the sticker and toward the full shipped unit.
Process and Timeline: From Idea to Finished Sticker Sheets
A clean production flow is boring in the best possible way. Define the use case. Choose the sheet size and material. Prepare artwork. Receive a digital proof. Approve cut lines. Print a sample if the order or launch risk justifies it. Move into production. Inspect. Pack. Ship.
Artwork files should include vector icons whenever possible, embedded or outlined fonts, high-resolution raster images at 300 dpi or higher at final size, bleed, safe zones, and a separate kiss-cut layer. Cut lines are often supplied as a spot color vector path, clearly named so prepress does not confuse it with printed artwork. If the sheet has 60 tiny shapes, the cut file matters as much as the art file.
Proofing is where expensive errors get caught. Wrong sticker counts. Missing bleed. Cut lines too close to text. A Monday spelled wrong. A habit tracker with six boxes instead of seven. Material mismatch. These are small failures, but they can turn a useful sheet into discounted inventory.
Timeline depends on print method, quantity, material availability, finishing, packing, and shipping distance. Simple digital sticker sheets may move in roughly 7-12 business days after proof approval in many production environments. Specialty materials, foil effects, sample rounds, retail packaging, or larger runs can push projects into 15-25 business days or longer. Treat that range as a planning reference, not a guarantee.
Delays usually come from predictable places: late artwork revisions, unclear dielines, custom material sourcing, color matching requests, holidays, freight changes, and slow proof approvals. If a launch date is fixed, build backward from the date customers need the sheets in hand. Leave time for sampling, production, shipping, and distribution to influencers, classrooms, event teams, or retail locations.
For brands ordering custom planner stickers as part of a larger product drop, coordinate them with the rest of the unboxing system. A sticker sheet that arrives five days after the cartons are packed is not an insert. It is an operational headache. The same logic applies if sheets are paired with mailer boxes, paper wraps, or other Custom Packaging Products.
Cost and Pricing Factors That Change Your Unit Cost
Sticker pricing is shaped less by physical size alone and more by the full production recipe: setup, material, print method, cut complexity, quantity, finish, inspection, and packing labor. A plain 4 x 6 inch paper sheet with 20 larger kiss-cut labels is not the same job as a 4 x 6 inch clear film sheet with 85 micro-icons and retail packaging.
Quantity matters because setup and proofing are spread across more sheets. As a broad planning example, a simple matte paper 4 x 6 inch digital sheet might land around $0.35-$0.85 per sheet at short-run quantities, while higher-volume runs may move lower depending on ink coverage, cut count, finish, and packing. Add removable adhesive, clear film, laminate, foil, or a header card, and the price can change quickly. Freight and import duties, where applicable, can also alter the real landed cost.
Dense sheets often surprise buyers. More stickers feel like more value, but each additional kiss-cut path can slow cutting and increase quality-control checks. Tiny disconnected shapes, sharp corners, and narrow slivers are more likely to lift, tear, or weed poorly. A sheet with fewer, better-planned shapes may cost less and perform better.
Minimum order quantity depends on print method, material, and finishing. Digital printing may support samples or short runs more easily. Offset, screen, foil, or specialty finishing may require higher setup commitment. Ask whether samples, reorder pricing, and mixed-design runs are available. Also confirm whether the quote covers one design only or several artworks sharing the same size and material.
Packing labor is easy to underestimate. Loose sheets are faster to count and pack. Retail sets may need header cards, hang holes, barcode labels, shrink bands, or individual bags. Each extra handling step adds cost and another point where specifications need to be checked. If the stickers will be inserted into a larger box, confirm whether the printer is shipping bulk sheets, collated bundles, or finished packs ready for fulfillment.
For an accurate quote, prepare the sheet dimensions, target quantity, material preference, number of designs, cut style, finish, packaging needs, delivery address, and deadline. If budget is tight, say so early. A production team can often suggest practical alternatives: standardizing the sheet size, reducing cut complexity, switching from clear film to matte paper, or packing sheets loose instead of adding retail cards.
Common Ordering Mistakes That Make Stickers Hard to Use
The most common mistake is designing for the screen instead of the planner page. On a monitor, a sticker sheet is enlarged, backlit, and viewed for a few seconds. In use, it may be 4 x 6 inches, viewed under warm desk light, peeled with one hand, and written on with whatever pen is nearby. Pretty online does not always mean practical on paper.
Weak cut-line planning is another culprit. Cut paths too close to lettering can clip text. Sharp corners can lift. Tiny disconnected pieces can tear. Overly tight spacing can make stickers hard to peel without bending neighboring shapes. A minimum 1.5 mm gap between small stickers is a sensible starting point, though exact tolerances depend on equipment, material, and shape.
Adhesive choice can wreck the experience. If users expect repositionable planner stickers and receive permanent adhesive, moving a label may tear the page. Permanent adhesive can still be the better choice for packaging inserts, branding seals, or one-time placement. Test on the actual planner paper when possible because coated, recycled, and textured papers all behave differently.
Writeability gets overlooked. Appointment labels, meal plans, trackers, and budget stickers should usually work with ballpoint or gel pens. A glossy finish may be fine for decorative art but frustrating for functional labels. If the sheet contains both decorative and writable elements, consider splitting designs by finish rather than forcing one surface to handle every job.
Ignoring planner formats is a quieter error. Monthly calendar boxes, bullet journal dots, vertical weekly columns, ring-bound planners, disc-bound planners, and academic planners all have different rhythms. If the sticker dimensions fight the page structure, users notice. They may not complain. They just stop using the sheet.
Proofing mistakes are painfully avoidable: approving too quickly, skipping a full-size printout, missing spelling errors, failing to count each sticker, or not checking whether every shape has enough space to peel cleanly. Print the proof at actual size on office paper. Cut a few rough shapes. Place them on a planner page. It takes 15 minutes and can save an entire run.
Next Steps Before You Request a Planner Sticker Quote
Before asking for a price, define the buyer or end user. Is the sheet for a stationery customer, teacher, coach, wedding planner, subscription box subscriber, or retail shopper? Then choose the planner format. Decide whether the stickers need to be writable, removable, decorative, functional, retail-ready, or some mix of those jobs.
Build a simple sticker inventory list. Include each sticker type, size, quantity per sheet, intended use, text requirements, icon art, brand colors, and blank writing space. This does not need to be elegant. A spreadsheet with 20 rows can clarify more than a mood board with 40 images.
- Print the layout at actual size.
- Place it beside the planner or journal it is meant to fit.
- Check whether text can be read at arm’s length.
- Confirm that writable areas are large enough for normal handwriting.
- Mark any shapes that look too small, too crowded, or hard to peel.
Gather production details before contacting a manufacturer: artwork files, preferred material, target quantity, deadline, packaging requirements, shipping destination, and sample needs. If the stickers are part of retail packaging or product packaging, share those dimensions too. A sticker sheet designed for a 6 x 9 inch mailer has different constraints than one hanging on a peg hook in a store.
The smartest budget move is often simplification. Standardize the sheet size. Reduce specialty finishes. Avoid excessive micro-cuts. Use matte paper where writeability matters. Order a slightly higher quantity only when repeat use is likely, not because the unit price looks tempting on a spreadsheet.
Custom planner stickers work best when the quote request is specific: sheet size, material, adhesive, finish, cut count, packaging, quantity, and deadline. A vague “How much for stickers?” forces guesswork. A focused specification gives you cleaner pricing, fewer proofing loops, and a finished sheet people Will Actually Use.
FAQ
What material is best for custom planner sticker sheets?
Matte paper is usually the safest choice for writable planner labels, habit trackers, appointment stickers, and calendar notes. Gloss paper works well for decorative stickers where color brightness matters more than writing. Vinyl is better for durable stickers, but it can add bulk to planner pages and may not suit every pen.
How much do custom planner stickers cost?
Cost depends on sheet size, quantity, material, adhesive, finish, cut complexity, and packaging. Dense sheets with many small kiss-cut stickers may cost more because cutting and inspection take longer. For an accurate quote, provide dimensions, quantity, artwork, material preference, finish, deadline, and shipping location.
What is the usual lead time for planner sticker production?
Lead time varies by order size, material availability, proof approval speed, finishing, and packing requirements. Simple digital print runs are typically faster than specialty finishes, custom packaging, or large retail orders. Build in extra time for sampling, proof revisions, shipping, and launch-date buffers.
Should planner stickers be removable or permanent adhesive?
Choose removable adhesive when users may reposition stickers on paper planners, journals, or calendars. Choose permanent adhesive when stickers are meant for packaging, branding, or one-time placement. Test the adhesive on the actual paper type because planner paper coatings can change peel performance.
How do I prepare artwork for custom planner stickers?
Use high-resolution or vector artwork, outlined fonts, CMYK color setup, bleed, safe zones, and a separate kiss-cut layer. Keep small icons simple so they print clearly and peel without tearing. Print a full-size paper mockup before proof approval to check spacing, readability, and planner fit.


