Buyer Fit Snapshot
| Best fit | Custom Product Boxes with Inserts projects where brand print, material claims, artwork control, MOQ, and repeat-order consistency need to be specified before quoting. |
|---|---|
| Quote inputs | Share finished size, material target, print colors, finish, packing count, annual reorder estimate, ship-to region, and any compliance wording. |
| Proofing check | Approve dieline scale, logo placement, barcode or warning zones, color tolerance, closure strength, and carton packing before bulk production. |
| Main risk | Vague material claims, crowded artwork, missing packing details, or unclear freight terms can make a low unit price expensive after revisions. |
Fast answer: Custom Product Boxes with Inserts: Design, Cost, Fit should be specified like a repeatable production item. The safest quote records material, print method, finish, artwork proof, packing count, and reorder notes in one written spec.
Production checks before approval
Compare the actual filled-product size with the drawing, then confirm tolerance on folds, seals, hang holes, label areas, and retail display edges. Reserve space for logos, QR codes, warning copy, and material claims before decorative graphics fill the panel.
Quote comparison points
Review material grade, print process, finish, sampling route, tooling charges, carton quantity, and freight assumptions side by side. A quote is only useful when the supplier can repeat the same color, closure quality, and packing count on the next order.
Custom Product Boxes with inserts solve a packaging problem that gets missed more often than it should: a product can survive the trip and still show up looking tired if it has room to shift, rub, or tip inside the carton. I have seen this happen with everything from glass bottles to small electronics, where the outer box looked fine but the inside had done the damage. The carton did its job on the outside and failed where it mattered most.
That is why the insert deserves the same respect as the printed box shell. The strongest custom product boxes with inserts keep the item stable in transit and shape the unboxing experience so it feels deliberate, orderly, and premium. A lot of damage claims start with movement, not with a crushed shipper, and that distinction matters a whole lot in real production.
What Are Custom Product Boxes with Inserts?
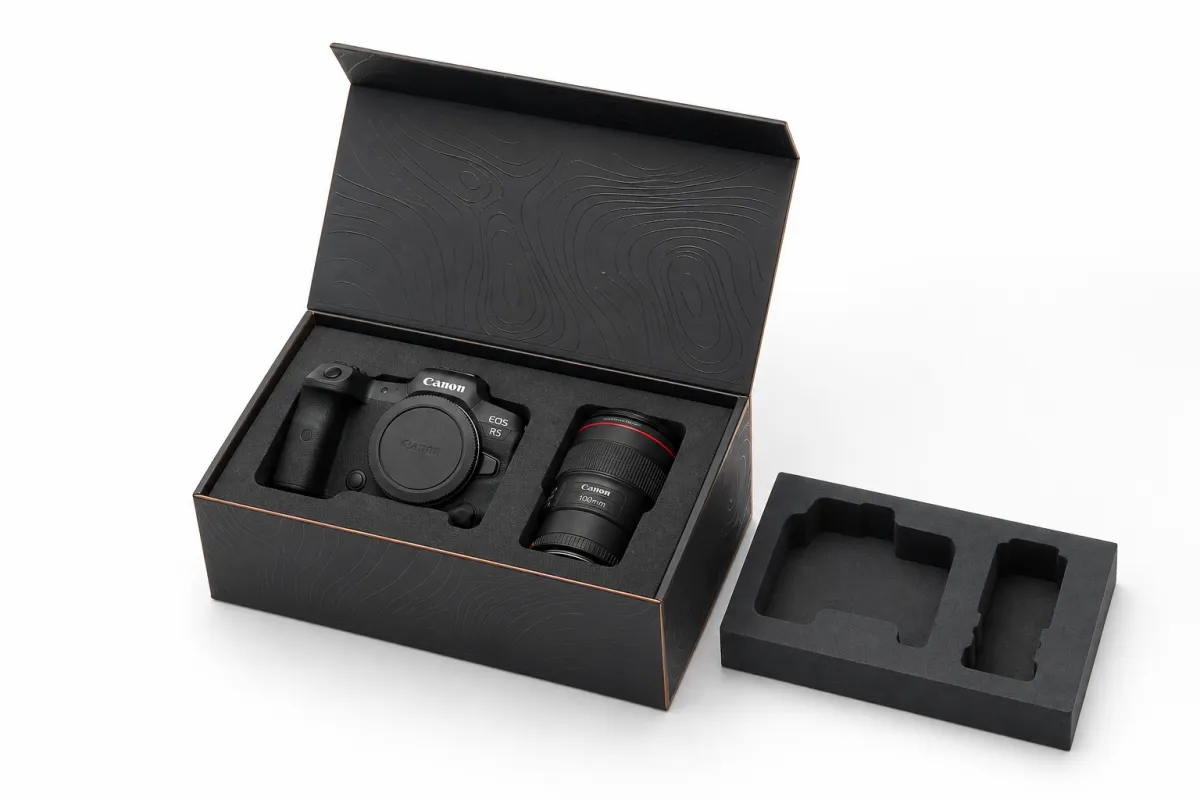
Custom product boxes with inserts pair a custom outer carton with an internal support structure that holds one product or several components in place. The outer box handles print, branding, and shelf presence. The insert does the quieter work inside the package: centering the item, separating parts, and reducing the small shocks that happen during packing, sorting, and delivery.
That split in function is why these packages show up in so many categories, from skincare to consumer electronics. A glass serum bottle, a charger kit, a sampler set, a PR mailer, and a subscription box each need a different level of restraint, but the underlying goal stays the same. Custom product boxes with inserts reduce empty space, control movement, and make the package feel engineered rather than improvised.
The presentation side matters too. A well-built insert can stage the reveal, keep accessories separated, and guide the customer’s eye in the order you want. That carries real weight in retail packaging and branded packaging because the box is often the first physical proof of product quality. If the fit is sloppy, trust drops fast.
- Cosmetics: bottles, jars, droppers, and compacts that can scuff, chip, or tip.
- Electronics: chargers, cables, handsets, and accessories that need clean separation.
- Beverage samplers: glass or PET formats that benefit from cradle-style support.
- PR kits: multi-piece sets that need a neat reveal and secure hold.
- Fragile retail products: items with coated surfaces, lids, corners, or labels that mark easily.
In practical terms, custom product boxes with inserts are more than attractive packaging. They cut avoidable loss while improving the way the product feels when it is opened. That returns value quickly when the item is expensive, delicate, or assembled from several parts.
How Custom Product Boxes with Inserts Work
The starting point for custom product boxes with inserts is always the product itself. Its dimensions determine the cavity size, the grip points, and how much tolerance the insert needs. A box that runs too loose allows drift. A box that runs too tight slows packout and can scuff coatings, crack caps, or deform sleeves. The best fit usually leaves just enough room to absorb normal manufacturing variation without letting the product wander.
Insert style matters as much as box style. Die-cut paperboard works well for lighter goods and clean presentation. Corrugated partitions bring more strength to multi-item kits and can be built into a grid. Molded pulp supports fiber-first packaging goals and can cradle irregular shapes. Foam still has a place for highly fragile items, though it can complicate recyclability. Hybrid structures are common too, especially where one component needs a rigid hold and another needs a softer touch.
Custom product boxes with inserts also manage shock by spreading force across a wider surface. The insert cannot erase every impact, but it can reduce the chance that one corner or one edge takes the full hit. That is why a product may fail in a simple mailer yet ship cleanly in a well-designed insert box. The difference is rarely thickness alone. It usually comes down to how the cavity, walls, and retention tabs work together.
There is a visual effect as well. A good insert turns the package into a sequence. The lid opens. The product stays centered. Accessories sit where they belong. Branding remains visible. Instead of a loose bundle of parts, the customer sees a structured presentation. That matters for custom printed boxes because the print is only half the experience; the interior geometry finishes the story.
- Retention: tabs, walls, and cutouts keep the item from drifting during transit.
- Shock control: the insert absorbs small impacts and limits direct transfer to the product.
- Alignment: the contents arrive facing the right way, which protects labels and graphics.
- Reveals: the opening sequence can show one product first and accessories second.
For brands comparing custom product boxes with inserts, the better question is not what looks best in a rendering. It is what keeps the product stable after handling, sorting, and the occasional rough drop. That question leads to stronger packaging decisions almost every time.
Key Factors That Shape Fit, Protection, and Presentation
Three variables shape custom product boxes with inserts: product risk, presentation goal, and production reality. Product risk covers weight, fragility, finish, and whether the item can scuff, leak, bend, chip, or shift. A matte jar and a glass bottle do not need the same cavity tolerance. A cable kit and a ceramic item do not need the same retention strategy either.
The outer box style and insert thickness need to work together. A rigid setup box can handle a different internal build than a foldable mailer. Once the product includes accessories, the fit becomes more sensitive because every extra piece uses valuable space. That is where cavity planning becomes practical, not decorative. A few millimeters can decide whether the product sits confidently or rattles around.
Branding adds another layer. Some buyers want interior print, others want a clean white interior, and some prefer the insert to act only as a framing device. Custom product boxes with inserts can support premium coatings, foil, soft-touch lamination, or a minimal matte finish, but the inside still needs to make sense once the customer opens the lid. A striking exterior with a careless insert feels unfinished.
Sustainability and compliance belong in the same conversation. Many brands now prefer fiber-based structures, recycled content, or FSC-certified board. If shipping performance is a concern, transit testing is worth the time. Industry groups such as ISTA publish common test methods, and fiber sourcing can be documented through FSC. Those references do not choose the structure for you, but they make the decision easier to defend internally.
Custom product boxes with inserts should also be tested like real packaging, not like a clean mockup. Prototype fit checks, drop tests, and compression checks reveal weak points fast. ASTM and ISTA-style methods help teams see whether the product shifts after vibration, whether corners compress under stack load, and whether the lid still closes correctly with the product seated inside. A design that looks perfect on a flat sample can behave differently once it is filled.
- Prototype fit: confirm that the item slides in with the intended resistance.
- Drop behavior: check whether the insert holds after corners and faces are impacted.
- Compression resistance: make sure the outer box protects the insert under stack pressure.
- Handling speed: confirm the packer can assemble the box without forcing the parts.
One practical rule helps here: if the package only works when people handle it gently, it is not ready. Custom product boxes with inserts should survive normal warehouse movement, not ideal conditions.
Custom Product Boxes with Inserts: Process and Timeline
The production path for custom product boxes with inserts is usually straightforward, but the details take time. It begins with product specs: dimensions, weight, finish, accessory count, and shipping method. From there the work moves into structural design, dieline creation, sample building, review, revisions, approval, and full production. If the insert has multiple cavities or unusual retention points, expect one or more rounds of refinement.
Most of the clock disappears during first-round engineering and sample feedback. A buyer may ask for the box to close more easily, the insert to grip more tightly, or the cavity to accept a sleeve or cap that was not part of the first brief. Those changes are normal, and they are one reason custom product boxes with inserts benefit from a careful sample stage instead of a rushed approval.
Lead time depends on material availability, printing method, finishing complexity, and whether new tooling is needed. A simple run may move from proof approval to production in roughly 12-15 business days, while more complex structures can take longer if the insert geometry changes or the board stock needs to be sourced in a specific grade. Molded or highly specialized components can stretch the schedule further because tooling, curing, or setup time comes into play.
Speed and control pull against each other. Rush work can be done, but it leaves less room for testing and refinement. That matters because custom product boxes with inserts are easy to underestimate on paper and expensive to correct after launch. A package that ships with a weak cavity or awkward packout sequence can create warehouse friction for months.
- Brief: share the product specs, quantity, and shipping expectations.
- Structural design: confirm the outer box style and insert type.
- Sample: build a filled prototype and test the actual product.
- Revision: adjust fit, board thickness, and assembly notes.
- Production: approve artwork and move to full run.
If the product is fragile, expensive, or part of a kit, do not skip the prototype. Custom product boxes with inserts are a packaging system, not a guess.
Custom Product Boxes with Inserts Pricing: Cost Drivers and MOQ
Pricing for custom product boxes with inserts is driven by structure more than the box alone. Board grade, insert material, print coverage, coatings, specialty finishes, and hand assembly all push the price in different directions. A simple one-piece paperboard insert with a printed carton is much easier to price than a multi-cavity kit with foil, soft-touch lamination, and a locked-in tray.
MOQ affects pricing because setup costs are spread across the run. In practical terms, a 250-unit order can carry a much higher unit price than a 5,000-unit order, even if the design stays the same. That is not the printer being difficult. It is how prepress, cutting, gluing, and waste are amortized. For custom product boxes with inserts, higher volume usually improves efficiency because the die, insert setup, and assembly steps are used more fully.
Insert complexity changes cost in ways buyers sometimes miss. A single cavity with generous tolerance is economical. Multiple cavities, tight tolerances, and unusual angles take more time to cut and assemble. If the design needs nested layers or a hybrid build, labor becomes a larger factor than material. For a 5,000-piece run, a simple die-cut paperboard insert might add about $0.10-$0.28 per unit, while corrugated partitions can land around $0.08-$0.22. Molded pulp often sits closer to $0.18-$0.45 once tooling is included, and foam can range from about $0.15-$0.40 depending on density and shape. Those ranges are not universal, but they give a practical starting point.
Hidden costs matter too. Freight, storage, packout labor, and damage from a poor fit can cost more than the insert itself. That is why custom product boxes with inserts should be judged on total landed cost, not only on the unit quote. A lower per-box price that increases breakage or assembly time is not actually cheaper.
| Insert Type | Best Use | Typical Cost Pressure | Assembly Speed | Notes |
|---|---|---|---|---|
| Die-cut paperboard | Cosmetics, lightweight kits, retail packaging | Lower to moderate | Fast | Strong fit, good print compatibility, easy to recycle |
| Corrugated partitions | Multi-item shippers, beverage samplers, larger components | Lower to moderate | Fast to moderate | Good strength for stacking and separation |
| Molded pulp | Fiber-first brands, shaped cradles, heavier parts | Moderate | Moderate | Useful for sustainability goals; tooling can affect lead time |
| Foam | Highly fragile electronics or premium displays | Moderate | Fast | Excellent cushion, but recycling can be harder |
| Hybrid structure | Complex kits with mixed protection needs | Higher | Slower | Best when one material cannot do the entire job |
Good buyers compare suppliers on more than price. Sample quality, communication, and the clarity of the trade-offs they explain reveal a lot about the final package. Custom product boxes with inserts are a classic place where the cheapest quote is often the one that left out labor, testing, or a second sample round.
Step-by-Step Guide to Ordering the Right Insert Box
Start with the product, not the package. Measure the item at its widest point, then note closures, caps, cords, sleeves, and any wrap or protective film. For custom product boxes with inserts, a small oversight can create a cavity that looks fine on paper and fails in the warehouse. The best briefs include exact dimensions, weight, finish, and whether the product ships alone or as part of a kit.
Next, choose the insert style based on risk, not only on appearance. A display piece that scratches easily may need a more controlled hold than a bottle that simply needs to stay upright. If you are unsure, compare a few structures side by side. In many cases, custom product boxes with inserts can be built from the same outer box family while the interior changes for each SKU. That keeps branding consistent and reduces future rework.
Then request a structural sample or prototype. That is the point where theory meets reality. Fill the box with the actual product, close it, shake it lightly, and run a simple packout test. Does the team have to force the parts together? Does the item sit too high? Does the lid press on a cap or accessory? Those questions are much faster to answer before production than after. I have seen teams catch a bad cavity height in five minutes with a filled sample, while the same issue would have caused a week of rework later.
A packout check matters even more if fulfillment speed is part of the brief. A beautiful insert that takes 40 seconds to assemble may look efficient on a mockup and painful on a busy line. Custom product boxes with inserts should not create bottlenecks. If assembly is too slow, simplify the cavity, reduce the number of parts, or separate the premium look from the structural hold.
- Document the product: size, weight, finish, accessories, and packaging method.
- Choose the structure: paperboard, corrugated, molded pulp, foam, or hybrid.
- Test a filled sample: check retention, reveal, and ease of assembly.
- Review the artwork: confirm print coverage, interior color, and brand placement.
- Approve instructions: make sure the packer knows exactly how the insert is built.
For teams comparing options, it helps to review Custom Packaging Products early in the process. That makes it easier to separate what is possible from what only looks good in a sketch. If you need a second reference point, the same custom packaging products page can be used to compare structure styles before the brief is locked.
Common Mistakes When Specifying Inserts
The first mistake is measuring only the body of the product and forgetting the details that actually cause fit problems. Caps, lids, cords, sleeves, labels, and wrapped accessories can all change the cavity. In custom product boxes with inserts, a few extra millimeters of real-world variation can be the difference between a clean reveal and a box that bulges or tears.
The second mistake is ignoring tolerance. A design can be technically correct and still fail if production variation is wider than the cavity allows. That happens often with products that are molded, filled, or hand-assembled. A tight insert may look precise on a drawing, but custom product boxes with inserts need a tolerance that reflects how the product is actually made, not just how the CAD file makes it appear.
Another common problem is choosing presentation over packout speed. A dramatic reveal can be excellent, but if the insert takes too many steps or slows the line, the package becomes expensive to use. The same is true when the insert is so decorative that it leaves too much empty space or fails to hold the item firmly. A package can look premium and still be awkward in operation.
Shipping tests get skipped more often than they should. That is a mistake for any product moving through parcel networks, warehouse hubs, or long-distance freight. Custom product boxes with inserts should be checked against real handling conditions because vibration, compression, and repeated motion expose problems a tabletop sample will not. One good drop test helps; several orientations tell a better story.
Scalability is the last trap. A package that works for samples may become inefficient once volume rises. A hand-built Insert That Feels manageable at 100 units may become painful at 5,000. If the brand plans to scale, custom product boxes with inserts should be designed with reordering, inventory flow, and assembly time in mind.
- Wrong measurements: the product was measured without accessories or protective wrap.
- Over-tight cavities: fit is precise on paper but too unforgiving in production.
- Too much ornament: the insert looks great and works poorly.
- No transit testing: the box is approved without a real shipping check.
- Future volume ignored: the design slows fulfillment when orders grow.
Most of these mistakes are preventable. The fix is a better brief, a filled sample, and direct feedback from the people who will actually pack the order.
Expert Tips and Next Steps for Better Packouts
If there is one pattern that keeps showing up in strong packaging programs, it is this: one insert family often does the work of several SKUs. Custom product boxes with inserts become easier to reorder when the cavity architecture is built around a shared shape family instead of one-off exceptions. That can reduce design work, simplify inventory, and make future runs more predictable.
It also helps to ask for a filled sample rather than only a flat one. Flat samples can hide a lot. A filled sample shows how the product sits, how the customer will see it, and whether the packout sequence feels clean or fussy. For custom product boxes with inserts, that one step can catch a misaligned cavity, a weak retention point, or a lid that presses too hard on the contents.
A good insert does not just hold a product. It tells the packer where the risk sits and tells the customer what was meant to matter.
A one-page spec sheet is another smart move. Keep it plain and practical: dimensions, weight, finish, shipping method, accessory count, print goals, and assembly notes. If you are comparing vendors, ask each one to quote the same spec. That makes the differences in material, labor, and sample quality easier to see. It also keeps custom product boxes with inserts from drifting into vague conversations about premium feel without operational proof.
One more point gets missed often: compare suppliers on how they explain trade-offs, not just on how they sell. A supplier who can tell you why a thicker board will slow packout, or why a molded cavity needs more lead time, is usually giving you useful information. That kind of clarity matters more than polished language. Good packaging design is built on constraints, and the best partner is the one who names them early.
- Build one insert family for multiple SKUs where possible.
- Request a filled sample, not just a blank structural sample.
- Document fit, weight, finish, shipping method, and assembly notes in one sheet.
- Compare quotes by sample quality, timing, communication, and cost trade-offs.
- Test, revise, and only then scale the run.
For brands that need a practical path forward, compare two or three quotes, test one prototype, document packout time, and move ahead only when custom product boxes with inserts meet both protection and budget goals. If the insert protects the product, speeds the line, and supports the brand story, the box is doing its job.
The clearest takeaway is simple: start with the real product, build the insert around its actual tolerances, and validate the filled sample before you approve a full run. That one habit keeps custom product boxes with inserts from becoming an expensive guess, and it usually improves protection, presentation, and packout speed at the same time.
Are custom product boxes with inserts worth the extra cost?
Yes, especially when the product is fragile, premium, or expensive to replace. Custom product boxes with inserts reduce damage risk, cut returns, and make the shipment feel more organized and intentional. The added cost is usually easier to justify when one damaged unit would cost more than the packaging upgrade.
Which insert material works best for custom product boxes with inserts?
Paperboard and corrugated inserts are strong choices for brands that want recyclability and lower material cost. Foam or molded options may fit better for highly fragile products, but the right choice depends on weight, shipping conditions, and brand goals. There is no universal winner for custom product boxes with inserts; the product matters more than the trend.
How do I know what size insert cavity to order?
Measure the product, accessories, and any protective wrap, then add or subtract tolerance based on how tightly the item should sit. A sample test is the safest way to confirm the fit before production. In practice, custom product boxes with inserts should be validated with the actual product, not just the dimensions on a spec sheet.
What affects custom product boxes with inserts pricing the most?
Material choice, insert complexity, print coverage, finishing, and MOQ usually have the biggest effect on unit cost. Labor and assembly time matter too, especially for multi-piece inserts or kits with several components. If you are pricing custom product boxes with inserts, compare total landed cost, not only the headline unit price.
How long does it usually take to produce custom product boxes with inserts?
Timeline depends on sample revisions, structural approval, material availability, and how complex the insert is. Plan extra time when you need new tooling, custom die lines, or multiple prototype rounds. For many programs, custom product boxes with inserts move faster when the brief is complete and the first sample is tested thoroughly.

