Buyer Fit Snapshot
| Best fit | custom wrap around labels design cost and uses for packaging buyers comparing material specs, print proof, MOQ, unit cost, freight, and repeat-order risk where brand print, material, artwork control, and repeat-order consistency matter. |
|---|---|
| Quote inputs | Share finished size, material target, print colors, finish, packing count, annual reorder estimate, and delivery region. |
| Proofing check | Approve dieline scale, logo placement, barcode or warning zones, color tolerance, and any recyclable or compostable wording before bulk production. |
| Main risk | Vague material claims, crowded artwork, or missing packing details can create delays even when the unit price looks attractive. |
Fast answer: Custom Wrap Around Labels Design Cost and Uses: Cost, MOQ, Proof, and Reorder Checks should be specified like a repeatable production item. The safest quote includes material, print method, finish, artwork proof, carton packing, and reorder notes in one written spec.
What to confirm before approving the packaging proof
Check the product dimensions against the actual filled item, not only the sales mockup. Ask for tolerance on folds, seals, hang holes, label areas, and retail display edges. If the package carries a logo, QR code, warning copy, or legal claim, reserve that space before decorative graphics fill the panel.
How to compare quotes without losing quality
Compare board or film grade, print process, finish, sampling route, tooling charges, carton quantity, and freight assumptions side by side. A lower quote is only useful if the supplier can repeat the same color, closure quality, and packing count on the next order.
Custom Wrap Around Labels: Design, Cost, and Best Uses
Custom wrap around labels can turn a plain bottle into a stronger sales tool, but only if the artwork, seam, and substrate are chosen for the actual container. I have seen gorgeous proofs come back from a press check and then look kinda awkward once they wrapped a tapered jar. The screen version was fine. The physical object was not. That gap between digital polish and real-world fit is where money gets wasted, and it is why custom wrap around labels deserve more scrutiny than they usually get.
Used well, these labels do more than cover a surface. They give you room for branding, ingredients, barcodes, warnings, directions, and visual hierarchy without cramming everything onto a tiny front panel. For a packaging buyer, the format only helps if the container shape, print process, adhesive, and application method are planned together. One weak link is enough to make the label look careless, even if the artwork itself is strong.
There is also a practical reason this format keeps showing up in retail. On shelf, people do not read packaging like a brochure. They scan. A label that wraps in a clear order can guide the eye faster than a scattered set of separate stickers. That matters when a shopper is making a decision in a few seconds and a store associate is pulling product by the dozen. In other words, custom wrap around labels are not just decoration. They are a reading system.
What Custom Wrap Around Labels Are
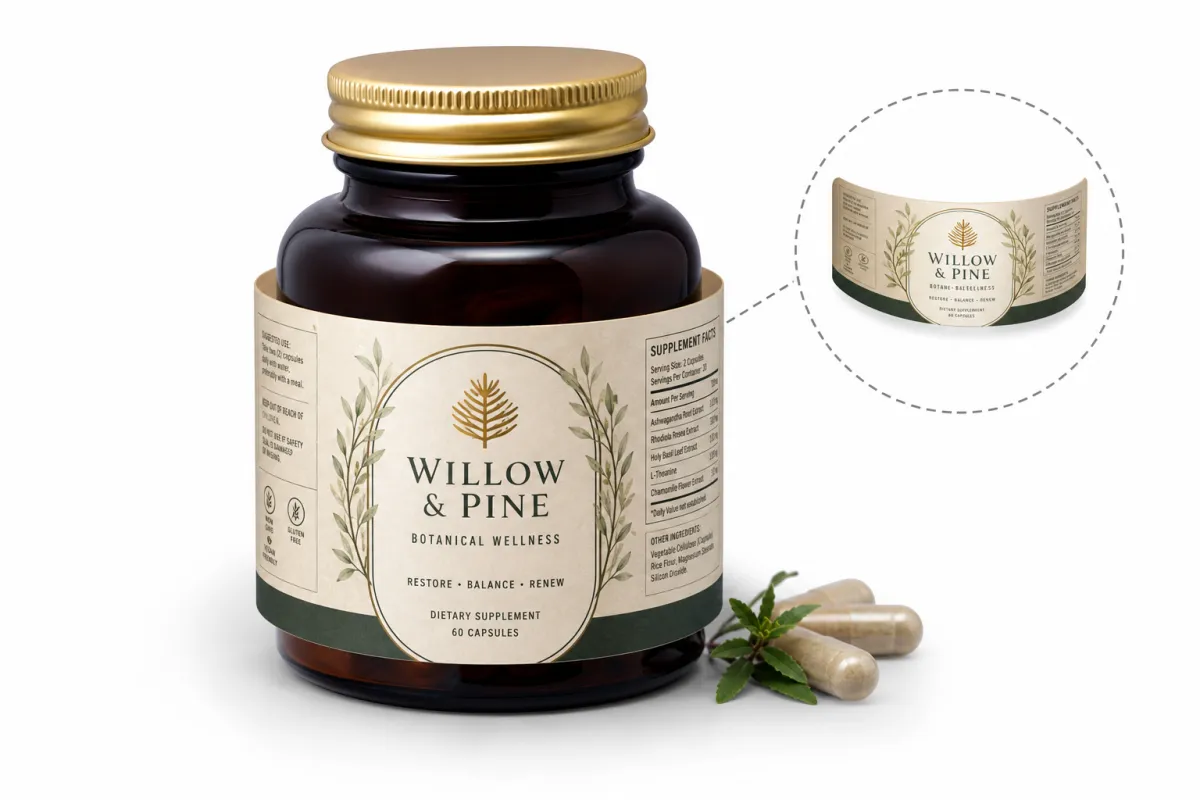
Custom wrap around labels are single continuous panels that wrap around part or all of a container's circumference. Instead of splitting the message into separate front and back labels, the artwork flows across the body of the bottle, jar, tube, or canister. The idea sounds simple. The execution rarely is. Curvature, seam placement, and panel order can change the finished look more than most buyers expect.
There is a reason custom wrap around labels show up so often in packaging. They give a product more visual real estate without adding another label piece, and they can make the pack feel cleaner, more premium, or less cluttered. A strong wrap does not just decorate a container. It creates a better reading path, which matters when a shopper is scanning a shelf in seconds, not minutes.
Bottles are the obvious home for wrap-around labels, but they also appear on jars, tubes, candles, supplements, and household products that need more than a small front label. In retail packaging, that wider canvas matters because the customer often reads quickly and from a short distance. The label has to carry the brand, the claim, and the fine print without turning into visual noise.
There is a practical difference between wrap-around labels and other label formats:
- Wrap-around labels use one continuous printed panel and usually carry the main branding plus support information.
- Front-and-back labels split the content into two separate pieces, which can be easier for small products but less unified visually.
- Shrink sleeves cover a larger area of the container and can handle full coverage, but they are a different production and application process entirely.
If the goal is a cleaner shelf presence, custom wrap around labels usually beat a crowded two-label setup. If the container is unusually shaped or the design needs full-body coverage, a sleeve may fit better. That decision matters because the proof can look correct while the finished pack behaves differently once the label meets the real container. I have watched teams approve the wrong format because the mockup looked good at arm's length and nobody wanted to slow the launch down.
A useful rule keeps the project grounded: these labels are about controlled surface coverage. They are not about filling every millimeter just because the space exists. Good packaging leaves breathing room, keeps type readable, and uses the wrap to organize information instead of dumping everything onto the bottle like it was designed in a hurry. If a layout feels crowded on a flat artboard, it will feel worse once it curves.
A label that looks polished on a screen and awkward on a bottle is not a win. It is a file that still needs to survive the real world.
How Do Custom Wrap Around Labels Work?
The process starts with accurate measurements. Circumference matters. Label height matters. Taper, shoulder angle, and any curve that steals usable print space matter too. Straight-sided bottles are forgiving. Tapered jars are not. Plenty of packaging problems begin with a rough dimension pulled from memory instead of an actual measurement taken with a ruler or caliper. You do not want to kinda wing this part.
Once the container is measured, the wrap length is calculated and then expanded for bleed and seam allowance. That is the point where custom wrap around labels move from a design exercise into a production plan. The label needs to close cleanly, with no gap and no ugly overlap. A proper dieline shows the live area, trim, bleed, and seam zone so the artwork can be built within realistic limits. Many suppliers ask for at least 0.125 inch of bleed, but follow the printer's template if it differs; the template beats a generic rule every time.
Artwork placement matters just as much as size. The front panel usually carries the brand name and product identity, while the side or back panel can hold ingredients, directions, warnings, or regulatory copy. On a wrap, the flow of those panels needs to make sense when someone turns the package in their hand. If the barcode sits on the seam or the ingredient list falls into a curve, the label can look cheap even when the print itself is excellent.
Application method changes the result too. Small runs are often hand-applied, which gives more flexibility but less consistency. Higher-volume jobs may be machine-applied, which makes roll direction, liner spec, and spacing more important. If the labels are wound in the wrong orientation, production slows down and errors multiply. People like blaming the printer first, but the application setup is often the real problem.
The seam deserves attention rather than apology. It can hide on the back panel, sit in a quiet visual area, or become part of the design through a pattern break, a vertical band, or a deliberate icon placement. With custom wrap around labels, the seam is almost always visible up close, so the goal is to make it feel intentional instead of accidental. The best teams plan for that from the first comp, not after the first complaint.
Container shape also changes how the label behaves after application. A straight cylinder is predictable. A tapered jar can pull the artwork out of alignment. Flexible tubes compress differently when they are squeezed. Once custom wrap around labels are applied to curved or flexible surfaces, the label face can shift just enough to affect line breaks, spacing, and visual balance. A proof on a flat screen cannot show that. That is the catch, and it is the part that catches people most often.
In one rebrand review I handled, the label looked centered on the dieline and the logo still drifted slightly left after application because the bottle shoulder was less forgiving than the spec sheet suggested. The fix was not dramatic; we moved the focal point by a few millimeters and rechecked the seam. But those few millimeters changed the whole pack. Packaging math is weird like that.
If you want a second opinion on shipping and handling expectations, distribution testing guidance from ISTA is worth a look. It is not glamorous, but neither is a label that scuffs in transit.
For businesses building broader Custom Packaging Products, the format performs best when the label, the container, and the shipping environment are treated as one system. That sounds like common sense because it is. The tricky part is making everyone on the project act like it is common sense before the order is placed.
What Affects Fit, Finish, and Price
Three things shape the economics of these labels more than anything else: size, quantity, and material. After that come adhesive, print method, and finish. Buyers often ask for a quote as if the answer is hidden somewhere behind a curtain. It is not. The price follows the specs, and the specs can change the unit cost quickly.
The pricing pattern is consistent. Small orders cost more per piece because setup is spread across fewer units. Larger orders lower the per-label cost because press setup, proofing, and finishing get divided across more labels. A 500-piece run can feel dramatically pricier than a 5,000-piece run for the same artwork, and sometimes the gap is larger than the difference between two materials. In some shops, the unit price can drop by 30 to 60 percent once the order moves into a better volume band.
As a rough buying range, paper labels for dry goods can land around $0.03-$0.08 per unit at mid-size quantities, depending on coverage and finish. BOPP labels often sit closer to $0.05-$0.14 per unit because the material is more durable. Vinyl or specialty materials can run higher, especially if the project needs moisture resistance, abrasion resistance, or a more premium face stock. Add soft-touch lamination, metallic ink, or Custom Die Cutting, and the cost climbs. That is not a mystery. That is print production.
These figures are directional, not a quote. Region, press type, lead time, and artwork complexity all move the number. A small label with a lot of ink coverage can cost more than a larger but simpler one. That surprises people until they see the press sheet and the finishing steps lined up side by side.
Material choice should follow the product environment, not the mood board. Paper can work for dry shelf products that are handled lightly. BOPP is usually a better fit for refrigerated items, products exposed to moisture, and bottles that get handled often. Vinyl can help when the use case calls for a tougher face stock, though it is not the right answer for every product. The package gets one life after it leaves the design file, and that life is usually messier than the render.
Finish changes both appearance and durability. Matte gives a softer, quieter look. Gloss pushes color harder and can help artwork stand out under retail lighting. Soft-touch feels more premium, but it raises cost and may not suit wet environments. Protective coatings can improve scuff resistance and keep labels looking fresh longer. If the product will sit in a cold chain, on a crowded shelf, or in a damp kitchen, that extra protection can be worth it. If the label will never face those conditions, paying for extra protection just to feel fancy is a waste.
| Material | Best For | Typical Per-Unit Range | Tradeoffs |
|---|---|---|---|
| Paper | Dry goods, low-handling items, short shelf life products | $0.03-$0.08 | Lower durability, more vulnerable to moisture and abrasion |
| BOPP | Bottles, jars, chilled products, heavy handling | $0.05-$0.14 | Slightly higher cost, better resistance to water and scuffing |
| Vinyl | Tougher use cases, premium durability, demanding surfaces | $0.08-$0.22 | Higher cost, can be more than needed for simple retail packaging |
Adhesive is another detail that gets ignored until labels start failing. Permanent adhesive works for most branded packaging. Removable adhesive is useful when the label needs to come off cleanly. Freezer-grade adhesive matters for cold storage and low-temperature application. If your custom wrap around labels are going onto oily glass, condensation-prone plastic, or a product that will be wiped down often, ask for a material sample before you place a large order. That single step can prevent a reprint, and reprints are expensive in the ugliest possible way.
If you are comparing Custom Labels & Tags, ask for tiered pricing at 250, 1,000, 5,000, and 10,000 pieces. The pattern usually shows where setup stops hurting and where the unit price becomes useful. That comparison is more honest than vague promises about affordability. It also makes it easier to see when a slightly better stock pays for itself by cutting failures.
Process, Proofing, and Timeline
The process follows a predictable path, even if the details vary by printer. The usual sequence is brief, artwork check, digital proof, material selection, production, finishing, and shipping. Clean files move quickly. Sloppy files can stall on the first step if the container dimensions are missing, the copy changes late, or the barcode gets treated like a small issue instead of a production variable. It is all connected, and the file review is where the whole thing either stays calm or starts to wobble.
A realistic timeline matters. Simple digital runs may move in a few business days after approval. More complex jobs with specialty finishes, larger quantities, or custom materials often take one to three weeks after proof approval. Shipping is separate, which sounds obvious until the launch date is already fixed and no one budgeted transit time. That mistake happens more often than teams admit, usually because people count production days and forget the truck.
Proofing is where expensive errors get caught. A solid proof checks seam placement, panel order, barcode placement, copy spacing, and size against the dieline. A better proof gets checked on a physical container sample, not only on a monitor. For custom wrap around labels, a flat screen can hide problems that appear the moment the material curves around glass or plastic. If possible, test under the same lighting and storage conditions the product will face in the market.
Packaging standards are not just for giant brands with a lab down the hall. If the product will move through distribution, ask how the label performs under rub, temperature shifts, and repeated handling. Broader packaging guidance from the EPA recycling resources can also help align substrate choices with end-of-life expectations. That does not replace the right material spec, but it does keep the brand story honest.
Here is what usually causes delays in production:
- Missing or inaccurate dielines
- Artwork changes after proof approval
- Unclear quantity or finish selection
- No physical sample for fit testing
- Late questions about barcode, compliance, or legal text
The smartest timeline request includes three separate numbers: proofing time, production time, and transit time. A single combined promise creates confusion later, especially when a "seven-day" order is not seven days from the moment the order is placed. For custom wrap around labels, clarity beats optimism every time. If you need the labels for a launch, put the sample date, approval date, and ship date in writing. That is boring, but it works.
Step-by-Step Ordering Guide
If you want labels that fit and print correctly the first time, begin with the container rather than the artwork. That is not glamorous advice, but it saves money. Packaging projects go wrong when the design is built on assumptions instead of measurements, and assumptions are where budgets get burned. A flat mockup can fool a team into thinking the work is finished, but the bottle has the final word.
- Measure the container accurately. Record the circumference, height, label-safe area, shoulder shape, and any taper. If the container changes shape as it rises, note where the usable area narrows. Custom wrap around labels need that information to avoid distortions. A ruler is better than memory, and a caliper is better than both.
- List the content that must fit. Branding, ingredients, instructions, warnings, barcode, lot space, and regulatory text all need room. If you are working with product packaging for retail, the label should balance compliance and shelf appeal instead of treating one as an afterthought. Do not let the legal copy bully the design, but do not hide it either.
- Choose the right material and adhesive. Paper, BOPP, and vinyl each solve different problems. Consider moisture, oil, refrigeration, shipping, and the amount of handling the package will face. That choice has more impact on the final result than most people expect. A cheaper stock that fails once is more expensive than a better stock that holds up.
- Build the artwork around the dieline. Place the front panel where the consumer will see it first. Keep the barcode and fine print where they are readable. Avoid putting critical copy near the seam unless you enjoy paying for mistakes twice. If you need a visual rule, keep the most important message in the straightest zone of the wrap.
- Request a proof and inspect it on a real sample. Screen previews are useful, but a wrap needs to be checked on the actual container. If possible, test the label under the same lighting and storage conditions the product will face in the market. A paper mockup is often enough to reveal whether the seam feels off.
- Approve a sample or short run before scaling. This is especially smart for new launches, rebrands, or retail expansion. Custom wrap around labels can look excellent on a proof and still need a small tweak once applied in real life. That little trial run is cheap insurance.
That last step is the one too many teams skip. They rush because the product launch is near, then wonder why the label looks off once it is wrapped and packed. If the project sits inside a larger packaging system, compare the label plan with Custom Packaging Products so the container, box, and shipping method work together instead of competing with each other.
A clean ordering checklist usually includes these items:
- Container dimensions
- Target quantity
- Artwork file
- Finish preference
- Application method
- Deadline or launch date
That may sound basic, and it is. Basic is underrated. Clear input leads to better results, fewer revisions, and a quote that reflects the project instead of a guessing game. It also keeps the conversation grounded when a sales team is tempted to promise a faster turnaround than the line can actually deliver.
Common Mistakes That Waste Money
Most problems are not caused by bad printers. They are caused by avoidable decisions made too early or too casually. That is good news, because avoidable mistakes are cheaper to fix than full reprints. A printer can only work with the file and the specs they are given.
- Ignoring seam space. If a logo, barcode, or critical line of copy lands in the overlap, the finished label can look clipped or crowded. Seam placement should be planned from the start.
- Choosing on price alone. The cheapest material often looks cheap, scuffs faster, or peels when the container gets cold or damp. A low quote does not save money if the product needs rework.
- Skipping shape analysis. A container can look almost cylindrical and still behave like a trap for fit. Small tapers and shoulders matter more than people think.
- Placing text too close to edges. Fine print near a curve becomes hard to read very quickly. The same is true for barcodes that sit too close to the trim or seam.
- Failing to test in the actual environment. A label that behaves well on a desk may fail in refrigeration, condensation, oil, or handling. That is not a design win. That is wishful thinking.
- Not planning for volume changes. A 500-piece test run and a 10,000-piece order are not the same project. Pricing, material, and lead time assumptions should change as quantities scale.
One expensive mistake is designing custom wrap around labels for a flat mockup and never checking how the artwork wraps around the container. The label may look balanced on a render and still drift off-center once it lands on the bottle. That is why hands-on proofing matters so much in branded packaging. The file is only half the story.
Another common miss is treating these labels like they are small versions of custom printed boxes. They are not. Boxes stay mostly flat. Labels have to survive curvature, application pressure, temperature shifts, and the occasional fingerprint from someone on the line. Different job, different rules. If you ignore that, the packaging will tell on you fast.
The finish matters too. A glossy label on a chilled bottle may look bright in photos and feel distracting under harsh shelf light if the glare is too strong. A matte or soft-touch finish may suit premium product packaging, but it can also push the budget higher. The tradeoff is real, and it shows up after the first production run if nobody thought it through.
There is another subtle mistake: forgetting scanner behavior. A barcode that looks fine to the eye can still scan poorly if the quiet zone is cramped or the curve distorts the bars. That is the sort of thing nobody notices until a store rejects cartons or a fulfillment line starts pausing. It is a tiny detail with a surprisingly loud consequence.
Expert Tips
Here is the practical part buyers usually want: the moves that make the project work better on day one.
First, use the seam on purpose. If the overlap lands in a quiet visual zone, it can disappear well enough. If the design has a pattern, texture, or secondary graphic, the seam can become part of the composition instead of something to hide. The seam is not invisible. Pretending it is invisible is how good artwork turns into awkward packaging.
Second, keep the most important information in the calmest part of the container. That usually means the straightest, least distorted zone. Put the brand name, core product claim, or key benefit there. Move legal copy, ingredients, and supporting content into the side or back wrap. Readability should beat ego every time, even if the brand team wants the hero statement to stretch farther than the bottle allows.
Third, ask for material samples before locking in a large order. If the product faces moisture, oils, cold storage, or repeated handling, samples show how the stock actually behaves. That is especially useful when the labels need a specific tactile feel or a certain print finish. The sample is the truth serum here; the render is just the dress rehearsal.
Fourth, think in systems. The label, the container, the closure, the shipping carton, and the shelf environment all affect one another. A strong label on a weak container still looks weak. A smart label on the wrong adhesive still fails. The format performs best when it is designed alongside the rest of the package, not treated as the last accessory to be added. This is the part many teams miss because the label seems small compared with the rest of the launch.
Fifth, if sustainability matters to the brand story, check the sourcing and end-of-life implications before ordering. FSC-certified paper can support a responsible sourcing message, while substrate choice and adhesive type can affect recycling behavior. The details matter because customers notice when a claim sounds better than the package behaves. Honest sustainability is less flashy, but it ages better.
Sixth, keep a simple production record for each job. Save the exact dieline version, material spec, adhesive note, and approved proof. The next reorder will go faster, and you will not have to reconstruct decisions from email fragments three months later. That might sound like admin work, but it saves a ridiculous amount of time once the product line grows.
For buyers building a broader range of branded packaging, the label decision should sit beside box, insert, and shipping plans instead of being handled in isolation. That is why many teams review Custom Labels & Tags and other packaging components together before approving a launch. It saves time. It also reduces the number of people who have to pretend they never worried about the seam.
The strongest custom wrap around labels usually feel boring in the best possible way: the branding is clear, the copy is readable, and the package looks like it was designed by someone who has actually held a bottle before.
Last, gather the information a printer needs before you ask for a quote. Container dimensions, target quantity, artwork, finish preference, and deadline are the core inputs. If you can also share the product environment, that helps even more. Custom wrap around labels are not guessed into existence. They are specified, checked, and built for a real use case.
That is the real advantage of custom wrap around labels. They can make product packaging cleaner, retail packaging more readable, and package branding more effective, but only when the design respects the physical object in the hand. The wrap is not just decoration. It is part of the product's selling system.
How are custom wrap around labels different from front-and-back labels?
Custom wrap around labels use one continuous printed panel around the container, while front-and-back labels are usually two separate pieces. The wrap format creates a more unified look and more uninterrupted branding space, but it also requires more attention to seam placement, panel flow, and curvature.
What size do they need to be?
Measure the container circumference first, then add bleed and seam allowance. You also need to account for taper, shoulders, and any area that should stay label-free. The final size should always be tested on a physical sample before the print file is approved. If the container has any change in diameter, measure more than one point.
Which materials work best?
Paper works well for dry, low-handling products where cost matters most. BOPP or vinyl is usually better for moisture, refrigeration, oil, or heavier handling. The face stock, adhesive, and finish all need to match the product environment if you want the labels to last. A material that survives cold and condensation can save a launch from turning into a reprint.
How much do they cost?
Price depends on size, quantity, material, finish, and print method. Smaller orders cost more per label because setup is spread across fewer pieces. Ask for tiered pricing so you can compare unit costs at different order volumes and see where the economics improve. If a quote seems unusually low, check whether finishing, shipping, or proofing has been omitted.
How long does it take to make them?
Proofing can take one to two business days if the artwork and specs are clean. Simple production runs may take a few business days after approval, while specialty finishes often take longer. Shipping time is separate, so build it into the launch schedule instead of assuming it will disappear on its own. A good plan gives every phase its own window.
Custom wrap around labels are one of the easiest ways to add structure, clarity, and shelf presence to a product, but they only perform well when the measurements, material, and artwork are handled with care. If you want them to work, start with the container, not the concept. Measure the wrap area, mark the seam, choose the substrate for the real environment, and test a sample on the actual bottle or jar before you approve production. That is the simplest path to custom wrap around labels that look deliberate instead of improvised.

