Buyer Fit Snapshot
| Best fit | Embossed Mailer Boxes with Logo projects where brand print, material claims, artwork control, MOQ, and repeat-order consistency need to be specified before quoting. |
|---|---|
| Quote inputs | Share finished size, material target, print colors, finish, packing count, annual reorder estimate, ship-to region, and any compliance wording. |
| Proofing check | Approve dieline scale, logo placement, barcode or warning zones, color tolerance, closure strength, and carton packing before bulk production. |
| Main risk | Vague material claims, crowded artwork, missing packing details, or unclear freight terms can make a low unit price expensive after revisions. |
Fast answer: Embossed Mailer Boxes with Logo: Film, Print, MOQ, and Carton Packing should be specified like a repeatable production item. The safest quote records material, print method, finish, artwork proof, packing count, and reorder notes in one written spec.
Production checks before approval
Compare the actual filled-product size with the drawing, then confirm tolerance on folds, seals, hang holes, label areas, and retail display edges. Reserve space for logos, QR codes, warning copy, and material claims before decorative graphics fill the panel.
Quote comparison points
Review material grade, print process, finish, sampling route, tooling charges, carton quantity, and freight assumptions side by side. A quote is only useful when the supplier can repeat the same color, closure quality, and packing count on the next order.
Embossed mailer Boxes With Logo do one thing better than a plain shipping carton: they make people stop for half a beat. The parcel hits the desk, the flap opens, and the surface has texture before the customer has even had time to read a word. That tiny pause is doing real branding work. In beauty, subscription kits, boutique ecommerce, and gift-led retail, the package can carry as much emotional weight as the product image that sold it.
There is also a practical side, and it is easy to miss. Embossed mailer boxes with logo are not a rescue plan for weak sizing, flimsy board, or messy artwork. They are a finish choice, not a fix-all. If the structure is wrong, the logo can be beautifully raised and still attached to a box that caves in during transit or looks awkward on a shelf. Premium packaging starts with fit, then strength, then decoration. Not the other way around.
When buyers compare formats, it helps to think in systems rather than in features. The product comes first, the protection comes second, and the finish comes last. If you want a wider view of packaging styles, the Custom Packaging Products catalog is a useful starting point, and lighter shipments may make more sense in Custom Poly Mailers instead of a mailer box at all.
In plain terms, embossed mailer boxes with logo work best when the artwork is simple, the board can hold its shape, and the surface finish supports the raised mark instead of flattening it. I’ve watched plenty of sample rounds where a design looked elegant on screen and then turned a little uncertain once pressure hit the board. The sections below cover how these Boxes Are Made, what drives price, where quotes get messy, and how to avoid the mistakes that make a custom box feel oddly cheap.
What Embossed Mailer Boxes With Logo Actually Are
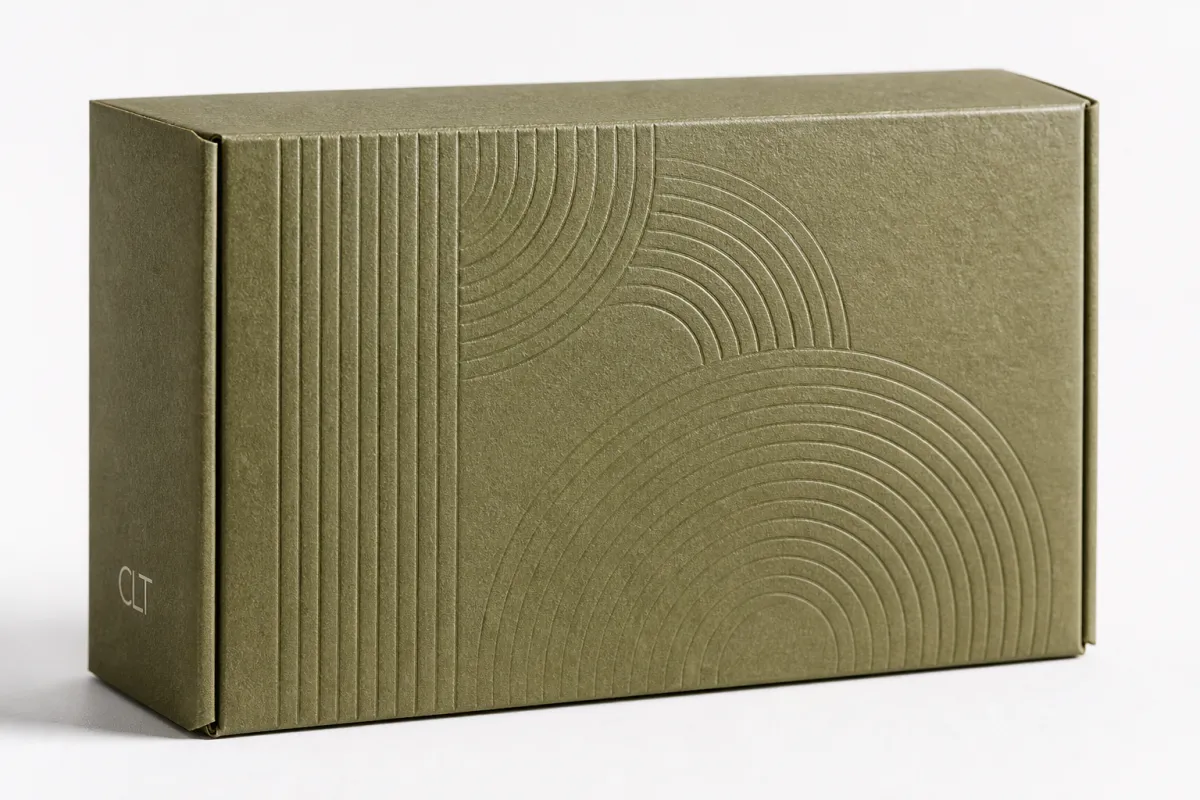
Embossing pushes a design upward from the surface of the box. On embossed mailer boxes with logo, the mark is felt as much as it is seen. That tactile cue changes how the package is read. A customer’s hand meets the logo before the eye has fully processed the color, and that slight sensory delay often makes the brand feel more deliberate. A printed box can be visually busy; an embossed one can feel restrained and expensive.
These boxes are usually built from corrugated board with a printed liner, laminated paperboard, or a solid paperboard mailer structure. The construction matters because emboss depth depends on the substrate. A smooth laminated surface can hold a crisp raised logo. A heavier flute structure may limit how deep the impression can go, which is why the effect is often kept modest or placed on a flatter panel with more support behind it.
That is the difference between embossed mailer boxes with logo and standard printed mailers. Print gives color, gradients, images, and small details. Embossing gives depth and tactility. The strongest versions combine both, but the logo still needs to be designed for the press rather than for a screen. Thin strokes, tiny text, and crowded marks tend to blur or disappear under pressure. Money spent on a beautiful vector file still vanishes if the design is too delicate for the board.
Brands that benefit most from embossed mailer boxes with logo usually sell something with a strong presentation story: skincare, cosmetics, subscription sets, influencer mailers, premium apparel, and limited launches. Seasonal campaigns fit too, especially if the box is meant to do some of the selling before the product is revealed. Commodity goods can use embossing, but the return is usually smaller because the customer cares more about speed and price than ceremony.
One mistake shows up over and over: people treat embossing as if it fixes the whole package. It does not. A raised logo cannot correct bad dimensions, weak flute selection, or a poorly balanced interior. The emboss is one layer in a package that still has to ship well, stack well, and open well.
Practical rule: if the box has to survive parcel handling, design the structure first and the decoration second. A pretty mailer that arrives dented is just expensive frustration with branding on it.
Good embossed mailer boxes with logo feel more expensive than they are. Poorly planned ones feel like an awkward shortcut dressed up as luxury. The line between the two is thinner than most buyers expect.
How Embossed Mailer Boxes With Logo Are Made
Production starts with the dieline. That flat template defines the box dimensions, folds, glue flaps, and logo placement. For embossed mailer boxes with logo, the dieline should be settled before price conversations get serious. Size changes affect material use, tooling, and the amount of board available for the raised area. Oversize boxes waste material and freight. Tight boxes pinch product edges or make the structure bow under pressure.
Material selection comes next. Suppliers often quote embossed mailer boxes with logo in E-flute or B-flute corrugated, or in a paperboard mailer style with a printed wrap. Each option carries a different tradeoff. E-flute tends to print well and keeps a cleaner profile. B-flute gives more cushioning but adds bulk. A smoother top liner usually gives the emboss more clarity, while a stronger board may be better for heavier products. The right answer depends on whether the package is carrying jewelry or something much denser.
The emboss itself uses a matched die and counter-die. The die presses the logo into the board after printing or finishing, while the counter-die supports the reverse side. That sounds straightforward. In production, though, there are a lot of moving parts. The toolmaker has to account for line weight, logo depth, coating behavior, and the spring-back of the board. Too shallow and the mark looks timid. Too deep and the coating can crack or the panel can distort around the impression.
There are a few common versions of embossed mailer boxes with logo. Blind embossing raises the logo with no ink or foil inside the impression, which creates a restrained result. Emboss plus print keeps the brand color visible while adding dimension. Emboss plus foil gives a brighter, more dramatic finish, especially for holiday sets or high-end retail launches. That last version can look impressive fast, and it can also tip into excess just as fast if the artwork is trying too hard.
Certification can matter too. If your brand needs FSC-aligned paper inputs, ask for the documentation early instead of treating it like an afterthought. The Forest Stewardship Council explains the standard clearly at fsc.org. Transit testing matters on the shipping side. The International Safe Transit Association publishes recognized test methods at ista.org, which is useful if your cartons will move through parcel networks that care much more about speed than about gentleness.
Timelines usually run through proofing, sample approval, tooling, production, and freight. A simple embossed mailer boxes with logo order can move through production in about 12 to 18 business days after final approval, but that is the optimistic side of the calendar. New tooling, artwork revisions, and sample changes often stretch the project to three or five weeks. Rush work exists, though it typically costs more and leaves less room to catch mistakes before they become expensive.
File preparation is where a lot of delays start. Vector artwork is the standard. Screenshots and low-resolution images are not. The logo should have enough line thickness to survive pressure, and tiny text should be avoided unless you enjoy reading messages that disappear in the press. The emboss zone needs breathing room, especially near folds, corners, and cutouts. If the supplier sends artwork rules, follow them exactly. Guessing is expensive here.
The approval stage is where many projects lose time. Artwork revisions, sample notes, and tooling sign-off each add a round. Buyers who send clean files and settle decisions quickly tend to move through the process with less friction. Buyers who treat every round as a chance to reinvent the logo usually end up paying for their indecision.
Cost, Pricing, MOQ, and Quote Basics for Embossed Mailer Boxes With Logo
Price comes down to five main variables: size, board grade, print coverage, emboss area, and quantity. Embossed mailer boxes with logo are not priced like shelf cartons because setup and tooling are part of the equation. A small logo on one panel costs less than a full-panel decorative emboss. One-color print is cheaper than full color, foil, and soft-touch coating together. The math is straightforward. The invoice still surprises people because the box looked smaller in their head than it does on paper.
MOQ, or minimum order quantity, shifts by supplier and construction. For embossed mailer boxes with logo, custom runs often start around 500 pieces, though 1,000 or more is common when the tooling is complex or the finish stack is more involved. Smaller quantities can be made, but the unit price climbs because setup gets spread over fewer cartons. That is usually where buyers decide whether the premium finish deserves the order size they actually have.
Useful pricing bands help with planning. At 500 units, embossed mailer boxes with logo may sit around $1.20 to $2.40 per unit depending on size and finish. At 1,000 to 3,000 units, the range often slides closer to $0.70 to $1.60. At 5,000 units and above, simpler builds can land around $0.45 to $1.10. Add foil, heavy coating, or more complex structures, and the number moves upward. Packaging tends to obey physics and labor costs, even when the presentation looks glamorous.
| Option | Look and Feel | Typical Use | Relative Cost | Buyer Note |
|---|---|---|---|---|
| Blind emboss | Subtle, tactile, minimal | Beauty, premium ecommerce, minimalist brands | Low to moderate | Best if the logo is simple and the panel is flat |
| Emboss + print | Raised logo with color detail | Subscription kits, retail mailers, launch boxes | Moderate | Good balance of brand clarity and tactile effect |
| Emboss + foil | High-contrast, premium, reflective | Gift packaging, seasonal campaigns, luxury sets | Moderate to high | Looks sharp if the artwork is restrained |
| Emboss + soft-touch lamination | Velvety surface with raised detail | Premium retail and unboxing-focused brands | High | Excellent feel, but shipping scuffs can still happen |
The quote should tell a complete story. Ask what is included, what costs extra, and whether tooling, plates, sample charges, or freight are separate. With embossed mailer boxes with logo, the trap is often the unit price alone. A low carton price can hide freight, revision fees, or tooling charges that show up later like a second invoice with worse timing.
Hidden costs usually show up in shipping, storage, rush fees, and revision cycles. If you request a sample and then change the logo size three times, the extra work will be billed somewhere. If the cartons sit in storage before shipment, expect that to show up too. If the delivery point changes from a dock to a warehouse door, freight may shift. None of that is unusual. It is just packaging production behaving like packaging production.
Thinking in tiers helps. A sample run proves the look and the feel. A mid-volume run reveals the real unit economics. A larger run is where the math starts to soften. For embossed mailer boxes with logo, those stages make it easier to judge whether the finish belongs in the product plan or only in the mood board.
Key Factors That Affect Fit, Finish, and Performance
Size matters more than most buyers expect. A beautiful emboss gets wasted if the item rattles inside the mailer or if the insert sits crooked. Embossed mailer boxes with logo should be sized around the product, the insert, and the shipping method. A little extra empty space can make the box feel cheap. Too little space can crush corners, bow the lid, or force the packer to fight the carton every time it closes.
Material thickness and structure drive performance too. E-flute corrugated is common because it balances print quality and strength. B-flute adds more cushioning and a bulkier profile. For embossed mailer boxes with logo, the structure should match the product weight and the level of shipping abuse you expect. If the item is fragile, strength belongs near the top of the priority list. The raised logo is not there to support the load.
Logo design changes the outcome in a very visible way. Strong line weight, clean spacing, and moderate size generally emboss better than dense graphics with lots of thin detail. Complex marks can work, but they need more testing and more tolerance for slight variation. A clean wordmark often performs better than a detailed illustration. That is not a criticism of creativity. It is a reminder that fiber, pressure, and coatings have opinions.
Finish choices can support the result or fight it. Matte and soft-touch surfaces tend to work well for embossed mailer boxes with logo because the contrast between a smooth field and a raised mark feels intentional. Spot UV can work if it is used carefully, though too much gloss can flatten the tactile effect visually. Foil adds energy and can be stunning on the right brand, but it should match the rest of the packaging instead of shouting over it.
Transit is a stricter test than a desk mockup. Stack pressure, conveyor friction, warehouse handling, and parcel drops expose weak specs quickly. If your cartons will move through carriers that treat boxes like disposable property, test them accordingly. ISTA methods help establish repeatable pass/fail criteria for shipping environments that do not care how nice the mockup looked.
Branding and function should pull in the same direction. The strongest embossed mailer boxes with logo protect the product, pack efficiently, and still feel like the brand that shipped them. Extra inserts can help, but they should not be used as a bandage for a weak box. Sometimes the smarter solution is a cleaner outer structure with a better interior hold, not a louder emboss just to make the mockup more photogenic.
Step-by-Step Process to Order Embossed Mailer Boxes With Logo
Start with the product, not the packaging concept. Measure the item, the inserts, the tissue, the tray, the foam, and the void space you can live with. Embossed mailer boxes with logo need a real dimensional target. Guessing tends to produce boxes that are either too loose or too tight, and both problems are annoying in different ways.
Once the size is known, prepare the artwork. Send vector files instead of screenshots and specify the exact logo placement. If the emboss should sit centered on the lid, say that. If it should sit lower to create a more deliberate reveal, say that too. On embossed mailer boxes with logo, a small placement error can shift the whole design from polished to awkward.
Ask for a sample or mockup next. A flat digital proof can confirm layout, but it cannot show the depth of the impression or the feel of the surface. A real sample shows whether the emboss reads cleanly, whether the logo looks too large, and whether the finish supports the design. If the supplier can sample on the exact board grade, even better. A sample on a different material tells a partial story at best.
Treat approval as a real decision, not a casual nod. Someone on your side needs to sign off on size, color targets, artwork, and the emboss zone. Once that approval lands, the factory usually moves into tooling and production. Changes after approval can add cost and time, which is why one clear sign-off beats a chain of vague messages that all say almost the same thing.
A simple decision path keeps the process sane:
- Confirm product dimensions and weight.
- Choose the box structure and board grade.
- Place the logo and request artwork guidelines.
- Review the sample, then approve the final proof.
- Place the order only after the fit and finish work together.
Keep the larger packaging picture in view. A premium box can be right for a retail drop, while a lower-cost mailer can fit repeat subscriptions or replenishment orders better. Embossed mailer boxes with logo tend to shine when the brand story benefits from a tactile reveal. If the product gains more from speed and lower freight than from presentation, another format may serve the business better.
When the cartons arrive, inspect the first few cases before the whole run goes into inventory. Check emboss depth, cut quality, fold lines, and fit with the real product. Test packing speed too. A box that looks perfect but slows the team down is not efficient. Embossed mailer boxes with logo should improve operations, not just the appearance of the unboxing.
Common Mistakes That Make Embossed Mailer Boxes With Logo Look Cheap
The easiest way to make embossed mailer boxes with logo look cheap is to crowd the panel. Oversized logos can flatten the tactile effect and make the box feel heavy instead of refined. The raised detail stops reading as premium and starts looking like a stamp trying too hard. Strong branding helps. Shouting across every square inch does not.
Artwork prep causes trouble more often than buyers expect. Hairline strokes, tiny text, and overly detailed graphics do not emboss cleanly. If the brand mark depends on intricate shading or ultra-fine line work, simplify it for the box or expect a weak result. A logo that looks elegant on a screen can turn muddy on the press. That is not a printer problem. That is a material problem.
Wrong sizing also makes embossed mailer boxes with logo feel less valuable. Too much empty space creates a flimsy unboxing moment. Too little space crushes the product or pushes the structure outward. Either outcome pulls the premium effect down. Buyers often obsess over finishes and forget that fit is the first thing the customer notices once the flap opens.
Finish clashes create another kind of damage. A glossy treatment can fight the tactile quality of the emboss and make the logo feel less intentional. On a few brands that tension works. On most, it just looks busy. The more durable visual choice is usually a finish stack that supports the raised detail rather than competing with it. Matte, soft-touch, and selective foil tend to age better than surfaces that try to do everything at once.
Budget mistakes are less glamorous, but they hurt more. People approve a quote without checking whether tooling, freight, or revision costs are included. Then the final invoice lands and the budget is already stretched. Embossed mailer boxes with logo should be quoted as a full system, not as a headline number with half the costs parked elsewhere. A clean quote is usually the better sign.
Skipping a physical sample is the fastest path to an expensive lesson. A screen mockup can tell you layout, but not depth, feel, or how the surface behaves in real light. The sample tells you whether the emboss is strong enough, whether the finish feels right, and whether the structure holds up through a few packing cycles. If the sample is wrong, fix it before production starts. That is where the savings show up.
Expert Tips and Next Steps Before You Place an Order
If you want a better quote, ask for two or three tiers. One should keep the structure simple, one should include the finish you actually want, and one should show the upgraded version with emboss plus print or foil. Embossed mailer boxes with logo are easier to compare when the options sit side by side instead of forcing you to guess what one more coating might do to the budget.
Order a sample that matches the real board and emboss depth. Flat digital proofs are useful, but they cannot show tactile quality. The impression has to be felt, the edge behavior has to be seen, and the logo has to read correctly in ordinary light. Embossed mailer boxes with logo depend on physical detail. The sample is not a nice extra. It is the actual test.
Test the box with the product you will ship, not an empty carton on your desk. Add the insert. Add tissue if you use it. Close the box. Shake it lightly. Then pack a few units the way your team will pack them on a busy day, not the perfect one. If the process feels awkward during testing, it will feel worse at scale.
Here is a short pre-order checklist that saves time and cuts down on drama:
- Final product dimensions and weight
- Artwork in vector format
- Emboss placement and logo size
- Target quantity and acceptable MOQ
- Desired finish stack
- Shipping destination and deadline
- Sample approval before production
For buyers under pressure, the safest move is often the one with the fewest unknowns. Embossed mailer boxes with logo can be a smart brand investment, but only if the structure, artwork, and budget line up cleanly. If one of those pieces is shaky, slow down. Saving a week is not worth approving a box you will regret for the next six months.
My practical view is simple: embossed mailer boxes with logo should make the package feel sharper, not more complicated. If the logo is clean, the box fits the product, and the quote makes sense, the project is probably on the right track. If the supplier cannot answer basic questions about board grade, tooling, or sample timing, keep looking. Packaging is full of noise. Clear answers cut through it.
There is a useful rule of thumb here. Start with measurement, confirm the sample, check freight, and approve the proof only after the full setup makes sense. That is how embossed mailer boxes with logo end up looking premium instead of merely expensive. Fancy finishes can draw attention, but fit and discipline keep the whole thing honest.
How do embossed mailer boxes with logo compare to printed mailer boxes?
Embossing adds tactile depth, while printing adds color and detail. If you want embossed mailer boxes with logo to feel premium without relying on a busy graphic layout, embossing is the stronger choice. If the design needs photography, gradients, or small visual information, printing carries more of the message. The best result often combines both, though the logo and artwork still need to stay readable after the press work is finished.
What is the typical MOQ for embossed mailer boxes with logo?
MOQ depends on the supplier, the size, and whether the build includes embossing alone or embossing plus print or foil. For embossed mailer boxes with logo, smaller custom runs often start around 500 to 1,000 units, though some vendors set higher thresholds for more complex jobs. If budget is tight, compare a test run against a larger order so you can see where the unit cost starts to behave differently.
How long does production usually take for embossed mailer boxes with logo?
Production time depends on proof approval, tooling, sample revisions, and the factory queue. Simple embossed mailer boxes with logo can move in about 12 to 18 business days after final approval, but new tooling or heavier revision cycles push that longer. If the boxes support a launch, holiday drop, or hard ship date, build in a buffer instead of hoping the schedule cooperates on its own.
Can embossed mailer boxes with logo protect fragile products in shipping?
Yes, if the structure and fit are designed correctly. Embossed mailer boxes with logo are decorative rather than structural by themselves, so protection comes from the board grade, insert design, and internal fit. For fragile items, test the box with the actual product and the actual shipping method before placing a volume order. A beautiful box that fails transit is still a failed box.
What artwork works best for embossed mailer boxes with logo?
Simple logos with strong line weight usually emboss better than intricate graphics. Fine text, hairline strokes, and dense decorative marks can get muddy in the press, especially on textured board. Ask for dielines and artwork guidelines before finalizing the file, then keep the mark clean enough that embossed mailer boxes with logo still read clearly from arm's length and under normal warehouse lighting.


